
Popular categories
Looking for a yarn?


Comments / Questions (56)
![]() Monika wrote:
Monika wrote:
Stricke Größe M. Nun alle Maschen auf der Nadel, Rumpf und Ärmel. Bin auch überzeugt, die Maschenzahl stimmt. Trotzdem geht 3B nicht über den Ärmeln auf. Haben sie einen Tipp?
09.01.2026 - 10:14DROPS Design answered:
Liebe Monika, beim rechten Vorderteil haben Sie 59 M: 5 BlendenMaschen + 3x18 Maschen A.3B, für den Ärmel: 4x18 M A.3B (72), dann 108 M Rückenteil = 6x18M A.3B, Ärmel: 4 x18 M A.3B, und linkes Vorderteil: 3x18 M A.3B + 1 M A.3B und 5 BlendenMaschen (60 M). Viel Spaß beim Stricken!
12.01.2026 - 07:55
![]() Michele wrote:
Michele wrote:
Then, kindly let me know how many stitches should be on left, back, and right. How can this statement (last line in the Body) be true with 183 stitches? "There are now 50 stitches on right piece, 90 on back piece and 51 on left piece". This equals 191 stitches, not 183. Thank you again.
12.03.2025 - 20:14DROPS Design answered:
Hi again Michele, You minus the 8 stitches (4 under each armhole) from the 191 stitches and this leaves you with 183 stitches. Regards, Drops Team.
13.03.2025 - 17:57
![]() Michele wrote:
Michele wrote:
I still have a problem. I will explain further. At the bottom of Body section, the pattern says (for size S) I should have 195 stitches, then on the next row I should: Work 50, increase 1, bind off 4, work 88, increase 2, bind off 4, work 49 and increase 1. Where 50+1-4+88+2-4+49-1=183. Yet the next statement says I will have 50 (right), 90 (back) and 51 (left) that totals 191, not 183. I cannot reconcile this 8 stitch difference. Please help!
12.03.2025 - 15:01DROPS Design answered:
Hi Michele, You work 50 + 1 (left front piece) - 4 (armhole) + 88 + 2 (back piece) - 4 (armhole) + 49 + 1 (right front piece) = 51 - 4 + 90 - 4 + 50 = 183 stitches. Hope this helps and happy knitting!
12.03.2025 - 18:38
![]() Michele wrote:
Michele wrote:
Hi. I'm knitting size S and have a question about the stitch count at the end of knitting the body section. The pattern says I should have 50+90+51 stitches. I have that many stitches if one doesn't count the 4+4 stitches in the two bind offs just above this. Is this correct? Were those 8 bind offs not counted in the 50+90+51 stitches mentioned that I should not have?
11.03.2025 - 16:06DROPS Design answered:
Dear Michele, when you get 50+90+51 sts for body, you have already cast off the 4 sts for each armhole, so that stitches should look like this on the needle: 50 sts (4 sts cast off), 90 sts (4 sts cast off) and 51 sts. Happy knitting!
12.03.2025 - 09:25
![]() Fabienne wrote:
Fabienne wrote:
Bonjour, J’ai encore une petite question le premier rang du diagramme est A2 doit se faire sur l’envers ? Merci
28.02.2025 - 17:19DROPS Design answered:
Bonjour Fabienne, le 1er rang de tous les diagrammes se tricote sur l'endroit, les diminutions et les jetés doivent toujours être faits sur l'endroit, pour chacun des diagrammes .Bon tricot!
03.03.2025 - 08:17
![]() Fabienne wrote:
Fabienne wrote:
Bonjour, je tricote ce gilet en XL et j’ai préféré tricoter les manches en aller/retour. Comment puis-je tricoter A2 en aller/retour Merci
27.02.2025 - 21:39DROPS Design answered:
Bonjour Fabienne, lisez le diagramme de droite à gauche sur l'endroit et de gauche à droite sur l'envers en suivant bien la légende "sur l'envers" indiquée pour les symboles concernés. Bon tricot!
28.02.2025 - 09:38
![]() Nicole Caplier wrote:
Nicole Caplier wrote:
Bonsoir, j'ai bien lu votre réponse. ok pour vos explications, mais dans ce cas pourquoi avoir uniquement mis la photo avec les motifs A3A et A3B? je suis très surprise!
07.05.2024 - 22:25DROPS Design answered:
Bonjour Mme Caplier, les sections de point fantaisie peuvent varier légèrement en fonction des tailles et des modèles pour conserver les bonnes proportions. Ainsi, si vous ne tricotez pas la taille du vêtement photographié, le vôtre sera un peu différent, mais la vue d'ensemble sera analogue. Bon tricot!
08.05.2024 - 07:57
![]() Nicole Caplier wrote:
Nicole Caplier wrote:
Bonjour, j'ai réalisé ce modèle en taille L. Il est magnifique. Une amie souhaite l'avoir mais en taille M . Le fait de ne devoir tricoter que des motifs A3B ne donne pas du tout le même rendu? avons nous fait une erreur? Merci
30.04.2024 - 12:19DROPS Design answered:
Bonjour Mme Caplier, c'est ainsi que le modèle a été conçu, dans les tailles M, L et XXXL, on va répéter A.3B uniquement (en terminant par A.3D pour la symétrie). Bon tricot!
30.04.2024 - 15:49
![]() Ekaterina wrote:
Ekaterina wrote:
Liebe, Redaktion, ich habe meine Fehler gefunden :) Die Anleitung ist in Ordnung Danke!
21.05.2023 - 17:51
![]() Ekaterina wrote:
Ekaterina wrote:
Hallo, nach Anleitung sollte man für Größe S nach dem die Maschen für A1A und A1B verteilt sind 14 Raporte a 14 Maschen + 1 bekommen und 2 x 5 Randmaschen. Ich bekommen zum 2. Mal 15 Raporte a 14 Maschen + 1. + 2 x 5 Randmaschen und es bleibt 1 Masche übrig. Irgendetwas stimmt nicht und ich kann es mir nicht erklären. Stimmen die Zahlen in der Anleitung? Danke!
21.05.2023 - 14:43DROPS Design answered:
Liebe Ekaterina, vor A.1 haben Sie 207 Maschen auf der Nadel, diese werden so gestrickt; 5 Blenden-Maschen, 14 Rapporte A.1A je 14 Maschen (= über die nächsten 196 Maschen); A.1B (= 1 Masche) und 5 Blenden-Maschen = 5+196+1+5=207 Maschen. Bei den Rückreihen stricken Sie: A.1B, A.1A wiederholen Sie und lesen Sie links nach rechts. Viel Spaß beim stricken!
22.05.2023 - 12:58
|
|||||||||||||||||||
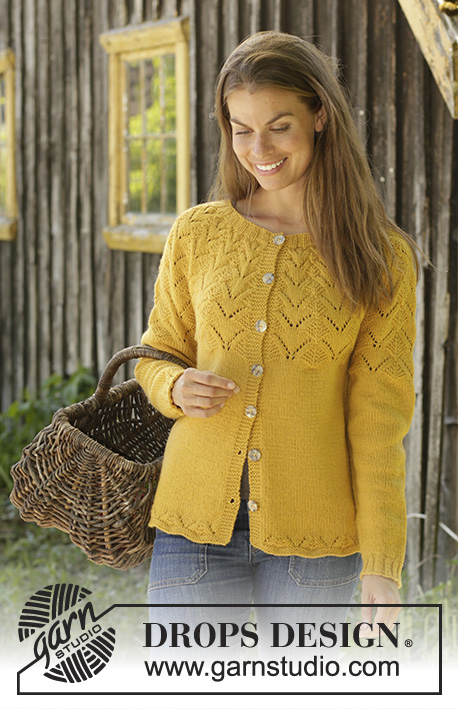
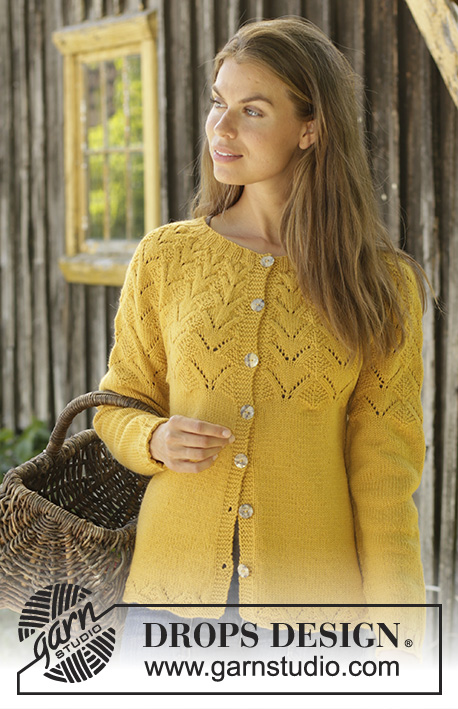
Golden Fairy Cardigan#goldenfairycardigan |
|||||||||||||||||||
 |
 |
||||||||||||||||||
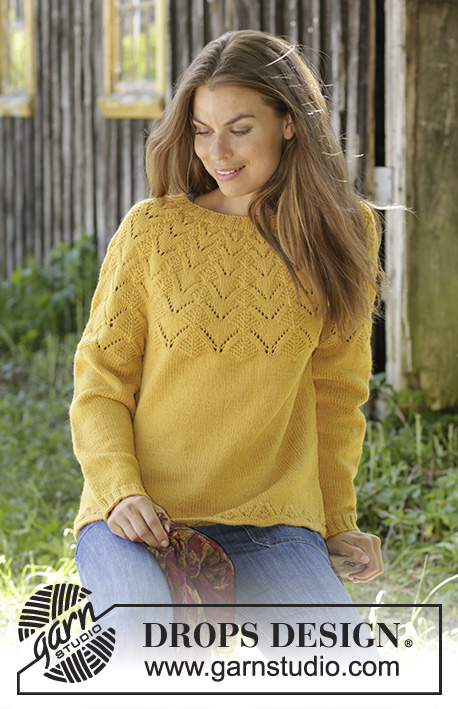
Knitted jacket in DROPS Cotton Merino or DROPS Lima. The piece is worked with round yoke and lace pattern. Sizes S - XXXL.
DROPS 195-23 |
|||||||||||||||||||
|
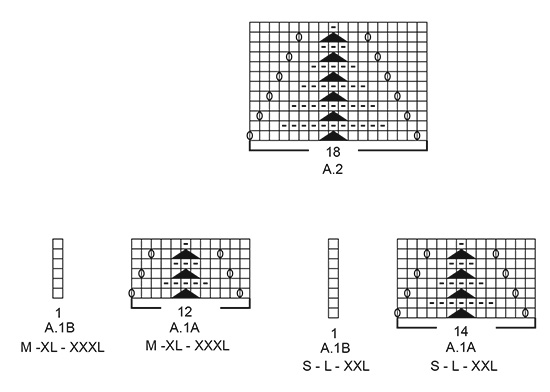
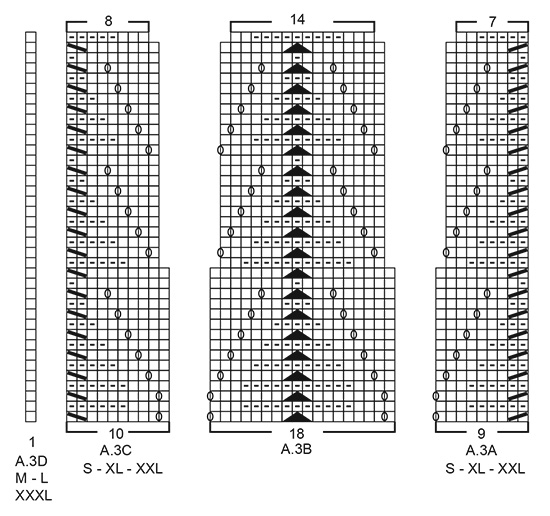
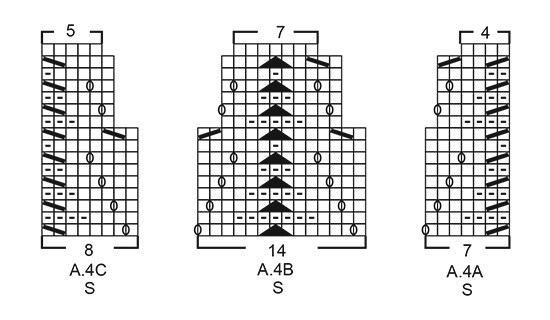
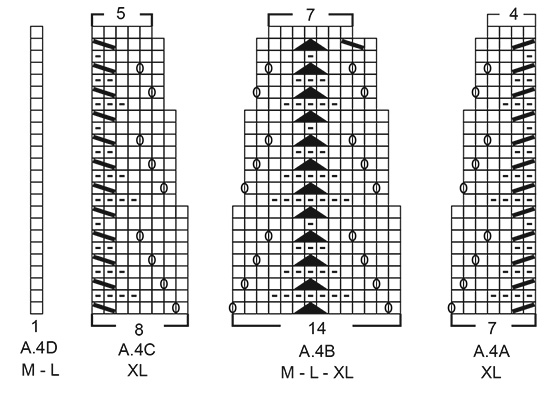
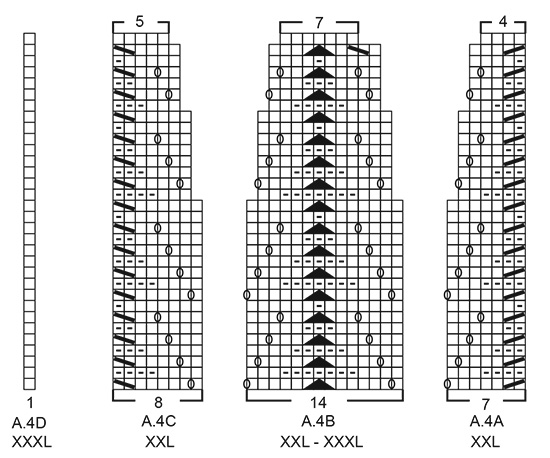
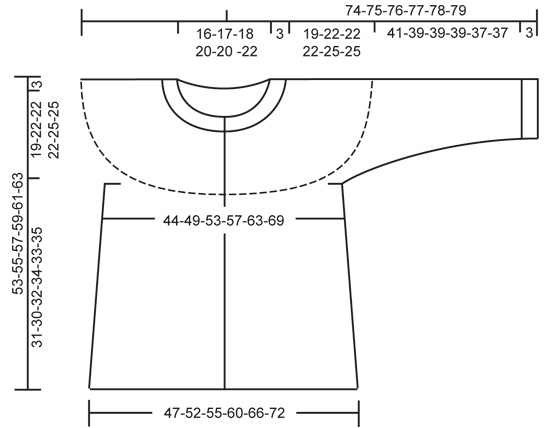
------------------------------------------------------- EXPLANATIONS FOR THE PATTERN: ------------------------------------------------------- RIDGE/GARTER STITCH (worked back and forth): 1 ridge = Knit 2 rows. PATTERN: See diagrams A.1 to A.4. Choose diagram for your size (applies to A.1 and A.4). The diagrams show all rows in the pattern seen from the right side. DECREASE/INCREASE TIP (evenly spaced): To work out how to decrease/increase evenly, count the total number of stitches on the needle (e.g. 249 stitches), minus the bands (e.g. 10 stitches) and divide the remaining stitches by the number of decreases/increases to be made (e.g. 6) = 39.8. In this example, decrease by knitting together approx. each 39th and 40th stitch. When increasing make 1 yarn over after approx. every 40th stitch; on the next row/round work the yarn overs twisted to avoid holes. Do not decrease/increase over the bands. DECREASE TIP (for sides of body): All decreases are made from the right side! Start 3 stitches before marker thread in side, knit 2 together, knit 2 (marker thread sits in between these 2 stitches), slip 1 stitch as if to knit, knit 1 and pass the slipped stitch over the knitted stitch (= 2 stitches decreased). INCREASE TIP (for mid under sleeves): Start 1 stitch before the marker thread, make 1 yarn over, knit 2 (marker thread sits between these 2 stitches), make 1 yarn over (= 2 stitches increased). On the next round knit the yarn overs twisted to avoid holes. Then work the increased stitches in stockinette stitch. BUTTONHOLES (bottom up): Work buttonholes on right band. 1 BUTTONHOLE = knit second and third stitch from the edge together and make 1 yarn over. On the next row knit the yarn over to leave a hole. Work buttonholes when piece measures: S: 8, 15, 22, 29, 36, 43 and 51 cm = 3⅛", 6", 8¾", 11⅜", 14¼", 17" and 20" M: 8, 15, 23, 30, 38, 45 and 53 cm = 3⅛", 6", 9", 11¾", 15", 17¾" and 21" L: 8, 16, 24, 32, 40, 48 and 55 cm = 3⅛", 6¼", 9½", 12½", 15¾", 19" and 21⅝" XL: 8, 15, 22, 29, 36, 43, 50 and 57 cm = 3⅛", 6", 8¾", 11 378", 14¼", 19¾" and 22½" XXL: 10, 17, 24, 31, 38, 45, 52 and 59 cm = 4", 6¾", 9½", 12¼", 15", 17¾", 20½" and 23¼" XXXL: 10, 17, 24, 31, 38, 45, 52 and 61 cm = 4", 6¾", 9½", 12¼", 15, 17¾", 20½" and 24" NOTE: The last of these 7-7-7-8-8-8 buttonholes is worked on the neck. ------------------------------------------------------- START THE PIECE HERE: ------------------------------------------------------- JACKET - SHORT OVERVIEW OF THE PIECE: The piece is worked back and forth with circular needle from mid front, bottom up as far as the armholes. The sleeves are worked in the round with double pointed needles/short circular needle bottom up. Body and sleeves are then placed on same circular needle and the yoke is finished working back and forth from mid front. BODY: Cast on 207-227-249-263-291-311 stitches (including 5 band stitches in each side towards mid front) with circular needle size 4 mm = US 6 and Cotton Merino. Change to circular needle size 3.5 mm = US 4 and work 2 RIDGES – read description above. Change back to circular needle size 4 mm = US 6 and work 2 rows stockinette stitch with 5 band stitches in garter stitch in each side. The next row is worked as follows from the right side: 5 band stitches in garter stitch, Work A.1A until there are 6 stitches left on row (= 14-18-17-21-20-25 repeats of 14-12-14-12-14-12 stitches), work A.1B (= 1 stitch) and finish with 5 band stitches in garter stitch. Continue this pattern. When A.1 has been completed, continue with stockinette stitch and 5 band stitches in garter stitch in each side. AT THE SAME TIME on the first row from the right side decrease 0-0-6-0-4-0 stitches evenly on row = 207-227-243-263-287-311 stitches REMEMBER THE KNITTING GAUGE! When the piece measures 8-8-8-8-10-10 cm = 3⅛"-3⅛"-3⅛"-3⅛"-4"-4" insert 2 marker threads in the piece as follows from the right side: First marker thread is inserted after the first 54-59-63-68-74-80 stitches on the row (= right front piece when garment is worn), 2nd marker thread after the next 98-108-116-126-138-150 stitches (= back piece). There are 55-60-64-69-75-81 stitches left on row after the 2nd marker thread (= left front piece – NOTE: There is 1 more stitch on the left front piece than the right because of the pattern which will later be worked on sleeves and yoke). On the next row from the right side work BUTTONHOLE on right band – read description above. AT THE SAME TIME decrease 1 stitch on each side of both marker threads - read DECREASE TIP (= 4 stitches decreased). Continue to decrease on each side of both marker threads every 8-8-8-9-9-9 cm = 3⅛"-3⅛"-3⅛"-3½"-3½"-3½" a total of 3 times in each side = 195-215-231-251-275-299 stitches. Continue working until the piece measures approx. 31-30-32-34-33-35 cm = 12¼"-11¾"-12½"-13⅜"-13"-13¾" (measured from bottom of the curve in A.1). The next row is worked as follows from the wrong side: Work as before over the first 50-54-58-63-67-72 stitches and increase at the same time 1-6-2-6-2-6 stitches evenly over these stitches (= left front piece), bind off 4-6-6-6-10-12 stitches for armhole, work as before over the next 88-96-104-114-122-132 stitches and increase 2-12-4-12-4-12 stitches evenly over these stitches (= back piece), bind off 4-6-6-6-10-12 stitches for armhole, work the remaining 49-53-57-62-66-71 stitches as before and increase 1-6-2-6-2-6 stitches evenly over these stitches (= right front piece). There are now 50-59-59-68-68-77 stitches on the right front piece, 90-108-108-126-126-144 stitches on the back piece and 51-60-60-69-69-78 stitches on the left front piece. Lay the piece to one side and work sleeves as described below. SLEEVE: Cast on 48-52-56-56-60-60 stitches with double pointed needles size 3.5 mm = US 4 and Cotton Merino. Knit 1 round. Then work rib in the round (= knit 2 / purl 2) for 3 cm = 1⅛". Knit 1 round where you decrease 6-8-10-10-10-8 stitches evenly on round = 42-44-46-46-50-52 stitches. Change to double pointed needles size 4 mm = US 6 and work stockinette stitch in the round. When the piece measures 10-8-11-11-9-9 cm = 4"-3⅛"-4⅜"-4⅜"-3½"-3½" insert 1 marker thread at the beginning of the round (= mid under sleeve). On the next round increase 2 stitches mid under sleeve - read INCREASE TIP. Increase like this every 2½-2½-1½-1½-1½-1½ cm = 1"-1"-½"-½"-½"-½" a total of 13-13-19-19-19-19 times = 68-70-84-84-88-90 stitches (change to short circular needle when necessary). Continue working until the piece measures 40-38-38-38-36-36 cm = 15¾"-15"-15"-15"-14¼"-14¼"- (increases mid under sleeve should now be finished and measurements are shorter in larger sizes due to longer yoke). Knit 1 round where you increase 8-8-12-12-12-12 stitches evenly on round = 76-78-96-96-100-102 stitches. The next round is worked as follows: Work 2-3-3-3-5-6 stitches in stockinette stitch, work A.2 over the next 72-72-90-90-90-90 stitches (= 4-4-5-5-5-5 repeats of 18 stitches) and finish with 2-3-3-3-5-6 stitches in stockinette stitch. Continue this pattern until you just have the last row in A.2 left to work. The last round is worked as follows: Bind off 2-3-3-3-5-6 stitches for armhole, work last row in A.2 over the next 72-72-90-90-90-90 stitches and bind off the remaining 2-3-3-3-5-6 stitches for armhole. The sleeve measures approx. 44-42-42-42-40-40 cm = 17¼"-16½"-16½"-16½"-15¾"-15¾" from the top down. Lay the piece to one side and work the other sleeve in the same way. YOKE: Place sleeves on same circular needle size 4 mm = US 6 as body, where you bind off stitches for armholes (without working the stitches) = 335-371-407-443-443-479 stitches on row. The first row is worked as follows from the right side: SIZES S, XL and XXL: 5 edge stitches in garter stitch, A.3A (= 9 stitches), work A.3B until there are 15 stitches left on row (= 17-23-23 repeats of 18 stitches), A.3C (= 10 stitches) and finish with 5 edge stitches in garter stitch. Continue this pattern (the pattern should match neatly on the sleeves too). When A.3 has been completed there are 263-347-347 stitches on the row. The next row is worked as follows from the right side: 5 edge stitches in garter stitch, work A.4A (= 7 stitches), A.4B until there are 13 stitches left on row (= 17-23-23 repeats of 14 stitches), A.4C (= 8 stitches) and finish with 5 edge stitches in garter stitch. Continue this pattern. When A.4 has been completed there are 138-180-180 stitches on row. Now go to ALL SIZES! SIZES M, L and XXXL: 5 edge stitches in garter stitch, work A.3B until there are 6 stitches left on row (= 20-22-26 repeats of 18 stitches), A.3D (= 1 stitch) and finish with 5 edge stitches in garter stitch. Continue this pattern (the pattern should match neatly on the sleeves too). When A.3 has been completed there are 291-319-375 stitches left on row. The next row is worked as follows from the right side: 5 edge stitches in garter stitch, work A.4B until there are 6 stitches left on row (= 20-22-26 repeats of 14 stitches), A.4D (= 1 stitch) and finish with 5 edge stitches in garter stitch. Continue this pattern. When A.4 has been completed there are 151-165-193 stitches on row. Now go to ALL SIZES! ALL SIZES: Knit 1 row from the right side where you decrease 30-39-49-56-56-61 stitches evenly on row – read DECREASE/INCREASE TIP = 108-112-116-124-124-132 stitches on row. The yoke now measures approx. 19-22-22-22-25-25 cm = 7½"-8¾"-8¾"-8¾"-9¾"-9¾" from where the sleeves and body were worked together. Now work NECK as described below. NECK: Change to circular needle size 3.5 mm = US 4 and work the next row as follows from the wrong side: 5 band stitches in garter stitch, * purl 2, knit 2 *, work from *-* until there are 7 stitches left on row, purl 2 and finish with 5 band stitches in garter stitch. Continue this rib for 3 cm = 1⅛" – remember the last buttonhole on right band. Then bind off loosely with garter stitch over garter stitch, knit over knit and purl over purl; to avoid the bind-off edge being tight you can bind off with circular needle size 4 mm = US 6. The whole jacket measures approx. 56-58-60-62-64-66 cm = 22"-22¾"-23⅝"-24⅜"-25¼"-16" from the shoulder down. ASSEMBLY: Sew openings under sleeves. Sew buttons onto left band. |
|||||||||||||||||||
Diagram explanations |
|||||||||||||||||||
|
|||||||||||||||||||
 |
|||||||||||||||||||
 |
|||||||||||||||||||
 |
|||||||||||||||||||
 |
|||||||||||||||||||
 |
|||||||||||||||||||
 |
|||||||||||||||||||
Have you finished this pattern?Tag your pictures with #dropspattern #goldenfairycardigan or submit them to the #dropsfan gallery. Do you need help with this pattern?You'll find 27 tutorial videos, a Comments/Questions area and more by visiting the pattern on garnstudio.com. © 1982-2026 DROPS Design A/S. We reserve all rights. This document, including all its sub-sections, has copyrights. Read more about what you can do with our patterns at the bottom of each pattern on our site. |
|||||||||||||||||||


With over 40 years in knitting and crochet design, DROPS Design offers one of the most extensive collections of free patterns on the internet - translated to 17 languages. As of today we count 324 catalogs and 12290 patterns - 12280 of which are translated into English (US/in).
We work hard to bring you the best knitting and crochet have to offer, inspiration and advice as well as great quality yarns at incredible prices! Would you like to use our patterns for other than personal use? You can read what you are allowed to do in the Copyright text at the bottom of all our patterns. Happy crafting!
Post a comment to pattern DROPS 195-23
We would love to hear what you have to say about this pattern!
If you want to leave a question, please make sure you select the correct category in the form below, to speed up the answering process. Required fields are marked *.