
Popular categories
Looking for a yarn?


Comments / Questions (15)
![]() Johanna Fältros wrote:
Johanna Fältros wrote:
Hej!! Får inte till 117 maskor det blir 121 maskor när jag bara gjort första varvet, även om jag gjort om det hundra gånger,förstår inte att de står 16 maskor på a3 när diagrammet har 17 maskor nått är ju fel😬
15.01.2022 - 10:19DROPS Design answered:
Hej Johanna. Det är 16 maskor i A.3, den svarta rutan är ingen maska på första varvet utan du går bara direkt till nästa ruta/symbol. Mvh DROPS Design
17.01.2022 - 14:29
![]() Johanna wrote:
Johanna wrote:
Får det inte att det skall bli två maskor kvar på varvet ,( a1 varv 5) 101 maskor och 2 ihop omslag gör att jag har tre maskor kvar i slutet som jag får sticka rätt eller har jag gjort någonstans fel??
13.01.2022 - 20:45
![]() GRAZIELLA wrote:
GRAZIELLA wrote:
Buongiorno, non trovo il diagramma A4B indicato nella spiegazione del corpo
08.06.2021 - 14:52DROPS Design answered:
Buonasera Graziella, grazie per la segnalazione, abbiamo corretto il testo: il diagramma a cui fa riferimento è A.7B. Buon lavoro!
08.06.2021 - 18:47
![]() Mónica Cruz wrote:
Mónica Cruz wrote:
De un tejido de arriba hacia abajo como este 195-16, ¿Se teje en redondo ó te costura al centro de la espalda?
01.10.2020 - 18:51DROPS Design answered:
Hola Monica. El modelo 195-16 se trabaja en redondo sin costura.
15.10.2020 - 21:18
![]() Jette Melsen wrote:
Jette Melsen wrote:
Er ved at strikke 195-15 str m, kan ikke få mønster a3 til at passe i midten, pind 1 ret slå om ret Pind 2 3 ret Pind 3 3 m sammen, så er der 1 m Pind 4 er der 2 m på diagrammet 😉
23.08.2020 - 16:26DROPS Design answered:
Hei Jette. Nei, det skal ikke strikkes 3 masker sammen på 3. pinne. Det skal strikkes 3 masker rett, løft den første maske som blev strikket over de 2 sidste masker så denne maske ligger rundt om de to andre masker. Altså, kun 1 maske mindre. God Fornøyelse!
24.08.2020 - 13:31
![]() Antonella wrote:
Antonella wrote:
Buongiorno, credo ci sia un errore nella spiegazione dell'esecuzione, parlo dello sprone poichè partendo da destra non ritrovo alla fine del lavoro, quindi a sinistra il diagramma con il quale iniziavo la destra ossia A2, anche inserendolo non tornano poi le maglie. Inoltre sempre nell'esecuzione dello sprone dopo un po sparisce l'inserimento dell'A3 e si parla solo di A2 A4 e A5. mi potete aiutare? Grazie molte
13.08.2020 - 13:39DROPS Design answered:
Buongiorno Antonella. Abbiamo corretto il testo. Sullo sprone continua a lavorare anche il diagramma A.3. Fa riferimento ai soli diagrammi A2, A4 e A5 perché in essi sono compresi gli aumenti. Buon lavoro!
13.08.2020 - 14:31
![]() SADORGE wrote:
SADORGE wrote:
Bonjour après le motif A1 j'ai bien 109 mailles mais après le 1 er rang de l'empiècement j'ai plus que 117 mailles ! j'ai du faire une erreur , vous dites A2 = 3 mais avec le jeté ça fait 4 , idem pour A3 qui fait 17 et non 16 ! faut il bien rajouter un jeté de chaque coté des 12 mailles des manches ? d'avance merci pour votre aide
11.05.2019 - 08:36DROPS Design answered:
Bonjour Mme Sadorge, les 4 jetés de A.2 ne sont pas comptés dans le nombre de mailles de ce rang, vous allez augmenter 1 m dans A.2 et 1 m dans A.3 (= devants) + 2 m dans A.4 (= dos) et en même temps augmenter avant et après les 12 m jersey des manches soit 8 augmentations au total, 109+8= 117 m (+ les jetés des torsades ajourées). Bon tricot!
13.05.2019 - 08:50
![]() Zehnder Christel wrote:
Zehnder Christel wrote:
Betrifft Diagramm A3 mit 16 M , Da sollte man in der 3 Reihe 3 M zusammen stricken und dann sollte man nachher 2 M haben - das geht aber nicht. Ich habe es so gelöst: das 1. x ein überzogenes Abnehmen und 1 M stricken, das 2. x 1 M stricken und dann die anderen 2 M zusammen stricken, und so immer abwechslungsweise wiederholen! Mit freundlichen Grüssen und viel Erfolg Ch. Zehnder
19.03.2019 - 09:43DROPS Design answered:
Liebe Frau Zehnder, A.3 wird bei der 1. Reihe über 16 M gestrickt, aber bei der 1. Reihe machen Sie 1 Umschlag (= 17 M), bei der 3. Reihe stricken Sie ein kleines Zopf - siehe Video- (= 16 M wieder). Viel Spaß beim stricken!
19.03.2019 - 11:25
![]() Gun-Britt Fredriksson wrote:
Gun-Britt Fredriksson wrote:
Uppdatering av mönstret tycker jag ska vara högst upp, då är det lättare att se det. Lätt att missa när det är så långt ner på sidan som i det här mönstret.
03.03.2019 - 10:59
![]() Gun-Britt Fredriksson wrote:
Gun-Britt Fredriksson wrote:
Jag har satt markörer på var sida om A3, tycker det underlättar var jag är i mönstret.
01.03.2019 - 10:51
|
|||||||||||||||||||||||||
Canari Jacket#canarijacket |
|||||||||||||||||||||||||
 |
 |
||||||||||||||||||||||||
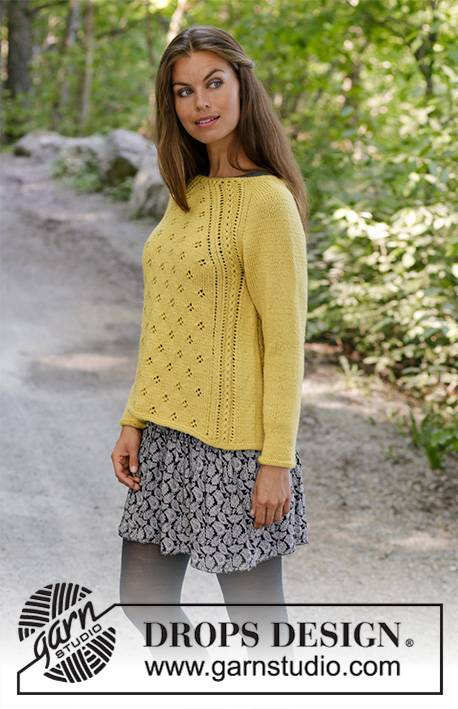
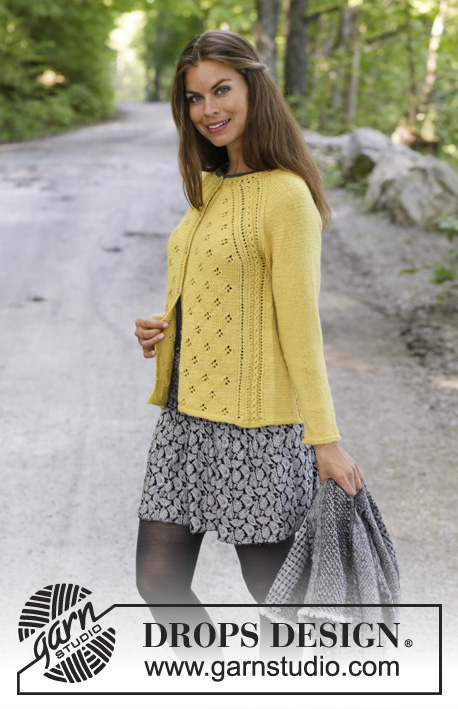
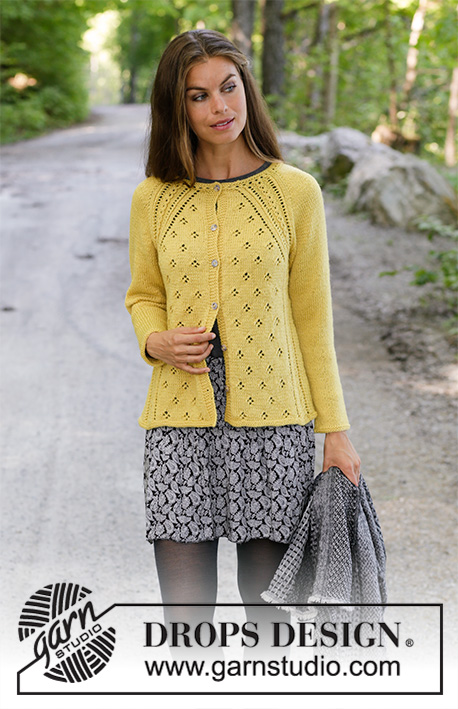
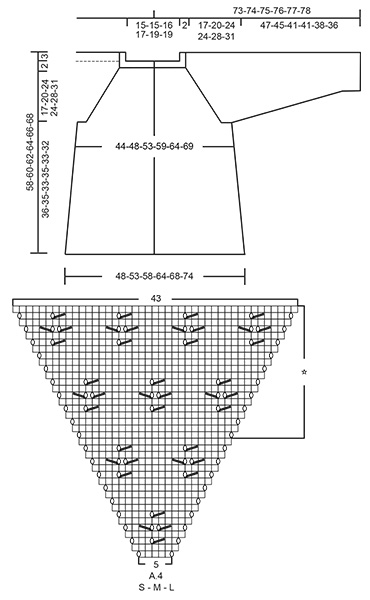
Knitted jacket with raglan in DROPS Karisma. The piece is worked top down with lace pattern. Sizes S - XXXL.
DROPS 195-15 |
|||||||||||||||||||||||||
|
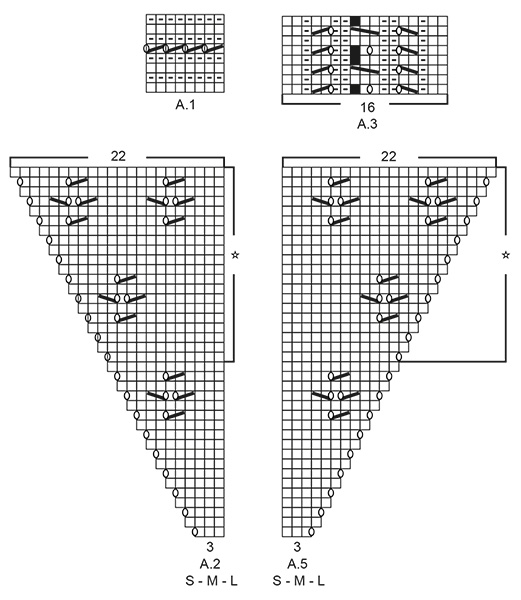
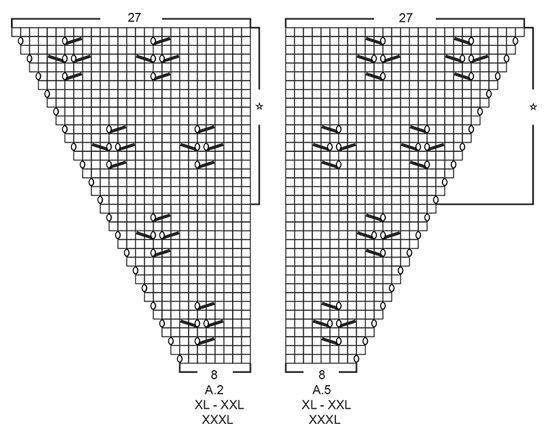
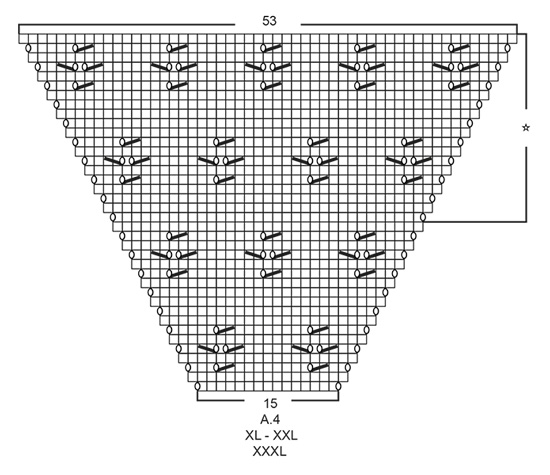
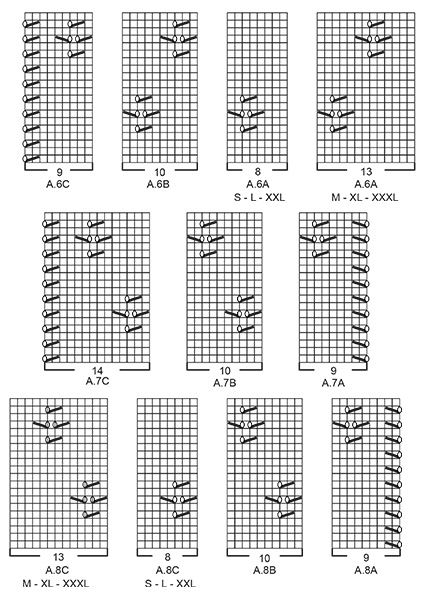
------------------------------------------------------- EXPLANATIONS FOR THE PATTERN: ------------------------------------------------------- RIDGE/GARTER STITCH (worked back and forth): 1 ridge = Knit 2 rows. RIDGE/GARTER STITCH (worked in the round): 1 ridge = 2 rounds. Knit 1 round and purl 1 round. PATTERN: See diagrams A.1 to A.8. Choose diagram for your size (applies to A.2, A.4, A.5, A.6A and A.8C). The diagrams show all the rows in the pattern seen from the right side. INCREASE TIP-1 (evenly spaced): To work out how to increase evenly, count the total number of stitches on the needle (e.g. 97 stitches) minus the bands (e.g. 10 stitches) and divide the remaining stitches by the number of increases to be made (e.g. 12) = 7.25. In this example, increase by making 1 yarn over after approx. each 7th stitch. On the next row (wrong side) purl the yarn overs twisted to avoid holes. Do not increase over the bands. INCREASE TIP-2 (for sides of body): All increases are made from the right side! Start 2 stitches before the marker thread, 1 yarn over, knit 4 (marker thread sits in the middle of these 4 stitches), 1 yarn over (= 2 stitches increased). On the next row (wrong side) purl the yarn overs twisted to avoid holes. Then work the increased stitches in stockinette stitch. DECREASE TIP (for mid under sleeve): Start 3 stitches before the marker thread, knit 2 together, knit 2 (marker thread sits in the middle of these 2 stitches), slip 1 stitch as if to knit, knit 1 and pass the slipped stitch over the knitted stitch (= 2 stitches decreased). BUTTONHOLES (top down): Work buttonholes on right band (when the garment is worn). 1 buttonhole = Work as before from the right side until there are 3 stitches left on the row, make 1 yarn over, knit 2 together and knit 1. On the next row (wrong side) knit the yarn over to leave a hole. NOTE: The first button is buttoned through a hole in A.1 on the neck, and then the next 5-5-6-6-7-7 buttonholes are worked as described above with approx. 9-9-8-8-7½-7½ cm = 3½"-3½"-3⅛"-3⅛"-2⅞"-2⅞" between each one. ------------------------------------------------------- START THE PIECE HERE: ------------------------------------------------------- JACKET - SHORT OVERVIEW OF THE PIECE: The neck, yoke and body are worked back and forth with circular needle from mid front and top down. The sleeves are worked with short circular needle/double pointed needles, top down. Be aware that all the stitch numbers on the yoke and body are given with A.3 = 16 stitches, but A.3 varies between 16 and 17 stitches. If you have just worked rounds 1-2-5 or 6 in A.3 when the number of stitches is given, you will have 4 more stitches on the needle. NECK: Cast on 97-97-101-105-113-113 stitches (including 5 band stitches in each side towards mid front) with circular needle size 3.5 mm = US 4 and Karisma. Work A.1 over all stitches on the needle, but on row 5 in A.1 you work until there are 2 stitches left on the row and finish with knit 2. When A.1 has been completed, knit 1 row from the right side where you increase 12-12-8-24-16-16 stitches evenly on row - read INCREASE TIP-1 = 109-109-109-129-129-129 stitches. Change to circular needle size 4 mm = US 6. Purl 1 row from the wrong side with 5 band stitches in GARTER STITCH in each side – read description above. Then work the yoke as described below. YOKE: The first row is worked as follows from the right side: 5 band stitches in garter stitch, work A.2 (= 3-3-3-8-8-8 stitches), A.3 (= 16 stitches), make 1 yarn over, work 12 stitches in stockinette stitch (= sleeve), 1 yarn over, work A.3 (= 16 stitches), A.4 (= 5-5-5-15-15-15 stitches), A.3 (= 16 stitches), 1 yarn over, work 12 stitches in stockinette stitch (= sleeve), 1 yarn over, A.3 (= 16 stitches), A.5 (= 3-3-3-8-8-8 stitches) and finish with 5 band stitches in garter stitch. There are now 117-117-117-137-137-137 stitches on the needle. Continue this pattern onwards; i.e. you increase on the front and back pieces in each side as shown in A.2, A.4 and A.5. On the sleeves you increase in each side of the stitches in stockinette stitch. Increase like this every 2nd round (i.e. on each row from the right side). On the next row (wrong side) the yarn overs in the diagrams are purled (to leave holes), and the increased stitches are worked into the pattern as shown in A.2, A.4 and A.5, while the yarn overs on the sleeves are purled twisted (to avoid holes), and the increased stitches are worked in stockinette stitch. REMEMBER THE KNITTING GAUGE and remember the BUTTONHOLES on the right band – read description above. When A.2, A.4 and A.5 have been worked 1 time in height there are 261-261-261-281-281-281 stitches on the needle. Continue this pattern onwards, i.e. the pattern repeats itself as shown in A.2, A.4 and A.5. Each time you have worked 20 rows in height there is room for 1 more repeat of the lace pattern in width on each front piece and 2 more repeats in width on the back piece. When you have increased a total of 24-29-34-34-39-44 times on each side of A.3 there are 301-341-381-401-441-481 stitches on the row and the piece measures approx. 19-22-26-26-30-33 cm = 7½"-8¾"-10¼"-10¼"-11¾"-13" from the cast-on edge and down mid front. The next row is worked as follows from the wrong side: Work 48-53-58-63-68-73 stitches as before (= right front piece), place the next 60-70-80-80-90-100 stitches on 1 thread for sleeve, cast on 6-6-6-8-8-10 new stitches on the needle (= in side under sleeve), work the next 85-95-105-115-125-135 stitches as before (= back piece), place the next 60-70-80-80-90-100 stitches on 1 thread for sleeve, cast on 6-6-6-8-8-10 new stitches on the needle (= in side under sleeve) and work the last 48-53-58-63-68-73 stitches as before (= left front piece). Body and sleeves are finished separately. THE PIECE IS NOW MEASURED FROM HERE! BODY: = 193-213-233-257-277-301 stitches. Insert 1 marker thread in each side, in the middle of the 6-6-6-8-8-10 stitches cast on under each sleeve. Allow the marker threads to follow your work onwards; they will be used a little later when you increase. The first row is worked as follows from the right side: 5 band stitches in garter stitch, A.6A (= 8-13-8-13-8-13 stitches), work A.6B over the next 10-10-20-20-30-30 stitches (= 1-1-2-2-3-3 repeats of 10 stitches), work A.6C (= 9 stitches), continue A.3 over the next 16 stitches, work 6-6-6-8-8-10 stitches in stockinette stitch (the marker thread sits in the middle of these 6-6-6-8-8-10 stitches), continue A.3 over the next 16 stitches, work A.7A (= 9 stitches), A.7B over the next 30-40-50-60-70-80 stitches (= 3-4-5-6-7-8 repeats of 10 stitches), A.7C (= 14 stitches), continue A.3 over the next 16 stitches, work 6-6-6-8-8-10 stitches in stockinette stitch (the marker thread sits in the middle of these 6-6-6-8-8-10 stitches), continue A.3 over the next 16 stitches, work A.8A (= 9 stitches), A.8B over the next 10-10-20-20-30-30 stitches (= 1-1-2-2-3-3 repeats of 10 stitches), work A.8C (= 8-13-8-13-8-13 stitches) and finish with 5 band stitches in garter stitch. Continue this pattern. When the piece measures 4 cm = 1½" from the division, increase 1 stitch on each side of both marker threads - read INCREASE TIP-2 = 4 stitches increased. Increase like this every 6-6-5-6-5-5 cm = 2⅜"-2⅜"-2"-2⅜"-2"-2" a total of 5 times = 213-233-253-277-297-321 stitches. Continue working until the piece measures approx. 35-34-32-34-32-31 cm = 13¾"-13⅜"-12½"-13⅜"-12½"-12¼" from the division, or to desired length, but make sure that you finish after a complete repeat of the lace pattern in height. Change to circular needle size 3.5 mm = US 4. Work 2 ridges back and forth over all stitches. Change back to circular needle size 4 mm = US 6. Bind off with knit from the right side, but make sure that the bind-off edge is not tight. The jacket measures approx. 58-60-62-64-66-68 cm = 22¾"-23⅝"-24⅜"-25¼"-26"-26¾" from the shoulder down. SLEEVE: Place the 60-70-80-80-90-100 stitches from the thread on the one side of the piece on short circular needle/double pointed needles size 4 mm = US 6 and knit up 1 stitch in each of the 6-6-6-8-8-10 new stitches cast on in the side under the sleeve = 66-76-86-88-98-110 stitches. Insert a marker thread in the middle of the 6-6-6-8-8-10 new stitches in side under sleeve and allow the marker thread to follow your work onwards; it will be used a little later when decreasing mid under sleeve. Start the round by the marker thread and work stockinette stitch in the round. When the piece measures 2-1-1-1-1-1 cm = ¾"-⅜"-⅜"-⅜"-⅜"-⅜"- decrease 2 stitches mid under sleeve – read DECREASE TIP. Decrease like this every 2nd round a total of 1-2-3-3-4-7 times = 64-72-80-82-90-96 stitches. Then decrease every 3½-2½-2-2-1½-1 cm = 1¼"-1"-¾"-¾"-½"-⅜" a total of 12-15-18-18-21-23 times = 40-42-44-46-48-50 stitches left on the needles. Continue until the piece measures 46-44-40-40-37-35 cm = 18"-16½"-15¾"-15¾"-14½"-13¾" from the division or to desired length (shorter measurements in larger sizes due to longer yoke). Change to double pointed needles size 3.5 mm = US 4 and work 2 RIDGES in the round - read description above. Change back to double pointed needles size 4 mm = US 6. Bind off with knit. Make sure the bind-off edge is not tight! The sleeve measures approx. 47-45-41-41-38-36 cm = 18½"-17¾"-16⅛"-16⅛"-15"-14¼" from the division. Work the other sleeve in the same way. ASSEMBLY: Sew buttons onto left band. |
|||||||||||||||||||||||||
Diagram explanations |
|||||||||||||||||||||||||
|
|||||||||||||||||||||||||
 |
|||||||||||||||||||||||||
 |
|||||||||||||||||||||||||
 |
|||||||||||||||||||||||||
 |
|||||||||||||||||||||||||
 |
|||||||||||||||||||||||||
Have you finished this pattern?Tag your pictures with #dropspattern #canarijacket or submit them to the #dropsfan gallery. Do you need help with this pattern?You'll find 27 tutorial videos, a Comments/Questions area and more by visiting the pattern on garnstudio.com. © 1982-2026 DROPS Design A/S. We reserve all rights. This document, including all its sub-sections, has copyrights. Read more about what you can do with our patterns at the bottom of each pattern on our site. |
|||||||||||||||||||||||||


With over 40 years in knitting and crochet design, DROPS Design offers one of the most extensive collections of free patterns on the internet - translated to 17 languages. As of today we count 324 catalogs and 12290 patterns - 12280 of which are translated into English (US/in).
We work hard to bring you the best knitting and crochet have to offer, inspiration and advice as well as great quality yarns at incredible prices! Would you like to use our patterns for other than personal use? You can read what you are allowed to do in the Copyright text at the bottom of all our patterns. Happy crafting!
Post a comment to pattern DROPS 195-15
We would love to hear what you have to say about this pattern!
If you want to leave a question, please make sure you select the correct category in the form below, to speed up the answering process. Required fields are marked *.