
Popular categories
Looking for a yarn?


Comments / Questions (23)
![]() FURSTENBERGER Michèle wrote:
FURSTENBERGER Michèle wrote:
Bonjour, je suis de nouveau perdu, j'ai du mal à comprendre les augmentations et diagrammes à utiliser pour une taille xxl à partir du col, et à quel endroit je dois mettre les marqueurs. Merci beaucoup, ce gilet me plait ,je voudrais bien le commencer.
10.04.2018 - 16:16DROPS Design answered:
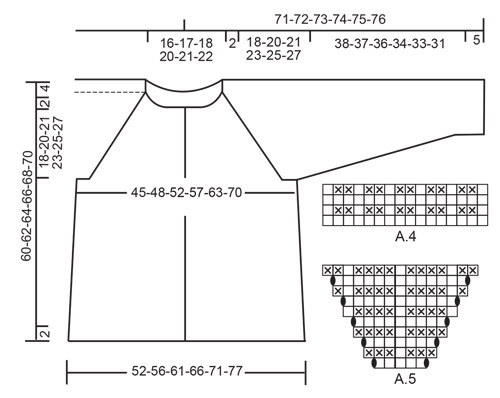
Bonjour Mme Furstenberger, les diagrammes A.1, A.2, A.4 et A.5 sont les mêmes pour toutes les tailles. En taille XXL, suivez les diagrammes A.3 et A.6 correspondant à cette taille. A.4 correspond au raglan = ces mailles sont tricotées à la transition entre chaque pièce et vous allez augmenter de part et d'autre de A.4 (= dans A.3 et A.6 pour les devants et le dos et dans A.5 pour les manches). Si vous voulez placer des marqueurs pour l'empiècement, mettez-en un après chaque diagramme pour bien repérer où ils se tricotent les uns après les autres et vérifier votre nombre de mailles. Bon tricot!
11.04.2018 - 10:11
![]() FURSTENBERGER Michèle wrote:
FURSTENBERGER Michèle wrote:
C'est mon premier tricot de haut en bas. Je suis perdue pour commencer le haut jusqu'à la séparation du tricot. A quel endroit je dois mettre des marqueurs. Merci de m'expliquer en détail ou par une vidéo similaire jusqu'à la séparation. J'adore vos modèles. Merci beaucoup.
10.04.2018 - 12:54DROPS Design answered:
Bonjour Mme Furstenberger, vous tricotez d'abord un rang sur l'endroit en glissant les mailles des manches en attente et en montant 8-10 m (cf taille) à la place de ces mailles (sous les manches) et au rang suivant sur l'envers (= 1er rang du dos et des devants), placez un marqueur à 41-44-47-51-56-61 m des bords (= vous avez maintenant 71-77-83-91-101-111 m pour le dos). Cette vidéo montre comment tricoter un pull de haut en bas et vous montrera comment on glisse les mailles des manches en attente et comment on monte les mailles sous les manches. Bon tricot!
10.04.2018 - 13:33
![]() FURSTENBERGER Michèle wrote:
FURSTENBERGER Michèle wrote:
Je ne comprend pas les diagrammes pour l'empiecement , pouvez-vous m'indiquer pour une taille XL ce que je dois faire par une petite video ou croquis. Merci beaucoup
05.04.2018 - 13:41DROPS Design answered:
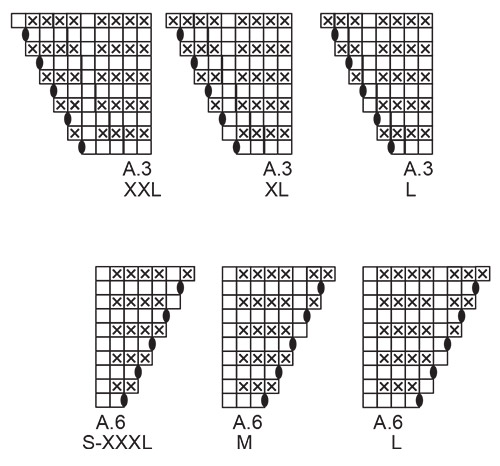
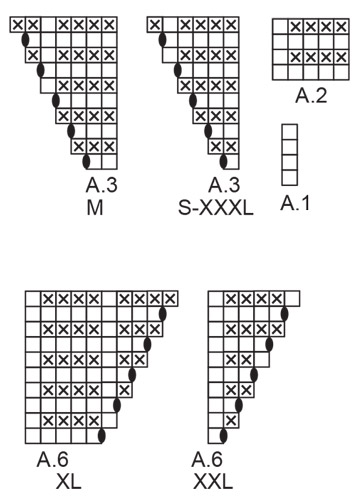
Bonjour Mme Furstenberger, lisez les diagrammes en commençant en bas à droite et de droite à gauche sur l'endroit et de gauche à droite sur l'envers. par Ex A.3 en taille XL se tricote ainsi au rang 1 (sur l'endroit): 4 m end, 1 jeté, au rang 2: tricotez le jeté torse à l'env, 4 m end et ainsi de suite, 1 case blanche = 1 m jersey endroit, 1 croix = jersey envers. Bon tricot!
05.04.2018 - 15:45
|
||||||||||
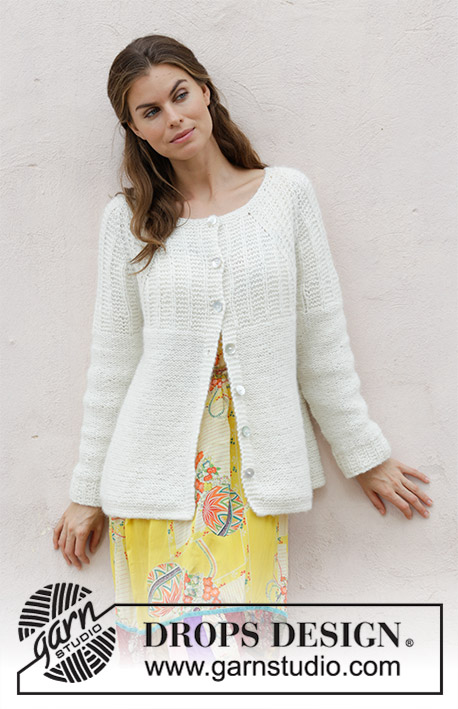
Sweet Pearl Jacket#sweetpearljacket |
||||||||||
 |
 |
|||||||||
Knitted jacket with garter stitch and raglan, worked top down. Sizes S - XXXL. The piece is worked in DROPS Air.
DROPS 187-38 |
||||||||||
|
INFORMATION FOR THE PATTERN: RIDGE/GARTER STITCH (worked back and forth): 1 ridge = Knit 2 rows. RIDGE/GARTER STITCH (worked in the round – for the sleeves): 1 ridge = 2 rounds. Knit 1 round and purl 1 round. PATTERN: See diagrams A.1 to A.6. Choose diagram for your size in A.3 and A.6. The diagrams show all the rows in the pattern seen from the right side. INCREASE TIP (for body): Work until there are 2 stitches left before the marker thread, 1 yarn over, work 4 stitches (the marker thread sits in the middle of these 4 stitches), 1 yarn over (= 2 stitches increased). Repeat at both marker threads (= 4 stitches increased). DECREASE TIP (for sleeves): Decrease1 stitch on each side of the marker thread as follows: Work until there are 3 stitches left before the marker thread, slip 1 stitch as if to knit, knit 1, pass the slipped stitch over the knitted stitch, knit 2 stitches (the marker thread sits in the middle of these 2 stitches), knit the next 2 stitches together (= 2 stitches decreased). BUTTONHOLE: Work buttonholes on the right band (when the garment is worn). Work from the right side, when there are 3 stitches left on the row as follows: Make 1 yarn over, knit the next 2 stitches together and knit the last stitch. On the next row knit the yarn over to leave a hole. The first buttonhole is worked when the yoke measures approx. 1½-2 cm / ½"-¾". Then work the other 6-6-7-7-7-7 buttonholes with 8-8-7½-7½-8-8 cm / 3"-3"-2⅞"-2⅞"-3"-3" between each one. ---------------------------------------------------------- JACKET: The yoke and body are worked back and forth, top down. The sleeves are worked in the round with double pointed needles. YOKE: Cast on 86-90-94-98-102-106 stitches (including 5 band stitches on each side of the piece) with circular needle size 4.5 mm / US 7. Work 2 RIDGES – see description above. Change to circular needle SIZE 5.5 mm/US 9 / US 9. Knit 1 row and increase 25 stitches (by making yarn overs) evenly on row (do not increase over the first and the last 5 stitches = bands) = 111-115-119-123-127-131 stitches. Knit 1 row from the wrong side; the yarn overs are knitted twisted to avoid holes. Read BUTTONHOLE – see description above. Then work pattern from the right side as follows: Work as follows over the left front piece: Work 5 band stitches in garter stitch, A.1 (= 1 stitch), A.2 (= 5 stitches) over the next 5-5-5-5-5-10 stitches (= 1-1-1-1-1-2 times in width), A.3 (= 1-2-3-4-5-1 stitches). Work as follows over left sleeve: Work A.4 (= 16 stitches), A.5 (= 5 stitches), A.4 over 16 stitches. Work as follows over the back piece: Work A.6 (= 2-3-4-5-1-2 stitches), A.2 over 10-10-10-10-15-20 stitches, A.3 over 1-2-3-4-5-1 stitches. Work as follows over right sleeve: Work A.4 over 16 stitches, A.5 over 5 stitches, A.4 over 16 stitches. Work as follows over right front piece: Work A.6 over 2-3-4-5-1-2 stitches, A.2 over 5-5-5-5-10-10 stitches and finish with 5 band stitches in garter stitch. Continue the pattern and increase as shown in A.3, A.5 and A.6 (i.e. increase 1 stitch on each side of each A.4 = a total of 8 stitches increased on each row from the right side). The increased stitches are worked twisted into the pattern as you go, there should not be holes. The band stitches are worked in garter stitch to finished length. REMEMBER THE GAUGE! Diagram A.1, A.2 and A.4 are repeated in height. When A.3, A.5 and A.6 have been worked 1 time in height, continue to increase and the increased stitches are worked into the pattern as before. Increase on each side of each A.4 a total of 14-16-19-21-24-27 times (including the increases in A.3, A.5 and A.6) = 223-243-271-291-319-347 stitches. Then continue with garter stitch over garter stitch and stockinette stitch over stockinette stitch until the piece measures 20-22-23-25-27-29 cm / 8"-8¾"-9"-9¾"-10½"-11½" from the neckline. Now divide sleeves and body from the right side as follows: Work 5 band stitches in garter stitch, purl 32-34-37-41-46-52 stitches (= left front piece), place the next 43-49-57-59-63-65 stitches on a thread (= sleeve), cast on 8-10-10-10-10-8 stitches under the sleeve, purl 63-67-73-81-91-103 stitches (= back piece), place the next 43-49-57-59-63-65 stitches on a thread (= sleeve), cast on 8-10-10-10-10-8 stitches under the sleeve, purl 32-34-37-41-46-52 stitches and finish with 5 band stitches in garter stitch. Body and sleeves are now finished separately. BODY: = 153-165-177-193-213-233 stitches. Continue working in stockinette stitch, but with the wrong side out, i.e. knit from the wrong side and purl from the right side with 5 band stitches in garter stitch in each side of the piece. Insert 1 marker thread 41-44-47-51-56-61 stitches in from each side of the piece (= front pieces = 71-77-83-91-101-111 stitches on back piece). When the piece measures 4 cm / 1½" from the division of the body and sleeves, increase 1 stitch on each side of the marker threads (= 4 stitches increased) – read INCREASE TIP! Increase like this every 4 cm / 1½" a total of 6-6-7-7-6-6 times = 177-189-205-221-237-257 stitches. When the piece measures 34-34-35-35-35-35 cm / 13½"-13½"-12¾"-12¾"-12¾"-12¾" from the division of body and sleeves, change to circular needle size 4.5 mm / US 7 and work 3 ridges. Bind off. Make sure that the bind off edge is not tight; you can bind off with a 1 size larger needle if necessary. The piece measures a total of approx. 56-58-60-62-64-66 cm / 22"-22¾"-23⅝"-24⅜"-25¼"-26" from the neck edge. SLEEVE: The piece is worked in the round with double pointed needles. Place the 43-49-57-59-63-65 stitches from the thread on the one side of the piece on double pointed needles SIZE 5.5 mm/US 9 and knit up 1 stitch in each of the 8-10-10-10-10-8 stitches cast on the body mid under sleeve = 51-59-67-69-73-73 stitches. Insert a marker thread in the middle of the new stitches. Continue with garter stitch over garter stitch and knit over knit; the 8-10-10-10-10-8 new stitches under the sleeve are worked in garter stitch. When the piece measures 3 cm / 1" from the division of sleeve and body, decrease 2 stitches mid under sleeve – read DECREASE TIP! Decrease every 5½-4-2½-2-2-2 cm / 2¼"-1½"-⅞"-¾"-¾"-¾" a total of 6-8-12-12-14-12 times = 39-43-43-45-45-49 stitches. AT THE SAME TIME when the sleeve measures 5 cm / 2" from where the division of sleeve and body, continue with stockinette stitch from the wrong side, i.e. turn the piece and knit in the round on the wrong side. When the piece measures 38-37-36-34-33-31 cm / 15"-14½"-14¼"-13½"-13"-12¼" change to double pointed needles size 4.5 mm / US 7 and work rib (purl 1, 2 stitches GARTER STITCH – see description above) in the round from the wrong side, AT THE SAME TIME as you decrease 0-1-1-0-0-1 stitch on the first row = 39-42-42-45-45-48 stitches. Bind off when the piece measures 43-42-41-39-38-36 cm / 17"-16½"-16"-15¼"-15"-14¼" from the division of sleeve and body. Make sure that the bind-off edge is not tight; you can bind off with a 1 size larger needle if necessary. The piece measures a total of 63-64-64-64-65-65 cm / 24¾"-25¼"-25¼"-25¼"-25½"-25½"" from the neck edge. Work the other sleeve in the same way. ASSEMBLY: Sew the buttons onto the left band. |
||||||||||
Diagram explanations |
||||||||||
|
||||||||||
 |
||||||||||
 |
||||||||||
 |
||||||||||
Have you finished this pattern?Tag your pictures with #dropspattern #sweetpearljacket or submit them to the #dropsfan gallery. Do you need help with this pattern?You'll find 27 tutorial videos, a Comments/Questions area and more by visiting the pattern on garnstudio.com. © 1982-2026 DROPS Design A/S. We reserve all rights. This document, including all its sub-sections, has copyrights. Read more about what you can do with our patterns at the bottom of each pattern on our site. |
||||||||||


With over 40 years in knitting and crochet design, DROPS Design offers one of the most extensive collections of free patterns on the internet - translated to 17 languages. As of today we count 324 catalogs and 12290 patterns - 12280 of which are translated into English (US/in).
We work hard to bring you the best knitting and crochet have to offer, inspiration and advice as well as great quality yarns at incredible prices! Would you like to use our patterns for other than personal use? You can read what you are allowed to do in the Copyright text at the bottom of all our patterns. Happy crafting!
Post a comment to pattern DROPS 187-38
We would love to hear what you have to say about this pattern!
If you want to leave a question, please make sure you select the correct category in the form below, to speed up the answering process. Required fields are marked *.