
Popular categories
Looking for a yarn?


Comments / Questions (23)
![]() Stefanie wrote:
Stefanie wrote:
Wenn ich die Arbeit beim Ärmel von innen nach außen wende, um glatt rechts weiter stricken zu können, habe ich an der Stelle dann einmal eine Hin- und Rückreihe? Dadurch habe ich jetzt dort ein kleines Loch ...
23.12.2019 - 13:51DROPS Design answered:
Liebe Stefanie, die erste Masche können Sie wie bei verkürzten Reihen aber nur bei der 1. Reihe stricken (siehe Video. Dann weiter in der Runde glatt stricken. Viel Spaß beim stricken!
02.01.2020 - 10:23
![]() Françoise wrote:
Françoise wrote:
Merci pour vos réponses et bon conseil qui me guide vraiment dans mes ouvrage de tricot.
06.11.2019 - 13:04
![]() Françoise wrote:
Françoise wrote:
Bonjour, J'ai encore besoin de vous. Quand j'arrive aux augmentations de 24 fois de A.4 pour la taille XXL, dois-je aussi continuer à augmenter aussi dans A.3 , A.5, A.6. Quand je calcule mes augmentations je me retrouve avec beaucoup plus de mailles c'et à dire 430 mailles au lieu de 319 mailles .(avant les augmentations quand j'ai fini A.3,A.5 , A.6 1 fois en hauteur j'obtiens 166 mailles). Merci de votre réponse, je ne comprend pas pourquoi j'ai autant de mailles en plus.
06.11.2019 - 09:42DROPS Design answered:
Bonjour Françoise, après avoir tricoté 1 fois A.3,A.5 et A.6, vous avez augmenté 5 fois 8 mailles = 40 m + les 127 m = vous devez avoir 167 m. Continuez à augmenter avant/après A.4 comme avant encore 19 fois (= 24 fois au total), vous allez augmenter au total: 24x 8 mailles = 192 m + les 127 m = 319 m. Bon tricot!
06.11.2019 - 12:15
![]() Françoise wrote:
Françoise wrote:
Re bonjour, si j'ai bien compris une fois mes graphiques terminés en hauteur je continue à augmenté dans chaque graphique comme avant, et j'augmente 24 fois de chaque côté de A.4.
03.11.2019 - 15:30DROPS Design answered:
Bonjour Françoise, augmentez de chaque côté de chaque A.4 et tricotez les augmentations en point fantaisie au fur et à mesure - cf réponse précédente. En taille XXL vous augmenterez 24 fois au total = vous aurez 319 mailles quand toutes les augmentations seront faites. Bon tricot!
04.11.2019 - 17:08
![]() Françoise wrote:
Françoise wrote:
Bonjour, une fois tous mes graphiques terminés en hauteur ,faut-il que je les reprennes du début pour aller jusqu'à 27 cm de hauteur (A.3) (A.5) (A.6)
03.11.2019 - 11:25DROPS Design answered:
Bonjour Françoise, vous continuez à augmenter en conservant le même rythme des mailles que dans A.2: *1 m end, 4 m point mousse* ou bien *4 m point mousse, 1 m end* pour que le motif soit toujours le même. Bon tricot!
04.11.2019 - 17:02
![]() Françoise Lelarge wrote:
Françoise Lelarge wrote:
Bonjour,j'attend toujours votre réponse je suis bloquée, au niveau des diagrammes comme je vous indiquée dans ma question précédente. Merci de me donner une réponse rapide.
02.11.2019 - 13:17DROPS Design answered:
Bonjour Mme Lelarge, vous trouverez la réponse ci-dessous, merci pour votre patience. Bon tricot!
04.11.2019 - 16:13
![]() Françoise Lelarge wrote:
Françoise Lelarge wrote:
Dans ma question précédente j'ai voulu dire combien de motifs A3 pour les devants et combien de motifs A6 pour le dos. Merci.
02.11.2019 - 09:30DROPS Design answered:
Cf réponse précédente pour le détail des diagrammes. Bon tricot!
04.11.2019 - 16:10
![]() Françoise Lelarge wrote:
Françoise Lelarge wrote:
Bonjour, pour les devants combien de fois dois-je répéter les motifs (3 pour le er devant droit) et le motif (6 pour le devant gauche)sachant que je tricote la taille xxl. Merci pour votre réponse.
02.11.2019 - 09:22DROPS Design answered:
Bonjour Mme Lelarge, en taille XXL, vous tricotez pour le devant gauche: 1 m de A.1, 1 x A.2 et 1 x A.3 = 11 mailles au total - pour le devant droit: 1 x A.6 et 2 x A.2 soit 11 m au total. Pour le dos: 1 x A.6, 3 x A.2 et 1 x A.3 = 21 m. Bon tricot!
04.11.2019 - 16:10
![]() Françoise LELARGE wrote:
Françoise LELARGE wrote:
Je me suis tromper dans ma question précédente ce n'est pas du kid silk mais du brushed alpaca silk avec air. Encore merci pour la réponse.
22.10.2019 - 12:20DROPS Design answered:
Bonjour Mme Lelarge, nous ne sommes malheureusement pas en mesure de pouvoir adapter chacun de nos modèles à chaque demande, tricotez un échantillon avec les 2 laines souhaitées, et essayez de trouver la tension/l'échantillon qui vous convient, mais ces 2 laines ensemble risqueraient d'être vraiment très épaisses pour cet échantillon. Demandez conseil à votre magasin DROPS, même par mail ou téléphone, on saura vous aider. Bon tricot!
22.10.2019 - 13:02
![]() Françoise LELARGE wrote:
Françoise LELARGE wrote:
Bonjour, Je voudrais tricoter se modèle avec un fil supplémentaire KID silk est-ce possible. (air + kid silk) combien de pelotes me faudrait-il de chaque. Cela me ferait un gilet plus volumineux et chaud. Merci de votre réponse.
22.10.2019 - 11:40DROPS Design answered:
Bonjour Mme Lelarge, en tricotant 1 fil Air + 1 fil Kid-Silk, vous obtiendrez un échantillon différent, correspondant au groupe D de nos fils (plus d'infos sur les alternatives ici). Il vous faudrait donc rechercher davantage parmi les modèles du groupe D. Bon tricot!
22.10.2019 - 13:00
|
||||||||||
Sweet Pearl Jacket#sweetpearljacket |
||||||||||
 |
 |
|||||||||
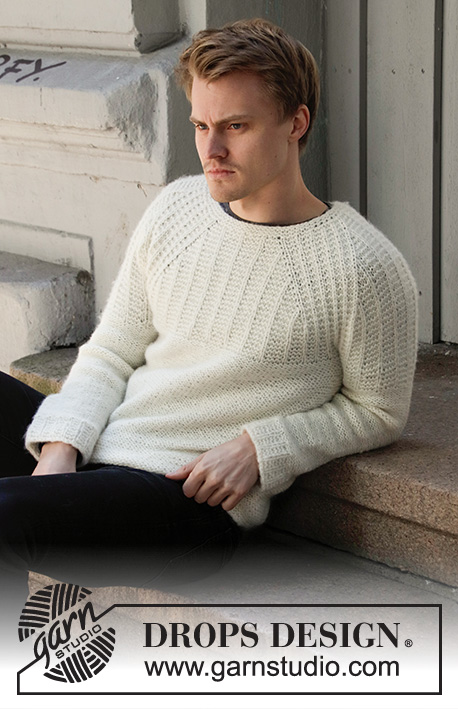
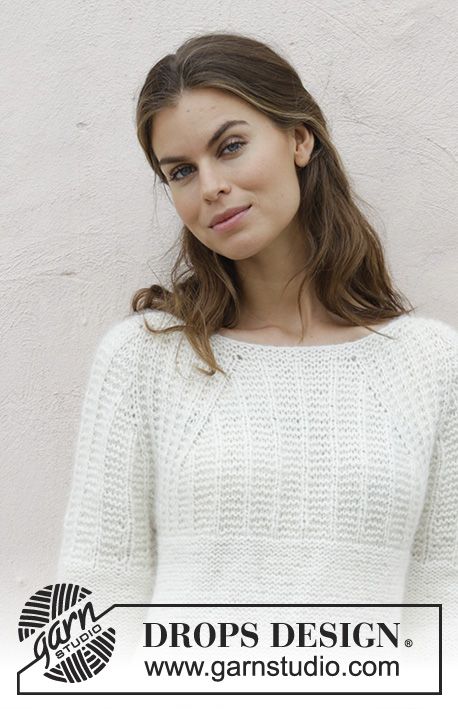
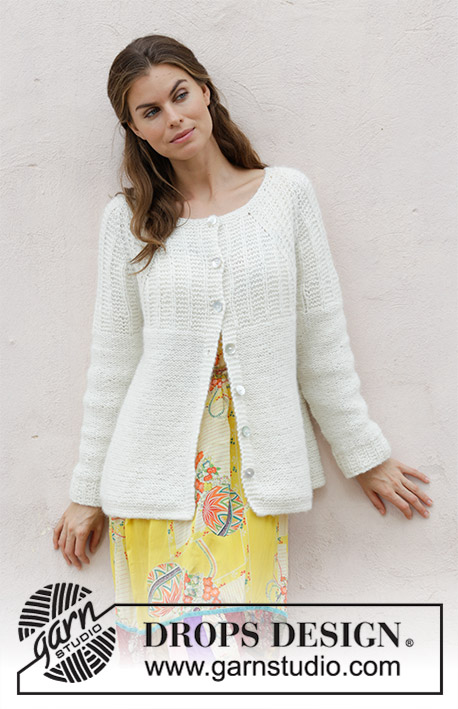
Knitted jacket with garter stitch and raglan, worked top down. Sizes S - XXXL. The piece is worked in DROPS Air.
DROPS 187-38 |
||||||||||
|
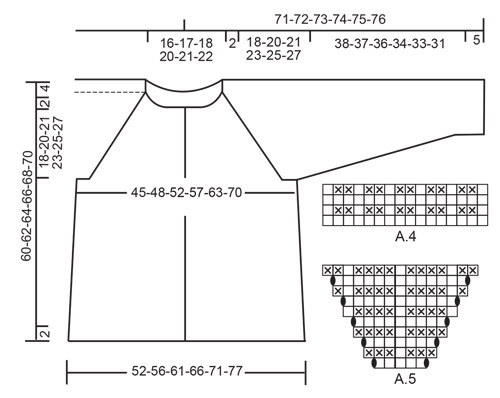
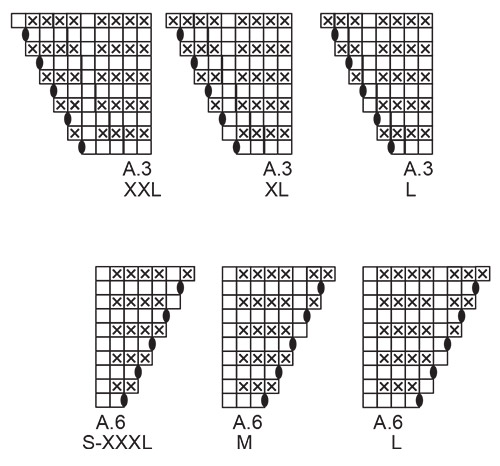
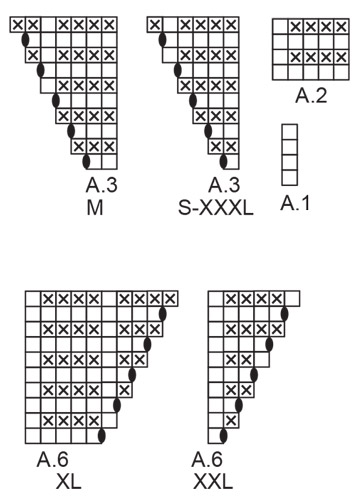
INFORMATION FOR THE PATTERN: RIDGE/GARTER STITCH (worked back and forth): 1 ridge = Knit 2 rows. RIDGE/GARTER STITCH (worked in the round – for the sleeves): 1 ridge = 2 rounds. Knit 1 round and purl 1 round. PATTERN: See diagrams A.1 to A.6. Choose diagram for your size in A.3 and A.6. The diagrams show all the rows in the pattern seen from the right side. INCREASE TIP (for body): Work until there are 2 stitches left before the marker thread, 1 yarn over, work 4 stitches (the marker thread sits in the middle of these 4 stitches), 1 yarn over (= 2 stitches increased). Repeat at both marker threads (= 4 stitches increased). DECREASE TIP (for sleeves): Decrease1 stitch on each side of the marker thread as follows: Work until there are 3 stitches left before the marker thread, slip 1 stitch as if to knit, knit 1, pass the slipped stitch over the knitted stitch, knit 2 stitches (the marker thread sits in the middle of these 2 stitches), knit the next 2 stitches together (= 2 stitches decreased). BUTTONHOLE: Work buttonholes on the right band (when the garment is worn). Work from the right side, when there are 3 stitches left on the row as follows: Make 1 yarn over, knit the next 2 stitches together and knit the last stitch. On the next row knit the yarn over to leave a hole. The first buttonhole is worked when the yoke measures approx. 1½-2 cm. Then work the other 6-6-7-7-7-7 buttonholes with 8-8-7½-7½-8-8 cm between each one. ---------------------------------------------------------- JACKET: The yoke and body are worked back and forth, top down. The sleeves are worked in the round with double pointed needles. YOKE: Cast on 86-90-94-98-102-106 stitches (including 5 band stitches on each side of the piece) with circular needle size 4.5 mm. Work 2 RIDGES – see description above. Change to circular needle size 5.5 mm. Knit 1 row and increase 25 stitches (by making yarn overs) evenly on row (do not increase over the first and the last 5 stitches = bands) = 111-115-119-123-127-131 stitches. Knit 1 row from the wrong side; the yarn overs are knitted twisted to avoid holes. Read BUTTONHOLE – see description above. Then work pattern from the right side as follows: Work as follows over the left front piece: Work 5 band stitches in garter stitch, A.1 (= 1 stitch), A.2 (= 5 stitches) over the next 5-5-5-5-5-10 stitches (= 1-1-1-1-1-2 times in width), A.3 (= 1-2-3-4-5-1 stitches). Work as follows over left sleeve: Work A.4 (= 16 stitches), A.5 (= 5 stitches), A.4 over 16 stitches. Work as follows over the back piece: Work A.6 (= 2-3-4-5-1-2 stitches), A.2 over 10-10-10-10-15-20 stitches, A.3 over 1-2-3-4-5-1 stitches. Work as follows over right sleeve: Work A.4 over 16 stitches, A.5 over 5 stitches, A.4 over 16 stitches. Work as follows over right front piece: Work A.6 over 2-3-4-5-1-2 stitches, A.2 over 5-5-5-5-10-10 stitches and finish with 5 band stitches in garter stitch. Continue the pattern and increase as shown in A.3, A.5 and A.6 (i.e. increase 1 stitch on each side of each A.4 = a total of 8 stitches increased on each row from the right side). The increased stitches are worked twisted into the pattern as you go, there should not be holes. The band stitches are worked in garter stitch to finished length. REMEMBER THE KNITTING TENSION! Diagram A.1, A.2 and A.4 are repeated in height. When A.3, A.5 and A.6 have been worked 1 time in height, continue to increase and the increased stitches are worked into the pattern as before. Increase on each side of each A.4 a total of 14-16-19-21-24-27 times (including the increases in A.3, A.5 and A.6) = 223-243-271-291-319-347 stitches. Then continue with garter stitch over garter stitch and stocking stitch over stocking stitch until the piece measures 20-22-23-25-27-29 cm from the neckline. Now divide sleeves and body from the right side as follows: Work 5 band stitches in garter stitch, purl 32-34-37-41-46-52 stitches (= left front piece), place the next 43-49-57-59-63-65 stitches on a thread (= sleeve), cast on 8-10-10-10-10-8 stitches under the sleeve, purl 63-67-73-81-91-103 stitches (= back piece), place the next 43-49-57-59-63-65 stitches on a thread (= sleeve), cast on 8-10-10-10-10-8 stitches under the sleeve, purl 32-34-37-41-46-52 stitches and finish with 5 band stitches in garter stitch. Body and sleeves are now finished separately. BODY: = 153-165-177-193-213-233 stitches. Continue working in stocking stitch, but with the wrong side out, i.e. knit from the wrong side and purl from the right side with 5 band stitches in garter stitch in each side of the piece. Insert 1 marker thread 41-44-47-51-56-61 stitches in from each side of the piece (= front pieces = 71-77-83-91-101-111 stitches on back piece). When the piece measures 4 cm from the division of the body and sleeves, increase 1 stitch on each side of the marker threads (= 4 stitches increased) – read INCREASE TIP! Increase like this every 4 cm a total of 6-6-7-7-6-6 times = 177-189-205-221-237-257 stitches. When the piece measures 34-34-35-35-35-35 cm from the division of body and sleeves, change to circular needle size 4.5 mm and work 3 ridges. Cast off. Make sure that the cast off edge is not tight; you can cast off with a 1 size larger needle if necessary. The piece measures a total of approx. 56-58-60-62-64-66 cm from the neck edge. SLEEVE: The piece is worked in the round with double pointed needles. Place the 43-49-57-59-63-65 stitches from the thread on the one side of the piece on double pointed needles size 5.5 mm and knit up 1 stitch in each of the 8-10-10-10-10-8 stitches cast on the body mid under sleeve = 51-59-67-69-73-73 stitches. Insert a marker thread in the middle of the new stitches. Continue with garter stitch over garter stitch and knit over knit; the 8-10-10-10-10-8 new stitches under the sleeve are worked in garter stitch. When the piece measures 3 cm from the division of sleeve and body, decrease 2 stitches mid under sleeve – read DECREASE TIP! Decrease every 5½-4-2½-2-2-2 cm a total of 6-8-12-12-14-12 times = 39-43-43-45-45-49 stitches. AT THE SAME TIME when the sleeve measures 5 cm from where the division of sleeve and body, continue with stocking stitch from the wrong side, i.e. turn the piece and knit in the round on the wrong side. When the piece measures 38-37-36-34-33-31 cm change to double pointed needles size 4.5 mm and work rib (purl 1, 2 stitches GARTER STITCH – see description above) in the round from the wrong side, AT THE SAME TIME as you decrease 0-1-1-0-0-1 stitch on the first row = 39-42-42-45-45-48 stitches. Cast off when the piece measures 43-42-41-39-38-36 cm from the division of sleeve and body. Make sure that the cast-off edge is not tight; you can cast off with a 1 size larger needle if necessary. The piece measures a total of 63-64-64-64-65-65 cm from the neck edge. Work the other sleeve in the same way. ASSEMBLY: Sew the buttons onto the left band. |
||||||||||
Diagram explanations |
||||||||||
|
||||||||||
|
||||||||||
|
||||||||||
|
||||||||||
Have you finished this pattern?Tag your pictures with #dropspattern #sweetpearljacket or submit them to the #dropsfan gallery. Do you need help with this pattern?You'll find 27 tutorial videos, a Comments/Questions area and more by visiting the pattern on garnstudio.com. © 1982-2025 DROPS Design A/S. We reserve all rights. This document, including all its sub-sections, has copyrights. Read more about what you can do with our patterns at the bottom of each pattern on our site. |
||||||||||


With over 40 years in knitting and crochet design, DROPS Design offers one of the most extensive collections of free patterns on the internet - translated to 17 languages. As of today we count 314 catalogues and 11821 patterns translated into English (UK/cm).
We work hard to bring you the best knitting and crochet have to offer, inspiration and advice as well as great quality yarns at incredible prices! Would you like to use our patterns for other than personal use? You can read what you are allowed to do in the Copyright text at the bottom of all our patterns. Happy crafting!
Post a comment to pattern DROPS 187-38
We would love to hear what you have to say about this pattern!
If you want to leave a question, please make sure you select the correct category in the form below, to speed up the answering process. Required fields are marked *.