
Popular categories
Looking for a yarn?


Comments / Questions (32)
![]() Christel Krieger wrote:
Christel Krieger wrote:
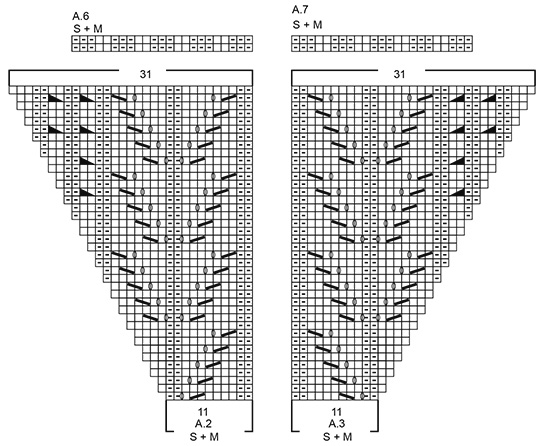
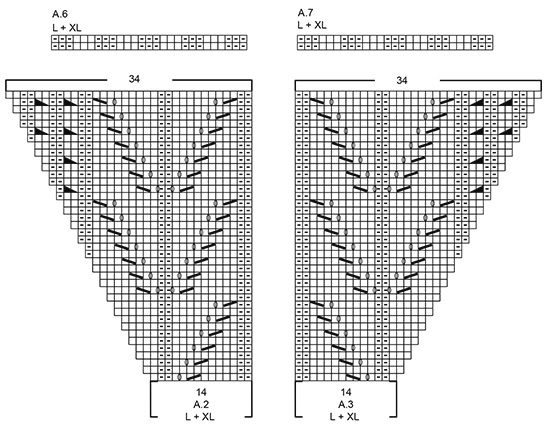
Frage zur Passe: Modell fl-011 (Elise Jacket) Die Zunahem von Raglan und Diagramm A2 und A3 sind 376 Maschen wie komme ich auf 436 Maschen zur Gr. XL
06.01.2020 - 06:53DROPS Design answered:
Liebe Frau Krieger, es wird 8 Maschen pro Zunahmenreihe zugenommen: 140 Maschen + (8 Maschen x 37) = 436 Maschen. Viel Spaß beim stricken!
06.01.2020 - 09:40
![]() Karin Hoes wrote:
Karin Hoes wrote:
Ik heb begrepen dat ik het patroon van A1 en A3 van L/XL van links naar rechts moet breien. Geldt dit ook voor A1, A5 en A4 met het kabelpatroon? Met een vriendelijke groet, Karin Hoes
24.08.2019 - 14:17DROPS Design answered:
Dag Karin,
De telpatronen brei je altijd van onder naar boven en van rechts naar links, gezien aan de goede kant. De eerste naald van het telpatroon is dus de onderste rij, deze brei je aan de goede kant en je leest van rechts naar links. Omdat je in dit patroon heen en weer breit, omdat het een vest is, brei je de tweede naald terug aan de verkeerde kant, dus lees je ook omgekeerd; van links naar rechts. Dit geldt voor alle telpatronen.
Bij de FAQS kun je ook meer informatie vinden over hoe je telpatronen moet lezen.
31.08.2019 - 14:26
![]() Lenie Van Der Putten wrote:
Lenie Van Der Putten wrote:
Heb het antwoord op mijn vraag al gevonden hoop dat ik nu zond van der Puttener problemen naar het einde kan breien. Met vriendelijke groet Lenie
04.03.2019 - 12:40
![]() Lenie Van Der Putten wrote:
Lenie Van Der Putten wrote:
Sorry dat ik u weer lastig val maar in het tel patroon A3 en A2 krijg je in de gelijke toeren een steek meer heb nu overal een steek markeerder tussen gedaan . Ben nu bij naald 6 waar ik dan 4 st. recht moet heb ik er maar 3 moet ik er dan een bijmaken want ik heb die toch niet door een omslag gekregen .Hoop dat het een beetje duidelijk is. Misschien te hoog gegrepen voor mij. Met vriendelijke groet Lenie van der Putten.
02.03.2019 - 17:43DROPS Design answered:
Dag Lenie,
IN een andere post zag ik dat je al antwoord had. Bedankt voor de terugkoppeling en succes met breien!
05.03.2019 - 19:52
![]() Lenie Van Der Putten wrote:
Lenie Van Der Putten wrote:
Ben het patroon nr 183-22 Fur Elise Jacket Heb nu het boordje van de hals klaar en moet nu met rondbreinaald 3 mm verder gaan . Ik heb nu 140 steken opstaan. Als ik dan volgens het patroon ga breien kom ik op 150 steken uit. Wat lees ik niet goed. Heb het wel 3 keer uitgeschreven kom er niet uit. hopelijk kunt u me helpen heb nog niet zo veel ervaring met rondbreinaalden Met vriendelijke groet Lenie van der Putten
17.02.2019 - 12:06DROPS Design answered:
Dag Lenie,
Ik heb alle steken die je moet breien opgeteld (uitgezonderd de omslagen) en kom op 140 steken. Kijk nog even goed na of je iets over het hoofd hebt gezien.
17.02.2019 - 19:16
![]() Desto wrote:
Desto wrote:
Bei der Passe ist eine Gesamtmaschenzahl nach allen Zunahmen für Größe S von 236 angegeben, müssten das nicht 336 Maschen sein?
05.12.2018 - 19:49DROPS Design answered:
Liebe Desto, es sieht so wie einem Schreibfehler aus, Sie sollen 336 M in der 1. Größe haben - danke für den Hinweis, Anleitung wird korrigiert. Viel Spaß beim stricken!
06.12.2018 - 09:51
![]() Anne-Marie S wrote:
Anne-Marie S wrote:
Hej varför ska man byta ner till rundsticka nr 2,5 (se Fram och bakstycke) känns fel att byta till tunnare sticka!
02.06.2018 - 05:50DROPS Design answered:
Hej Anne-Marie, jo det är resåren som sticka med st nr 2,5. Lycka till :)
04.06.2018 - 09:28
![]() Anne-Marie Silven wrote:
Anne-Marie Silven wrote:
Hej,varför ska man byta till rundsticka 2,5 mitt i arbetet ? Mvh Anne-Marie
26.05.2018 - 23:06
![]() Doris wrote:
Doris wrote:
Liebes Drops Team, mir gefällt das Muster der Jacke sehr gut. Ich möchte aber lieber einen Pullover stricken. Planen Sie, diese Anleitung noch für Pullover zu veröffentlichen?
21.05.2018 - 10:12DROPS Design answered:
Liebe Doris, hier finden Sie die Anleitung für dieses Modell als Pullover. Viel Spaß beim stricken!
22.05.2018 - 10:07
![]() Quentin Sandra wrote:
Quentin Sandra wrote:
Hallo Im Muster A2 scheint ein Fehler zu sein. In der 15. Reihe fehlt eine zugenommen Masche in der Zeichnung. In der 13. Reihe wird zwar ohne zunzunahm gestrickt aber dennoch fehlt die Masche vom raglan der ärmelseite oder sehe ich das falsch?
23.04.2018 - 07:12DROPS Design answered:
Liebe Frau Quentin, Bei jede 2. Reihe nimmt die Maschen in A.2 zu. Welche Größe stricken Sie?
23.04.2018 - 10:12
|
||||||||||||||||||||||
Für Elise Jacket#furelisejacket |
||||||||||||||||||||||
 |
 |
|||||||||||||||||||||
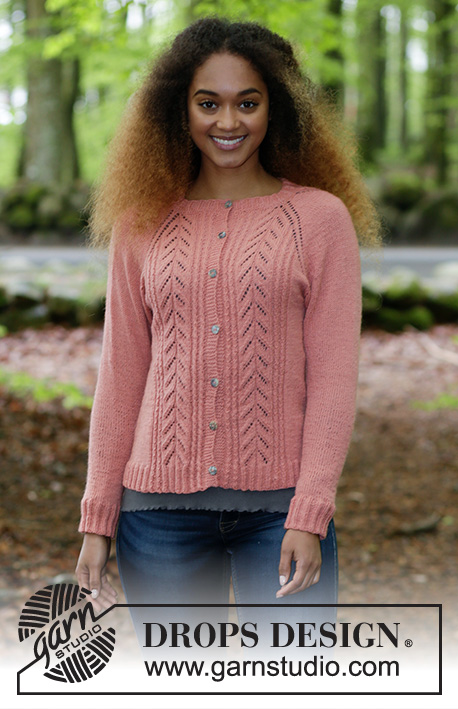
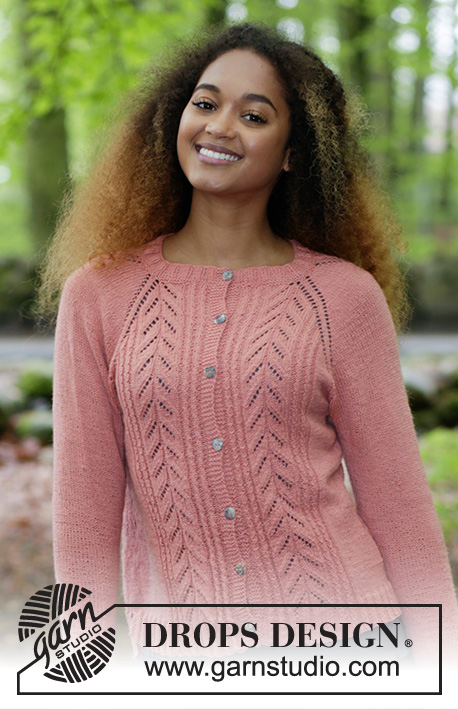
Knitted jacket with lace pattern, small cables and raglan, worked top down. Sizes S - XXXL. The piece is worked in DROPS Flora.
DROPS 183-22 |
||||||||||||||||||||||
|
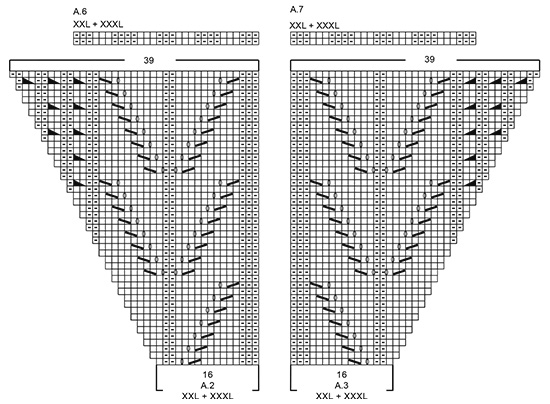
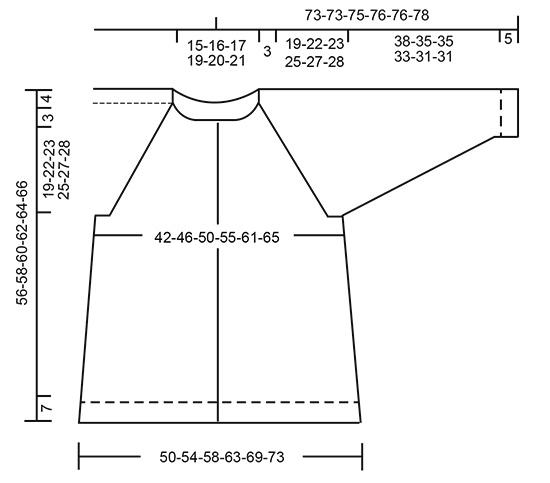
INFORMATION FOR THE PATTERN: RIDGE/GARTER STITCH (worked back and forth): 1 ridge = Knit 2 rows. DECREASE/INCREASE TIP (evenly spaced): To work out how to decrease/increase evenly, count the total number of stitches on needle (e.g. 132 stitches), minus the bands (e.g. 10 stitches) and divide by the number of decreases/increases to be made (e.g. 12) = 10.1. In this example, decrease by knitting together approx. every 9th and 10th stitch. Do not decrease over the bands. When increasing, make 1 yarn over after approx. every 10th stitch (on next row knit the yarn overs twisted to avoid holes). PATTERN: See diagrams A.1 to A.7. Choose diagram for your size! The diagrams show all rows in the pattern seen from the right side. RAGLAN: All increases are worked from the right side! Increase raglan in each transition between body and sleeves. Increase as follows: Work as far as 1 stitch before marker thread, 1 yarn over, 2 stitches stockinette stitch (marker thread sits in the middle of these 2 stitches), 1 yarn over. Repeat at each of the remaining transitions between body and sleeves (= 8 stitches increased on row). On the next row (from wrong side) purl yarn overs so that there are holes. Then work the new stitches on the front and back pieces into the pattern A.2/A.3. The new stitches on the sleeves are worked in stockinette stitch. INCREASE TIP (for sides of body): Start 5 stitches before marker thread, make 1 yarn over, knit 10 stitches (marker thread sits in the middle of these 10 stitches), make 1 yarn over (= 2 stitches increased). On the next row purl the yarn overs twisted to avoid holes. DECREASE TIP (for mid under sleeve): Start 3 stitches before marker thread, knit 2 together, knit 2 (marker thread sits in the middle of these 2 stitches), slip 1 stitch as if to knit, knit 1, pass the slipped stitch over the knitted stitch (= 2 stitches decreased). BUTTONHOLES: Work buttonholes on right band (when garment is worn): Work from the right side until there are 3 stitches left at end of row, make 1 yarn over, knit together the next 2 stitches and knit 1. On the next row, knit the yarn over to leave a hole. The first buttonhole is worked when the rib on the neck measures approx. 2 cm / ¾". Then work the remaining 6-6-7-7-8-8 buttonholes with approx. 8-8-7½-7½-7-7 cm / 3⅛"-3⅛"-2⅞"-2⅞"-2¾"-2¾" between each. ---------------------------------------------------------- JACKET: The piece is worked back and forth with circular needle. It is worked top down. The sleeves are worked in the round with double pointed needles. YOKE: Cast on 132-137-142-147-152-157 stitches (including 5 band stitches in each side towards mid front) with circular needle size 2.5 mm / US 1.5 and Flora. Purl 1 row from the wrong side. The next row is worked as follows from the right side: 5 band stitches in GARTER STITCH – see description above, * knit 2, purl 3 *, repeat from *-* until there are 7 stitches left on row, knit 2 and finish with 5 band stitches in garter stitch. Continue the rib in this way - remember BUTTONHOLE on right band – see description above. When the rib measures 3 cm / 1" knit 1 row from the right side where you decrease 12-13-12-11-10-9 stitches evenly on row – read DECREASE/INCREASE TIP = 120-124-130-136-142-148 stitches. Knit 1 row from wrong side. Work 1 row from right side where you increase as follows: 5 band stitches in garter stitch, knit 26-28-28-31-28-31 stitches, * knit 1, 1 yarn over *, work from *-* a total of 4-2-5-2-10-7 times, knit 50-54-54-60-56-62 stitches, * knit 1, 1 yarn over *, work from *-* a total of 4-2-5-2-10-7 times, knit 26-28-28-31-28-31 stitches, 5 band stitches in garter stitch = 128-128-140-140-162-162 stitches on row. Knit 1 row from wrong side where all yarn overs are knitted twisted to avoid holes. REMEMBER THE GAUGE! Change to circular needle size 3 mm / US 2.5 and work PATTERN – see description above, from the right side: 5 band stitches in garter stitch, A.1 (= 8-8-8-8-12-12 stitches), A.2 (= 11-11-14-14-16-16 stitches), 1 yarn over, 2 stitches stockinette stitch and insert a marker thread in the middle of these 2 stitches (= 1 stitch stockinette stitch on each side of the marker thread), 1 yarn over, 17 stitches stockinette stitch (= sleeve), 1 yarn over, 2 stitches stockinette stitch and insert a marker thread in the middle of these 2 stitches (= 1 stitch stockinette stitch on each side of the marker thread), 1 yarn over, A.3 (= 11-11-14-14-16-16 stitches), A.4 (= 16-16-16-16-22-22 stitches), A.2, 1 yarn over, 2 stitches stockinette stitch and insert a marker thread in the middle of these 2 stitches (= 1 stitch stockinette stitch on each side of the marker thread),1 yarn over, 17 stitches stockinette stitch (= sleeve), 1 yarn over, 2 stitches stockinette stitch and insert a marker thread in the middle of these 2 stitches (= 1 stitch stockinette stitch on each side of the marker thread), 1 yarn over, A.3, A.5 (= 8-8-8-8-12-12 stitches), 5 band stitches in garter stitch. Work 1 row back in the same way (= 2nd row in diagrams), the yarn overs in each transition between body and sleeves are purled to leave holes. The first increases to raglan are now finished (= 8 stitches increased). Continue the pattern in this way and increase to RAGLAN – see description above. Increase like this every 2nd row (= each row from the right side) a total of 26-30-31-37-38-42 times = 336-368-388-436-466-498 stitches. NOTE: When A.2/A.3 has been completed in height, work the new increased stitches in each raglan in stockinette stitch. The pattern in A.2/A.3 continues in height as before, i.e. the last 10-10-14-14-16-16 rows in diagram A.2/A.3 are repeated in height – NOTE!: The 2-2-2-2-3-3 cables in the diagrams are worked every 4th row to finished length. When all increases are finished, work 8-10-12-6-10-6 rows of pattern as before without increasing to raglan. The piece measures approx. 22-25-26-28-30-31 cm / 8¾"-9¾"-10¼"-11"-11¾"-12¼". The next row is worked as follows from the wrong side: Work the first 51-55-59-65-72-76 stitches (= right front piece), place the next 71-79-81-93-95-103 stitches on a thread (= sleeve), cast on 8-10-12-12-14-16 new stitches mid under sleeve, work the next 92-100-108-120-132-140 stitches (= back piece), place the next 71-79-81-93-95-103 stitches on a thread (= sleeve), cast on 8-10-12-12-14-16 new stitches mid under sleeve, work the remaining 51-55-59-65-72-76 stitches (= left front piece). Body and sleeves are finished separately. THE PIECE IS NOW MEASURED FROM HERE! BODY: = 210-230-250-274-304-324 stitches. Insert a marker thread after 55-60-65-71-79-84 stitches in each side (= 100-110-120-132-146-156 stitches on back piece). Continue back and forth with pattern, stockinette stitch and 5 band stitches in garter stitch in each side towards mid front. Work stockinette stitch over the new stitches cast on in each side. When piece measures 4 cm / 1½" increase 2 stitches in each side (= 4 stitches increased on row) – read INCREASE TIP. Increase in this way every 6th round 10 times = 250-270-290-314-344-364 stitches. When piece measures 23-22-23-23-23-24 cm / 9"-8¾"-9"-9"-9"-9½" change to circular needle size 2.5 mm / US 1.5. The next row from the right side is worked as follows: 5 band stitches in garter stitch, work pattern as before over the next 39-39-42-42-51-51 stitches AT THE SAME TIME as all purl 2 are increased to purl 3 (= 7-7-7-7-8-8 stitches increased), work the next 42-52-56-68-66-76 stitches AT THE SAME TIME as you increase 19-19-27-25-31-31 stitches evenly over these stitches, work pattern as before over the next 78-78-84-84-100-100 stitches AT THE SAME TIME as all purl 2 are increased to purl 3 (= 11-11-11-11-15-15 stitches increased), work the next 42-52-56-68-66-76 stitches AT THE SAME TIME as you increase 19-19-27-25-31-31 stitches evenly over these stitches, work pattern as before over the next 39-39-42-42-51-51 stitches AT THE SAME TIME as all purl 2 are increased to purl 3 (= 7-7-7-7-8-8 stitches increased), finish with 5 band stitches in garter stitch = 313-335-371-391-437-457 stitches. Now work rib as follows: 5 band stitches in garter stitch, work rib with (purl 3 /2 cable stitches) as before over the next 10-10-10-10-15-15 stitches, A.6 (= 23-23-27-27-29-29 stitches), work (2 cable stitches/purl 3) as before over the next 10-10-10-10-15-15 stitches, continue with (knit 2 /purl 3) over the next 67-77-87-97-97-107 stitches, work (purl 3 /2 cable stitches) as before over the next 10-10-10-10-15-15 stitches, A.7 (= 23-23-27-27-29-29 stitches), purl over purl and cable over cable over the next 19-19-19-19-27-27 stitches, A.6, work (2 cable stitches/purl 3) as before over the next 10-10-10-10-15-15 stitches, continue with (knit 2 /purl 3) over the next 67-77-87-97-97-107 stitches, work (purl 3 /2 cable stitches) as before over the next 10-10-10-10-15-15 stitches, A.7, work (2 cable stitches/ purl 3) as before over the next 10-10-10-10-15-15 stitches, finish with 5 band stitches in garter stitch. Continue in this way until the rib measures 7 cm / 2¾". Bind off with knit over knit and purl over purl. To avoid a tight bind-off edge you can bind off with a size larger needle. SLEEVE: Place the 71-79-81-93-95-103 stitches from the thread on double pointed needles size 3 mm / US 2.5 and, in addition, knit up 1 stitch in each of the 8-10-12-12-14-16 new stitches cast on under the sleeve = 79-89-93-105-109-119 stitches. Insert a marker thread in the middle of the new stitches cast on under the sleeve (= 4-5-6-6-7-8 new stitches on each side of the marker thread). The start of the round is mid under sleeve. Work stockinette stitch in the round. When the piece measures 4 cm / 1½" decrease 1 stitch on each side of the marker thread under the sleeve - read DECREASE TIP-2. Decrease in this way every 8th-5th-5th-3rd-3rd-3rd round a total of 13-18-19-24-25-28 times = 53-53-55-57-59-63 stitches. Continue with stockinette stitch until the sleeve measures 38-35-35-33-31-31 cm / 15"-13¾"-13¾"-13"-12¼"-12¼" (shorter measurements in larger sizes because of broader shoulders). Work 1 round where you increase 12-12-15-13-11-12 stitches evenly on round = 65-65-70-70-70-75 stitches. Work rib (knit 2 /purl 3). When the rib measures 5 cm / 2" bind off with knit over knit and purl over purl. To avoid a tight bind-off edge you can bind off with a size larger needle. The sleeve measures 43-40-40-38-36-36 cm / 17"-15¾"-15¾"-15"-14¼"-14¼". Work the other sleeve in the same way. ASSEMBLY: Sew buttons onto left band. |
||||||||||||||||||||||
Diagram explanations |
||||||||||||||||||||||
|
||||||||||||||||||||||
 |
||||||||||||||||||||||
 |
||||||||||||||||||||||
 |
||||||||||||||||||||||
 |
||||||||||||||||||||||
 |
||||||||||||||||||||||
Have you finished this pattern?Tag your pictures with #dropspattern #furelisejacket or submit them to the #dropsfan gallery. Do you need help with this pattern?You'll find 28 tutorial videos, a Comments/Questions area and more by visiting the pattern on garnstudio.com. © 1982-2026 DROPS Design A/S. We reserve all rights. This document, including all its sub-sections, has copyrights. Read more about what you can do with our patterns at the bottom of each pattern on our site. |
||||||||||||||||||||||


With over 40 years in knitting and crochet design, DROPS Design offers one of the most extensive collections of free patterns on the internet - translated to 17 languages. As of today we count 324 catalogs and 12290 patterns - 12280 of which are translated into English (US/in).
We work hard to bring you the best knitting and crochet have to offer, inspiration and advice as well as great quality yarns at incredible prices! Would you like to use our patterns for other than personal use? You can read what you are allowed to do in the Copyright text at the bottom of all our patterns. Happy crafting!
Post a comment to pattern DROPS 183-22
We would love to hear what you have to say about this pattern!
If you want to leave a question, please make sure you select the correct category in the form below, to speed up the answering process. Required fields are marked *.