
Popular categories
Looking for a yarn?


Comments / Questions (16)
![]() Ophélie wrote:
Ophélie wrote:
Bonjour, pour le tricotage des côtes, lorsqu'il est mentionné de répéter 6 fois en tout le rang 3, après il est indiqué "quand on a 78 mailles en attente sur les arrêts de mailles de chaque côté...". Dois-je comprendre qu'il faut en fait répéter 6 fois le rang 3 de chaque côté (soit 12 fois en tout) ? Sinon, je n'ai que 60 mailles en attente de chaque côté (42 + (3x6)). Merci !
22.12.2025 - 14:45DROPS Design answered:
Bonjour Ophélie, vous allez d'abord mettre en attente 42 m de chaque côté, puis vous tricotez 6 fois le 3ème rang de chaque côté, autrement dit, vous mettez en attente 6 x 6 mailles de chaque côté, vous aurez ainsi: 42 + 6 x 6 m = 78 mailles en attente de chaque côté. Bon tricot!
23.12.2025 - 17:34
![]() Silvia wrote:
Silvia wrote:
Quando dice diminuire ad ogni lato per lo scaldo, intende ad ogni ferro dritto o anche al rovescio. Io non lavoro con i ferri circolari. Grazie
20.11.2025 - 10:13DROPS Design answered:
Buonasera Silvia, questo modello è lavorato in piano: si diminuisce all'inizio di ogni ferro come indicato. Buon lavoro!
05.12.2025 - 23:49
![]() Romy wrote:
Romy wrote:
Ich Stricke gerade das Modell Nonchalant as-078 Mir ist aufgefallen,das zwei Angaben nicht übereinstimmen. Bei den Angaben vom Rückenteil steht ab 67cm für die Armausschnitte abnehmen aber auf der Skizze wären es 92cm?
25.06.2022 - 16:34DROPS Design answered:
Liebe Romy, die 92 cm in de Skizze sind für die gesamte Höhe, so haben Sie 67 cm vor dem Armausschnitt + 25 cm Armausschnitt = 92 cm. Viel Spaß beim stricken!
27.06.2022 - 08:19
![]() Sandy Beach wrote:
Sandy Beach wrote:
I have looked and looked at the pictures, and the instructions... What is the point of the four braids? I can see No aesthetic or practical value in them.
14.10.2021 - 01:01DROPS Design answered:
Hi Sandy, The braids can be left out if you wish. Happy knitting!
14.10.2021 - 06:59
![]() Conny wrote:
Conny wrote:
Hallo, ich habe eine Frage zum Strickmantel „Nonchalant“. Ich weiss nicht, wo ich die Zöpfe genau anbringen soll, der Anleitung kann ich leider nicht folgen und auf den Bildern ist es auch nicht richtig ersichtlich. Übrigens ein tolles Teil geworden, die Arbeit hat sich gelohnt.
08.04.2021 - 17:42DROPS Design answered:
Liebe Conny, die Zöpfe sollen ca 60-70 cm von der unteren Kante sein (ziehen Sie mal die Jacke an, um die genaue Läng anzupassen). Dann nähen Sie beim linken Vorderteil: 1 kurzen Zopf in den abgeketteten Maschen der linken Blende + 1 langen Zopf in die 1. Reihe der Blende (Außerseite); beim rechten Vorderteil: 1 kurzen Zopf bei der 1. Reihe der Blende (Innenseite) + 1 langen Zopf in den abgeketteten Maschen der rechten Blende. Hoffentlich kann dies helfen!
09.04.2021 - 07:28
![]() Anita wrote:
Anita wrote:
Ik heb het boord aan het vest gebreid tot aan 78 steken op hulpdraad(-naald) aan beide kanten. Nu moeten de steken van beide kanten van de hulpdraad weer op de (rondbrei)naald en moet begonnen worden met afkanten. Alleen mijn naald eindigde op het middenstuk. Hoe begin ik met het afkanten? Vanaf punt middenstuk de 78 steken doorbreien tot eind van de naald en dan in 1x alle steken afkanten? Dan heeft de ene kant 1x een rij (78 steken) teveel gebreid. Of zie ik iets over het hoofd?
18.01.2021 - 17:47DROPS Design answered:
Dag Anita,
Nee, ik zou niet door breien tot het eind, maar de draad afknippen en aan het begin beginnen met afkanten. Anders wordt het inderdaad ongelijk.
22.01.2021 - 16:15
![]() Deborah Dash wrote:
Deborah Dash wrote:
I can't figure out what size to make. I am a new knitter. Do you double the bust cm measurement to figure out the size? Then convert the total cm's to inches? I am used to seeing a front and back schematic which I can add together to get the total cm/inches around. I am usually a L--42 inches measured around with a tape measure. Thanks.
24.05.2020 - 21:21DROPS Design answered:
Dear Mrs Dash, measure a similar garment you have and like the shape and compare the measurements to those in the chart to find out the matching size - read more about chart here and convert into inches here. Happy knitting!
25.05.2020 - 10:17
![]() Annika wrote:
Annika wrote:
I følge svaret deres skal det altså (i strl. XL) felles en maske i hver side ved 10cm,, 36 cm., 62cm, og ved 88cm - altså da man feller av (diagrammet sier at den er 88cm lang i str. XL)? Og så stemmer jo selvfølgelig ikke oppgitt antall masker da man feller til ermehull og hals samtidig, så ved 88cm har man 82 masker minus hva enn man har felt til ermer og hals? Blir veldig forvirret av tellingen her.
26.04.2020 - 00:11DROPS Design answered:
Hej Annika, du feller ved 10cm, 36cm og sidst 62cm. Så feller du til ærmehull ved 64cm osv. Når du er færdig med alle fellinger skal du have 52 masker. God fornøjelse!
29.04.2020 - 10:28
![]() Muriel wrote:
Muriel wrote:
Bonjour, quelles sont les mesures exactes d'une taille XXXL ? Bien à vous et merci pour la réponse
18.02.2020 - 21:33DROPS Design answered:
Bonjour Muriel, vous trouverez toutes les mesures de l'ouvrage terminé pour chaque taille dans le schéma, dans l'ordre des tailles indiqué. Vous trouverez plus d'infos sur les tailles et les schémas ici. Bon tricot!
19.02.2020 - 09:09
![]() Annika wrote:
Annika wrote:
Bakstykke: Når jeg har felt to masker etter 10 cm, og så skal felle hver 26. cm - mener man da fra start, eller fra man feller ved 10cm? Så felle masker ved 26 eller 16 cm andre gang?
28.12.2019 - 19:41DROPS Design answered:
Hej Annika, Da feller du igen efter 26 cm. God fornøjelse!
31.01.2020 - 11:36
|
||||
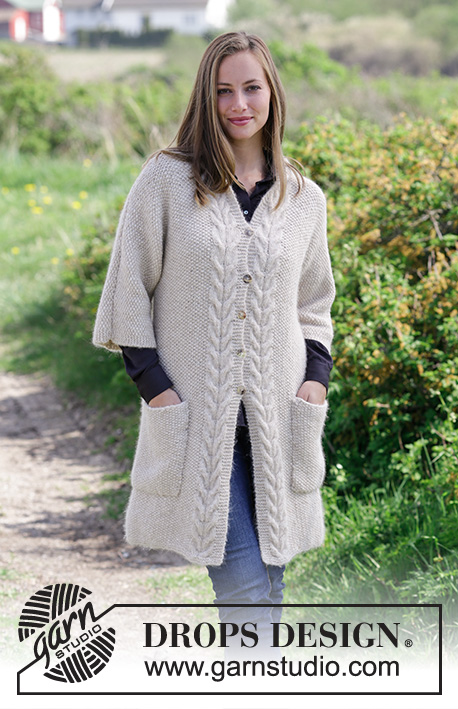
Nonchalant#nonchalantjacket |
||||
 |
 |
|||
Knitted jacket with rib and shawl collar. Size: S - XXXL Piece can be worked in 2 strands DROPS Brushed Alpaca Silk or 1 strand DROPS Melody.
DROPS 180-30 |
||||
|
INFORMATION FOR PATTERN: GARTER STITCH (back and forth): 1 ridge = knit 2 rows. DECREASE TIP (applies to front and back piece): All decreases are done from the right side. Decrease after 1 edge stitch as follows: Slip 1 stitch knitwise, knit 1, pass slipped stitch over. Decrease before 1 edge stitch as follows: Knit 2 together. INCREASE TIP (applies to sleeves): All increases are done from the right side. Increase 1 stitch inside 1 edge stitch in each side of piece by making 1 yarn over, on next row purl yarn over twisted to avoid holes. ---------------------------------------------------------- JACKET: Work front and back piece back and forth separately. Work sleeves back and forth on circular needle. BACK PIECE: Cast on 73-78-82-88-94-101 stitches (including 1 edge stitch in each side of piece) on circular needle size 8 mm / US 11 with 2 strands Brushed Alpaca Silk or 1 strand Melody. Work 1 ridge in GARTER STITCH - see explanation above. Then work in stockinette stitch with 1 edge stitch in garter stitch in each side of piece. REMEMBER THE GAUGE! When piece measures 10 cm / 4" in all sizes, decrease 1 stitch in each side - READ DECREASE TIP (= 2 stitches decreased). Decrease like this every 16-16-25-26-26-26 cm / 6¼"-6¼"-9¾"-10¼"-10¼"-10¼" 4-4-3-3-3-3 times in total = 65-70-76-82-88-95 stitches. When piece measures 60-62-63-64-66-67 cm / 23½"-24½"-24¾"-25¼"-26"-26½", bind off 4 stitches in each side for armholes at beginning of the next 2 rows. Then bind off for armholes in each side at beginning of every row as follows: bind off 3 stitches 0-1-1-2-2-2 times, 2 stitches 2-1-2-1-3-4 times and 1 stitch 1-2-2-3-1-2 times = 47-48-50-52-54-55 stitches. When piece measures 20-20-21-22-22-23 cm / 8"-8"-8¼"-8¾"-8¾"-9" from where the first 4 stitches were bind off for armhole (piece measures 80-82-84-86-88-90 cm / 31½"-32¼"-33"-33⅞"-34⅝"-35½" in total) bind off the middle 17-18-20-20-20-21 stitches for neck and finish each shoulder separately = 15-15-15-16-17-17 stitches remain on each shoulder. On next row from the neck, bind off 1 stitch = 14-14-14-15-16-16 stitches. Bind off when piece measures 82-84-86-88-90-92 cm / 32¼"-33"-33⅞"-34⅝"-35½"-36¼" in total. Work the other shoulder the same way. RIGHT FRONT PIECE: Cast on 27-29-30-33-36-39 stitches (including 1 edge stitch in each side) on circular needle size 8 mm / US 11 with 2 strands Brushed Alpaca Silk or 1 strand Melody. Work 1 ridge. Continue with stockinette stitch with 1 edge stitch in garter stitch at the end of row from right side. When piece measures 10 cm / 4", decrease 1 stitch at the end of next row from right side. Decrease like this every 16-16-25-26-26-26 cm / 6¼"-6¼"-9¾"-10¼"-10¼"-10¼" 4-4-3-3-3-3 times in total = 23-25-27-30-33-36 stitches. When piece measures 60-62-63-64-66-67 cm / 23½"-24½"-24¾"-25¼"-26"-26½", bind off for armholes at the beginning of every row from wrong side as on back piece = 14-14-14-15-16-16 stitches. Bind off when piece measures 22-22-23-24-24-25 cm / 8¾"-8¾"-9"-9½"-9½"-9¾" from where the first 4 stitches were bind off for armhole (piece measures 82-84-86-88-90-92 cm / 32¼"-33"-33⅞"-34⅝"-35½"-36¼" in total). LEFT FRONT PIECE: Cast on as right front piece and work in stockinette stitch with 1 edge stitch in garter stitch at the beginning of row from right side. Decrease in the side at beginning of row from right side. Bind off for armhole at the beginning of row from right side. SLEEVE: Cast on 44-44-44-51-51-51 stitches (including 1 edge stitch in each side of piece) on circular needle size 8 mm / US 11 with 2 strands Brushed Alpaca Silk or 1 strand Melody. Work rib (= knit 3/purl 4) with 1 edge stitch in garter stitch in each side of piece. When piece measures 4 cm / 1½", decrease every 4 purl stitches to 3 purl stitches = 38-38-38-44-44-44 stitches. Continue rib (= knit 3/purl 3) until piece measures 14 cm / 5½". Insert 1 marker in the piece (= folding edge). NOW MEASURE PIECE FROM HERE! Work 1 ridge. Then work in stockinette stitch and 1 edge stitch in garter stitch in each side of piece. When piece measures 1 cm / ⅜", increase 1 stitch in each side of piece - read INCREASE TIP (= 2 stitches increased). Increase like this every 6½-6½-5½-6-5½-4½ cm / 2½"-2½"-2¼"-2⅜"-2¼"-1¾" 7-7-8-7-7-8 times in total = 52-52-54-58-58-60 stitches. When piece measures 42-41-41-39-37-36 cm / 16½"-16"-16"-15¼"-14½"-14¼" from marker (piece measures 56-55-55-53-51-50 cm / 22"-21½"-21½"-21"-20"-19¾" in total) bind off 3 stitches in each side for sleeve caps. Then bind off stitches in each side every other row as follows: 2 stitches 1-2-2-2-3-3 times and 1 stitch 2-2-2-2-3-4 times. Then bind off 2 stitches in each side until piece measures 49 cm / 19¼" from marker (piece measures 63 cm / 24 3/4 in total). Now bind off 3 stitches 1 time in each side. Bind off. Sleeve measures 64 cm / 25¼" in total (including 14 cm / 5½" folding edge). ASSEMBLY: Sew the shoulder seams. RIB: Rib around jacket: Pick up 219-225-231-237-243-249 stitches from right side on circular needle size 8 mm / US 11 with 2 strands Brushed Alpaca Silk or 1 strand Melody up along right front piece, back of neck and down along left front piece inside 1 stitch. Knit 1 row from wrong side. Then work next row as follows: 3 stitches in garter stitch, * knit 3, purl 3 *, repeat from *-* and finish with knit 3 and 3 stitches in garter stitch. Work until rib measures 15 cm / 6" - adjust so that last row is worked from wrong side. On next row from right side, increase all 3 purl stitches to 4 purl stitches = 254-261-268-275-282-289 stitches. ROW 1 (= wrong side): Work the first 42-42-42-48-48-48 stitches, then slip them on 1 stitch holder, work the rest of row as before. ROW 2 (= right side): Work as 1st row. ROW 3: Work the first 6 stitches, then slip them on the stitch holder, work the rest of row as before. Repeat 3rd row (i.e. work 6 stitches less on every row) 6-6-6-8-8-8 times in total. After 78-78-78-96-96-96 stitches in each side have been slipped on stitch holders, slip all stitches back on needle again. Bind off stitches with knit over knit and purl over purl. Neck measures approx. 25-25-25-28-28-28 cm / 9¾"-9¾"-9¾"-11"-11"-11" in the back of neck. ASSEMBLY: Sew in sleeves. Sew underarm and side seams in one inside 1 edge stitch. BRAID: Short braid: Cut 12 strands Brushed Alpaca Silk or 6 strands Melody of approx. 80 cm / 31½" and make a braid. Long braid: Cut 12 strands Brushed Alpaca Silk or 6 strands Melody of approx. 100 cm / 39½" and make a braid. Make 2 short braids and 2 long braids. Fasten braids on jacket approx. 60-70 cm / 23½"-27"" from cast-on edge as follows: Fasten 1 short braid on left front piece and 1 long braid on right front piece in bind-off edge on rib. Fasten 1 short braid on wrong side of jacket on right front piece where stitches were picked up for rib. Fasten 1 long braid on right side of jacket on left front piece where stitches were picked up for rib. |
||||
Diagram explanations |
||||
|
||||
 |
||||
Have you finished this pattern?Tag your pictures with #dropspattern #nonchalantjacket or submit them to the #dropsfan gallery. Do you need help with this pattern?You'll find 23 tutorial videos, a Comments/Questions area and more by visiting the pattern on garnstudio.com. © 1982-2026 DROPS Design A/S. We reserve all rights. This document, including all its sub-sections, has copyrights. Read more about what you can do with our patterns at the bottom of each pattern on our site. |
||||


With over 40 years in knitting and crochet design, DROPS Design offers one of the most extensive collections of free patterns on the internet - translated to 17 languages. As of today we count 324 catalogs and 12290 patterns - 12280 of which are translated into English (US/in).
We work hard to bring you the best knitting and crochet have to offer, inspiration and advice as well as great quality yarns at incredible prices! Would you like to use our patterns for other than personal use? You can read what you are allowed to do in the Copyright text at the bottom of all our patterns. Happy crafting!
Post a comment to pattern DROPS 180-30
We would love to hear what you have to say about this pattern!
If you want to leave a question, please make sure you select the correct category in the form below, to speed up the answering process. Required fields are marked *.