
Popular categories
Looking for a yarn?


Comments / Questions (156)
![]() Cathy Sullivan wrote:
Cathy Sullivan wrote:
This pattern is impossible to make. You refer to A4 and that isn't even listed. The rows need to numbered. Then it says work over the first 9 (for size small) repetitions = half back piece. What repetitions? I have been crocheting for 55 years and I have never had a worse experience. Please make all corrections or have someone contact me.
20.06.2017 - 21:50DROPS Design answered:
Dear Mrs Sullivan, diagrams are read from the bottom corner on the right side towards the left, 1st row = at the very bottom. 1 repetition in A.3b = the diagram A.3b 1 time in width - 9 repetitions in A.3b = work A.3b a total of 9 times in width. Should you need any further individual assistance, you are welcome to ask your question here or to contact the store where you bought your yarn, even per mail or telephone. Happy crocheting!
21.06.2017 - 17:15
![]() Ida wrote:
Ida wrote:
Hej! Efter diagram A2 ska A3 virkas men sista varvet på A2 stämmer inte med första i A3. Hur är det man ska göra egentligen? När kommer någon rättelse?
18.06.2017 - 13:37DROPS Design answered:
Hej! Du ska börja med varv 2 i diagrammet.
27.06.2017 - 17:01Hande wrote:
Hi, Thanks for your quick answer. According to your answer I see that 2nd round consists of 3 rounds in fact, right? Thanks again
16.06.2017 - 15:08DROPS Design answered:
Dear Hande, each round is only 1 round, but each round starts working round in part a of the diagram 1 time in width, and then repeating the same round in part b of the diagram to the end of round. On next round, work next round in part a of the diagram 1 time in width, and repeat next round in part b of the diagram to the end of round. (= you work on the same round: round 1 in part a of diagram then repeat round 1 in part b of diagram to the end of round, on next round, repeat the same with round 2 of each diagram, and so on.). Happy crocheting!
16.06.2017 - 16:38Hande wrote:
Hi, In the 2nd round it reads "Work A.1a (shows how round begins and ends), work A.1b the entire round". However, when I look at A.1b, there are 3 rounds (1st round: 1 double crochet in each stitch. 2nd round: 1 double crochet in stitch and 1 chain. 3rd round: 1 double crochet in stitch and 1 double crochet around chain space.). So, which round of these will I work for 2nd round? I'm so confused. Could you please help me? Thanks in advance
15.06.2017 - 17:11DROPS Design answered:
Dear Mrs Hande, start to read diagrams from the bottom corner on the right side and read from the right towards the left every round, ie start round with A.1a then repeat A.1b (round 1) all the round. On next round, work A.1a (2nd round) and repeat A.1b (2nd round), and so on. Happy crocheting!
15.06.2017 - 18:10
![]() Adrian wrote:
Adrian wrote:
Is there possible you can do a video of each diagram section. I am having trouble reading the diagrams. For each row do you start the diagrams from left to right or right to left. THank you
14.06.2017 - 22:20DROPS Design answered:
Dear Adrian, this pattern is worked in the round, start reading diagrams from the bottom corner on the right side towards the left on every round. Start each round with diagram part a and repeat diagram part b around. Each symbol represent 1 st/group of st, see diagram text. Happy crocheting!
15.06.2017 - 08:23
![]() Dawn wrote:
Dawn wrote:
Okay I am completely lost with this patterns is there any way that there is a written line for line Pattern that I could use? That diagram setup is completely confusing
28.05.2017 - 02:27DROPS Design answered:
Dear Dawn, there is only diagrams to this pattern. You are welcome to request any further personnal assistance from the store where you bought your yarn, even per mail or telephone. Happy knitting!
29.05.2017 - 09:38
![]() Conxita wrote:
Conxita wrote:
Es posible que necesite un ganchillo de 2mm. para obtener la muestra? Con el ganchillo de 3,5mm sale una muestra mucho más grande....
23.05.2017 - 22:11DROPS Design answered:
Hola Conxita. Es posible que trabajes muy flojo con el ganchillo y necesites un número de ganchillo que el que menciona el patrón, pero el número dos me parece demasiado pequeño. Es importante tambien que mantengas la tensión del tejido constante a lo largo de toda la labor.
28.05.2017 - 17:03KATERINA wrote:
I have ended the last row of A.2b but I have problem how to continue the pattern. A.3b 1st row is not the same to the last row of A.2b
21.05.2017 - 15:50DROPS Design answered:
Dear Katerina. you are right, the diagram is wrong. We will send your question to the Design Department so that they check it.
21.05.2017 - 17:14
![]() Nuria wrote:
Nuria wrote:
Hola! Si en la vuelta A1b se finaliza con puntos altos, ¿por qué en A2b se comienza con puntos altos y altos sobre cadeneta alternos? No comprendo a qué cadeneta se refiere. Gracias de antemano, un saludo.
11.05.2017 - 22:48DROPS Design answered:
Hola Nuria. El diagrama A.2B lo comenzamos a trabajar desde la 2ª fila del diagrama, es decir, 1 punto bajo, 4 puntos de cadeneta sobre los puntos altos de la fila anterior.
14.05.2017 - 12:12
![]() Jenny Hjelm wrote:
Jenny Hjelm wrote:
Hej jag undrar; på stl xl efter varv 2 är det 176 st + lm. Ska räkna jag räkna att det är 176+ 176 då och sen öka 128 st? Eller hoppar jag över lm och ökar 128 st i 128 lm? Får det inte att stämma annars med 304 st. Tacksam för svar. /Jenny
06.05.2017 - 15:32DROPS Design answered:
Hej Jenny, efter varv 2 har du 88 st och 88 lm. På varv 3 virkar du 1 st i varje st och 1 st om varje lm samtidigt som du ökar 128 st jämt fördelt = 304 stolpar. Lycka till!
11.05.2017 - 12:19
|
||||||||||||||||||||||||||||||||||||||||
Lizzy#lizzytunic |
||||||||||||||||||||||||||||||||||||||||
 |
 |
|||||||||||||||||||||||||||||||||||||||
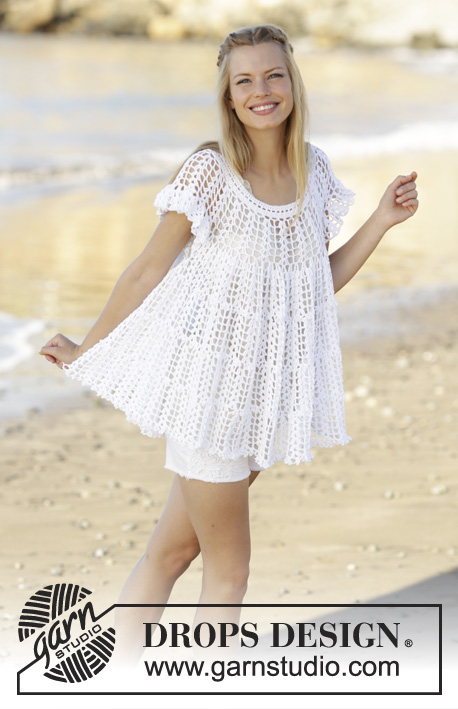
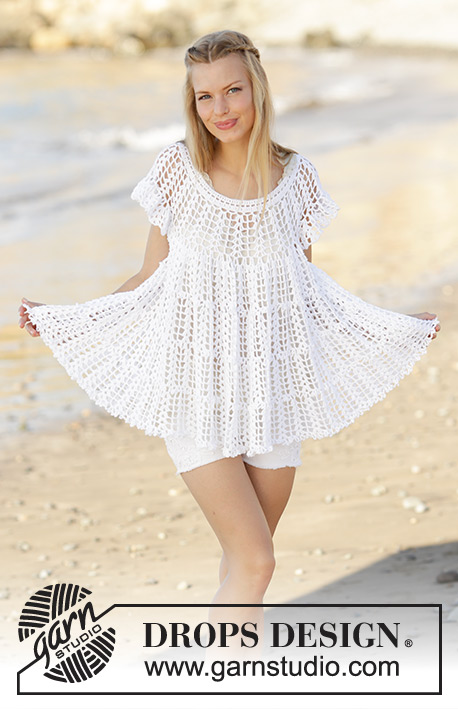
Tunic with fan pattern, flounce and A-shape, crochet top down in DROPS Safran. Size S-XXXL.
DROPS 176-2 |
||||||||||||||||||||||||||||||||||||||||
|
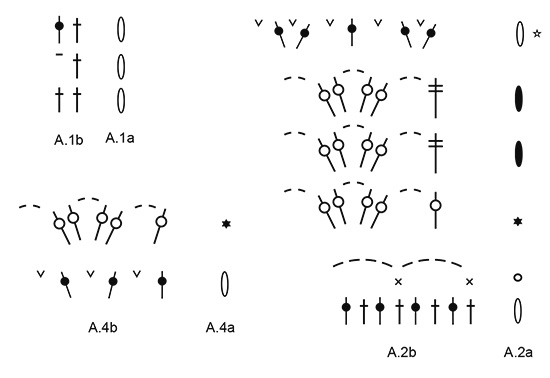
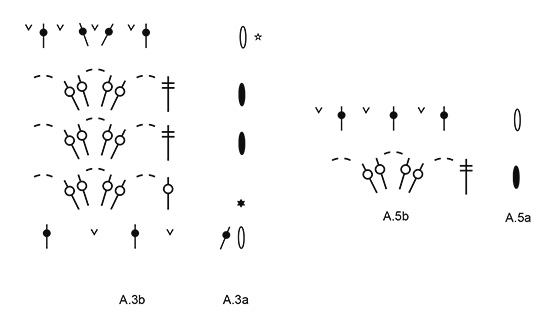
CROCHET INFO: At beginning of every round with double crochet replace first double crochet with 3 chain stitches. Finish round with 1 slip stitch in 3rd chain stitch at beginning of round. PATTERN: See diagrams A.1 to A.5. (Diagrams A.1a, A.2a, A.3a, A.4a and A.5a show how round begins and ends). INCREASE TIP 1 (evenly spaced): To calculate how to increase evenly, use the total number of stitches on round (e.g. 180 stitches) and divide stitches by number of increases to be done (e.g. 74) = 2.4. I.e. in this example increase alternately in approx. every 2nd and 3rd stitch. INCREASE TIP 2: Increase 1 double crochet by working 2 double crochet in same stitch. INCREASE TIP 3: Increase an extra chain space by working (1 double crochet and 5 chain stitches) around a chain space. ---------------------------------------------------------- TUNIC: Worked in the round, top down. Round begins mid back. NOTE! Choose your normal size. The chest measurement is wide, but the garment drapes nicely. Begin on hook size 3.5 mm/E/4 and Safran, work 180-192-202-211-221-233 chain stitches and form a ring with 1 slip stitch in 1st chain stitch. Work 3 chain stitches (= 1 double crochet) - READ CROCHET INFO, * skip 1 chain stitch, work 1 double crochet in each of the next 5 chain stitches *, repeat from *-* 28-30-32-33-35-37 more times, skip 1 chain stitch, work 1 double crochet in each of the remaining 4-4-2-5-3-3 chain stitches = 150-160-168-176-184-194 double crochet. Work from 2nd round in diagrams as follows: Work A.1a (shows how round begins and ends), work A.1b the entire round. On 3rd round work 1 double crochet in every double crochet and 1 double crochet around every chain stitch and increase in addition 74-96-104-128-136-142 double crochet evenly – READ INCREASE TIP 1 (evenly spaced) and INCREASE TIP 2 = 224-256-272-304-320-336 double crochet. Work from 2nd round in diagrams as follows: Work A.2a (shows how round begins and ends), work A.2b (= 28-32-34-38-40-42 repetitions). When 5th round has been worked vertically, repeat this round 3-3-4-5-6-6 more times (= 6-6-7-8-9-9 rounds in total with fans). Then work 6th round and increase 4-0-6-2-8-14 chain spaces evenly - READ INCREASE TIP 3 = 144-160-176-192-208-224 chain spaces. REMEMBER THE CROCHET GAUGE! Piece measures approx. 14-14-15-16-17-17 cm / 5½"-5½"-6"-6¼"-6¾"-6¾" from first chain stitch row worked. Work from 2nd round in diagrams as follows: Work A.3a (shows how round begins and ends), work A.3b (= 72-80-88-96-104-112 repetitions). When 4th round has been worked vertically, the yoke is done. Piece measures approx. 18-18-19-20-21-21 cm / 7"-7"-7½"-8"-8¼"-8¼" from neck edge and down (and approx. 28-29-30-32-33-34 cm / 11"-11½"-11¾"-12½"-13"-13½" from shoulder). Insert a marker thread in piece, NOW MEASURE PIECE FROM HERE. Work 4th round in A.3b one more time as follows: Work over the first 9-10-11-12-13-14 repetitions (= half back piece), skip 18-20-22-24-26-28 repetitions (= sleeve), work over the next 18-20-22-24-26-28 repetitions (= front piece), skip 18-20-22-24-26-28 repetitions (= sleeve), work over the remaining 9-10-11-12-13-14 repetitions (= half back piece) = 36-40-44-48-52-56 repetitions for body. Repeat 4th round in A.3a and A.3b 2 more times (= 6 round in total with fans). Then work 5th round and increase 0-2-4-0-2-4 chain spaces evenly = 144-162-180-192-210-228 chain spaces. Piece measures approx. 8 cm / 3⅛". Work from 2nd round in diagrams as follows: Work A.4a (shows how round begins and ends), work A.4b (= 48-54-60-64-70-76 repetitions). On next round continue from 3rd round in A.3a and A.3b. When 4th round has been worked vertically, repeat this round 3 more times (= 6 rounds in total with fans). Then work as explained below and increase in addition 3-0-6-1-1-4 chain spaces evenly: * Work last round in A.3b 1 time in width, work last round in A.5b 1 time in width *, repeat from *-* = 171-189-216-225-246-270 chain spaces. Piece measures approx. 18 cm / 7". Work from 2nd round in diagrams as follows: Work A.4a (shows how round begins and ends), work A.4b (= 57-63-72-75-82-90 repetitions). On next round continue from 3rd round in A.3a and A.3b. When 4th round has been worked vertically, repeat this round 3 more times (= 6 rounds in total with fans). Work next round in the different sizes as follows: Size S, M, L and XL: Work as explained below and increase in addition 20-12-0-2 chain spaces evenly: Work A.3a, * work last round in A.3b 1 time in width, work last round in A.5b 2 times in width *, repeat from *-* the entire round = 210-222-240-252 chain spaces. Size XXL and XXXL: Work A.5a, then work last round in A.5b the entire round and increase in addition 18-6 chain spaces evenly = 264-276 chain spaces. Piece measures approx. 28 cm / 11". Then work in all sizes from last round in diagrams as follows: Work A.4a (shows how round begins and ends), work A.4b (= 70-74-80-84-88-92 repetitions). On next round continue from 3rd round in A.3a and A.3b. When 4th round has been worked vertically, repeat this round vertically until piece measures approx. 33-34-35-35-36-37 cm / 13"-13½"-13¾"-13¾"-14¼"-14½". Work the last round in diagram. Tunic measures approx. 63-65-67-69-71-73 cm / 24¾"-25½"-26⅜"-27⅛"-28"-28¾" from shoulder. Fasten off. |
||||||||||||||||||||||||||||||||||||||||
Diagram explanations |
||||||||||||||||||||||||||||||||||||||||
|
||||||||||||||||||||||||||||||||||||||||
 |
||||||||||||||||||||||||||||||||||||||||
 |
||||||||||||||||||||||||||||||||||||||||
 |
||||||||||||||||||||||||||||||||||||||||
Have you finished this pattern?Tag your pictures with #dropspattern #lizzytunic or submit them to the #dropsfan gallery. Do you need help with this pattern?You'll find 9 tutorial videos, a Comments/Questions area and more by visiting the pattern on garnstudio.com. © 1982-2026 DROPS Design A/S. We reserve all rights. This document, including all its sub-sections, has copyrights. Read more about what you can do with our patterns at the bottom of each pattern on our site. |
||||||||||||||||||||||||||||||||||||||||


With over 40 years in knitting and crochet design, DROPS Design offers one of the most extensive collections of free patterns on the internet - translated to 17 languages. As of today we count 324 catalogs and 12291 patterns - 12281 of which are translated into English (US/in).
We work hard to bring you the best knitting and crochet have to offer, inspiration and advice as well as great quality yarns at incredible prices! Would you like to use our patterns for other than personal use? You can read what you are allowed to do in the Copyright text at the bottom of all our patterns. Happy crafting!
Post a comment to pattern DROPS 176-2
We would love to hear what you have to say about this pattern!
If you want to leave a question, please make sure you select the correct category in the form below, to speed up the answering process. Required fields are marked *.