
Popular categories
Looking for a yarn?


Comments / Questions (86)
![]() Cristina wrote:
Cristina wrote:
Cosa significa "allo stesso tempo aggiustare il n° di m a 78-84-90-98-105" se parto da "Avviare 84-88-92-96 m "? Grazie
30.04.2020 - 16:05DROPS Design answered:
Buongiorno Cristina. P.es nella taglia più piccola, avvia 84 maglie e al ferro indicato, diminuisce 6 maglie a intervalli regolari, così da avere sui ferri 78 maglie. In modo analogo per le altre taglie. Nelle due taglie più grandi aumenta le maglie necessarie. Abbiamo aggiunto il numero di maglie da avviare per la taglia più grande. Buon lavoro!
30.04.2020 - 16:42
![]() Anita Johansson wrote:
Anita Johansson wrote:
Hej Var i sidan ska den första markeringen vara när man börjar sticka slätstickning? Varvet börjar ju annars mitt bak.
29.04.2020 - 12:53DROPS Design answered:
Hej Anita, förhöjningen stickar du fram och tillbaka förbi den markören du satte i mitt bak. När du kommer till FRAM OCH BAKST sätter du 6 markörer og nu börjar varvet i sidan enligt mönstret. Lycka till :)
29.04.2020 - 14:16
![]() Jodie wrote:
Jodie wrote:
Hi, I am starting body for the dress and I have 136 st (3-4) now I have to place stitch markers but I’m confused. When I divided my last row for the sleeves, don’t and back i ended in the middle of st he back, the next row said to add 1st st marker at beg or round (=side) how can I do that if I’m not at the side? Do I knit to before I cast on 6sts? Please help I’m so lost. 🤦🏻♀️
08.04.2020 - 12:34
![]() Ulrike wrote:
Ulrike wrote:
Am Beginn des Rumpfes soll der erste Markierer an die Seite gelegt werden? Aber wohin genau? Mittig zwischen den 6 angeschlagenen Maschen unterhalb der Ärmel?
28.01.2020 - 08:34DROPS Design answered:
Liebe Ulrike, die erste Markierer muss an der Seite sein = zwischen den neuen 6 angeschlagenen Maschen unter der Ärmel. Viel Spaß beim stricken!
28.01.2020 - 11:05
![]() Jodi wrote:
Jodi wrote:
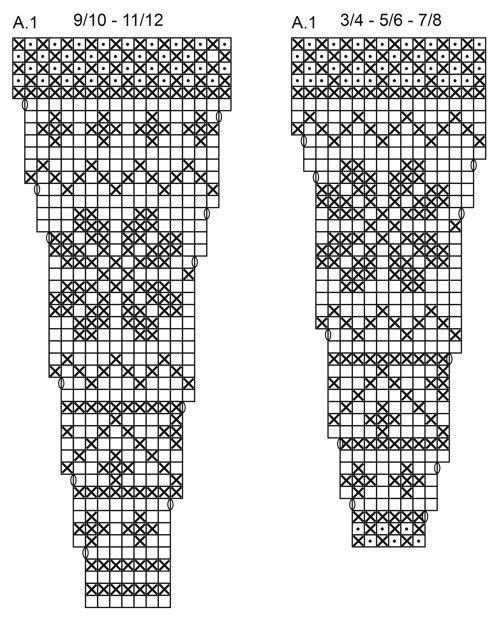
Where will I find the revised A.1 chart for size 3/4? Many Thanks!
14.01.2020 - 21:19DROPS Design answered:
Dear Jodi, if you printed the pattern after the correction, you get the correct diagram, if you printed the pattern before the correction, please print the new diagram. Happy knitting!
15.01.2020 - 09:21
![]() Pia wrote:
Pia wrote:
Hvorfor skal der strikkes forhøjelse på ryggen? Kan det evt. udenlades?
13.01.2020 - 20:43DROPS Design answered:
Hej Pia, mange foretrækker at ryggen er lidt højere end forstykket for at få bedre pasform, men forhøjningen i ryggen kan undlades :)
15.01.2020 - 15:04
![]() Helle wrote:
Helle wrote:
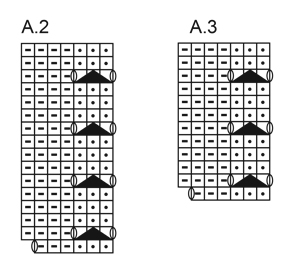
Skal omslagene i A.2 og A. 3 strikkes drejet på den følgende omgang?
11.12.2019 - 22:31DROPS Design answered:
Hei Helle. Nei,kastene skal strikkes slik at det blir hull på neste omgang. Lykke til!
12.12.2019 - 08:13
![]() Agnes Holst Kazuhara wrote:
Agnes Holst Kazuhara wrote:
Mønster Diagram A1, skal det skrikkes i glatstrik eller retstrik = 1 omg vrang, 2 omg ret? Ryg- og forstykke: Strik 4 omg retstrik, hvordan skal det forstås, skal *1 omg vrang, 2 omg ret* gentages 4 omgange dvs. i alt 12 omgange? Ærme: Strik 4 omg retstrik, igen hvordan skal det forstås, skal *1 omg vrang, 2 omg ret* gentages 4 omgange dvs. i alt 12 omgange?
28.11.2019 - 21:19DROPS Design answered:
Hei Agnes! Se gjerne vårt svar til kommentaren din under, vi håper det hjelper. Lykke til!
29.11.2019 - 11:29
![]() Agnes Holst Kazuhara wrote:
Agnes Holst Kazuhara wrote:
Mønster: Skal diag A1 strikkes i glatstrik eller retstrik (1. omg vrang, 2 omg ret osv)? Ryg- og forstykke : Strik 4 omg retstrik - hvordan skal dette forstås - skal "1. omg vrang, 2 omg ret" gentages 4 gange? Ærme: Strik 4 omg retstrik, igen - hvordan skal dette forstås - skal "1. omg vrang, 2 omg ret" gentages 4 gange?
28.11.2019 - 21:15DROPS Design answered:
Hei Agnes! Kjolen strikkes rundt på rundpinne, derfor strikkes den bare i glattstrikk frem til kjolekanten når A.2 skal strikkes. Etter A.2 er strikket skal det strikkes 2 riller, 1 rille = første omgang rett, andre omgang vrang. For å få 2 riller må det da strikkes 4 omganger. Lykke til!
29.11.2019 - 10:57
![]() Stacey Hancharyk wrote:
Stacey Hancharyk wrote:
Hi there, The pattern for the yoke says that the increases for the smallest size after A1 is 208 STS. I do not have that many stitches. Can you please tell me what the total number of stitches should be after every inc row in the yoke please. Thank you Stacey
03.11.2019 - 09:45DROPS Design answered:
Dear Mrs Hancharyk , in the smallest size you start working A.1 over 6 sts, and then increase a sshown in diagram; when A.1 is done in height you should have 16 sts in each A.1; 16 sts x 13 repeats in width = 208 sts. Happy knitting!
04.11.2019 - 16:47
|
|||||||||||||||||||
Forest Dance#forestdancedress |
|||||||||||||||||||
 |
 |
||||||||||||||||||
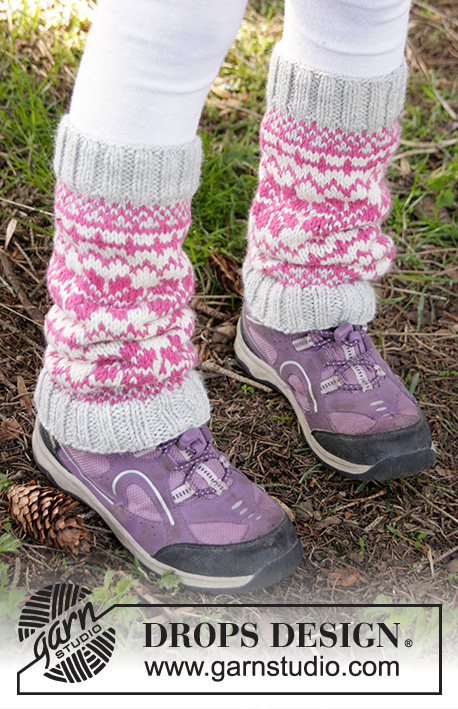
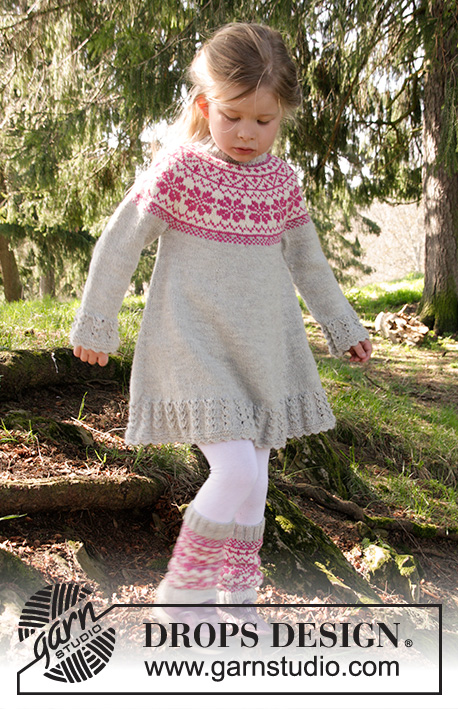
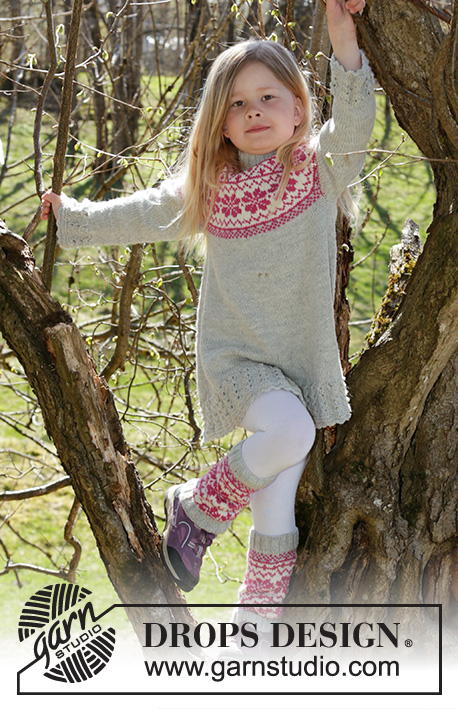
Knitted dress with Nordic pattern in DROPS Karisma. Size children 3 - 12 years.
DROPS Children 27-9 |
|||||||||||||||||||
|
INCREASE TIP: Inc with YO, on next round K YO twisted to avoid holes. PATTERN: See diagrams A.1 to A.3. See diagram for size! KNITTING TIP: To avoid the knitting gauge to tighten when working pattern, it is important not to tighten the strands on back side of piece. Switch to a higher needle no when working pattern if the pattern is somewhat tight. RIDGE: (worked in the round): 1 ridge = 2 rounds. K 1 round and P 1 round. ---------------------------------------------------------- DRESS: Worked in the round, top down. YOKE: Cast on 84-88-92-96-100 sts on a small circular needle size 3.5 mm / US 4 with light pearl gray. Insert 1 marker at beg of round (= mid back). Work rib = K 2/P 2 for 3-3-4-4-5 cm / 1"-1"-1½"-1½"-2" (= neck edge). Switch to a short circular needle size 4 mm / US 6. K 1 round while at the same time adjusting no of sts to 78-84-90-98-105. Then work an elevation at the back in stockinette st as follows: K 8 sts past marker, turn, tighten yarn and P 16 sts on return, turn, tighten yarn and K 24 sts, turn, continue by working 8 sts more on every turn until a total of 48-48-64-64-80 sts have been worked, turn and K 1 round until marker mid back again. Then work A.1 (= 13-14-15-14-15 repetitions in width) - see diagram for size. READ KNITTING TIP! REMEMBER THE KNITTING GAUGE Switch to a longer circular needle when there are enough sts. When A.1 has been worked, there are 208-224-240-252-270 sts on needle. Work 0-0-1-0-1 cm / 0"-0"-½"-0"-½" with light pearl gray. Piece now measures approx. 15-15-16-17-18 cm / 6"-6"-6¼"-6¾-7" mid front (measured without rib in the neck). Work with light pearl gray and in stockinette st until finished measurements. First work 1 round while AT THE SAME TIME inc 4-4-4-12-10 sts evenly = 212-228-244-264-280 sts. Work next round as follows: Work 31-33-35-37-39 sts, slip the next 44-48-52-58-62 sts on 1 stitch holder for sleeve (without working them first), cast on 6 new sts, work 62-66-70-74-78 sts (= front piece), slip the next 44-48-52-58-62 sts on 1 stitch holder for sleeve (without working them first), cast on 6 new sts, work 31-33-35-37-39 sts. BODY: = 136-144-152-160-168 sts. NOW MEASURE PIECE FROM HERE! Now insert 6 markers in the piece as follows: Insert 1st marker at beg of round (= side), 2nd marker after 24-25-26-27-28 sts, 3rd marker after another 20-22-24-26-28 sts, 4th marker after another 24-25-26-27-28 sts (= side), 5th marker after another 24-25-26-27-28 sts, 6th marker after another 20-22-24-26-28 sts (24-25-26-27-28 sts remain on round after last marker). When piece measures 3 cm / 1", inc as follows: Inc 1 st on each side of 1st and 4th marker, inc 1 st after 2nd and 5th marker and 1 st before 3rd and 6th marker – READ INCREASE TIP (= 8 sts inc). Inc every 2-2½-2½-3-3 cm / ¾"-⅞"-⅞"-1⅛"-1⅛" 13-13-14-14-15 times in total = 240-248-264-272-288 sts. When piece measures 29-34-38-42-46 cm / 11½"-13½"-15"-16½"-18", dec 0-2-0-2-0 st evenly on round = 240-246-264-270-288 sts, then work according to A.2. When A.2 has been worked one time vertically, there are 280-287-308-315-336 sts on round. Work 2 RIDGES - see explanation above, and bind off. SLEEVE: Slip sts from one stitch holder on double pointed needles size 4 mm / US 6, cast in addition on 6 sts mid under sleeve (insert 1 marker in the middle of these sts) = 50-54-58-64-68 sts. NOW MEASURE PIECE FROM HERE! Work in stockinette st in the round with light pearl gray. When sleeve measures 2 cm / ¾", dec 1 st on each side of marker. Repeat dec every 4½-3½-4-3-3½ cm / 1¾"-1¼"-1½"-1"-1¼" 5-7-7-10-10 times in total = 40-40-44-44-48 sts. When piece measures 20-25-29-32-36 cm / 8"-9¾"-11½"-12½"-14¼", adjust no of sts to = 42-42-48-48-48. Work A.3, when A.3 has been worked one time vertically, there are 49-49-56-56-56 sts on round. Work 2 ridges in garter st, bind off. Work the same way over the sts on the other stitch holder. ASSEMBLY: Sew the openings under the sleeves. CROCHET EDGE: Work a finishing edge around the bottom of dress on hook size 3.5 mm/E/4 as follows with light pearl gray: 1 sc in first st, * ch 3, 1 dc in 1st ch worked, skip 2 or 3 sts, 1 sc in next st *, repeat from *-* the entire round and finish with 1 sl st in 1st sc from beg of round. Fasten off. Crochet the same way around the sleeves. |
|||||||||||||||||||
Diagram explanations |
|||||||||||||||||||
|
|||||||||||||||||||
 |
|||||||||||||||||||
 |
|||||||||||||||||||
 |
|||||||||||||||||||
Have you finished this pattern?Tag your pictures with #dropspattern #forestdancedress or submit them to the #dropsfan gallery. Do you need help with this pattern?You'll find 28 tutorial videos, a Comments/Questions area and more by visiting the pattern on garnstudio.com. © 1982-2026 DROPS Design A/S. We reserve all rights. This document, including all its sub-sections, has copyrights. Read more about what you can do with our patterns at the bottom of each pattern on our site. |
|||||||||||||||||||


With over 40 years in knitting and crochet design, DROPS Design offers one of the most extensive collections of free patterns on the internet - translated to 17 languages. As of today we count 324 catalogs and 12290 patterns - 12280 of which are translated into English (US/in).
We work hard to bring you the best knitting and crochet have to offer, inspiration and advice as well as great quality yarns at incredible prices! Would you like to use our patterns for other than personal use? You can read what you are allowed to do in the Copyright text at the bottom of all our patterns. Happy crafting!
Post a comment to pattern DROPS Children 27-9
We would love to hear what you have to say about this pattern!
If you want to leave a question, please make sure you select the correct category in the form below, to speed up the answering process. Required fields are marked *.