
Popular categories
Looking for a yarn?


Comments / Questions (54)
![]() Heike Becker wrote:
Heike Becker wrote:
Ich komme mit dem 2.Teil der Raglanzunahme nicht klar. Da steht: “Dann in jeder Hin-R (= jeder 2. R) wie folgt zunehmen: 2 M am Rückenteil, je 2 M an jedem Vorderteil und je 2 M an jedem Ärmel (= insgesamt 8 M zugenommen, die ….. Ich komme auf 10 Maschen,nicht auf 8 ingesamt und weiß nicht, wie ich diese verteilen soll. Ich bitte um Hilfe.
03.04.2017 - 21:22DROPS Design answered:
Liebe Frau Becker, es wird 2 M am Rückenteil, nur 1 M an jedem Vorderteil (und nicht je 2 M an jedem Vorderteil, Anleitung wird angepasst) und je 2 M an jedem Ärmel = 8 M. Viel Spaß beim stricken!
04.04.2017 - 10:10
![]() Benedetta wrote:
Benedetta wrote:
Adesso è chiaro,problema risolto! Grazie mille! Buona serata
30.03.2017 - 21:19
![]() Benedetta wrote:
Benedetta wrote:
Vi ringrazio per il vostro aiuto ma purtroppo non mi coincidono gli schemi.
30.03.2017 - 19:03DROPS Design answered:
Buonasera Benedetta. Per la taglia S, è come se lei lavorasse l’ultima riga del diagramma A2 riferito alla taglia M, lavorando però le prime due maglie della riga a diritto; quindi 4 m a dir, prime 2 m della riga a dir, la terza maglia di quella riga coincide con la prima maglia del diagramma A3. Se ci indica dove esattamente non tornano i diagrammi, possiamo verificare. Grazie. Buon lavoro!
30.03.2017 - 19:45
![]() Benedetta wrote:
Benedetta wrote:
Grazie! Quindi devo iniziare il giro con le 4 delle 8 m avviate e lavoraro 6 m a rasata e continuare con lo schema A3? (Tg S)
30.03.2017 - 13:10DROPS Design answered:
Buongiorno Benedetta. Se non sbagliamo i conti, dovrebbero essere 4 delle 8 m avviate a maglia rasata + altre 2 maglie a maglia rasata, le successive 40 maglie lavorate con il diagramma A3, 7 m a maglia rasata. Per capire dove inizia il diagramma A3 provi a lavorare le prime maglie della penultima riga di A3: i gettati devono trovarsi sopra i gettati dell’ultima riga di A2. Individuata da quale m inizia A3, disfa queste maglie e riprende dalla riga giusta di A3. Ci riscriva se non è chiaro. Buon lavoro!
30.03.2017 - 14:31
![]() Benedetta wrote:
Benedetta wrote:
Buongiorno, sono a rischio prendere le maglie della manica e vorrei chiedervi se lo schema A 3 deve collegarsi con lo schema A perché non mi ritrovo con lo schema.Grazie!
30.03.2017 - 11:57DROPS Design answered:
Buongiorno Benedetta. Quando riprende le maglie della maniche, lavora A3 su A2, iniziando A3 da dove aveva finito A2. Di fatto prosegue con lo stesso motivo, senza aumentare. Buon lavoro!
30.03.2017 - 12:35
![]() Benedetta wrote:
Benedetta wrote:
Grazie! Ho un'altra domanda: per la Tg S: Per i raglan ho lavorato solo una volta 12 aumenti,poi al successivo giro aumento 8 m e al rovescio lavoro tutte le m a rovescio per creare i buchi?
22.03.2017 - 20:56DROPS Design answered:
Buonasera Benedetta. Sì è corretto. Buon lavoro!
22.03.2017 - 21:24
![]() Benedetta wrote:
Benedetta wrote:
Buonasera,ho bisogno del Vs aiuto"inserire un segnapunti tra queste maglie",cioè il segnaposto va inserito dopo le due maglie rasate e prima di A2? Grazie mille!
22.03.2017 - 15:50DROPS Design answered:
Buonasera Benedetta. Il segnapunti viene inserito tra le due maglie lavorate a maglia rasata. Quindi p.es: 1 m gettata, 1 m rasata, segnapunti, 1 m rasata, diagramma A.2. Buon lavoro!
22.03.2017 - 16:01
![]() Karen wrote:
Karen wrote:
Love the pattern and finally finishing first sleeve; however, not sure since in the round how to start A1 i.e. Purling first row on right side? Thanks and love you guys and your patterns and yarn!!
15.08.2016 - 14:43DROPS Design answered:
Dear Karen, when you work in the round you are always working from RS, ie you will K all sts (no P sts from WS since no WS rows). Happy knitting!
15.08.2016 - 16:57
![]() Angelina wrote:
Angelina wrote:
Salve, ho un dubbio, mi chiedevo, all'inizio dei punti del diagramma A.2 vedo un gettato, va lavorato sempre o sono io che leggo male lo schema? Grazie!
11.08.2016 - 01:14DROPS Design answered:
Buongiorno Angelina. Nel diagramma A.2, tutti i ferri dispari iniziano e finiscono con dei gettati. Buon lavoro!
11.08.2016 - 06:37
![]() Benedetta wrote:
Benedetta wrote:
Grazie è troppo poco x la Vs gentilezza!
03.08.2016 - 19:01
|
|||||||||||||||||||
Sea Nymph Cardigan#seanymphcardigan |
|||||||||||||||||||
|
|
|||||||||||||||||||
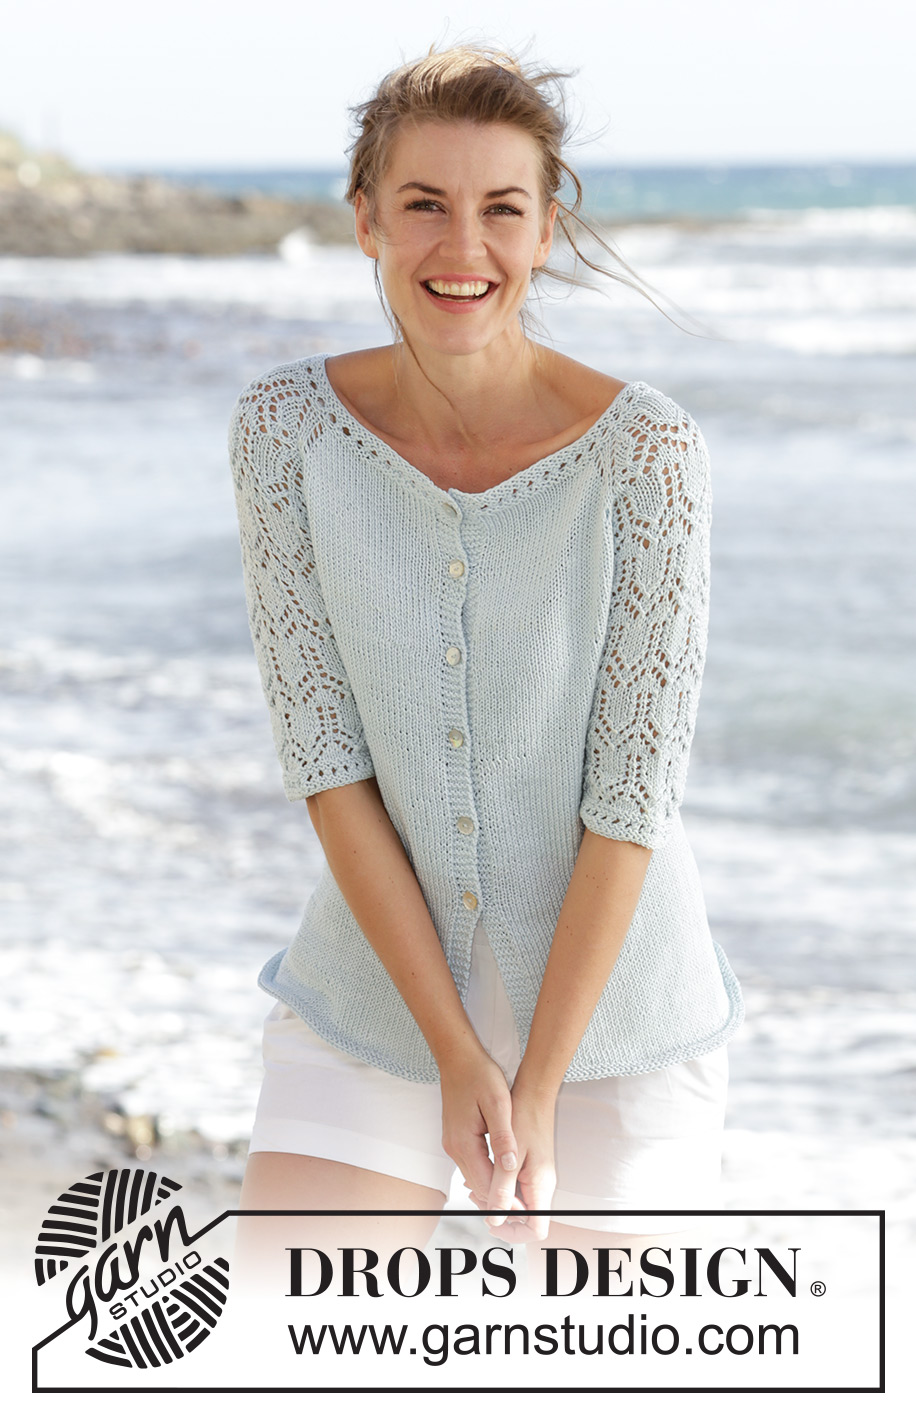
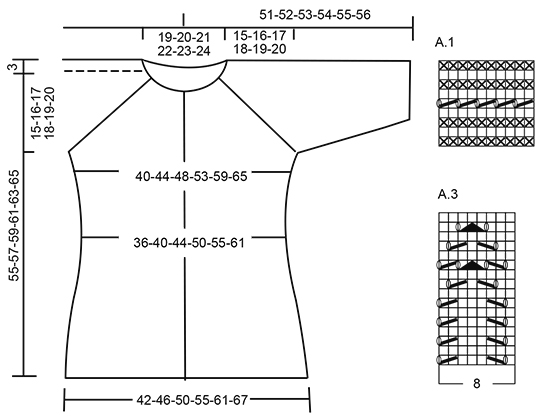
Knitted DROPS jacket with raglan, lace pattern and ¾ sleeves in "Muskat". Worked top down. Size: S - XXXL.
DROPS 169-5 |
|||||||||||||||||||
|
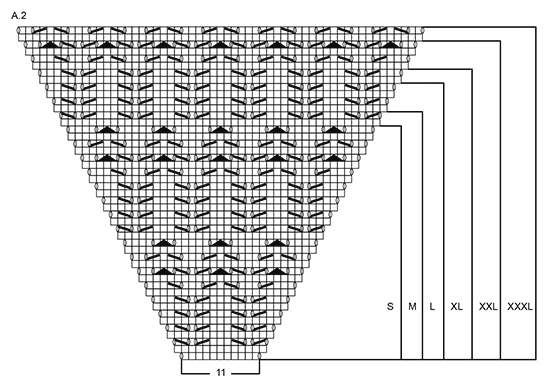
GARTER ST (back and forth): K all rows. 1 ridge = K2 rows. PATTERN: See diagrams A.1 to A.3. The diagrams show all rows in pattern seen from RS. Choose diagram for your size. RAGLAN: Inc on every row from RS (= every other row) as follows: Inc 4 sts on back piece, 2 sts on each front piece and 2 sts on each sleeve (= 12 sts inc, inc on sleeve are drawn in pattern) – beg 3 sts before each A.2 and work as follows: 1 YO, K 1, 1 YO, K 2 (marker is in the middle of these sts), A.2, K 2 (marker is in the middle of these sts), 1 YO, K 1, 1 YO. P the YOs closest to markers on next round to make holes, P YOs towards back/front piece twisted to avoid holes. Inc 12 sts this way 0-2-3-7-10-14 times more (= 1-3-4-8-11-15 times in total, first inc is explained in the text). Then inc on every row from RS (= every other row) as follows: Inc 2 sts on back piece, 1 sts on each front piece and 2 sts on each sleeve (= 8 sts inc, inc on sleeve are drawn in pattern) – beg 2 sts before each A.2 and work as follows: 1 YO, K 2 (marker is in the middle of these sts), A.2, K 2 (marker is in the middle of these sts), 1 YO. P YOs on next row to make holes. Inc 8 sts this way 16-15-16-13-12-9 times in total. BUTTONHOLES: Dec for buttonholes on right band. 1 buttonhole = K tog second and third st from edge and make 1 YO. Dec for buttonholes when piece measures (measured from cast-on edge): SIZE S-M-L: 2, 9, 16, 23, 30 and 37 cm / ¾",3½",6¼",9",11¾",14½" SIZE XL-XXL-XXXL: 2, 9, 16, 23, 30, 37 and 44 cm ¾",3½",6¼",9",11¾",14½",17¼" ---------------------------------------------------------- JACKET: Work back and forth on circular needle from mid front, work top down. Cast on 97-101-105-109-113-117 sts (includes 5 band sts in each side towards mid front) on circular needle size 4 mm / US 6 with Muskat. K 1 row from RS, then work A.1 (1st row = from WS) with 5 sts in garter st in each side, on last row in A.1 inc 15 sts evenly = 112-116-120-124-128-132 sts. Then work as follows from mid front and from RS: 5 sts in garter st, work 17-18-19-20-21-22 sts in stockinette st, 1 YO, 1 st in stockinette st, 1 YO, 2 sts in stockinette st (insert a marker between these sts), A.2 (= 11 sts), 2 sts in stockinette st (insert a marker between these sts), 1 YO, 1 st in stockinette st, 1 YO, 34-36-38-40-42-44 sts in stockinette st, 1 YO, 1 st in stockinette st, 1 YO, 2 sts in stockinette st (insert a marker between these sts), A.2, 2 sts in stockinette st (insert a marker between these sts), 1 YO, 1 st in stockinette st, 1 YO, 17-18-19-20-21-22 sts in stockinette st, 5 sts in garter st. Continue this pattern, and inc for RAGLAN as explained above, first inc is now done. REMEMBER THE KNITTING GAUGE. When A.2 has been worked vertically - see marking for your size, there are 252-272-296-324-356-384 sts on needle, inc are now done. Work next row as follows from WS: Work 43-47-51-57-63-69 sts (= right front piece), slip the next 45-47-51-53-57-59 sts on a stitch holder (= sleeve), cast on 8 sts under sleeve, work the next 76-84-92-104-116-128 sts (= back piece), slip the next 45-47-51-53-57-59 sts on a stitch holder (= sleeve), cast on 8 new sts under sleeve, work the last 43-47-51-57-63-69 sts (= left front piece). BODY: There are now 178-194-210-234-258-282 sts on body. Continue in stockinette st and garter st as before. Insert a marker in each side, in the middle of the 8 new sts that were cast on. NOW MEASURE PIECE FROM HERE. When piece measures 4 cm / 1½", dec 1 st on each side of markers (= 4 sts dec), repeat dec every 4-4-4-5-5-5 cm / 1½"-1½"-1½"-2"-2"-2" 3 times in total = 162-178-194-218-242-266 sts. When piece measures 22-23-24-25-26-27 cm / 8¾"-9"-9½"-9¾"-10¼"-10⅝', inc 1 st on each side of each marker (= 4 sts inc), repeat inc every 2 cm / ¾" 5 more times = 186-202-218-242-266-290 sts. When piece measures 36-37-38-39-40-41 cm / 14¼"-14½"-15"-14¼"-15¾"-16⅛", work 2 ridges over all sts. Bind off K 1/P 1 (to avoid a wavy bind-off edge), piece measures approx. 55-57-59-61-63-65 cm / 21⅝"-22½"-23¼"-24"-24¾"-25½" from cast-on edge. SLEEVE: Worked in the round. Slip sts from sleeve back on double pointed needles size 4 mm / US 6, pick up 1 st in each of the 8 sts under sleeve = 53-55-59-61-65-67 sts. Insert 1 marker mid under sleeve = beg of round. NOW MEASURE PIECE FROM HERE! Then work as follows: 6-7-1-2-4-6 sts in stockinette st, A.3 over the next 40-40-56-56-56-56 sts (beg A.3 where A.2 ends for your size), 7-8-2-3-5-7 sts in stockinette st. When piece measures 4 cm / 1½", dec 1 st on each side of marker. Work the sts that do not fit the pattern in stockinette st, make sure that no of dec and inc in pattern is correct. Repeat dec every 7-7-5-5-3-3 cm / 2¾"-2¾"-2"-2"-1"-1" 2-2-3-3-4-4 more times = 47-49-51-53-55-57 sts. When piece measures 24-23-23-22-22-21 cm / 9½"-9"-9"-8¾"-8¾"-8¼", work A.1 over all sts, then bind off. Work the other sleeve the same way. Sew the buttons on to left front piece. |
|||||||||||||||||||
Diagram explanations |
|||||||||||||||||||
|
|||||||||||||||||||
 |
|||||||||||||||||||
 |
|||||||||||||||||||
Have you finished this pattern?Tag your pictures with #dropspattern #seanymphcardigan or submit them to the #dropsfan gallery. Do you need help with this pattern?You'll find 23 tutorial videos, a Comments/Questions area and more by visiting the pattern on garnstudio.com. © 1982-2026 DROPS Design A/S. We reserve all rights. This document, including all its sub-sections, has copyrights. Read more about what you can do with our patterns at the bottom of each pattern on our site. |
|||||||||||||||||||


With over 40 years in knitting and crochet design, DROPS Design offers one of the most extensive collections of free patterns on the internet - translated to 17 languages. As of today we count 324 catalogs and 12291 patterns - 12281 of which are translated into English (US/in).
We work hard to bring you the best knitting and crochet have to offer, inspiration and advice as well as great quality yarns at incredible prices! Would you like to use our patterns for other than personal use? You can read what you are allowed to do in the Copyright text at the bottom of all our patterns. Happy crafting!
Post a comment to pattern DROPS 169-5
We would love to hear what you have to say about this pattern!
If you want to leave a question, please make sure you select the correct category in the form below, to speed up the answering process. Required fields are marked *.