
Popular categories
Looking for a yarn?


Comments / Questions (28)
![]() Luville wrote:
Luville wrote:
Hello. i would like to ask if the turning chain in the pattern counts as 1 double crochet/treble? personally, whenever i read patterns, they seem to be counted as part of the rows unless stated otherwise.
29.07.2025 - 08:47DROPS Design answered:
Dear Lucille, see INFO CROCHET at the beginning of the written pattern, the chains at the beginning of the round replace here the first stitch. Happy crocheting!
30.07.2025 - 08:03
![]() Kajsa-Malin Atlestam wrote:
Kajsa-Malin Atlestam wrote:
Hej Jag förstår inte riktigt 1a delen. Ska det vara 6 st i rad och därefter hoppar jag över en maska och fortsätter så? Ska i så fall dessa små "hål" som bildas efter de 6 st placeras rätt över varandra i mönstret? Det ser inte ut så på bilden tycker jag.
05.11.2024 - 09:42DROPS Design answered:
Hej Kajsa-Malin, du starter på denne måde for at kanten skal blive elastisk.
05.11.2024 - 12:19
![]() Aderonke Uwechue wrote:
Aderonke Uwechue wrote:
Thank You for this pattern so beautiful it took a week to complete
03.05.2023 - 22:29
![]() Anita wrote:
Anita wrote:
W opisie wzoru jest informacja o pęknięciu na początku , czy to oznacza że po zrobieniu 4 rzędów ,przerabiając kolejne rzędy nie łączymy ich ze sobą i powstaje otwór ? Czy jest możliwe dodanie zdjęcia z tym pęknięciem ?
01.05.2022 - 15:47DROPS Design answered:
Witaj Anito, na początku (przez 9 rzędów) przerabiasz robótkę w tę i z powrotem. Od 10-tego rzędu (okrążenia) łączysz i przerabiasz już na okrągło. Na górze jest pęknięcie z boku, tak jak w zwykłej spódnicy np. na zamek. Na boku naszej spódnicy będą guziki (patrz niżej części DZIURKI NA GUZIKI i BRZEG NA DOSZYCIE GUZIKÓW). Pozdrawiamy!
03.05.2022 - 07:49
![]() Aurelia wrote:
Aurelia wrote:
Hola, acabo de terminar la falda. Ha quedado preciosa y me ha encantado seguir las instrucciones de vuestro patrón porque eran muy claras y concisas. Mi pregunta es ¿es recomendable planchar la prenda ? ¿Con o sin vapor?. Muchas gracias
22.08.2021 - 08:48DROPS Design answered:
Hola Aurelia, en principio, recomendamos planchar la prenda con vapor con temperatura baja y siempre por el lado revés y con un trapo por encima, evitando que haya contacto directo entre la plancha y la prenda.
23.08.2021 - 13:13
![]() MRay wrote:
MRay wrote:
How can I lengthen a skirt crochet pattern to be a longer (maxi) skirt?
24.03.2020 - 18:11DROPS Design answered:
Dear Mrs MRay, you can probably lengthen the part before lace pattern - we are unfortunately not able to adjust every pattern to every single request, but you are welcome to contact your DROPS store - even per mail or telephone - for every individual assistance. Happy crocheting!
25.03.2020 - 09:29
![]() Maj-Britt Larsen wrote:
Maj-Britt Larsen wrote:
Hvordan ved jeg om jeg skal hækle en S eller L ? jeg kan ikke hitte str. guide. :-)
07.07.2018 - 17:01
![]() Karin Bachert-Sedlak wrote:
Karin Bachert-Sedlak wrote:
In der Anleitung heißt es noch vor dem Muster: \"wenn insgesamt 4 R gehäkelt....\" , bzw. \"Nach insgesamt 9 R...\" Worauf bezieht sich insgesamt? Sollen im ersten Fall 4R hin- und zurück gehäkelt werden oder zähle ich die R von Beginn weg? Dh nur jeweils eine R hin und zurück? Im zweiten Fall: 9 R ab der ersten Zunahme? Vielen lieben Dank für die Hilfe! Karin
28.05.2018 - 17:04DROPS Design answered:
Liebe Frau Bachert-Sedlak, sie zahlen die Reihen von Anfang an, dh nach 4 Reihen bzw 9 Reihen von der Anschlagskante. Viel Spaß beim häkeln!
28.05.2018 - 17:07
![]() Sofia wrote:
Sofia wrote:
Förstår inte början /slutet av varven i diagrammet. Det känns som mönstret får ett "stopp" istället för att det flyter runt
13.09.2017 - 20:24DROPS Design answered:
Hej Sofia, jo det stämmer, man börjar om för varje varv, annars kan mönstret hamna lite snett. Lycka till!
14.09.2017 - 09:14
![]() Elin wrote:
Elin wrote:
Jag skulle vilja göra den här kjolen men så att slutlängden är 60 cm. Går det att anpassa mönstret?
06.01.2017 - 16:03DROPS Design answered:
Hej Elin. Ja, det tror jeg sagtens kan lade sig göre. Jeg ville saa haekle delen överst (efter mönstret) laengere, men det er selvfölgelig op til dig og hvad du foretraekker :) God fornöjelse.
09.01.2017 - 15:09
|
||||||||||||||||||||||||||||||||||||||||
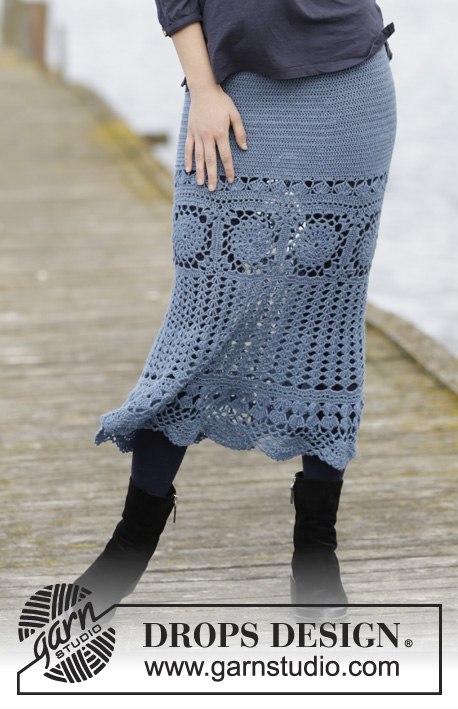
Lady Lace#ladylaceskirt |
||||||||||||||||||||||||||||||||||||||||
 |
 |
|||||||||||||||||||||||||||||||||||||||
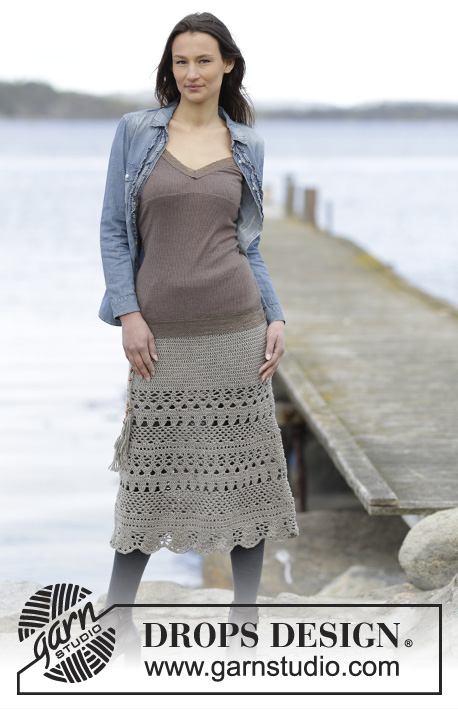
Crochet DROPS skirt with double crochet and lace pattern, worked top down in ”Merino Extra Fine”. Size S-XXXL.
DROPS 165-33 |
||||||||||||||||||||||||||||||||||||||||
|
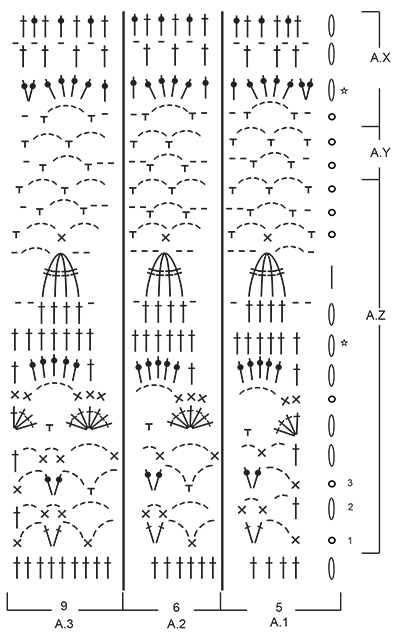
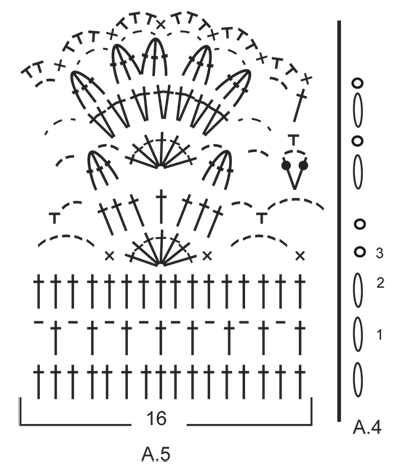
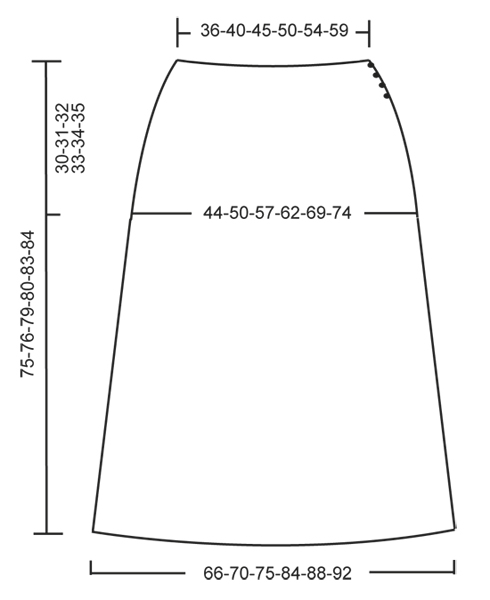
CROCHET INFO: Replace first dc at beg of every dc row with 3 ch. Replace first sc at beg of every sc row with 1 ch. Replace first dc at beg of every dc round with 3 ch. Finish round with 1 sl st in 3rd ch at beg of round. Replace first sc at beg of every sc round with 1 ch. Finish round with 1 sl st in 1st ch at beg of round. PATTERN: See diagrams A.1-A.5. A.4 shows how round beg and ends. INCREASE TIP: Inc 1 dc by working 2 dc in same dc. NOTE: Inc alternately on right and left side of markers (seen from RS). ---------------------------------------------------------- SKIRT: Work back and forth, top down to after vent in the side, then work in the round. Work 153-169-190-211-227-248 ch (includes 3 ch to turn with) on hook size 4 mm / G/6 with Merino Extra Fine. Work first row as follows: 1 dc in 4th ch from hook (= 2 dc), 1 dc in each of the next 2-4-4-4-6-6 ch, * skip ch 1, 1 dc in each of the next 6 ch *, repeat from *-* 20-22-25-28-30-33 more times = 130-144-162-180-194-212 dc. Then work back and forth with 1 dc in every dc - READ CROCHET INFO. REMEMBER THE CROCHET GAUGE! When 4 rows have been worked vertically, insert 6 markers in the piece as follows: Work 10-12-13-15-17-19 dc, insert a marker, then insert 5 markers 22-24-27-30-32-35 dc apart. 10-12-14-15-17-18 dc remain after last marker. On next row inc 1 dc before all markers – READ INCREASE TIP! Repeat inc every other row/round 2-3-4-4-6-6 more times, AT THE SAME TIME when 9 rows have been worked in total vertically, end vent in the side and work piece in the round, beg in the side. Then inc every 3rd round 2 times more in all sizes = 160-180-204-222-248-266 dc. Continue with 1 dc in every dc. When piece measures 30-31-32-33-34-35 cm / 11¾"-12¼"-12½"-13"-13⅜"-13¾" in total, work 1 round with 1 dc in every dc while AT THE SAME TIME inc 4-2-2-2-0-6 dc evenly = 164-182-206-224-248-272 dc. Now continue with pattern as follows: Work A.1 over the first 5 dc, then work A.2 25-28-32-35-39-43 times in width, A.3 over the last 9 dc. On 8th round in A.Z inc 18-18-18-24-24-24 dc evenly = 182-200-224-248-272-296 dc. Continue to work A.Z as before but now work A.2 28-31-35-39-43-47 times in width. When A.Z has been worked 1 time vertically, work A.Y over A.Z. Then work A.X over A.Y. On 2nd round in A.X inc 18 dc evenly in all sizes = 200-218-242-266-290-314 dc. Continue to work A.X as before but now work A.2 31-34-38-42-46-50 times in width. Then work A.Z over A.X. On 8th round in A.Z inc 18 dc evenly in all sizes = 218-236-260-284-308-332 dc. Continue to work A.Z as before but now work A.2 34-37-41-45-49-53 times in width. When A.Z has been worked 1 time vertically, work A.Y over A.Z 2-2-3-3-4-4 times in total vertically. Then work A.X over A.Y. On last round in A.X inc 23-21-13-21-13-5 dc evenly = 241-257-273-305-321-337 dc. Now work an edge as follows: Work A.5 15-16-17-19-20-21 times in total in width. (A.4 shows how round beg and ends.) When A.5 has been worked 1 time vertically, cut the thread and fasten tightly. Piece measures approx. 75-76-79-80-83-84 cm / 29"-30"-31"-31½"-32¾"-33". BUTTONHOLE LOOPS: Along the opening on front piece work buttonhole loops as follows (beg at the bottom): 2 sc around first dc, ch 3, skip 1 dc, * work 2 sc around next dc, ch 3, skip 1 dc *, repeat from *-* 2 more times and finish with 2 sc around last dc at the top, turn and work back as follows: 1 sc in every sc and 3 sc in every ch-space. BUTTON FOLDING EDGE: Along the other side of the opening work 5 rows with sc back and forth (on 1st row work 2 sc in every dc = 18 sc), cut the yarn. Sew the buttons on to the button folding edge. EDGE: Work an edge at top of waist on skirt as follows from RS: Fasten the strand with 1 sl st at the edge of button folding edge, ch 1, * ch 1, skip ch 1, 1 sc in next ch *, repeat from *-* along the entire edge of waist. Fasten off. TWINED STRING: Cut 2 lengths of yarn of 7 meters/ 7 1/2 yds. Twine the strands tog until they resist, fold the string double so that it twines again. Tie a knot in one end so that string stays twined. Thread string up and down in every other dc in the first row with dc in waist (thread pearls on the string if you want). Then make a tassel in each end by making a knot approx. 12 cm / 4¾" from each end. |
||||||||||||||||||||||||||||||||||||||||
Diagram explanations |
||||||||||||||||||||||||||||||||||||||||
|
||||||||||||||||||||||||||||||||||||||||
 |
||||||||||||||||||||||||||||||||||||||||
 |
||||||||||||||||||||||||||||||||||||||||
 |
||||||||||||||||||||||||||||||||||||||||
Have you finished this pattern?Tag your pictures with #dropspattern #ladylaceskirt or submit them to the #dropsfan gallery. Do you need help with this pattern?You'll find 13 tutorial videos, a Comments/Questions area and more by visiting the pattern on garnstudio.com. © 1982-2026 DROPS Design A/S. We reserve all rights. This document, including all its sub-sections, has copyrights. Read more about what you can do with our patterns at the bottom of each pattern on our site. |
||||||||||||||||||||||||||||||||||||||||


With over 40 years in knitting and crochet design, DROPS Design offers one of the most extensive collections of free patterns on the internet - translated to 17 languages. As of today we count 325 catalogs and 12298 patterns - 12288 of which are translated into English (US/in).
We work hard to bring you the best knitting and crochet have to offer, inspiration and advice as well as great quality yarns at incredible prices! Would you like to use our patterns for other than personal use? You can read what you are allowed to do in the Copyright text at the bottom of all our patterns. Happy crafting!
Post a comment to pattern DROPS 165-33
We would love to hear what you have to say about this pattern!
If you want to leave a question, please make sure you select the correct category in the form below, to speed up the answering process. Required fields are marked *.