
Popular categories
Looking for a yarn?


Comments / Questions (7)
![]() Margherita wrote:
Margherita wrote:
Volendo lavorare il modello con filato air bisogna comunque abbinarlo ad altri filati (vedi 3 capi) oppure da solo? grazie
26.11.2019 - 22:48DROPS Design answered:
Buongiorno Margherita, Air è un filato che appartiene al gruppo C come Cotton Viscose. Può provare a fare un campione e vedere se corrisponde a quello indicato oppure aggiungere un capo di un filato del gruppo A, come Alpaca, per un risultato migliore. Buon lavoro!
27.11.2019 - 09:49
![]() Fayolle wrote:
Fayolle wrote:
Serait il possible d'avoir les explications du modèle 89-14 tricoté avec des aiguilles 4,5 (21m x 32 rgs au lieu des aiguilles 6 ? Merci
09.11.2018 - 11:37DROPS Design answered:
Bonjour Mme Fayolle, nous ne sommes malheureusement pas en mesure de pouvoir ajuster chacun de nos modèles à chaque demande. N'hésitez pas à demander conseil au magasin où vous avez acheté votre laine ou bien consultez les modèles adaptés à votre tension. Bon tricot!
09.11.2018 - 13:27
![]() Chantal Bonneton wrote:
Chantal Bonneton wrote:
Bonjour, je viens de commencer ce modèle, par ailleurs très beau. Pour le dos, vous dîtes : " A 2 cm de hauteur de côtes, changer pour les aiguilles 6" mais faut-il continuer en côtes ou en jersey ? Merci pour votre réponse.
28.01.2018 - 23:29DROPS Design answered:
Bonjour Mme Bonneton, on continue en jersey, merci pour l'info, les explications ont été ajustées. Bon tricot!
29.01.2018 - 10:07
![]() KUSNIEREK Christiane wrote:
KUSNIEREK Christiane wrote:
Bonjour, Je souhaite réaliser ce modèle avec une seule sorte de laine ( plutôt coton ) Laquelle puis je utiliser et en quelle quantité pour une taille M ? Merci.
07.05.2016 - 14:02DROPS Design answered:
Bonjour Mme Kusnierek, vous trouverez ici toutes les informations sur les alternatives entre les groupes, n'hésitez pas à demander conseil à votre magasin DROPS! Bon tricot!
09.05.2016 - 09:32
![]() Dea wrote:
Dea wrote:
C'è un problema: passando col mouse sopra la foto non si vede l'immagine ingrandita :-/
03.12.2012 - 18:44DROPS Design answered:
Grazie. E' stato segnalato.
04.12.2012 - 16:22
![]() Drops Design wrote:
Drops Design wrote:
Bonjour, nous ne connaissons pas ce fil et n'avons donc aucune info à ce sujet. Pour choisir votre taille, reportez-vous au patron en bas de page, les mesures y sont indiquées en cm et sont fiables.
09.03.2010 - 10:15
![]() Desfontaine wrote:
Desfontaine wrote:
Bonjour. Merci de bien vouloir m'indiquer si je peux utiliser une laine Phildar (désolée - un ancien stock -:)))Ref Phil mohair 50 échantillon 10x10 en aig 5,5 : 18 rangs et 14 mailles, à la place des 3 fils. Pour une taille 38, quelle taille choisir chez Drops ? Chez Katia le 38/40 est beaucoup trop grand. Merci pour votre aide. J'aime énormément ce modèle
08.03.2010 - 16:35
|
|
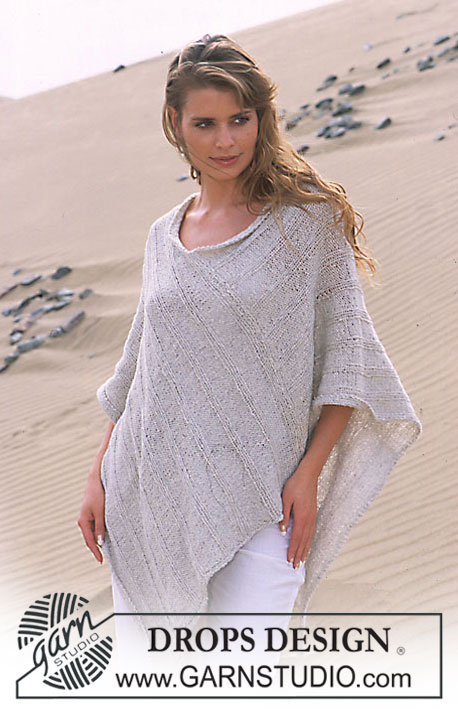
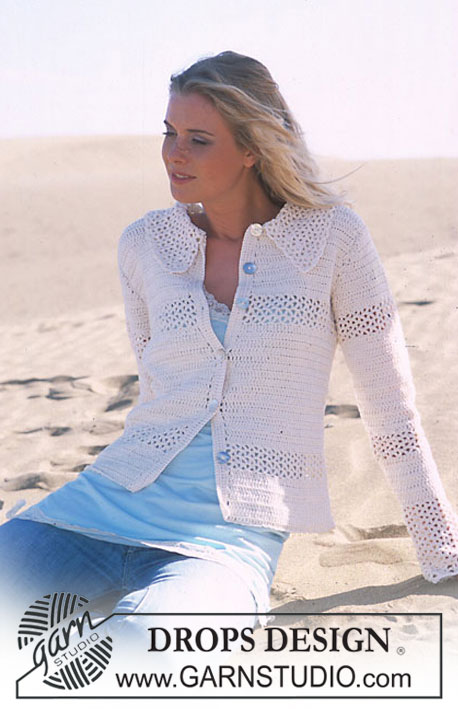
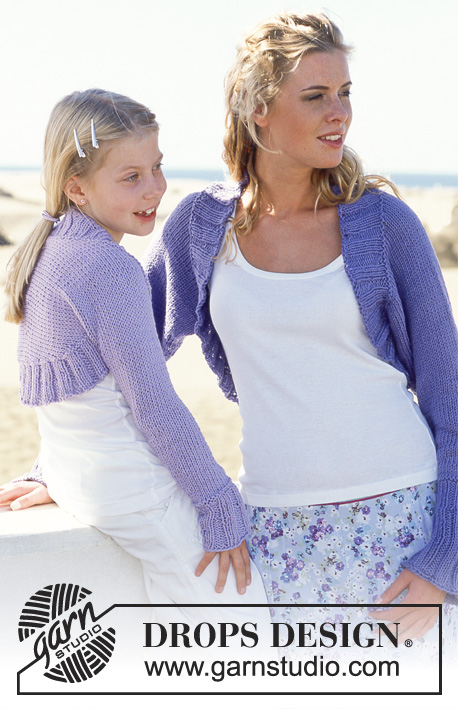
DROPS 89-14 |
|
|
|
|
DROPS Cardigan in Cotton Viscose, Vivaldi and Glitter
DROPS 89-14 |
|
|
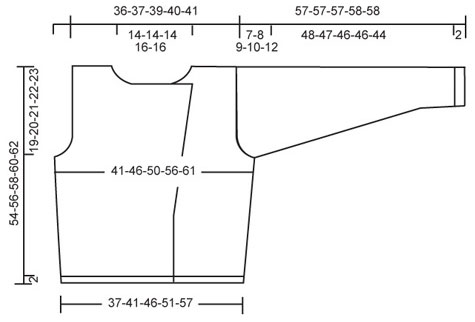
Gauge: 14 sts x 20 rows with 1 strand of each yarn (3 strands) on larger needles in stockinette st = 10 x 10 cm. Rib: * K 1, P 2 *, repeat * - *. Increasing tips: Inc inside of 5 edge sts by making a yo. On the next row, twist and K the yo. All increases are made on right side rows. Back: Loosely cast on 54-60-66-72-81 sts on smaller needles with 1 strand of each yarn (= 3 strands). P 1 row (wrong side), then knit rib, keeping 1 edge st at each side in garter st. When the piece measures 2 cm change to larger needles and stockinette st, increasing (for sizes XL and XXL only) on the 1st row to 54-60-66-74-82 sts. When the piece measures 10 cm inc 1 st at each side every 10 cm a total of 3 times = 60-66-72-80-88 sts. When the piece measures 35-36-37-38-39 cm bind off for armhole at each side every other row: 3 sts 1 time, 2 sts 0-1-2-2-3 times and 1 st 2-2-2-5-6 times = 50-52-54-56-58 sts. When the piece measures 52-54-56-58-60 cm bind off the center 18-18-18-20-20 sts for the neck. On the next row dec 1 st at each neck edge = 15-16-17-17-18 sts remain on each shoulder. Bind off when the piece measures 54-56-58-60-62 cm. Right front: Loosely cast on 33-36-39-42-45 sts on smaller needles with 1 strand of each yarn (= 3 strands). P 1 row (wrong side), then knit rib as follows from center front: K 1 (edge st knit in garter st), K 1, P 1, K 1, P 1 (these 5 sts are the buttonband), * K 1, P 2 *, repeat * - * and finish with K 1 (edge st knit in garter st). When the piece measures 2 cm change to larger needles and establish pattern on the next row as follows (right side): K 1 (edge st knit in garter st), K 1, P 1, K 1, P 6 and then K and decrease evenly spaced over the remaining sts to 31-34-37-41-45 sts on the row. Continue in rib and stockinette st as established. Read the entire next section before knitting: Side inc: When the piece measures 10 cm inc 1 st at the side edge every 10 cm a total of 3 times. Lapel: When the piece measures 24-25-26-27-28 cm inc 1 st at the center front every 3 cm – see Increasing tips – 8 times – P the increased sts as seen from the right side. Armhole: When the piece measures 35-36-37-38-39 cm bind off for armhole at the side as on back. Neck: When the piece measures 46-47-49-50-52 cm bind off 18 sts at center front edge for neck. Continue to bind off at neck edge every other row: 2 sts 1 time and 1 st 2-2-2-3-3 times. After all shaping is complete 15-16-17-17-18 sts remain on needles. Bind off when the piece measures 54-56-58-60-62 cm. Left front: Cast on and knit the same as the right, reversing shaping. Sleeve: Loosely cast on 29-32-35-41-41 sts on smaller needles with 1 strand of each yarn (= 3 strands). P 1 row (wrong side), then knit 2 rows rib keeping 1 edge st at each side in garter st. Change to larger needles and stockinette st, increasing evenly spaced on the 1st row to 31-34-37-41-41 sts. When the piece measures 4 cm inc 1 st at each side every 5-5-4.5-4.5-3.5 cm a total of 9-9-10-10-12 times = 49-52-57-61-65 sts. When sleeve measures 50-49-48-48-46 cm bind off for sleeve cap at each side every other row: 3 sts 1 time, 2 sts 2 times and 1 st 1-2-3-4-6 times, then bind off 2 sts at each side until piece measures 56-56-56-57-57 cm, then bind off 3 sts 1 time at each side. Bind off the remaining sts, the piece measures approx. 57-57-57-58-58 cm. Assembly: Sew shoulder seams. Crocheted edge: Crochet reverse crochet (sc from left to right) along button bands, lapel, and back of the neck with 1 strand of each yarn (= 3 strands). Crocheted buttonhole: Crochet 2-3 buttonholes at the top of right buttonband with 1 strand of each yarn (= 3 strands) as follows: 1 sc in st, ch 5, fasten with 1 sc approx. 2 cm below, turn and crochet 6 sc back in ch-loop, finish with 1 sl st in 1st sc from previous row. Crocheted button: Ch 2 with 1 strand of each yarn (= 3 strands). 1st row: 6 sc in 2nd ch from hook, then 1 sl st in 1st sc at start of row to join. 2nd row: Ch 1, 2 sc in each sc, finish with 1 sl st in 1st sc at start of row (= 12 sc). 3rd row: Ch 1, 1 sc in each sc, finish with 1 sl st in 1st sc at start of row (= 12 sc). 4th row: Ch 1, 1 sc in every other sc, finish with 1 sl st in 1st sc at start of row (= 6 sc). Insert button into crocheted covering, sew opening tightly around button. Sew in sleeves. Sew sleeve and side seams using edge sts as a seam allowance. Sew on buttons. Sew the small button to the back side of right front in the transition between lapel and neck shaping, to hold the lower lapel in place. |
|
 |
|
Have you finished this pattern?Tag your pictures with #dropspattern or submit them to the #dropsfan gallery. Do you need help with this pattern?You'll find 21 tutorial videos, a Comments/Questions area and more by visiting the pattern on garnstudio.com. © 1982-2026 DROPS Design A/S. We reserve all rights. This document, including all its sub-sections, has copyrights. Read more about what you can do with our patterns at the bottom of each pattern on our site. |


With over 40 years in knitting and crochet design, DROPS Design offers one of the most extensive collections of free patterns on the internet - translated to 17 languages. As of today we count 324 catalogs and 12285 patterns - 12275 of which are translated into English (US/in).
We work hard to bring you the best knitting and crochet have to offer, inspiration and advice as well as great quality yarns at incredible prices! Would you like to use our patterns for other than personal use? You can read what you are allowed to do in the Copyright text at the bottom of all our patterns. Happy crafting!
Post a comment to pattern DROPS 89-14
We would love to hear what you have to say about this pattern!
If you want to leave a question, please make sure you select the correct category in the form below, to speed up the answering process. Required fields are marked *.