
Popular categories
Looking for a yarn?


Comments / Questions (13)
![]() Kristin wrote:
Kristin wrote:
Når man skal måle før felling,er lengden med eller uten ørelappene? Jeg tenker det er kun lengden uten lappene men ble litt usikker. Klem
09.01.2026 - 01:58DROPS Design answered:
Hei Kristin, Du måler lengden uten øreklaffer. Hilsen Drops Team.
09.01.2026 - 06:26
![]() Patrizia wrote:
Patrizia wrote:
Buon giorno e aiuto!!! Ho lavorato i paraorecchie ma ora non riesco a capire come trasferirli sui ferri circolari per lavorarli in tondo.. potreste dirmi se c'è un video che mi fa' vedere cosa fare? Grazie!!!!
04.03.2023 - 11:21DROPS Design answered:
Buongiorno Patrizia, deve semplicemente spostare le maglie una a una sui ferri circolari. Buon lavoro!
04.03.2023 - 16:50
![]() Michaela Zalac wrote:
Michaela Zalac wrote:
Ihre Homepage ist so unglaublich informativ, die Tutorials super und der Garnumrechner eine große Hilfe. Die Anleitungen gut verständlich erklärt. Vielen, vielen Dank....
21.11.2022 - 11:38
![]() Jocelyne wrote:
Jocelyne wrote:
Décidément, je ne sais pas si c'est du à la traduction, mais les explications sont toujours aussi peu claires
12.04.2022 - 11:08
![]() Barbara wrote:
Barbara wrote:
Once the ears stitches are on the stitch holder and the head of the hat is stitched together, what do I do with the ears? I asked my knitting store teacher and she couldn't help me.
12.01.2020 - 00:44DROPS Design answered:
Dear Barbara, when all stitches are increased, you will then sew together top of hat with grafting/kitchener stitches. Put the hat flat so that the ears are on each side and sew top seam. Happy knitting!
13.01.2020 - 09:34
![]() Erika Marangoni wrote:
Erika Marangoni wrote:
Complimenti per il berretto è bellissimo... Volevo chiedere una cosa... Io sono arrivata alla fine ma non riesco proprio a capire come cucire il cappello... Ho lavorato l ultima riga fino al segnalino poi ho messo le altre maglie sul fermaglio e mi rimangono sul ferro di sinistra le altre maglie... Premetto che non ho usato i ferri circolari... Mi potete aiutare? Grazie mille in anticipo...
16.11.2019 - 21:48DROPS Design answered:
Buonasera Erika, deve chiudere le maglie a punto maglia. Buon lavoro!
17.11.2019 - 23:05
![]() AVANTI SHIRALI wrote:
AVANTI SHIRALI wrote:
Hello! How do i calculate the cast on stitches if the yarn is thinner ( for 5mm needles)? Thanks for the pattern! I love the drop design resources/videos.
06.09.2018 - 17:22DROPS Design answered:
Hi Avanti, There is a yarn calculator to the right of the photo whichyou can use when working with alternative yarns. Remember to do a trial piece 10 x 10 cm to make sure you have the right knitting tension; so that the measurements on the garment are correct. Happy knitting!
07.09.2018 - 07:52
![]() Sari Mulford wrote:
Sari Mulford wrote:
Hvad med det sorte i øjnene....? Mvh Sari
27.11.2017 - 19:03DROPS Design answered:
Hei Sari. Litt usikker på hva du mener. I oppskriften under Materialer står det: Og brug en rest af farve 01 natur, 07 orange og 02 sort til dekoration. Og i oppskriften står det: ØJNE: Øjet strikkes frem og tilbage på 2 strømpep. Slå 6 m op med sort på strømpep 6. 1.P: Strik 2 m ret i hver m p ud (dvs strik i forreste og bagerste maskebue) = 12 m på p. Vend arb og skift til natur. mvh Drops design
28.11.2017 - 14:45
![]() Nancy Battaini wrote:
Nancy Battaini wrote:
Do you measure the entire hat or in your terms:"piece" including ear flaps or from the front of the hat?
12.02.2017 - 17:43DROPS Design answered:
Dear Mrs Battaini, you will measure without ear flaps, ie from front of hat. Happy knitting!
13.02.2017 - 11:21Annjeffrey wrote:
Cannot print off pattern
02.11.2015 - 15:38
|
|
Otis#otishat |
|
 |
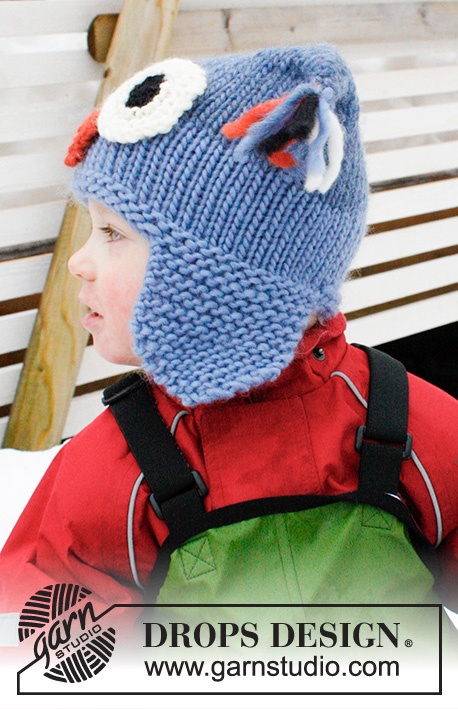 |
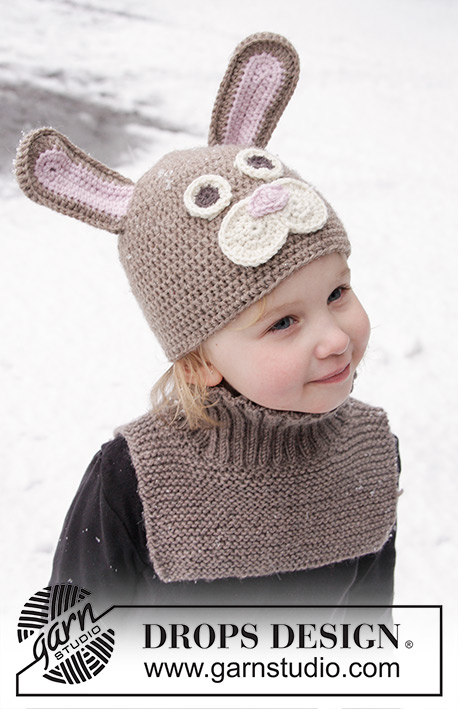
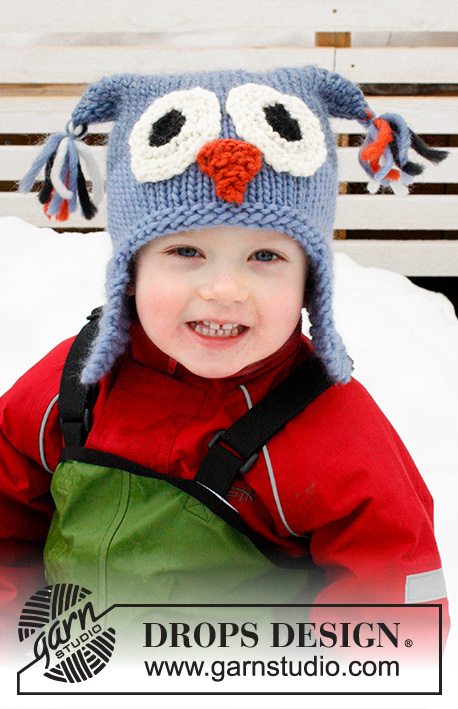
Knitted owl hat for children in DROPS Snow. Piece is worked with ear flaps. Size 2 - 12 years.
DROPS Extra 0-1017 |
|
|
GARTER ST (in the round on circular needle): * K 1 round and P 1 round *, repeat from *-*. 1 ridge = 2 rounds. GARTER ST (back and forth on needle): K all rows. 1 ridge = K2 rows. ---------------------------------------------------------- OWL HAT: Hat is worked from bottom up. Beg by working ear flaps as follows: Cast on 3 sts on double pointed needles size 7 mm / US 10.75 with light blue, work in GARTER ST - see explanation above, back and forth on needle - AT THE SAME TIME on first row (= RS) inc 1 st in each side by making a YO inside edge st = 2 sts inc. Repeat inc on every other row from RS 4-4-4-5-5-5 more times (= 5-5-5-6-6-6 times in total) = 13-13-13-15-15-15 sts on needle. Continue to work in garter st until piece measures approx. 8-9-10-10-10-11 cm / 3"-3½"-4"-4"-4"-4½". Put piece aside, work another ear flap the same way and make sure to finish on the same row on both ear flaps. Cast on 4-5-6-4-4-5 new sts on circular needle size 7 mm / US 10.75 with light blue (= back of hat), then work one ear flap on to needle, make sure that ridges fit. Cast on 18-18-18-18-19-19 new sts (= at the front of hat), work next ear flap on to needle (make sure that ridges fit here as well) and cast on 4-5-6-5-5-5 new sts on needle (= back of hat) = 52-54-56-57-58-59 sts on needle. Put piece tog and work in the round, P 1 round, K 1 round and P 1 round. Then work in stockinette st. When piece measures 8-9-9-10-10-11 cm / 3"-3½"-3½"-4"-4"-4½", switch to blue/violet and work until piece measures 14-15-16-17-17-18 cm / 5½"-6"-6¼"-6¾"-6¾"-7". On next round, dec 0-0-0-1-0-1 sts evenly = 52-54-56-56-58-58 sts on needle. Insert a marker in each side of piece, first marker after 13-13-14-14-15-15 sts from beg of round and second marker 13-14-14-14-14-14 sts before beg of round (= 26-27-28-28-29-29 sts on each side of markers). Continue in stockinette st and inc AT THE SAME TIME at each marker every other round to make an ear in each side as follows: Work until 1 st before marker, make a YO, work 2 sts (marker is between these 2 sts), make another YO. On next round K YOs twisted to avoid holes. Repeat inc 2 more times (= 3 times in total) = 64-66-68-68-70-70 sts on needle. Finish with 1 round K without inc, then work until first marker so that opening in the piece is in the side. Insert sts on a stitch holder and place hat flat so that markers are in each side. Sew tog with grafting/kitchener sts and make sure that sts are the same size or somewhat bigger to make the edge elastic. EYES: Work eye back and forth on 2 double pointed needles. Cast on 6 sts on double pointed needles size 6 mm / US 10 with black. ROW 1: Work 2 sts K in every st the rest of row (i.e. work in front and back loop of st) = 12 sts on needle. Turn piece and switch to off white. ROW 2: K all sts. Turn piece. ROW 3: * K 2 in first st, K 1 *, repeat from *-* the entire row = 18 sts. Turn piece. ROW 4: K rest of row. Turn piece. ROW 5: * K 2 in first st, K 2 *, repeat from *-* the entire row = 24 sts. Then bind off as follows: * bind off 3 sts, make 1 YO and bind off YO *, repeat from *-* until all sts have been bind off. Sew side seam of eye tog with small stitches. Work another eye the same way. Sew eyes to mid front of hat, make sure to sew inside bind-off edge. BEAK: Worked back and forth on 2 double pointed needles. Cast on 7 sts with orange on double pointed needles size 6 mm / US 10. ROW 1: K 4, K 2 tog and K 1 = 6 sts. ROW 2: K 3, K 2 tog, K 1 = 5 sts. ROW 3: K 2, K 2 tog, K 1 = 4 sts. ROW 4: K 1, K 2 tog, K 1 = 3 sts. ROW 5: K 1, K 2 tog = 2 sts. ROW 6: K 2 tog, cut the yarn and pull it through the last st and fasten. Sew beak below eyes mid front on hat. EAR TUSSLE: Cut 1 yarn light blue, blue/violet, orange, black and off white on approx. 10 cm / 4". Use a needle, thread all strands half way through ear at the top of hat. Fold strands double and make sure that yarn ends are the same length. Use a strand to tie around yarn in towards hat so make a small tussle. Repeat on the other ear. |
|
Have you finished this pattern?Tag your pictures with #dropspattern #otishat or submit them to the #dropsfan gallery. Do you need help with this pattern?You'll find 20 tutorial videos, a Comments/Questions area and more by visiting the pattern on garnstudio.com. © 1982-2026 DROPS Design A/S. We reserve all rights. This document, including all its sub-sections, has copyrights. Read more about what you can do with our patterns at the bottom of each pattern on our site. |
|


With over 40 years in knitting and crochet design, DROPS Design offers one of the most extensive collections of free patterns on the internet - translated to 17 languages. As of today we count 325 catalogs and 12291 patterns - 12281 of which are translated into English (US/in).
We work hard to bring you the best knitting and crochet have to offer, inspiration and advice as well as great quality yarns at incredible prices! Would you like to use our patterns for other than personal use? You can read what you are allowed to do in the Copyright text at the bottom of all our patterns. Happy crafting!
Post a comment to pattern DROPS Extra 0-1017
We would love to hear what you have to say about this pattern!
If you want to leave a question, please make sure you select the correct category in the form below, to speed up the answering process. Required fields are marked *.