
Popular categories
Looking for a yarn?


Comments / Questions (91)
![]() Kari wrote:
Kari wrote:
Hei, jeg har veldig lyst til å strikke denne, men synes den henger litt langt ned foran. Vil det se rart ut om jeg legger opp færre masker på forstykkene?
15.04.2014 - 14:03DROPS Design answered:
Hei Kari. Modellen er jo designet til at skulle haenge ned foran. Du kan selvfölgelig pröve dig frem og evt legge faerre m op til forstykkerne - husk at antal m skal gaa op i patent
16.04.2014 - 13:03
![]() Torti Noele wrote:
Torti Noele wrote:
Je vous remercie de m'indiquer les équivalences en tailles Eu / S, M, L, Xl, XXL...cela me faciliterait dans le calcul du nombre de pelotes à commander.
24.03.2014 - 08:26DROPS Design answered:
Bonjour Mme Noele, vous trouverez à la fin de chaque modèle un schéma avec les mesures pour chacune des tailles. Les mesures sont en cm, prises ouvrage à plat, d'un côté à l'autre. Comparez-les à un vêtement analogue dont vous aimez la forme pour trouver votre taille. Bon tricot!
24.03.2014 - 09:17Monika Nygård wrote:
Ursnygg måste bara ha en sån
18.02.2014 - 15:18
![]() Anette wrote:
Anette wrote:
Vilket garn har använts till er modell? Funkar den att sticka för en nybörjare? Med vänlig hälsning, Anette
13.02.2014 - 15:31DROPS Design answered:
Hej Anette. Denne kan du strikke i Alpaca Silk eller i Vivaldi. Modellen paa billedet er i Vivaldi. Den er nok lidt svaer hvis du er helt nybegynder, men du kan jo altid faa hjaelp fra vores instruktionsvideoer eller spörg her.
13.02.2014 - 16:04
![]() Elisabeth wrote:
Elisabeth wrote:
Hold op den er lækker den må kej da lave
01.02.2014 - 18:44
![]() Katharina wrote:
Katharina wrote:
Sondern schönes Modell. Perfekt für kühle Abende. Aber wie muss ich stricken wenn ich nur eine Farbe verwenden möchte? Danke schon mal für die Hilfe!
31.01.2014 - 20:56DROPS Design answered:
Lieeb Katharina, die Kombination der beiden Materialien und der dadurch entstehende Effekt ist Teil des Designs.
03.02.2014 - 08:48
![]() Nadine wrote:
Nadine wrote:
Welk garen is gebruikt voor het vest op de foto? Alpaca silk 01/14 of Vivaldi 01/09?
30.01.2014 - 08:56DROPS Design answered:
Hoi Nadine. De model op de foto is in DROPS Vivaldi gebreid.
31.01.2014 - 11:07
![]() Melanie wrote:
Melanie wrote:
Wirklich sehr schönes Modell. Hoffe sehr, dass die Anleitung bald kommt - würde es so gerne nachstricken!
28.01.2014 - 10:31
![]() Loretta wrote:
Loretta wrote:
E' bellissimo, leggero ed impalpabile l'ideale per la primavera
23.01.2014 - 23:28Monika Nygård wrote:
Jätte snygg den kan man inte vara utan.
23.01.2014 - 16:08
|
|
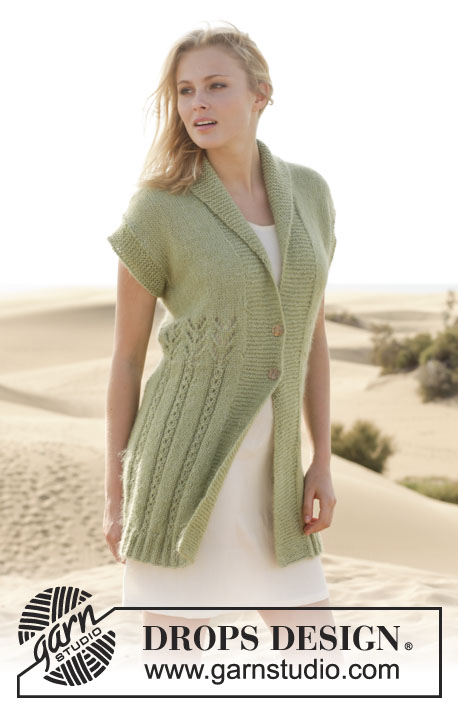
Brise d'Ete#brisedetecardigan |
|
|
|
|
Knitted DROPS jacket in English rib with two colors in ”Brushed Alpaca Silk ” or ”Vivaldi”. Size: S - XXXL.
DROPS 152-12 |
|
|
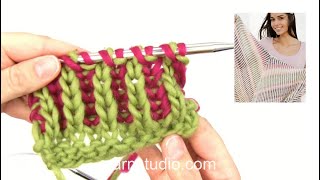
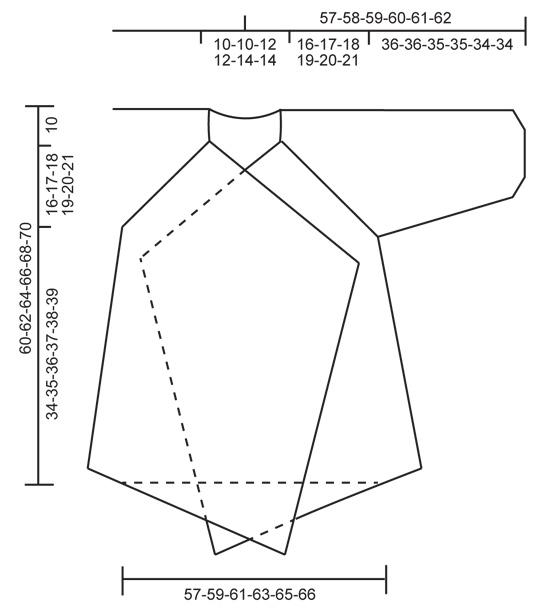
GARTER ST (back and forth on needle): K all rows. 1 ridge = K2 rows. ENGLISH RIB ST: When counting the sts, the YOs are not counted as sts. KNITTING TIP 1: To make an English rib in two colors work back and forth on a circular needle as follows: Work 1st row as explained below, turn piece and then beg color change as follows: Work 2nd row as explained below with color 1 and then move all sts on circular needle to the other end so that next row can be worked with color 2 from the same side of piece - then turn piece and work the next 2 rows as the first 2 – i.e. work 1 row with each color and work 2 rows in total from the same side before turning piece and working back. KNITTING TIP 2: If you are in doubt, see what color the previous row was worked with on the color of edge st. ENGLISH RIB IN TWO COLORS: ROW 1 (= WS): Worked with color 01, off white * 1 YO, slip 1 st as if to P, K 1 *, repeat from *-* until 1 st remain, 1 YO, slip 1 st as if to P. Turn piece. ROW 2 (= RS): Worked with color 01, off white * K tog YO and slipped st, 1 YO, slip 1 st as if to P *, repeat from *-* until 2 sts remain, K tog YO and slipped st. Move sts back on circular needle to work from same side one more time and switch color (read KNITTING TIP 1 and 2). ROW 3 (= RS): Work with color 14, light grayish green * 1 YO, slip 1 st as if to P, P tog YO and slipped st *, repeat from *-* until 1 st remain, 1 YO, slip 1 st as if to P. Turn piece. ROW 4 (= WS): Worked with color 01, off white * P tog YO and slipped st, 1 YO, slip 1 st as if to P *, repeat from *-* until 2 sts remain, P tog YO and slipped st. Move sts back on circular needle to work from same side one more time and switch color. ROW 5 (= WS): Work with color 14, light grayish green * 1 YO, slip 1 st as if to P, K tog YO and slipped st *, repeat from *-* until 1 st remain, finish with 1 YO, slip 1 st as if to P. Turn piece. Repeat rows 2-5. INCREASE TIP (applies to sleeve): Inc 1 st at beg of row after 1 edge st and 1 st before 1 edge st at end of row. Inc 1 st by making a YO, on next row work YO twisted i.e. work in back loop of st instead front. NOTE: Work the inc sts in English rib. DECREASE TIP 1: Dec from RS in English rib as follows: Dec as follows before marker: Work in English rib until 3 sts remain before st with marker (Read ENGLISH RIB ST above), slip 1 st as if to K, K the next 2 sts tog and then pass 1 slipped st over. 2 sts dec. Dec as follows after marker: Work in English rib until marker, K 3 tog. 2 sts dec. DECREASE TIP 2: Dec 2 sts as follows: Slip 1 st as if to K, K 2 tog, psso ---------------------------------------------------------- JACKET: First worked back and forth in parts before slipping them on same needle and then work back and forth until finished measurements. BACK PIECE: Worked back and forth on circular needle - see KNITTING TIP 1. Loosely cast on 96-99-102-105-108-111 sts (includes 1 edge st in each side) on circular needle size 6 mm / US 10 with off white. Work next row as follows from RS: 1 edge st in GARTER ST - see explanation above -, * K 1, K 2 tog *, repeat from *-* until 2 sts remain, finish with K 1 and 1 edge st in garter st = 65-67-69-71-73-75 sts. Work ENGLISH RIB IN TWO COLORS – see explanation above – with 1 edge st in garter st in each side of piece until piece measures 33-34-35-36-37-38 cm / 13"-13⅜"-13¾"-14¼"-14½"-15" (adjust so that next row is 2nd-2nd-2nd-3rd-3rd-2nd row in English rib). REMEMBER THE GAUGE! Now dec 1 edge st in each side on next row as follows: Dec 1 edge st at beg of next row by working the first 2 sts K twisted tog, work as before until 2 sts remain, K the last 2 tog = 63-65-67-69-71-73 sts. Work 1 more row (= 3rd-3rd-3rd-4th-4th-3rd row in English rib). Put the piece aside and work both front pieces. RIGHT FRONT PIECE: Worked back and forth on circular needle. Loosely cast on 93-96-99-102-105-108 sts (includes 1 edge st in each side) on circular needle size 6 mm / US 10 with off white. Work next row as follows from RS: 1 edge st in garter st, * K 1, K 2 tog *, repeat from *-* until 2 sts remain, finish with K 1 and 1 edge st in garter st (work edge st in garter st until finished measurements) = 63-65-67-69-71-73 sts. Work ENGLISH RIB IN TWO COLORS with 1 edge st in garter st in each side of piece until piece measures 33-34-35-36-37-38 cm / 13"-13⅜"-13¾"-14¼"-14½"-15" (adjust so that next row is 2nd-2nd-2nd-3rd-3rd-2nd row in English rib). On next row dec edge st in garter st in right side of piece by working the last 2 sts K tog = 62-64-66-68-70-72 sts remain on row. Work 1 more row (= 3rd-3rd-3rd-4th-4th-3rd row in English rib). Put piece aside. LEFT FRONT PIECE: Work as right front piece but reversed, i.e. when 1 edge st is dec, work the first 2 sts twisted tog. SLEEVE: Worked back and forth on needle. Cast on 32-32-34-34-35-35 sts (includes 1 edge st in each side) on circular needle size 6 mm / US 10 with off white. Work next row as follows from RS: 1 edge st in garter st, * K 1, 2 sts in next st *, repeat from *-* until 1-1-3-3-2-2 sts remain, finish with K 0-0-2-2-1-1 and 1 edge st in garter st = 47-47-49-49-51-51 sts. Then work in ENGLISH RIB IN TWO COLORS with 1 edge st in garter st in each side of piece. When piece measures 8 cm / 3⅛", inc 1 st in each side inside 1 edge st - READ INCREASE TIP. Repeat inc in each side of piece every 5-4-4-3-2½-2½ cm / 2"-1½"-1½"-1⅛"-⅞"-⅞" 4-6-6-8-8-10 more times (= 5-7-7-9-9-11 times in total) = 57-61-63-67-69-73 sts. Work English rib with 1 edge st in garter st in each side of piece until piece measures 35-35-34-34-33-33 cm / 13¾"-13¾"-13⅜"-13⅜"-13"-13" (adjust so that next row is 2nd-2nd-2nd-3rd-3rd-2nd row in English rib). Dec 1 edge st in each side of piece as follows: Work the first 2 sts K twisted tog, work as before until 2 sts remain, K 2 tog = 55-59-61-65-67-71 sts. Then work 1 more row (= 3rd-3rd-3rd-4th-4th-3rd row in English rib) AT THE SAME TIME insert 1 marker in each side of piece inside 5 sts. Put piece aside and make another sleeve. YOKE: Slip sleeves between front and back piece in each side on same circular needle with off white outwards (= RS) = 297-311-321-335-345-359 sts on row. Now insert 1 marker in the transitions between back piece and sleeves in each side (= 6 markers in total incl markers on sleeves). Next row = 4th-4th-4th-5th-5th-4th row in English rib (= WS). Work 2-3-3-1-1-3 rows in English rib before dec for raglan on sleeves and back piece (NOTE: Do not dec on front piece) on next row (= 2nd-3rd-3rd-2nd-2nd-3rd row in English rib). Work as follows from RS: Work 1 edge st in garter st, 61-63-65-67-69-71 sts in English rib as before (YOs are not counted as sts – READ ENGLISH RIB ST), work the first 5 sts in English rib from sleeve as before, dec 2 sts after marker – see DECREASE TIP 1 above, continue with English rib until 3 sts remain before next marker on sleeve, dec 2 sts before marker – see DECREASE TIP 1 above, work the last 5 sts from sleeve as before, marker, then dec 2 sts on back piece after marker, work until 3 sts remain before marker in other side of back piece, dec 2 sts before marker, work the first 5 sts on sleeve as before, dec 2 sts after marker, continue in English rib until 3 sts remain before next marker on sleeve, dec 2 sts before marker, work the last 5 sts from sleeve as before, then work the last 61-63-65-67-69-71 sts in English rib and 1 edge st in garter st as before = 12 sts dec. Then dec differently on sleeves and back piece. Sleeve: Repeat dec every 4th row 10-10-11-12-13-13 more times (i.e. dec every 2nd-3rd-3rd-2nd-2nd-3rd row in English rib) = 11-15-13-13-11-15 sts remain on each sleeve. Back piece: Repeat dec on back piece every 8th row 0-0-0-1-2-2 times, then every 4th row 10-10-11-10-9-9 times (i.e. dec every 2nd-3rd-3rd-2nd-2nd-3rd row in English rib) = 19-21-19-21-23-25 sts remain on back piece. = 165-179-177-183-185-199 sts on needle. Then on next row (= RS in S-XL-XXL, WS in M-L-XXXL) work as follows: Work 1 edge st in garter st, English rib as before over the next 61-63-65-67-69-71 sts (= front piece), then work rib in two colors (i.e. work K over K sts in English rib in the same color as English rib sts and P over P sts in English rib in same color as English rib) over the next 41-51-45-47-45-55 sts (i.e. sleeves and back piece). NOTE: I.e. YO and slipped st K tog, and work P sts P, AT THE SAME TIME dec 4-14-4-6-2-12 sts evenly i.e. dec 2 sts 2-7-2-3-1-6 times – see DECREASE TIP 2, work English rib as before over the last 61-63-65-67-69-71 sts and 1 edge st in garter st (= front piece) = 161-165-173-177-183-187 sts. Work 1 edge st in garter st, English rib as before over the next 61-63-65-67-69-71 sts (= front piece), then work K over K and P over P over the next 37-37-41-41-43-43 sts, English rib as before over the last 61-63-65-67-69-71 sts and 1 edge st in garter st (= front piece). bind off with light grayish green with K over K and P over P - NOTE: bind off YOs as sts. ASSEMBLY: Sew side and underarm seams in one inside 1 edge st. |
|
 |
|
Have you finished this pattern?Tag your pictures with #dropspattern #brisedetecardigan or submit them to the #dropsfan gallery. Do you need help with this pattern?You'll find 25 tutorial videos, a Comments/Questions area and more by visiting the pattern on garnstudio.com. © 1982-2026 DROPS Design A/S. We reserve all rights. This document, including all its sub-sections, has copyrights. Read more about what you can do with our patterns at the bottom of each pattern on our site. |


With over 40 years in knitting and crochet design, DROPS Design offers one of the most extensive collections of free patterns on the internet - translated to 17 languages. As of today we count 324 catalogs and 12290 patterns - 12280 of which are translated into English (US/in).
We work hard to bring you the best knitting and crochet have to offer, inspiration and advice as well as great quality yarns at incredible prices! Would you like to use our patterns for other than personal use? You can read what you are allowed to do in the Copyright text at the bottom of all our patterns. Happy crafting!
Post a comment to pattern DROPS 152-12
We would love to hear what you have to say about this pattern!
If you want to leave a question, please make sure you select the correct category in the form below, to speed up the answering process. Required fields are marked *.