
Popular categories
Looking for a yarn?


Comments / Questions (32)
![]() Reija Keskinen wrote:
Reija Keskinen wrote:
Kaunis
31.12.2013 - 13:46
![]() Beate wrote:
Beate wrote:
Sicher auch in anderen Farben sehr schön,würde ich gerne nacharbeiten
30.12.2013 - 00:18
![]() Katrin wrote:
Katrin wrote:
So schlicht und simpel die Frontansicht, umso aufregender der Rücken. Sehr chic mit Jeans oder Rock. Da lohnt sich die Arbeit!
28.12.2013 - 19:04
![]() Mary-ann wrote:
Mary-ann wrote:
Een hele leuke rugpand
28.12.2013 - 07:06
![]() Helga wrote:
Helga wrote:
Vorne schlicht,aber das Rückenteil machts.
27.12.2013 - 22:42Cindy Laudel wrote:
Very cute - but then the model is a lot slimmer than me.
12.12.2013 - 20:43
![]() Leduc wrote:
Leduc wrote:
Dos différent et surprenant du plus bel effet .
12.12.2013 - 17:51
![]() NikitaBonbon wrote:
NikitaBonbon wrote:
I cannot see the bottom edge…slightly worry about that because if I knit it, I should consider my wide ass…
11.12.2013 - 21:22
![]() Betty Ann wrote:
Betty Ann wrote:
This is beautiful. A perfect spring/summer knit.
11.12.2013 - 16:45
![]() Merethe wrote:
Merethe wrote:
Spændende ryg.
11.12.2013 - 11:07
|
|||||||||||||||||||||||||
Framboise#framboisecardigan |
|||||||||||||||||||||||||
 |
 |
||||||||||||||||||||||||
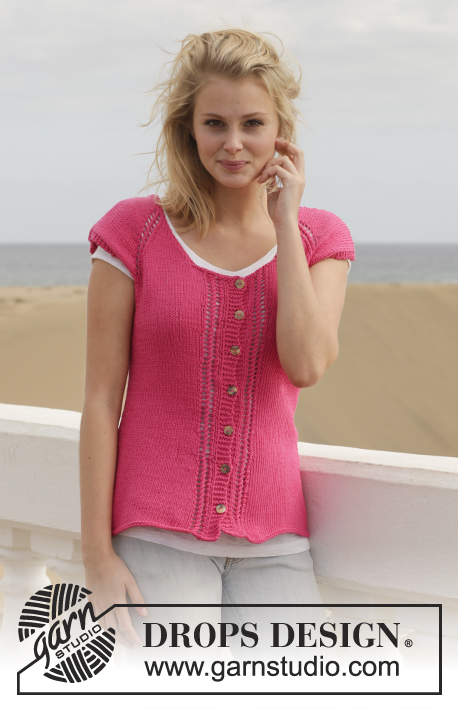
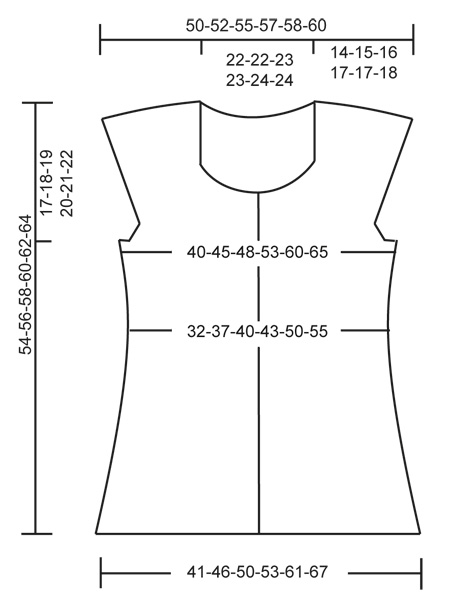
Knitted DROPS jacket with cables and lace pattern in ”Cotton Light”. Size: S - XXXL.
DROPS 154-19 |
|||||||||||||||||||||||||
|
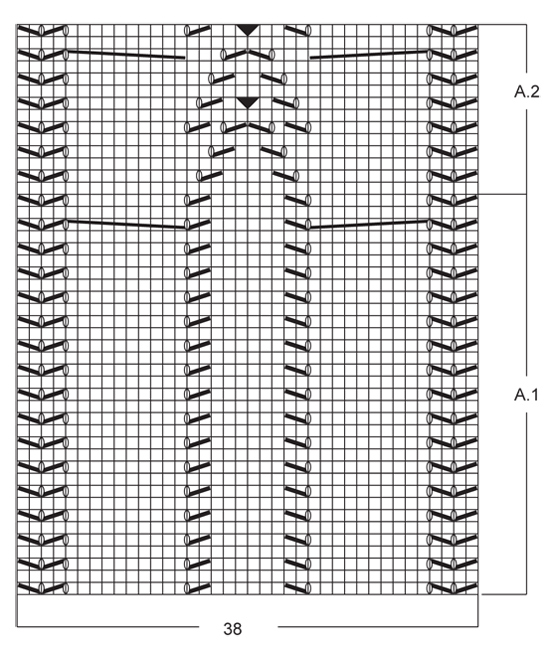
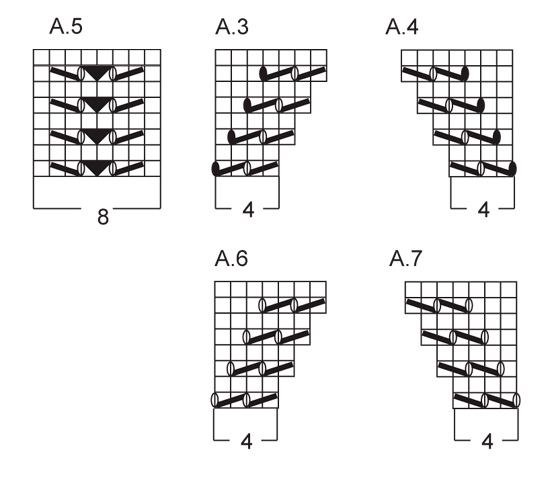
GARTER ST (back and forth on needle): K all rows. 1 ridge = K2 rows. PATTERN: See diagrams A.1-A.7. The diagrams show all rows in pattern seen from RS. DECREASE TIP: Dec from RS. Dec as follows before 1st and 3rd marker: Work until 2 sts remain before marker, slip 1 st as if to K, K 1, psso. Dec as follows after 2nd and 4th marker: K 2 tog. INCREASE TIP: Inc from RS. Inc as follows before 1st and 3rd marker: Work sts until marker, make 1 YO. Inc as follows after 2nd and 4th marker: Work sts until marker, make 1 YO. On next row work YOs twisted to avoid holes. BUTTONHOLES: Dec for buttonholes on right band. 1 buttonhole = K tog second and third st from edge and make 1 YO. Dec for buttonholes when piece measures: SIZE S: 5, 11, 17, 23, 29, 35 and 41 cm / 2",4⅜",6¾",9",11⅜",13¾",16⅛" SIZE M: 7, 13, 19, 25, 31, 37 and 43 cm / 2¾",5⅛",7½",9¾",12¼",14½",17" SIZE L: 8, 14, 20, 26, 32, 39 and 45 cm / 3⅛",5½",8",10¼",12½",15¼",17¾" SIZE XL: 8, 14, 20, 26, 32, 39 and 45 cm / 3⅛",5½",8",10¼",12½",15¼",17¾" SIZE XXL: 5, 12, 19, 26, 33, 40 and 47 cm / 2",4¾",7½",10¼",13",15¾",18"½ SIZE XXXL: 7, 14, 21, 28, 35, 42 and 49 cm / 2¾",5½",8¼",11",13¾",16½",19¼" ---------------------------------------------------------- BODY: Worked back and forth on circular needle to make room for all the sts. Cast on 184-204-222-232-268-292 sts (includes 5 band sts in each side) on circular needle size 3.5 mm / US 4 with Cotton Light. Work 1 ridge in GARTER ST - see explanation above. Switch to circular needle size 4 mm / US 6. Then work first row as follows from RS: Work 5 sts in garter st (= band), A.5 (= 8 sts), stockinette st over the next 60-70-79-84-102-114 sts, A.1 (= 38 sts), stockinette st over the next 60-70-79-84-102-114 sts, A.5 (= 8 sts), finish with 5 sts in garter st. REMEMBER THE GAUGE! Continue in garter st, with pattern and in stockinette st until piece measures 6 cm / 2½". NOTE: A.2 (= 38 sts) is worked over A.1 when A.1 has been worked 1 time vertically (work pattern A.2 until finished measurements). Work pattern A.5 until finished measurements. Remember BUTTONHOLES on right band. Now insert 4 markers in the piece as follows: Work 5 sts in garter st, A.5, 32-37-41-44-53-59 sts in stockinette st, insert 1st marker, 3 sts in stockinette st, insert 2nd marker, 25-30-35-37-46-52 sts in stockinette st, A.2, 25-30-35-37-46-52 sts in stockinette st, insert 3rd marker, 3 sts in stockinette st, insert 4th marker, 32-37-41-44-53-59 sts in stockinette st, A.5, finish with 5 band sts in garter st. Move the markers upwards when working. On next row from RS dec 1 st before 1st and 3rd marker and after 2nd and 4th marker (= 4 sts dec) – see explanation above. I.e. there are 3 sts between every dec the entire way upwards. Repeat dec every 1½-1½-1½-1½-1-1 cm / ½"-½"-½"-½"-⅜"-⅜" 6-6-7-6-8-9 more times (= 7-7-8-7-9-10 times in total) AT THE SAME TIME on 2nd-4th and 6th dec, dec after A.5 (right front piece), in each side of A.2 and before A.5 (left front piece), i.e. work 3 sts tog instead of 2 sts (= 8 sts dec every other dec) = 144-164-178-192-220-240 sts remain on needle. When piece measures 25-25-25-26-26-26 cm / 9¾"-9¾"-9¾"-10¼"-10¼"-10¼", inc on next row from RS 1 st at every marker (= 4 sts inc) – see explanation above = 148-168-182-196-224-244 sts. Then inc differently in each size: SIZE S: Repeat inc every 1½ cm / ½" 5 more times (= 6 times in total) AT THE SAME TIME on 2nd and 4th inc, inc 1 st after A.5 (right front piece), in each side of A.2 and before A.5 (left front piece), inc by making a YO straight before/after A.2/A.5, work YO twisted on next row = 176 sts on needle. SIZE M-L-XL-XXL-XXL: Repeat inc every 1½ cm / ½" 5-5-6-6-7 more times (= 6-6-7-7-8 times in total) AT THE SAME TIME on 2nd-4th and 6th inc, inc 1 st after A.5 (right front piece), in each side of A.2 and before A.5 (left front piece), inc by making a YO straight before/after A.2/A.5, work YO twisted on next row (= 8 sts inc on every other inc) = 200-214-232-260-284 sts on needle. When piece measures 37-38-39-40-41-42 cm / 14½"-15"-15¼"-15¾"-16⅛"-16½", work next row from RS as follows: 5 band sts in garter st, A.5, stockinette st over the next 24-30-34-38-45-51 sts, 14 sts in garter st, 18-24-27-32-39-45 sts in stockinette st, A.2 (= 38 sts), 18-24-27-32-39-45 sts in stockinette st, 14 sts in garter st, stockinette st over the next 24-30-34-38-45-51 sts, A.5, finish with 5 sts in garter st. Repeat this row 1 more time from WS. Then (from RS) bind off for armholes as follows: 5 band sts in garter st, A.5, stockinette st over the next 24-30-34-38-45-51 sts, 3 sts in garter st, bind off the next 8 sts, 3 sts in garter st, 18-24-27-32-39-45 sts in stockinette st, A.2 (= 38 sts), 18-24-27-32-39-45 sts in stockinette st, 3 sts in garter st, bind off the next 8 sts, 3 sts in garter st, stockinette st over the next 24-30-34-38-45-51 sts, A.5, finish with 5 sts in garter st = 80-92-98-108-122-134 sts on back piece and 40-46-50-54-61-67 sts on each front piece and finish each part separately. LEFT FRONT PIECE: = 40-46-50-54-61-67 sts. Work from WS. 5 sts in garter st, A.5 (= 8 sts), 24-30-34-38-45-51 sts in stockinette st, finish with 3 sts in garter st. On next row (= RS) work the first 2 sts in stockinette st twisted tog after the 3 sts in garter st for armhole, repeat dec on every row from RS 0-3-5-5-6-7 more times (= 1-4-6-6-7-8 times in total) = 39-42-44-48-54-59 sts remain on needle. Work next row from RS as follows: 3 sts in garter st, pattern A.4 (= 4 sts) (NOTE: Pattern A.4 is displaced 1 st on every row from RS in towards middle AT THE SAME TIME inc 1 st in A.4 for sleeve on every row from RS (as shown in diagram)), 19-22-24-28-34-39 sts in stockinette st, A.5, finish with 5 sts in garter st. Continue with A.4 until 13-13-13-12-7-4 sts for sleeve have been inc (inc 1 st on every row from RS, SEE YO in diagram) = 52-55-57-60-61-63 sts on needle. Then work A.7 over A.4 until finished measurements. Continue with pattern, in stockinette st and in garter st upwards until piece measures 40-42-44-44-46-48 cm / 15¾"-16½"-17¼"-17¼"-18"-19". Then on next row from WS work 1 ridge over the first 16-16-17-17-18-18 sts, work the other sts as before. Then bind off the first 14-14-15-15-16-16 sts for neck = 38-41-42-45-45-47 sts remain on needle. Then work in garter st over the 2 outermost sts towards the neck, in stockinette st and with pattern as before AT THE SAME TIME dec sts at beg of every row from neck (= WS) inside the 2 sts in garter st as follows: K 2 tog (= 1 st dec), repeat dec 8 more times (= 9 times in total) = 29-32-33-36-36-38 sts remain on shoulder (after all inc for sleeve). Work in stockinette st and garter st until piece measures 54-56-58-60-62-64 cm / 21¼"-22"-22¾"-23⅝"-24⅜"-25¼". Work 1 ridge in garter st. Loosely bind off. RIGHT FRONT PIECE: Work as left front piece but bind off for armhole before 3 sts in garter st by K 2 tog, and bind off for neck at beg of row from RS. REMEMBER BUTTONHOLES! Work diagram A.3 and A.6 instead of A.4 and A.7. Note, the 2 yo in chart A.3 works opposite on next row, i.e P the 1st yo twisted, P the 2nd yo, i.e the 1 st yo will be a st, the 2nd yo will also be a st but will create a hole. BACK PIECE: = 80-92-98-108-122-134 sts. Bind off for armholes as on front piece = 78-84-88-96-108-118 sts remain on needle. Work next row from RS as follows: 3 sts in garter st, A.3 over the next 4 sts (A.3 is displaced in towards middle), 13-16-18-22-28-33 sts in stockinette st, A.2 over the middle 38 sts as before, 13-16-18-22-28-33 sts in stockinette st, A.4 over the next 4 sts, finish with 3 sts in garter st. NOTE: A.3/A.4 is displaced towards the neck. Continue displacement until 13-13-13-12-7-4 sts have been inc in both diagram A.3 and A.4 for sleeves = 104-110-114-120-122-126 sts. Then continue displacement by working A.6 over A.3 and A.7 over A.4. Continue with pattern, in stockinette st and in garter st upwards until piece measures 51-53-55-57-59-61 cm / 20"-21"-21⅝"-22½"-23¼"-24". On next row from RS K all cable sts in A.2 tog 2 by 2 = 94-100-104-110-112-116 sts on needle. Work 1 ridge over the middle 40-40-42-42-44-44 sts, work the other sts as before. Then bind off the middle 36-36-38-38-40-40 sts (= 2 sts in garter st in each side) = 29-32-33-36-36-38 sts in each side. Work each shoulder separately. Work in stockinette st and garter st over the 2 outermost sts towards the neck until piece measures 54-56-58-60-62-64 cm / 21¼"-22"-22¾"-23⅝"-24⅜"-25¼". Work 1 ridge in garter st. Loosely bind off. ASSEMBLY: Sew shoulder seams tog edge to edge. Sew on buttons. |
|||||||||||||||||||||||||
Diagram explanations |
|||||||||||||||||||||||||
|
|||||||||||||||||||||||||
 |
|||||||||||||||||||||||||
 |
|||||||||||||||||||||||||
 |
|||||||||||||||||||||||||
Have you finished this pattern?Tag your pictures with #dropspattern #framboisecardigan or submit them to the #dropsfan gallery. Do you need help with this pattern?You'll find 22 tutorial videos, a Comments/Questions area and more by visiting the pattern on garnstudio.com. © 1982-2026 DROPS Design A/S. We reserve all rights. This document, including all its sub-sections, has copyrights. Read more about what you can do with our patterns at the bottom of each pattern on our site. |
|||||||||||||||||||||||||


With over 40 years in knitting and crochet design, DROPS Design offers one of the most extensive collections of free patterns on the internet - translated to 17 languages. As of today we count 324 catalogs and 12290 patterns - 12280 of which are translated into English (US/in).
We work hard to bring you the best knitting and crochet have to offer, inspiration and advice as well as great quality yarns at incredible prices! Would you like to use our patterns for other than personal use? You can read what you are allowed to do in the Copyright text at the bottom of all our patterns. Happy crafting!
Post a comment to pattern DROPS 154-19
We would love to hear what you have to say about this pattern!
If you want to leave a question, please make sure you select the correct category in the form below, to speed up the answering process. Required fields are marked *.