
Popular categories
Looking for a yarn?


Comments / Questions (21)
![]() Germana wrote:
Germana wrote:
Scusa ma allora lo schema comprende sia i ferri pari che dispari? Aiuto mi sono incartata.....a me tra ferri pari e dispari mi da un totale di 7.....
06.09.2017 - 19:34DROPS Design answered:
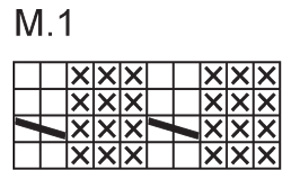
Buonasera Germana, il diagramma mostra tutti i ferri del lavoro, e gli intrecci sono ogni 4 ferri, sul diritto del lavoro. Buon lavoro!
06.09.2017 - 19:40
![]() Germana wrote:
Germana wrote:
Salve ho un problema con lo schema M1 può essere che tra un intreccio e l'altro ci sono 7 ferri? Mi sembra così strano....grazieee
06.09.2017 - 16:23DROPS Design answered:
Buongiorno Germana. L'intreccio è ogni 4 ferri. Buon lavoro!
06.09.2017 - 16:50
![]() Twerts wrote:
Twerts wrote:
In de beschrijving van het patroon in het Nederlands staat voor de zak 26 cm in plaats van 26 naalden.
12.03.2016 - 18:17DROPS Design answered:
Hoi Twerts. Het moet 26 cm zijn volgens het originele Noorse patroon.
14.03.2016 - 16:20
![]() Stella Nicastro wrote:
Stella Nicastro wrote:
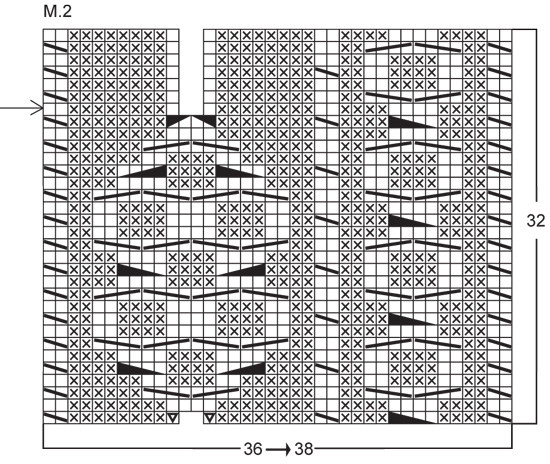
Salve vorrei avere dei chiarimenti riguardo ai simboli dei motivi. Il secondo e terzo simbolo indicano entrambi "m. rasata rovescia/rov. (visto dal diritto del lavoro)". Credo che il terzo sia sbagliato, e se possibile vorrei sapere comunque se con quella frase si intende "maglie a rovescio su dritto, e maglie a dritto su rovescio".
21.12.2015 - 10:31DROPS Design answered:
Buongiorno Stella, abbiamo modificato la legenda del diagramma, alcuni simboli erano errati, tra cui uno di quelli che ci ha indicato lei. Si, la m rasata rovescia è a rov sul diritto del lavoro e a dir sul rovescio del lavoro. Buon lavoro!
21.12.2015 - 14:03
![]() Inkeri Pulkka wrote:
Inkeri Pulkka wrote:
Kysymys:voinko samalla ohjeella neuloa suoraa neuletta,vai muuttuko koko,tarkoitus tehdä 12-vuotiaalle yksinkertainen neule,-villa ei käy,mikä lanka sopii tähän ohjeeseen? kiios
16.11.2013 - 12:33
![]() Kirsten Petersen wrote:
Kirsten Petersen wrote:
Kan det være rigtigt at jo større størrelse jo kortere bliver ærmerne?
12.11.2012 - 22:38DROPS Design answered:
Ja det stemmer for jo bredere/større bliver skulderpartiet på trøjen. God fornøjelse!
15.11.2012 - 10:32
![]() Charlotte Valestra wrote:
Charlotte Valestra wrote:
I need help on the pattern. Do you have written instructions instead of a diagram?
16.10.2012 - 19:35DROPS Design answered:
Dear Mrs Valestra, there is no written instructions for this diagram, but 1 square = 1 st x 1 row, and the diagramm show the pattern from RS, so all odd rows will be RS and all even rows will be WS. Happy Knitting !
14.11.2012 - 11:12
![]() Lucia Grazzani wrote:
Lucia Grazzani wrote:
Vorrei sapere come ricevre le vostre riviste o dove trovarle in Italia. grazie e arrivederci
01.09.2012 - 14:42DROPS Design answered:
Le riviste non sono ancora state tradotte in italiano purtroppo, ma si possono acquistare in versione inglese e francese (nella stessa rivista) presso i nostri rivenditori oppure presso un rivenditore all'estero.
06.09.2012 - 00:29
![]() Mariëtte wrote:
Mariëtte wrote:
Klopt het dat de kabel in averechte steken opkomt? Voor het l pand begin ik links onder maar de volgorde van kabel breien is toch zoals bij het rechterpand: eerst 2 st op hulpnld achter het werk en dan 2 steken voor?
04.04.2012 - 17:00DROPS Design answered:
De kabel zelf wordt in tricotst gebreid met averechte st om heen. U kunt bij het breien van het linker pand ook kiezen om de kabels zelf te spiegelen (dus lag de 2 st achter op het rechter pand, moeten ze voor op he linker pand), maar dat is niet het geval bij dit model. U hoeft hier alleen de kabelpatronen (M.1 en M.2 te spiegelen)
05.04.2012 - 15:24
![]() DROPS Design NL wrote:
DROPS Design NL wrote:
Hoi Dineke. Je moet ook de kabel in spiegelbeeld breien. Bijv. de eerste kabels die je maakt in nld 1: In spiegelbeeld moet je de 3 kabels nu de st achter het werk zetten en breien ipv voor het werk (M.2). Hetzelfde geldt voor patroon M.1.
19.01.2012 - 10:31
|
|||||||||||||||||||||||||||||||
DROPS 74-6 |
|||||||||||||||||||||||||||||||
 |
 |
||||||||||||||||||||||||||||||
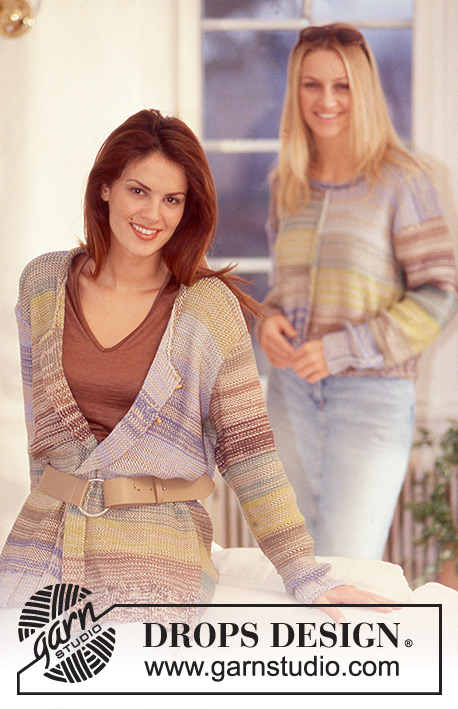
DROPS Cardigan in Alpaca
DROPS 74-6 |
|||||||||||||||||||||||||||||||
|
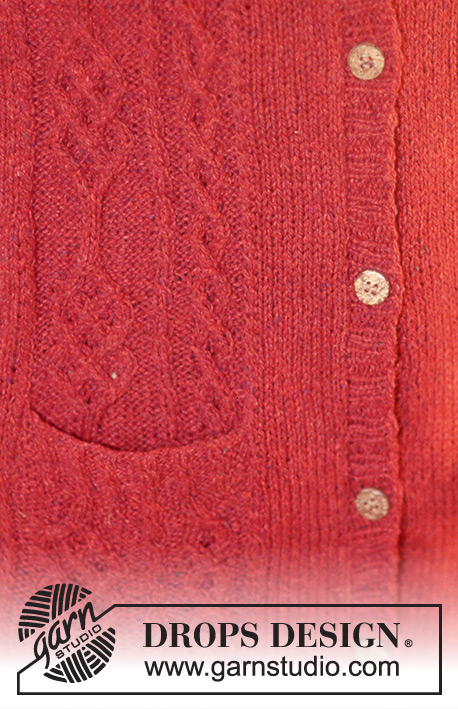
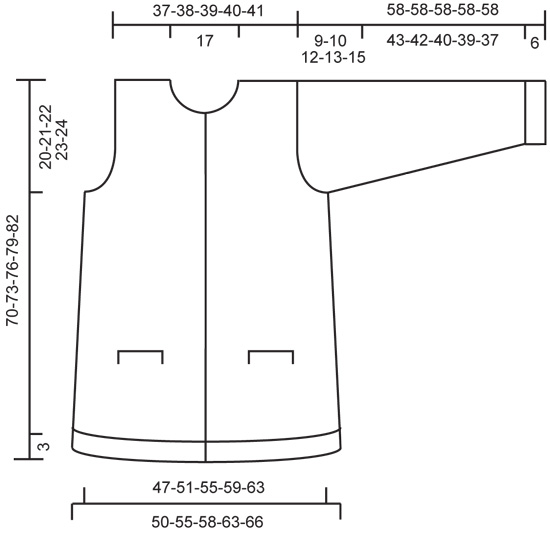
Gauge: 23 sts x 30 rows on larger needles in stockinette st = 10 x 10 cm. Pattern: See charts. The pattern is seen from the right side. Back: Cast on 119-129-139-149-159 sts on smaller needles. Establish the pattern on the first row as follows (right side row): K 1 (edge st), K 2 (for a small cable as in Pattern 1), Pattern 1 over 115-125-135-145-155 sts, K 1 (edge st). Knit in pattern as established until the piece measures approx. 3 cm (adjust to end after 4th row of pattern), then change to larger needles and stockinette st, decreasing 1-1-3-3-5 sts evenly distributed on the first row = 118-128-136-146-154 sts. When the piece measures 18 cm dec 1 st at each side every 6-7-7-8-8 cm a total of 4 times = 110-120-128-138-146 sts. When the piece measures 50-52-54-56-58 cm bind off for armhole at each side every other row: 4 sts 1 time, 3 sts 0-1-2-2-3 times, 2 sts 2-3-3-5-5 times and 1 st 4-3-3-4-4 times = 86-88-90-90-92 sts. When the piece measures 68-71-74-77-80 cm bind off the center 36 sts for the neck. Then dec 1 st at each neck edge every other row 2 times = 23-24-25-25-26 sts remain on each shoulder. Bind off when the piece measures 70-73-76-79-82 cm. Pocket lining: Cast on 32 sts on smaller needles and knit stockinette st for 26 cm, put sts on a st holder. Knit a second pocket lining. Right front: Cast on 72-77-82-87-92 sts on smaller needles. Establish pattern on the first row as follows beginning at center front edge (right side row): K 1 (edge st), Pattern 1 over 70-75-80-85-90 sts, K 1 (edge st). Knit Pattern 1 for approx. 3 cm (adjust to end after 4th row of pattern) – on the last row dec 1 st by P 2 tog the 19th and 20th sts (counted from center front edge) = 71-76-81-86-91 sts. Change to larger needles and continue as follows beginning from center front edge: K 1 (edge st), 10 sts stockinette st, Pattern 2 (36 sts which will inc to 38 sts in the pattern), 23-28-33-38-43 sts stockinette st and K 1 (edge st). Continue with pattern as established over all sts. When the piece measures 18 cm dec 1 st at side every 6-7-7-8-8 cm a total of 4 times = 67-72-77-82-87 sts. At the same time when the piece measures approx. 20-21 cm – adjust to end after 26 rows of Pattern 2 - see the arrow on the chart – put the 32 center sts of Pattern 2 onto a st holder for the pocket opening and put the 32 sts from one of the pocket linings onto the needles in their place. Continue pattern as established over all sts, continuing Pattern 2 on the pocket lining sts. Note: on the 25th row of the pattern (the row before the arrow), 2 sts are decreased – when you begin the pattern again, these sts are again increased on row 1. When the piece measures 50-52-54-56-58 cm bind off for armhole at the side every other row: 4 sts 1 time, 3 sts 0-1-2-2-3 times, 2 sts 2-3-3-5-5 times and 1 st 4-3-3-4-4 times. When the piece measures 60-62-65-67-70 cm bind off 12 sts at center front edge for neck. Then bind off at the neck edge every other row: 3 sts 1 time, 2 sts 2 times and 1 st 8 times = 28-29-31-31-33 sts (or 30-31-33-33-35 sts if you are in rows 1 through 25 of Pattern 2) remain every shoulder. When the piece measures 70-73-76-79-82 cm dec 5-5-6-6-7 (dec 2 sts more if you are in rows 1 through 25 of Pattern 2) evenly distributed on the row. On the next row bind off the remaining 23-24-25-25-26 sts. Left front: Cast on and knit the same as the right, reversing shaping so that the pattern will be the same at each side of center front – that is, read the charts for Patterns 1 and 2 from left to right (mirror image). Sleeve: Cast on 52-57-57-62-62 sts on smaller needles. Knit Pattern 1 for 6 cm. Change to larger needles and knit stockinette st to finished measurements. When the piece measures 8 cm inc 1 st at each side a total of 17-16-19-18-21 times: Size S: every 7 rows. Size M: alternately every 7th and 8th rows. Sizes L and XL: every 6 rows. Size XXL: every 5 rows = 86-89-95-98-104 sts. When sleeve measures 49-48-46-45-43 cm bind off for sleeve cap at each side every other row: 4 sts 1-1-1-1-1 time, 3 sts 1-1-1-0-0 time, 2 sts 4-4-3-3-2 times, 1 st 2-4-9-11-14 times, then 2 sts at each side until the piece measures 57 cm and then bind off 3 sts 1 time. Bind off the remaining sts, sleeve measures approx. 58 cm. Pocket edges: Put sts from st holder on smaller needles = 32 sts. On the first row, establish pattern as follows: K 3 (knit in garter st throughout), K 2 (for small cable), Pattern 1 over 25 sts (in the 7th st from start of pocket edge inc 1 st = 33 sts on needle), K 3 (knit in garter st throughout). Knit in pattern as established for 2.5 cm, bind off. Sew the edges to sweater from right side. Fold pocket lining double and sew to bottom of pocket edge, sew up sides. Assembly: Sew shoulder seams. Button band: Pick up approx. 142-166 sts (divisible by 4 +2 sts) along left button band on smaller needles. Knit rib as follows from right side: K 2 (knit in garter st throughout), * K 2, P 2 *, repeat from * - *, finish with K 2 and 2 sts in garter st. Knit in rib as established for 2 cm, bind off in pattern. Repeat along right button band, but after 1 cm make 7 buttonholes evenly distributed on the band. The bottom buttonhole should be approx. 10 cm from the lower edge and the top buttonhole should be approx. 8 cm from the top edge (you will make 1 buttonhole in the neckband as well). 1 buttonhole = bind off 2 sts and cast on 2 new sts on the next row. Neckband: Pick up approx. 111-131 sts (divisible by 5 + 6 sts) around the neck (including over button bands) on smaller needles. Knit as follows (seen from the right side): K 2 (knit in garter st throughout), K 2, then Pattern 1 to last 2 sts, K 2 (knit in garter st throughout). After 1 cm make 1 buttonhole over the others on button bands. Bind off when neckband measures 2.5 cm. Assembly: Sew in sleeves. Sew sleeve and side seams using edge sts as a seam allowance. Sew on buttons. |
|||||||||||||||||||||||||||||||
Diagram explanations |
|||||||||||||||||||||||||||||||
|
|||||||||||||||||||||||||||||||
 |
|||||||||||||||||||||||||||||||
 |
|||||||||||||||||||||||||||||||
 |
|||||||||||||||||||||||||||||||
Have you finished this pattern?Tag your pictures with #dropspattern or submit them to the #dropsfan gallery. Do you need help with this pattern?You'll find 21 tutorial videos, a Comments/Questions area and more by visiting the pattern on garnstudio.com. © 1982-2026 DROPS Design A/S. We reserve all rights. This document, including all its sub-sections, has copyrights. Read more about what you can do with our patterns at the bottom of each pattern on our site. |
|||||||||||||||||||||||||||||||


With over 40 years in knitting and crochet design, DROPS Design offers one of the most extensive collections of free patterns on the internet - translated to 17 languages. As of today we count 325 catalogs and 12298 patterns - 12288 of which are translated into English (US/in).
We work hard to bring you the best knitting and crochet have to offer, inspiration and advice as well as great quality yarns at incredible prices! Would you like to use our patterns for other than personal use? You can read what you are allowed to do in the Copyright text at the bottom of all our patterns. Happy crafting!
Post a comment to pattern DROPS 74-6
We would love to hear what you have to say about this pattern!
If you want to leave a question, please make sure you select the correct category in the form below, to speed up the answering process. Required fields are marked *.