
Popular categories
Looking for a yarn?


Comments / Questions (74)
![]() Paola Pomioli wrote:
Paola Pomioli wrote:
Salve, sono necessari i ferri circolari perché si lavora in tondo? Può darmi una spiegazione al riguardo per favore?
16.06.2018 - 11:13DROPS Design answered:
Buongiorno Paola. L'uso dei ferri circolari è molto diffuso soprattutto nei paesi del nord Europa. Questo modello è lavorato in parti separate, avanti e indietro sui ferri. Può sostituire i ferri circolari con quelli dritti. Le spiegazioni non cambiano. Buon lavoro!
16.06.2018 - 15:40
![]() Linda Peachey wrote:
Linda Peachey wrote:
I am swatching for this pattern and have had to go to a size 6 (4.00 mm) needle to get the stitch gauge. Is the fabric supposed to be a loose knit? I often have gauge difficulty with Drops patterns, so perhaps I am doing something wrong. Help, please?
28.12.2017 - 04:20DROPS Design answered:
Dear Linda, just as every knitter work with different gauge, we also have different preferencses (as how dense we like our knitted fabric). The pattern is written for the gauge that is given, however, if you prefer somewhat thighter texture, you will have to recalculate the stitch count. If you are having difficulty achieving gauge, you might want to try a different type of needle (like metallic, instead of bamboo, etc), or a different knitting style (continental instead of English, etc). I hope you can work it out, this sweater is so pretty it will worth it. Happy crafting!
29.12.2017 - 09:58Makkak Markussen wrote:
Hvormange garn skal jeg bestille til str. M.
22.11.2016 - 20:14DROPS Design answered:
Hej Makkak. Størrelse: S - M - L - XL - XXL - XXXL Materialer: DROPS BABY ALPACA SILK fra Garnstudio 350-400-450-500-550-600 g f.nr 7820, grønn Saa str M skal du bruge 400 gr = 50 gr per nöste er 8 nöster i alt.
23.11.2016 - 11:39Privat wrote:
Bonjour, je rencontre des difficultés pour réaliser l'arrondi du devant du modèle lady or thé forest n'y drops design. Pouvez-vous svp me donner des précisions. J'ai un niveau moyen et je ne comprends pas les explications, notamment "milieu devant" et comment continuer le point de blé dans l'angle casse. Merci par avance pour ces précisions.
22.08.2016 - 18:28DROPS Design answered:
Bonjour Mme Privat, le "milieu devant" est le côté bordure devant, opposé au "côté" (= fente côté et couture au dos). Quand vous montez les mailles pour l'arrondi du bas du devant, tricotez les nouvelles mailles au point de blé au fur et à mesure, en fonction des mailles suivantes pour conserver le motif du point de blé. Bon tricot!
23.08.2016 - 08:07
![]() Antonella wrote:
Antonella wrote:
Sto facendo questo cardigan. Nella spiegazione per il davanti nella sezione suggerimento, dite di fare 1 ferro e 2 ferriprima di iniziare gli aumenti. Questo vuol dire che devo lavorare 11 ferri nel davanti destro e 12 ferri nel davanti sinistro? Nel davanti destro il 1º ferro è quindi sul rovescio? Grazie
20.11.2015 - 19:51DROPS Design answered:
Buonasera Antonella. Per il davanti destro, il primo ferro è sul diritto del lavoro e aumenterà verso il centro ai ferri 2, 4, 6, 8 e 10 (sul rovescio del lavoro). Per il davanti sinistro, il primo ferro è sempre sul diritto del lavoro e aumenterà ai ferri 3, 5, 7, 9 e 11 (sul diritto del lavoro). Ci sono quindi 10 ferri per il davanti destro e 11 per il davanti sinistro. Buon lavoro!
23.11.2015 - 19:00
![]() Bente wrote:
Bente wrote:
Mangler det noe i oppskriften på forstykket?, etter økt til sammen 8 m skal det jo økes på de neste 6 p 10 m til. skal de økes på hver pinne da eller? :altså pinne 1 til 6. det skal jo i den buen være økning på 18 masker.
05.06.2015 - 16:30DROPS Design answered:
Hej Bente, Nej du stopper efter de 8 økninger, da har du det antal masker som står i opskriften efter de 6 pinde. God fornøjelse!
07.08.2015 - 14:55Claudette Phaneuf wrote:
J'ai reçu ma laine pour le modèle 149-14. Elle est très douce au touché et la couleur me plait. Mon échantillon est fait et j'ai commencé le dos. Ce gilet devrait me garder au chaud durant nos hivers québécois. C'est avec plaisir que j'ai entamé ce tricot.
25.07.2014 - 13:38Claudette Phaneuf wrote:
Merci, je commande la laine et je m'y mets. Beau modèle.
15.07.2014 - 11:10Claudette Phaneuf wrote:
Est-ce que ce gilet peut se faire avec des aiguilles droites? si oui, est-ce que les grosseurs des aiguilles sont les mêmes que des aiguilles circulaires? c'est-à-dire que ça prend des # 2,5 et 3?
14.07.2014 - 22:41DROPS Design answered:
Bonjour Mme Phaneuf, on utilise ici une aiguille circulaire pour avoir suffisamment de place pour y loger toutes les mailles. Ainsi, vous pouvez tricoter avec des aiguilles droites, mais vos mailles seront plus serrées, pensez à bien respecter et conserver la tension de 24 m x 32 rangs jersey = 10 x 10 cm avec des aiguilles 3 ou celles qui vous seront nécessaires pour avoir cet échantillon. Bon tricot!
15.07.2014 - 08:48
![]() Bente Baasch wrote:
Bente Baasch wrote:
Hej jeg kan ikke forstå opskriften på højre forstykke,det står at man skal strike Striber ryg og forstyk,men samtidig med at der skal strikkes 11 m perlestrik og glatstrikning resten af pinden.????
24.03.2014 - 20:15DROPS Design answered:
Hej Bente. Du skal starte med at tage ud til forstykket som der beskrives (de 11 m perlestrik er forkanten). Saa du begynder med de 6 pinde der er beskrevet under forstk og bagefter strikker du videre med striberne til FORSTYK/BAGSTYK
25.03.2014 - 17:25
|
|
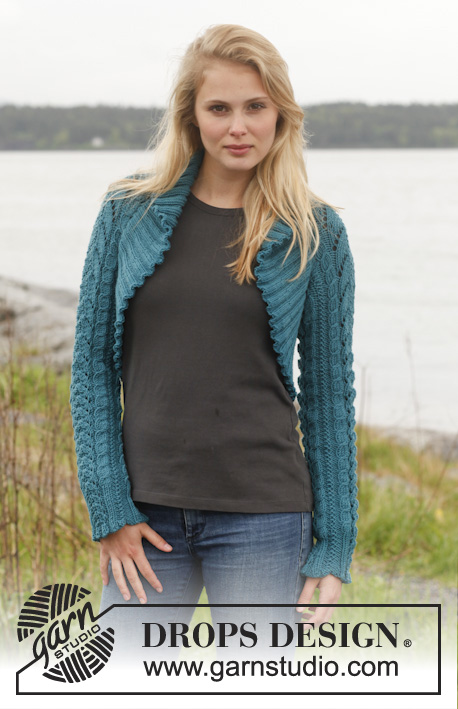
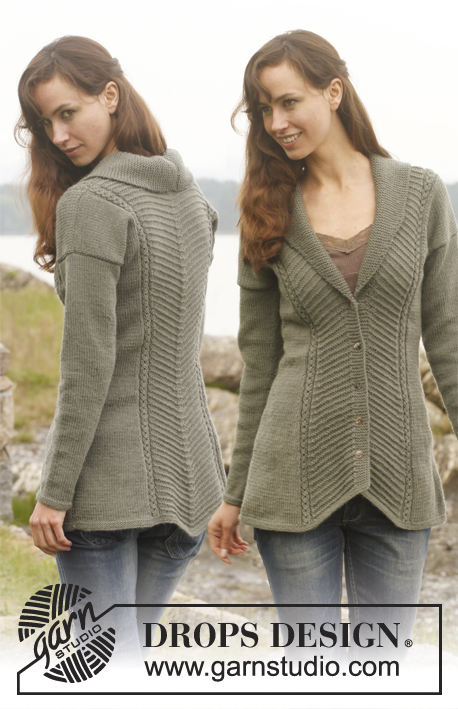
Lady of the Forest#ladyoftheforestcardigan |
|
|
|
|
Knitted DROPS jacket with stripes in stockinette st and double seed st in ”BabyAlpaca Silk”. Size: S - XXXL.
DROPS 149-14 |
|
|
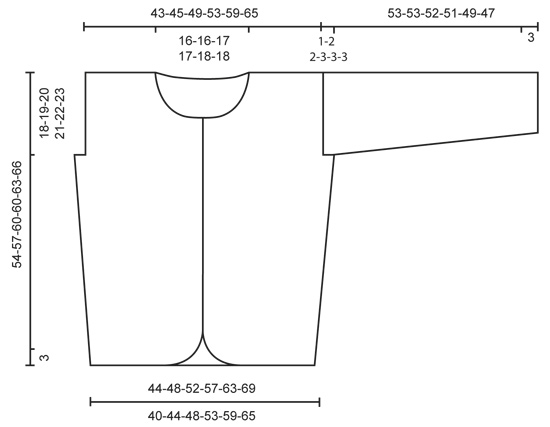
GARTER ST (back and forth on circular needle): K all rows. 1 ridge = K 2 rows. DOUBLE SEED ST: Row 1: * K 1, P 1 *, repeat from *-*. Row 2: K over K and P over P. Row 3: P over K and K over P. Row 4: As 2nd row. Repeat row 1 to 4. KNITTING TIP: Work 1 row on right front piece before beg inc towards mid front. Work 2 rows on left front piece before beg inc towards mid front (i.e. left front piece is 1 row longer than right front piece. That way you avoid cutting the thread every time new sts are cast on in rounded edge at the front). BUTTONHOLE BODY: bind off for buttonholes on right band. 1 buttonhole = bind off 4th and 5th st from mid front and cast on 2 new sts on next row over these sts. bind off for buttonholes when piece measures: SIZE S: 7, 15, 22, 30, 37 and 46 cm / 2¾", 6", 8¾", 11¾", 14½" and 18". SIZE M: 8, 16, 24, 32, 40 and 49 cm / 3⅛", 6¼", 9½", 12½", 15¾" and 19¼". SIZE L: 8, 17, 25, 33, 41 and 51 cm / 3⅛", 6¾", 9¾", 13", 16⅛" and 20". SIZE XL: 8, 17, 25, 33, 41 and 51 cm / 3⅛", 6¾", 9¾", 13", 16⅛" and 20". SIZE XXL: 9, 18, 26, 35, 43 and 53 cm / 3½", 7", 10¼", 13¾", 17" and 21" SIZE XXXL: 9, 18, 26, 35, 43 and 56 cm / 3½", 7", 10¼", 13¾", 17" and 22" NOTE! bind off the last buttonhole on 2nd row on neckline. STRIPES BODY: * Work 8½-9-9½-9½-10-10½ cm / 3¼"-3½"-3¾"-3¾"-4"-4¼" in stockinette st, 8½-9-9½-9½-10-10½ cm / 3¼"-3½"-3¾"-3¾"-4"-4¼" double seed st *, repeat from *-* 2 more times = 3 stripes in double seed st. BUTTONHOLE SLEEVE: bind off for buttonholes on part 1 of sleeve. 1 buttonhole = bind off 4th and 5th st from edge on band and cast on 2 new sts on next row over these sts. bind off for buttonholes when piece measures: 2, 5, 8 and 11 cm / ¾", 2", 3⅛" and 4⅜" for all sizes. STRIPES SLEEVE: Work 7½-7-6-5½-2-1 cm / 2⅞"-2¾"-2⅜"-2¼"-¾"-⅜" in stockinette st, 8½-9-9½-9½-10-10 cm / 3¼"-3½"-3¾"-3¾"-4"-4¼" double seed st, 8½-9-9½-9½-10-10 cm / 3¼"-3½"-3¾"-3¾"-4"-4¼" in stockinette st, 16½-16-15-14½-15-14 cm / 6½"-6¼"-6"-5¾"-6"-5½" double seed st = 2 stripes in total in double seed st. INCREASE TIP: At beg of row: Inc 1 st after 1 edge st by getting yarn between 2 sts from previous row - work this st twisted, i.e. work in back loop of st instead of front to avoid holes. K the new st twisted if next st is P, P the new st twisted if next st is K. Continue pattern as before. At end of row: Inc 1 st before 1 edge st by getting yarn between 2 sts from previous row - work this st twisted, i.e. work in back loop of st instead of front to avoid holes. K the new st twisted if previous st is P, P the new st twisted if previous st is K. DECREASE TIP: At beg of row: Dec 1 st by working the 2 sts after 1 edge st tog, K tog if next st is P, P tog if next st is K. Continue pattern as before. At end of row: Dec 1 st by working the 2 sts before 1 edge st tog, K tog if previous st is P, P tog if previous st is K. Continue pattern as before. ----------------------------------------------------------- BACK PIECE: Worked back and forth on circular needle. Cast on 99-107-117-129-143-159 sts (includes 1 edge st in each side) on circular needle size 2.5 mm / US 1.5 with BabyAlpaca Silk. Work DOUBLE SEED ST - see explanation above, with 1 edge st in GARTER ST in each side - see explanation above. When 10 rows have been worked, switch to circular needle size 3 mm / US 2.5. Then work STRIPES BODY - see explanation above – with 1 edge st in garter st in each side. When piece measures 8 cm / 3⅛", inc 1 st in each side - READ INCREASE TIP! Repeat inc in each side every 8-6½-7-6½-7½-10 cm / 3⅛"-2½"-2¾"-2½"-2⅞"-4" 3-4-4-4-4-3 more times (= 4-5-5-5-5-4 sts inc in each side) = 107-117-127-139-153-167 sts. REMEMBER THE KNITTING GAUGE! When piece measures 36-38-40-39-41-43 cm / 14¼"-15"-15¾"-15¼"-16⅛"-17", bind off 2-5-5-6-6-6 sts at beg of the next 2 rows for armholes = 103-107-117-127-141-155 sts on needle. Continue with stripes until piece measures 52-55-58-58-61-64 cm / 20½"-21½"-22¾"-22¾"-24"-25¼". Now bind off the middle 37-37-39-39-41-41 sts for neck and finish each shoulder separately. Continue to bind off 1 st on next row from neck = 32-34-38-43-49-56 sts remain on the shoulder. Bind off when piece measures approx. 54-57-60-60-63-66 cm / 21¼"-22½"-23½"-23½"-24¾"-26". Work the other shoulder. RIGHT FRONT PIECE: Worked back and forth on circular needle. READ ALL OF THE FOLLOWING SECTION BEFORE CONTINUING! Cast on 39-43-47-53-61-69 sts (includes 1 edge st in the side) on circular needle size 2.5 mm / US 1.5 with BabyAlpaca Silk. Work double seed st - see explanation above, with 1 edge st in garter st in the side (1st row = RS). NOTE: Beg seed st with K towards mid front on 1st row. AT THE SAME TIME cast on new sts at the end of every row towards mid front for rounded front edge as follows: Cast on 2 sts 5 times in total = 49-53-57-63-71-79 sts. When 10 rows have been worked, switch to circular needle size 3 mm / US 2.5. Continue with STRIPES BODY - AT THE SAME TIME work double seed st towards mid front as follows: Row 1 (RS): 11 sts double seed st, stockinette st until 1 st remains, 1 edge st in garter st. Row 2 (WS): 1 edge st in garter st, stockinette st until 11 sts remain, work the remaining 11 sts in double seed st AT THE SAME TIME cast on 2 new sts towards mid front. Repeat 1st and 2nd row 3 more times (= 4 times in total) = 8 sts inc. Then work as follows: Row 1: 11 sts double seed st, stockinette st until 1 st remains, 1 edge st in garter st. Row 2: 1 edge st in garter st, stockinette st until 11 sts remain, work the remaining 11 sts in double seed st. Row 3: 9 sts double seed st, stockinette st until 1 st remains, 1 edge st in garter st. Row 4: 1 edge st in garter st, stockinette st until 9 sts remain, work the remaining 9 sts in double seed st. Row 5: 7 sts double seed st, stockinette st until 1 st remains, 1 edge st in garter st. Row 6: 1 edge st in garter st, stockinette st until 7 sts remain, work the remaining 7 sts in double seed st. Inc towards mid front are done and there are 57-61-65-71-79-87 sts on needle. Work in stockinette st with 7 sts double seed st towards mid front and 1 edge st in garter st in the side – REMEMBER BUTTONHOLES on band – see explanation above. When piece measures 8 cm / 3⅛", inc in the side as on back piece = 61-66-70-76-84-91 sts on needle. When piece measures 36-38-40-39-41-43 cm / 14¼"-15"-15¾"-15¼"-16⅛"-17" (measured on the side on the longest), bind off 2-5-5-6-6-6 sts at beg of next row from the side for armholes = 59-61-65-70-78-85 sts on needle. When piece measures 45-48-50-50-52-55 cm / 17¾"-19"-19¾"-19¾"-20½"-21½", slip 17-17-17-17-19-19 sts towards mid front on 1 stitch holder for neck (work sts before slipping them on stitch holder to avoid cutting the yarn). Then bind off at beg of every row from neck: 2 sts in total 4 times and then 1 st 2 times = 32-34-38-43-49-56 sts remain on shoulder. Bind off when piece measures 54-57-60-60-63-66 cm / 21¼"-22½"-23½"-23½"-24¾"-26". LEFT FRONT PIECE: Work as right front piece but reversed. READ KNITTING TIP! RIGHT SLEEVE: Worked back and forth on circular needle. Bottom part of sleeve is worked in 2 parts before slipping them tog. PART 1: Cast on 26-27-28-28-28-29 sts (includes 1 edge st and 7 sts button band) on circular needle size 2.5 mm / US 1.5 with BabyAlpaca Silk. Work double seed st - see explanation above, with 1 edge st in garter st in the side (1st row = RS). REMEMBER BUTTONHOLES when sleeve measures 2, 5, 8 and 11 cm / ¾", 2", 3⅛" and 4⅜". When 10 rows have been worked, switch to circular needle size 3 mm / US 2.5. Then work as follows: Row 11 (RS): 7 sts double seed st, stockinette st until 1 st remains, 1 edge st in garter st. Row 12 (WS): 1 edge st in garter st, stockinette st until 7 sts remain, work the remaining 7 sts in double seed st. Continue working like this, REMEMBER THE KNITTING GAUGE. When piece measures 12 cm / 4¾", bind off the 7 sts in seed st = 19-20-21-21-21-22 sts on needle. Put piece aside. PART 2: Cast on 38-40-41-43-43-45 sts (includes 1 edge st and 7 sts button band) on circular needle size 2.5 mm / US 1.5 with BabyAlpaca Silk. Work double seed st - see explanation above, with an edge st in garter st in the side (1st row = RS). When 10 rows have been worked, switch to circular needle size 3 mm / US 2.5 and work as follows: Row 11 (RS): 1 edge st in garter st, stockinette st until 7 sts remain, work the remaining 7 sts in double seed st. Row 12 (WS): 7 sts double seed st, stockinette st until 1 st remains, 1 edge st in garter st. Continue working like this, REMEMBER THE KNITTING GAUGE. When piece measures 12 cm / 4¾", slip the two parts tog on needle, so that edges in seed st overlap and band's opening is faced forwards (PART 2 is under PART 1). There are now 57-60-62-64-64-67 sts on needle (includes 1 edge st in each side). Then work STRIPES SLEEVE - see explanation above, with 1 edge st in garter st in each side, AT THE SAME TIME when piece measures 12 cm / 4¾", inc 1 st inside 1 edge st in each side – READ INCREASE TIP! Repeat inc in each side every 8th-7th-7th-6th-5th-4th row 15-16-17-18-21-22 more times (= 16-17-18-19-22-23 sts in total inc in each side) = 89-94-98-102-108-113 sts. When piece measures 52-51-50-48-46-44 cm / 20½"-20"-19¾"-19"-18"-17¼", insert 1 marker in each side. Continue until piece measures 53-53-52-51-49-47 cm / 21"-21"-20½"-20"-19¼"-18½" and bind off. LEFT SLEEVE: Work as right sleeve but reversed. Remember BUTTONHOLES on PART 1! ASSEMBLY: Sew the shoulder seams. Fasten button band on sleeve. Sew in the sleeves. Sew sleeve and side seams in one inside 1 edge st. (Markers on sleeve should fit towards the side of front and back piece). NECK EDGE: Pick up approx. 120 to 140 sts around the neck (includes sts on stitch holders at the front) on circular needle size 2.5 mm / US 1.5 with BabyAlpaca Silk. Work 9 rows double seed st back and forth, AT THE SAME TIME on 2nd row bind off for 1 buttonhole on right band. Bind off. |
|
 |
|
Have you finished this pattern?Tag your pictures with #dropspattern #ladyoftheforestcardigan or submit them to the #dropsfan gallery. Do you need help with this pattern?You'll find 19 tutorial videos, a Comments/Questions area and more by visiting the pattern on garnstudio.com. © 1982-2026 DROPS Design A/S. We reserve all rights. This document, including all its sub-sections, has copyrights. Read more about what you can do with our patterns at the bottom of each pattern on our site. |


With over 40 years in knitting and crochet design, DROPS Design offers one of the most extensive collections of free patterns on the internet - translated to 17 languages. As of today we count 324 catalogs and 12290 patterns - 12280 of which are translated into English (US/in).
We work hard to bring you the best knitting and crochet have to offer, inspiration and advice as well as great quality yarns at incredible prices! Would you like to use our patterns for other than personal use? You can read what you are allowed to do in the Copyright text at the bottom of all our patterns. Happy crafting!
Post a comment to pattern DROPS 149-14
We would love to hear what you have to say about this pattern!
If you want to leave a question, please make sure you select the correct category in the form below, to speed up the answering process. Required fields are marked *.