
Popular categories
Looking for a yarn?


Comments / Questions (30)
![]() Woro wrote:
Woro wrote:
Bonjour, Ce gilet me plait beaucoup mais avant de me lancer, je me pose des p'ti'questions: Toute la beauté de ce gilet réside dans la symétrie des rayures. Ne risque-t-on pas de la perdre au changement de pelote? Et lors de l'assemblage des différentes "pièces", les rayures sont-elles automatiquement parallèles?? Amicalement
30.01.2014 - 08:58DROPS Design answered:
Bonjour Mme Woro, pour une transition plus douce entre les pelotes, commencez la nouvelle par la même couleur que la fin de la précédente. Les différentes parties se tricotent en vis à vis, les rayures seront donc parallèles à l'assemblage. Bon tricot!
30.01.2014 - 11:04
![]() Moni wrote:
Moni wrote:
Wow, das ging schnell :-) Vielen Dank
29.11.2013 - 09:38
![]() Moni wrote:
Moni wrote:
Tolle Anleitung, schöne Jacke. allerdings verstehe ich den Zunahmetipp so, dass dann Löcher entstehen. Richtig, oder sollen die Umschläge verschränkt abgestrickt werden? danke Moni
29.11.2013 - 04:53DROPS Design answered:
Liebe Moni, wir haben uns bei diesem Modell entschieden, die Umschläge nicht verschränkt abzustricken, damit dekorative Löcher entstehen.
29.11.2013 - 07:46
![]() Regine wrote:
Regine wrote:
Toll wann soll ich das alles stricken?
02.07.2013 - 10:54
![]() Isabella wrote:
Isabella wrote:
Fint snitt og herlig farge. Passer til alt.
19.06.2013 - 06:40
![]() Dkamphuis wrote:
Dkamphuis wrote:
Hoop dat deze er zo gauw mogelijk op komt te staan zou in rode tinten ook erg leuk zijn
17.06.2013 - 16:42
![]() Andrea wrote:
Andrea wrote:
Das Jäckchen paßt zu allem, auch mit längeren Ärmeln
15.06.2013 - 13:51
![]() Dkamphuis wrote:
Dkamphuis wrote:
Leuk patroon laat maar gauw komen zodat we er mee kunnen beginnen
14.06.2013 - 13:29
![]() Elisabeth wrote:
Elisabeth wrote:
Fin Fin
13.06.2013 - 17:46Jane wrote:
Oh, yes please, this one is for me!!
13.06.2013 - 12:02
|
|
Svenja#svenjacardigan |
|
 |
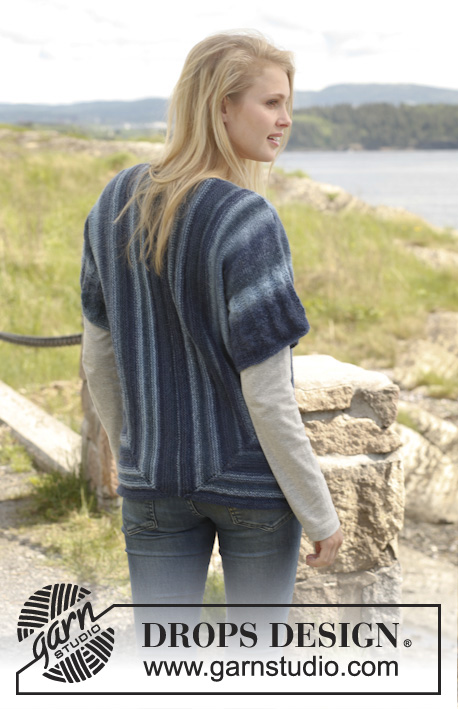 |
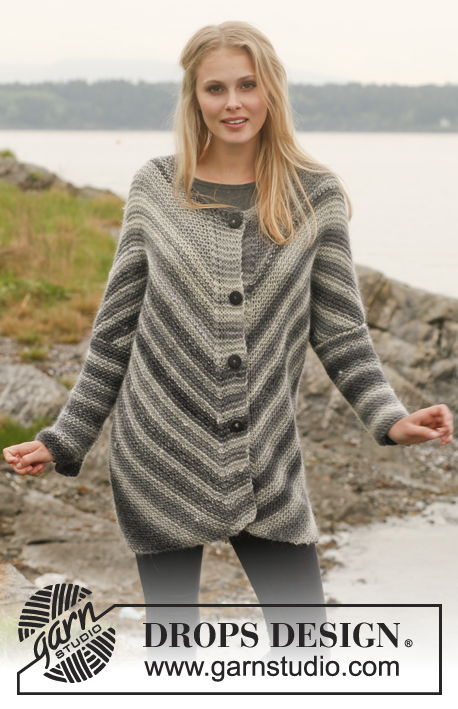
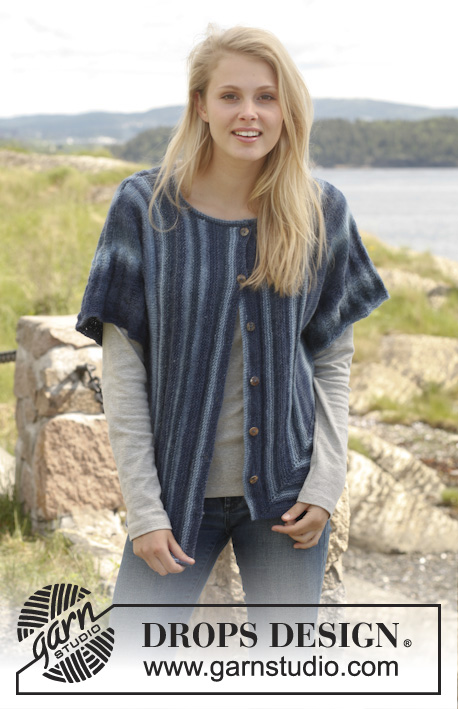
Knitted DROPS jacket with short sleeves worked sideways in ”Delight”. Size: S - XXXL.
DROPS 149-34 |
|
|
GARTER ST (back and forth on circular needle): K all rows. 1 ridge = 2 rows K. STRIPE PATTERN: * 4 ridges (i.e. 8 rows K), 4 rows in stockinette st *, repeat from *-*. INCREASE TIP: Inc 1 st by making 1 YO. On next row P YO when working in stockinette st and K when working in garter st. ---------------------------------------------------------- JACKET: Piece is worked in parts. The piece is worked back and forth on circular needle because of no of sts. LEFT SLEEVE + FRONT PIECE: Beg at the edge of sleeve, cast on new sts for front piece and work until mid front. Cast on 58-58-58-66-66-66 sts (includes 1 edge st in each side) on circular needle size 3 mm / US 2.5 with Delight. Work 2 RIDGES in garter st - see explanation above (1st row = RS). Switch to circular needle size 3.5 mm / US 4 and work next row from RS as follows: 1 edge st in garter st, 2 sts in stockinette st, * 4 sts in garter st, 4 sts in stockinette st *, repeat from *-* 6-6-6-7-7-7 times in total and finish with 4 sts in garter st, 2 sts in stockinette st and 1 edge st in garter st. Continue the pattern like this. When piece measures 3 cm / 1", inc 1 st inside 1 edge st in left side of piece (seen from RS – NOTE: Inc 1 st by working 2 sts in same st and work the inc sts in pattern). Repeat inc every 4th row 7 more times (= 8 inc in total under sleeve) = 66-66-66-74-74-74 sts. When piece measures 15 cm / 6", work in stockinette st while AT THE SAME TIME on 1st row from RS casting on 21-21-20-12-10-7 new sts at the end of row = 87-87-86-86-84-81 sts. P 1 row back with 1 edge st in garter st in each side. Then work in stockinette st as follows: Row 1 (= RS): 1 edge st in garter st, K until 1 st remains and work 2 sts in last st (= 1 st inc) = 88-88-87-87-85-82 sts. Row 2 (= WS): P with 1 edge st in garter st in each side. Row 3 (= RS): 1 edge st in garter st, K until 2 sts remain, 1 YO, K 1 (insert 1 marker in this st), 1 YO, K 1. Row 4: P all sts and YOs with 1 edge st in garter st in each side. Then work in stockinette st with 1 edge st in garter st in each side while AT THE SAME TIME on every row from RS inc 1 st on each side of st with marker – READ INCREASE TIP (= 2 sts inc per inc row). When piece measures 26-28-30-30-33-36 cm / 10¼"-11"-11¾"-11¾"-13"-14¼" measured from the edge on sleeve at the longest (piece measures approx. 11-13-15-15-18-21 cm / 4⅜"-5⅛"-6"-6"-7"-8¼" from where new sts were cast on), work STRIPE PATTERN – see explanation above, with 1 edge st in garter st in each side – NOTE: Continue inc on each side of st with marker as before. AT THE SAME TIME when piece measures 31-33-34-37-39-42 cm / 12¼"-13"-13⅜"-14½"-15¼"-16½" from edge of sleeve, bind off for neck on every other row (i.e. at beg of every row from RS) as follows: bind off 12-12-12-13-13-13 sts 1 time and 1 st 2-2-2-3-3-3 times, then bind off 1 st every 4th row (i.e. on every other row from RS) 2 times in total. Continue with STRIPE PATTERN, 1 edge st in garter st in each side and inc as before until piece measures approx. 38-40-42-45-48-51 cm / 15"-15¾"-16½"-17¾"-19"-20" from edge of sleeve – adjust after 7 rows K (piece measures approx. 23-25-27-30-33-36 cm / 9"-9¾"-10⅝"-11¾"-13"-14¼" from where new sts were cast on and edge with STRIPE PATTERN measures approx. 12-12-12-15-15-15 cm / 4¾"-4¾"-4¾"-6"-6"-6"). On next row from WS bind off sts at beg of row and to and with st with marker (= bottom edge on jacket) = approx. 122-126-132-134-138-142 sts remain on row. Switch to circular needle size 3 mm / US 2.5 and work in garter st back and forth for 2 cm / ¾" for band, then loosely bind off. RIGHT SLEEVE + FRONT PIECE: Cast on and work as left front piece but reversed. I.e. inc under sleeve in right side of piece (seen from RS) and when casting on new sts on row (for side on front piece), cast on at the end of row from WS (instead of RS). K 1 row from RS. Then work as follows: Row 1 (= WS): 1 edge st in garter st, P until 1 st remains and work 2 sts in last st (= 1 st inc towards bottom edge) = 88-88-87-87-85-82 sts. Row 2 (= RS): 1 edge st in garter st, 1 YO, K 1 (insert 1 marker in this st), 1 YO and K the rest of row. Row 3 (= WS): P with 1 edge st in garter st in each side. Then work in stockinette st with 1 edge st in garter st in each side while AT THE SAME TIME on every row from RS inc 1 st on each side of st with marker as on left front piece. When casting/binding off for neck, bind off at beg of every row from WS (instead of RS) and bind off sts in bottom edge on jacket from RS instead of WS. In addition when band measures approx. ½-1 cm / ¼"-½", bind off for 6-6-6-7-7-7 buttonholes evenly. Upper buttonhole should be max. 0.5 cm / ¼" from neck edge, and bottom hole approx. 10 cm / 4" from bottom edge. 1 buttonhole = bind off 2 sts and cast on 2 new sts on next row over these sts. LEFT SLEEVE + BACK PIECE: Work as right sleeve + front piece but when piece measures 31-33-34-37-39-42 cm / 12¼"-13"-13⅜"-14½"-15¼"-16½", bind off for neck at beg of every row from WS as follows: bind off 1 st 4 times in total. When sts in bottom edge have been bind off, approx. 134-138-142-148-152-156 sts remain on needle. Work 1 ridge in garter st and loosely bind off (= mid back). RIGHT SLEEVE + BACK PIECE: Cast on and work as left sleeve + front piece but bind off for neck as on left back piece (and bind off at beg of every row from RS). ASSEMBLY: Sew the back piece tog mid back inside bind-off edge. Sew shoulder seams inside 1 edge st. Sew underarm and side seams in one inside 1 edge st. Sew on buttons. NECK EDGE: Pick up from RS approx. 94 to 116 sts around the neck on circular needle size 3 mm / US 2.5 with Delight. K 4 rows (1st row = WS) and loosely bind off with K from WS. |
|
 |
|
Have you finished this pattern?Tag your pictures with #dropspattern #svenjacardigan or submit them to the #dropsfan gallery. Do you need help with this pattern?You'll find 20 tutorial videos, a Comments/Questions area and more by visiting the pattern on garnstudio.com. © 1982-2026 DROPS Design A/S. We reserve all rights. This document, including all its sub-sections, has copyrights. Read more about what you can do with our patterns at the bottom of each pattern on our site. |
|


With over 40 years in knitting and crochet design, DROPS Design offers one of the most extensive collections of free patterns on the internet - translated to 17 languages. As of today we count 325 catalogs and 12298 patterns - 12288 of which are translated into English (US/in).
We work hard to bring you the best knitting and crochet have to offer, inspiration and advice as well as great quality yarns at incredible prices! Would you like to use our patterns for other than personal use? You can read what you are allowed to do in the Copyright text at the bottom of all our patterns. Happy crafting!
Post a comment to pattern DROPS 149-34
We would love to hear what you have to say about this pattern!
If you want to leave a question, please make sure you select the correct category in the form below, to speed up the answering process. Required fields are marked *.