
Popular categories
Looking for a yarn?


Comments / Questions (54)
![]() Grosbot wrote:
Grosbot wrote:
Très beau modèle bien réussi avec très bonnes explications un rendu magnifique!!!!merci
10.06.2016 - 15:48
![]() Isabelle Wyckmans wrote:
Isabelle Wyckmans wrote:
Merci pour les explications de ce très beau modèle!
25.03.2016 - 21:12
![]() Grazia wrote:
Grazia wrote:
Siete fantastici...non ci abbandonate mai! Grazie grazie ancora grazie
26.01.2016 - 22:39
![]() Katja wrote:
Katja wrote:
Hallo, das Tuch ist sehr schön geworden allerdings habe ich von der 2. Farbe (für die Spitzen) nur 50 g Wolle anstatt wie in der Anleitung 100g gebraucht. Habe ich was falsch gemacht oder stimmt die Angabe in der Anleitung nicht? Danke
20.01.2016 - 20:49DROPS Design answered:
Antwort siehe unten! :-)
24.01.2016 - 20:25
![]() Katja Grumbach wrote:
Katja Grumbach wrote:
Hallo, das Tuch ist sehr schön geworden allerdings habe ich von der 2. Farbe (für die Spitzen) nur 50 g Wolle anstatt wie in der Anleitung 100g gebraucht. Habe ich was falsch gemacht oder stimmt die Angabe in der Anleitung nicht? Danke
16.12.2015 - 22:35DROPS Design answered:
Die Wollmengen werden immer auf ganze Knäuel aufgerundet, d.h. es werden möglicherweise nicht ganze 100 g benötigt, aber mehr als 50 g. Wenn Ihre Maschenprobe geringfügig anders ausgefallen ist, kann es sein, dass Sie weniger Garn verbraucht haben.
20.12.2015 - 17:01
![]() Ilka wrote:
Ilka wrote:
Ich möchte gerne nachfragen, ob das Tuch noch gespannt werden sollte. Zwar steht in der Anleitung nichts davon, aber ich bin diesbezüglich unsicher. Ansonsten ist das Tuch sehr schön geworden und die BabyAlpacaSilk zu verhäkeln ein Traum.
08.03.2015 - 14:47DROPS Design answered:
Ja, Sie können es noch spannen oder zumindest anfeuchten, auf Maß ziehen und trocknen lassen. Das Lochmuster kommt dann noch besser zur Geltung. Schön, dass Ihnen das Tuch so gut gefällt, und BabyAlpaca Silk fühlt sich wirklich toll an und ist auch sehr angenehm auf der Haut zu tragen. Viel Spaß mit Ihrem neuen Schmuckstück! :-)
09.03.2015 - 09:43
![]() Jeannette wrote:
Jeannette wrote:
DROPS 137-29 DROPS design: Model nr. BS-018 Heb het patroon vluchtig ingekeken maar ik begrijp alleen niet dat er slechts 11 beginlossen worden opgezet als er bovenaan (de langste zijde dus) wordt begonnen. Of lees ik het niet goed?
25.02.2015 - 20:50DROPS Design answered:
Hoi Jeanette. Je begint bovenaan met de 11 lossen en haakt vervolgens door volgens de teltekening M.1 (Zie onderaan). Op deze manier wordt de sjaal steeds groter en vormt de driehoek. De l/stk aan de zijkanten van de driehoek (kijk M.1) worden de bovenkant van de sjaal. Lees het patroon altijd zorgvuldig door.
26.02.2015 - 14:13
![]() Christina wrote:
Christina wrote:
Tror faktiskt att jag håller på att bli lite knäpp.Jag virkar den här sjalen, men efter ca 12 cm är det inget snack om saken, det blir en snäckskalssjal...inte det minsta lik sjalen på bilden.
28.09.2014 - 01:02
![]() Eva Maria wrote:
Eva Maria wrote:
En la explicación del gráfico, la hilera 4 y 6 es errónea.
12.09.2014 - 08:34DROPS Design answered:
Hola Eva. Tienes razón, en la 4ª fila de la explicación falta una parte del diagrama. Gracias. Pero en la fila 6, ¿ puedes concretar donde ves el fallo?, porque a primera vista la explicación está correcta.
16.09.2014 - 09:41
![]() Joke wrote:
Joke wrote:
Ik krijg geen geluid bij de drops video's om te volgen met het patroon. ligt dat aan mijne gsm want via pc ging dat ook niet? mvg joke
30.06.2014 - 20:13DROPS Design answered:
Hoi Joke. Alle onze video's zijn zonder geluid. We zijn een internationaal bedrijf met gebruikers vanuit de hele wereld :-), dus het is niet mogelijk om één of meerdere talen in elk video te zetten. Maar daarom hebben we ook een korte beschrijving boven elke video.
01.07.2014 - 13:51
|
|||||||||||||||||||||||||
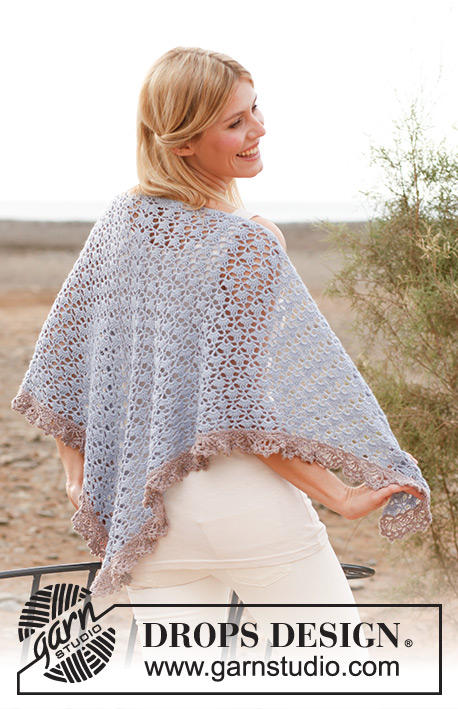
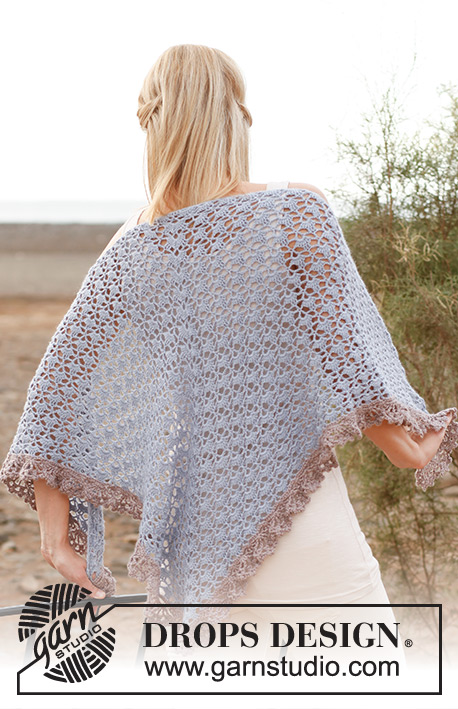
Tranquility#tranquilityshawl |
|||||||||||||||||||||||||
 |
 |
||||||||||||||||||||||||
Crochet DROPS shawl in "BabyAlpaca Silk".
DROPS 137-29 |
|||||||||||||||||||||||||
|
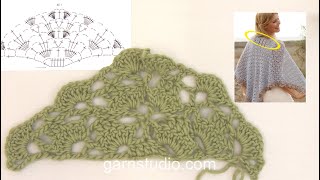
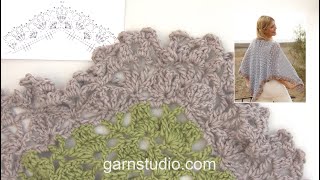
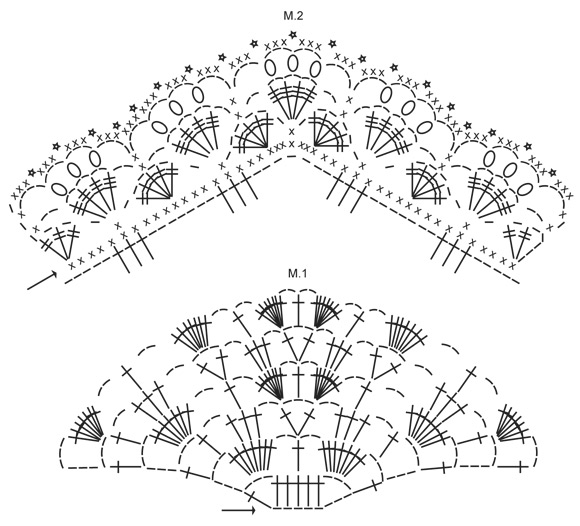
PATTERN: See diagrams M.1 and M.2, both patterns are also described below. BOBBLE: 1 bobble = 3 dc worked tog. This is done as follows: Work 1 dc but wait with last pull through, work 1 more dc, wait with last pull through, work 1 more dc but wait with last pull through, make 1 YO and pull thread through all 4 loops on hook. ---------------------------------------------------------- SHAWL: The piece is worked from the top and down to tip. Also see diagram M.1. Ch 11 with ice blue on hook size 3.5 mm/E/4. ROW 1: Turn and work 1 dc in 7th ch from hook (= 1 dc + ch 3), then work 1 dc in each of the last ch 4, ch 3 and 1 more dc in last ch, turn piece. ROW 2: ch 6, 7 dc in first ch-space, ch 2, skip 2 dc, 1 dc in next dc, ch 2, skip 2 dc, 7 dc in next ch-space, ch 3 and 1 more dc in same ch-space, turn piece. ROW 3: ch 6, 1 dc in first ch-space, ch 2, skip 2 dc, 1 dc in each of the next 3 dc, ch 2, skip 2 dc and ch 2, in next dc work 1 dc + ch 3 + 1 dc, ch 2, skip 2 ch and 2 dc, 1 dc in each of the next 3 dc, ch 2, skip 2 dc, in last ch-space work 1 dc + ch 3 + 1 dc, turn piece. ROW 4: ch 6, 7 dc in first ch-space, ch 2, skip 1 dc + ch 2 + 1 dc, 1 dc in next dc, ch 2, skip 1 dc + ch 2 + 1 dc, in middle ch-space work: [7 dc, ch 2, 1 dc, ch 2 and 7 dc], ch 2, skip 1 dc + ch 2 + 1 dc, 1 dc in next dc, ch 2, 7 dc in last ch-space, ch 3 and 1 more dc in last ch-space, turn piece. ROW 5: ch 6, 1 dc in first ch-space, ch 2, skip 2 dc, 1 dc in each of the next 3 dc, ch 2, * skip 2 dc + ch 2, in next dc work 1 dc + ch 3 + 1 dc, ch 2, skip 2 ch + 2 dc, 1 dc in each of the next 3 dc, ch 2 *, repeat from *-* until middle dc on piece, skip 2 dc + ch 2, in the middle dc on piece work 1 dc + ch 3 + 1 dc, skip 2 ch + 2 dc, ch 2, 1 dc in each of the next 3 dc, ch 2, ** skip 2 dc + ch 2, in next dc work 1 dc + ch 3 + 1 dc, skip 2 ch + 2 dc, ch 2, 1 dc in each of the next 3 dc, ch 2 **, repeat from **-** until 1 ch-space remains on row, in this work 1 dc + ch 3 + 1 dc, turn piece. ROW 6: ch 6, * 7 dc in first ch-space, ch 2, skip 1 dc + ch 2 + 1 dc, 1 dc in next dc, ch 2, skip 1 dc + ch 2 + 1 dc *, repeat from *-* until middle ch-space, in this work: [7 dc, ch 2, 1 dc, ch 2 and 7 dc], ** ch 2, skip 1 dc + ch 2 + 1 dc, 1 dc in next dc, ch 2, skip 1 dc + ch 2 + 1 dc, 7 dc in next ch-space **, repeat from **-** the rest of row, finish with ch 3 and 1 more dc in last ch-space, turn piece. Repeat 5th and 6th row until piece measures approx. 60 cm / 23½'' in the middle and 120 cm / 47 1/4'' in width - finish after 5th row, cut the yarn. Continue with LACE - see explanation below. LACE – also see diagram M.2: Switch to light gray purple. First work 1 row with sc as follows: ch 1, 2 sc in each of the first ch 2-spaces, 1 sc in each of the next 3 dc, * 2 sc in next loop, 3 sc in next loop, 2 sc in next loop, 1 sc in each of the next 3 dc *, repeat from *-* until the middle ch 3-spaces, work 2 sc in first space, 7 sc in second space (= middle space) and 2 sc in last space, 1 sc in each of the next 3 dc, repeat from *-* the rest of row, finish with 2 sc in each of the last ch 2-spaces. Turn piece. ROW 1: ch 5, in first sc work: 1 tr, ch 1, 1 tr and ch 1, * skip 4 sc, 1 sc in next sc, ch 1, skip 4 sc, in next sc work: [1 tr, 1 ch] 5 times *, repeat from *-* until 5 sc remain at the tip of shawl (= in the middle), skip 2 sc, 1 sc in next sc, ch 1, skip 2 sc, ** in next sc work: [1 tr, 1 ch] 5 times, skip 4 sc, 1 sc in next sc, ch 1, skip 4 sc **, repeat from **-** until 5 sc remain, skip the first 4 sc, in last sc work: 1 tr, ch 1, 1 tr, 1 ch and 1 tr. Turn piece. ROW 2: ch 1, 1 sc in first tr, * ch 2, in next sc work: [1 dtr, ch 2] 4 times, skip 2 tr, work 1 sc in next tr *, repeat from *-* the rest of row but finish with 1 sc in 4th ch from beg of previous row. Turn piece. ROW 3: ch 1, 1 sc in first sc, * ch 4, skip 1 ch-space, in next ch-space work 1 BOBBLE – see explanation above, ch 3, 1 bobble in next ch-space, ch 3, 1 bobble in next ch-space, ch 4, 1 sc in next sc *, repeat from *-* the rest of row. Turn piece. ROW 4: ch 1, 3 sc in first ch-space, * ch 4, 1 dc in the first of the 4 ch (= 1 picot), 3 sc in next ch-space *, repeat from *-* the rest of row. Fasten off. |
|||||||||||||||||||||||||
Diagram explanations |
|||||||||||||||||||||||||
|
|||||||||||||||||||||||||
 |
|||||||||||||||||||||||||
Have you finished this pattern?Tag your pictures with #dropspattern #tranquilityshawl or submit them to the #dropsfan gallery. Do you need help with this pattern?You'll find 7 tutorial videos, a Comments/Questions area and more by visiting the pattern on garnstudio.com. © 1982-2026 DROPS Design A/S. We reserve all rights. This document, including all its sub-sections, has copyrights. Read more about what you can do with our patterns at the bottom of each pattern on our site. |
|||||||||||||||||||||||||


With over 40 years in knitting and crochet design, DROPS Design offers one of the most extensive collections of free patterns on the internet - translated to 17 languages. As of today we count 325 catalogs and 12298 patterns - 12288 of which are translated into English (US/in).
We work hard to bring you the best knitting and crochet have to offer, inspiration and advice as well as great quality yarns at incredible prices! Would you like to use our patterns for other than personal use? You can read what you are allowed to do in the Copyright text at the bottom of all our patterns. Happy crafting!
Post a comment to pattern DROPS 137-29
We would love to hear what you have to say about this pattern!
If you want to leave a question, please make sure you select the correct category in the form below, to speed up the answering process. Required fields are marked *.