
Popular categories
Looking for a yarn?


Comments / Questions (137)
Claudia Alarcon wrote:
Hola, en la vuelta de revés también se hacen 2 puntos juntos de DERECHO?
25.02.2013 - 19:40DROPS Design answered:
Hola Claudia, por el lado derecho (LD): tejer 2 pts juntos del derecho (pjd), por el lado revés (LR): tejer 2 pts juntos del revés (pjr) = 1 HEB (lazada) entre 2 pts
26.05.2013 - 19:14
![]() Carna wrote:
Carna wrote:
Zo ik het zie is de rondbreinaald alleen handig bij de halsboord.De boorden bij de panden en de mouwen worden heen en weer gebreid dus het je toch een naad.
27.01.2013 - 11:52DROPS Design answered:
Je gebruikt inderdaad alleen de kleine rondbreinld alleen voor de boord. Maar je kan ook heen en weer breien op een rondbreinld, dus dan hoef je niet 2 nld 4,5 aan te schaffen voor de boorden. Veel plezier mee!
28.01.2013 - 22:11
![]() Cobie Hooijmeijer wrote:
Cobie Hooijmeijer wrote:
Ik wil dit patroon gaan breien, maar kan het telpatroon niet vinden op de site. i.e. geen duidelijke uitleg
19.01.2013 - 15:36DROPS Design answered:
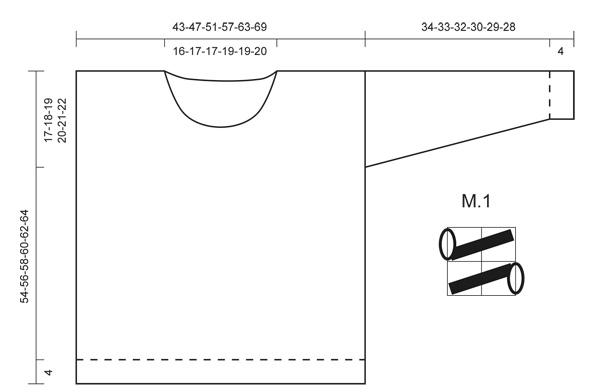
Het telpatroon staat onderaan dit patroon - bij de maattekening
19.01.2013 - 20:48
![]() Claudia B. wrote:
Claudia B. wrote:
Ich habe den Pulli vor 2 Wochen fertiggestrickt. Finde ihn superschön. Nur leider ist Größe S bei mir mit einer Kindergröße, etwa 146, vergleichbar :(
15.01.2013 - 16:51
![]() Mia wrote:
Mia wrote:
Hej, hur gör jag när jag maskar av för halsen? då gör jag väl inte omtag/2 ihop o lyfter? utan varje maska för sig?
14.01.2013 - 18:47
![]() Anne wrote:
Anne wrote:
I do not understand the m.1 stitch pattern on this pattern.mcan anyone explain in English. Thank yu
09.01.2013 - 21:17DROPS Design answered:
Dear Anne, M.1 is worked as follows on 2 sts/2 rows : R1 (from RS) : yo, K2 tog. R2 (from WS) : yo, P2 tog. Repeat these both sts all the row, and these 2 rows until finished measurements. Do not hesitate to work a gauge to figure out how it is on a smaller number of sts, and do not forget 1 edge st each side. Happy knitting !
09.01.2013 - 21:28
![]() DROPS Design Deutschland wrote:
DROPS Design Deutschland wrote:
Zu Britta: es ist sehr wichtig, dass Sie darauf achten, dass die Rück-R mit einem Umschlag beginnt. Wenn man diesen Umschlag nicht macht, verzieht sich das Strickstück.
04.01.2013 - 10:18
![]() Claudia B. wrote:
Claudia B. wrote:
Ich stricke in grösse s.. beim abnehmen von 12 maschen fuer den halsausschnitt sollten auf jeder seite 25 maschen übrig bleiben. auf der linken seite funktioniert das auch. nach den 12 abnahmen wird es allerdings schwierig: ich beginne mit einer rechten masche (randmasche?). direkt darauf folgt aber ein umschlag und damit geht das muster nicht auf.was mache ich falsch? können Sie mir erkären, wie ich die erste abnahmereihe stricken muss??
01.01.2013 - 21:51DROPS Design answered:
Hallo Claudia, der Mustersatz umfasst ja 2 Maschen, wenn Sie 2 M abketten, verschiebt sich das Muster nicht. Beim Abnehmen von 1 Masche müssen Sie gut darauf achten, dass sich das Muster nicht verschiebt, Sie können evtl. nur den Umschlag weglassen und haben dann bei der nächsten Abnahme wieder einen vollen Mustersatz abgenommen. Achten Sie in der Rück-R darauf, dass Sie durch den Umschlag nicht wieder 1 M zunehmen.
04.01.2013 - 10:56
![]() Heike wrote:
Heike wrote:
Also entweder ich bin blind oder es gibt für diese Srickanleitung kein Diagramm, dem ich lt. Anleitung folgen soll, kann mir jemand behilflich sein?
18.12.2012 - 16:50DROPS Design answered:
Liebe Heike, das Diagramm ist rechts neben der Schnittzeichnung auf Höhe des Bündchens. Der Rapport geht halt nur über 2 M, daher ist das Diagramm klein. Viel Spass beim Stricken!
18.12.2012 - 19:23
![]() Britta wrote:
Britta wrote:
Hallo, es wird eben schief, sogar sehr!
27.11.2012 - 15:33DROPS Design answered:
Liebe Britta, ich werde dem nochmals nachgehen und habe bei unserer Designabteilung nachgefragt.
28.11.2012 - 20:41
|
|||||||
Santorini Blue#santorinibluesweater |
|||||||
 |
 |
||||||
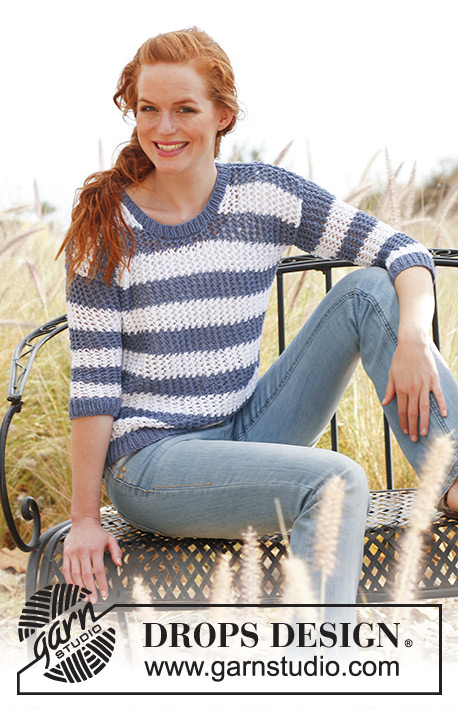
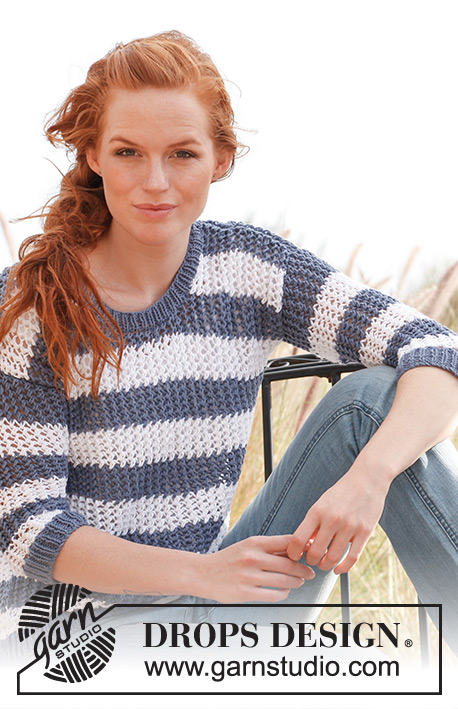
Knitted DROPS jumper with lace pattern in ”Paris”. Size S-XXXL
DROPS 139-33 |
|||||||
|
GARTER ST (back and forth on needle): K all rows. NOTE: All edge sts are worked in garter st. PATTERN: See diagram M.1. The diagram shows both rows in the pattern seen from RS. STRIPES: Work * 10 rows white, 10 rows denim blue *. Repeat from *-*. INCREASE TIP: Inc 1 st by getting the thread between 2 sts from previous row - K this st twisted, i.e. work in back loop of st instead of front to avoid holes. NOTE: Work inc sts in stockinette st until they can be worked in pattern in each side. ---------------------------------------------------------- BACK PIECE: Worked back and forth on needle. Cast on 70-76-82-94-102-110 sts with denim blue on circular needle size 4.5 mm / US 7. Work rib (K 1/P 1) with 1 edge st in garter st - Read explanation above - in each side for 4 cm / 1½". NOTE: On last row from WS, dec 8-8-8-12-12-12 sts evenly = 62-68-74-82-90-98 sts. Then switch to needle size 5 mm / US 8 and white - At the same time work diagram M.1 and STRIPES - Read explanation above - with 1 edge st in each side. REMEMBER THE GAUGE! When piece measures 37-38-39-40-41-42 cm / 14½"-15"-15¼"-15¾"-16⅛"-16½", insert a marker in each side of piece (armholes beg here). Continue to work until piece measures 52-54-56-58-60-62 cm / 20½"-21¼"-22"-22¾"-23⅝"-24⅜". Now bind off the middle 18-20-20-22-22-24 sts for neck and finish each shoulder separately. Bind off 2 sts at beg of next row from neck = 20-22-25-28-32-35 sts remain on the shoulder. Loosely bind off all sts when piece measures 54-56-58-60-62-64 cm / 21¼"-22"-22¾"-23⅝"-24⅜"-25¼". FRONT PIECE: Cast on and work as on back piece until piece measures 43-45-46-48-49-51 cm / 17"-17¾"-18"-19"-19¼"-20". Now bind off the middle 12-14-14-16-14-16 sts for neck and finish each shoulder separately. Then bind off for neck at the beg of every row from neck (= every other row) as follows: bind off 2 sts 1 time, 1 st 1 time. Then bind off 1 st at beg of every other row from neck (= every 4th row) a total of 2-2-2-2-3-3 times = 20-22-25-28-32-35 sts remain on shoulder. Loosely bind off all sts when piece measures 54-56-58-60-62-64 cm / 21¼"-22"-22¾"-23⅝"-24⅜"-25¼". SLEEVE: Worked back and forth on needle. Cast on 38-40-42-46-48-50 sts with denim blue on circular needle size 4.5 mm / US 7. Work rib K 1/P 1 with 1 edge st in each side for 4 cm / 1½". NOTE: On last row from WS, dec 8-8-8-10-10-10 sts evenly = 30-32-34-36-38-40 sts. Then switch to needle size 5 mm / US 8 and white - At the same time work diagram M.1 and STRIPES. When piece measures 5 cm / 2", inc 1 st - Read INCREASE TIP above - inside 1 edge st in each side. Repeat inc every 2½-2½-2½-2-2-1½ cm / ⅞"-⅞"-⅞"-¾"-¾"-½" a total of 10-10-10-12-12-12 times = 50-52-54-60-62-64 sts. Continue until piece measures 34-33-32-30-29-28 cm / 13½"-13"-12½"-11¾"-11⅜"-11" (shorter measurements in the larger sizes because of wider shoulders). Loosely bind off all sts. Knit another sleeve the same way. ASSEMBLY: Graft or sew shoulder seams from RS with neat stitches. Sew in sleeves between markers in each side inside 1 edge st. Sew sleeve and side seams in one. NECK EDGE: Work around the neck with denim blue on circular needle size 4.5 mm / US 7 as follows: Beg mid back, pick up from RS approx. 90 to 110 sts inside 1 edge st around the neck. K next round - while AT THE SAME TIME adjusting no of sts to 90-94-98-104-108-112. Then work rib (K 1/P 1) until neck edge measures 2 cm / ¾", loosely bind off all sts with K over K and P over P. |
|||||||
Diagram explanations |
|||||||
|
|||||||
 |
|||||||
Have you finished this pattern?Tag your pictures with #dropspattern #santorinibluesweater or submit them to the #dropsfan gallery. Do you need help with this pattern?You'll find 14 tutorial videos, a Comments/Questions area and more by visiting the pattern on garnstudio.com. © 1982-2026 DROPS Design A/S. We reserve all rights. This document, including all its sub-sections, has copyrights. Read more about what you can do with our patterns at the bottom of each pattern on our site. |
|||||||


With over 40 years in knitting and crochet design, DROPS Design offers one of the most extensive collections of free patterns on the internet - translated to 17 languages. As of today we count 324 catalogs and 12290 patterns - 12280 of which are translated into English (US/in).
We work hard to bring you the best knitting and crochet have to offer, inspiration and advice as well as great quality yarns at incredible prices! Would you like to use our patterns for other than personal use? You can read what you are allowed to do in the Copyright text at the bottom of all our patterns. Happy crafting!
Post a comment to pattern DROPS 139-33
We would love to hear what you have to say about this pattern!
If you want to leave a question, please make sure you select the correct category in the form below, to speed up the answering process. Required fields are marked *.