
Popular categories
Looking for a yarn?


Comments / Questions (132)
![]() Birgit wrote:
Birgit wrote:
Das Modell ist wunderschön, die Strickanleitung verständlich, aber leider stimmt die Angabe der Wollmenge überhaupt nicht. Für Größe XXXL habe ich nur für das Rückenteil bereits 400g verstrickt (lt. Angabe sollten für den kompletten Pullover 1000g ausreichen). Das bedeutet, dass die Wollmenge für die Größe XXXL bei mindestens 1300-1400g liegt.
18.12.2013 - 09:49DROPS Design answered:
Liebe Birgit, diesr Pullover wurde schon sehr oft nachgestrickt und wir haben noch keine Rückmeldung zur Garnmenge bekommen. Haben Sie das Originalgarn und stimmt die Maschenprobe?
18.12.2013 - 12:09
![]() Tania wrote:
Tania wrote:
Tengo una duda :cuando pone que hay que menguar 12 puntos equitativamente, como hago para que me de exacto si mi patron es de 134 puntos (talla l) ?
17.11.2013 - 00:51DROPS Design answered:
Hola Tania. Tienes que dism aprox cada 11 pts.
19.11.2013 - 12:51
![]() Nancy wrote:
Nancy wrote:
I'm confused about finish shoulder separately. So I have 62,4BO,62. I then will do back and forth knitting from that point on each shoulder separately following pattern M3 with XL arrow. How do I mirror on both sides? Do I start on my left shoulder at the XL arrow reading left to right? My other question is at the same time. Do I BO 2 at the neck and also decrease 1 at the end?
20.10.2013 - 21:44DROPS Design answered:
Dear Nancy, you work M.3 on the front piece as you made for back piece, right shoulder start with XL arrow, and after the first 4 BO, you will continue binding off 7 times 2 sts and 5 times 1 st (size XL) at the beg of every row starting on the neck side. Happy knitting!
21.10.2013 - 10:24
![]() Nancy wrote:
Nancy wrote:
I'm confused about finish shoulder separately. So I have 62,4BO,62. I then will do back and forth knitting from that point on each shoulder separately following pattern M3 with XL arrow. How do I mirror on both sides? Do I start on my left shoulder at the XL arrow reading left to right? My other question is at the same time. Do I BO 2 at the neck and also decrease 1 at the end?
20.10.2013 - 17:20Ruth wrote:
How should WS be worked in the back piece? Should it also be worked *K1, P3* or *P1, K3*? or maybe some other way? Thanks!
28.08.2013 - 07:14DROPS Design answered:
Dear Ruth, you work from RS : K1, P3. From WS, work K over K and P over P : P1, K3. Happy knitting!
28.08.2013 - 11:18
![]() Nel Uytterhoeven wrote:
Nel Uytterhoeven wrote:
Voor de telpatronen: is het rij 1 beginnen aan de goede kant van het breiwerk en rij 2 aan de slechte kant van het breiwerk?
02.08.2013 - 18:02DROPS Design answered:
Als een telpatroon heen en weer wordt gebreid, zoals hier, leest u alle oneven naalden (1, 3, 5 etc) van rechts naar links en die breit u aan de goede kant en alle even naalden (2, 4, 6) leest u van links naar rechts en breit u aan de verkeerde kant.
04.08.2013 - 22:52
![]() Esther Jewett wrote:
Esther Jewett wrote:
Working on back. So far so good. Note: cable 1st and 13th row on M3 after the first 24 rows.
18.04.2013 - 17:14Nashwaahmed wrote:
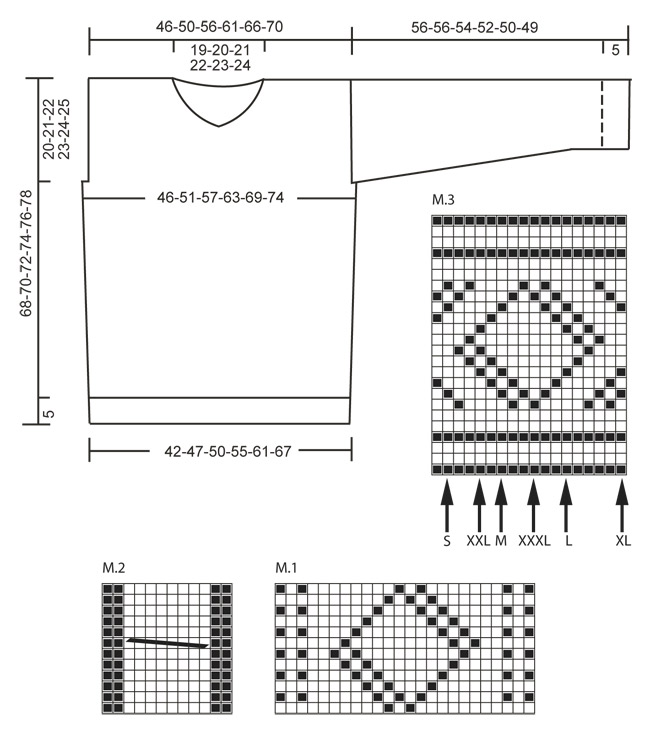
Diagram M.3 is not working right with me, i am making a Large size sweater now and i have 118 stitches if i start from the arrow as indicated i will work over 13 stitches then i will start the whole 18 stitches again and repeat and this is not working for the 116 stitch i have( after excluding edge stitches)
01.03.2013 - 17:26DROPS Design answered:
Dear Mrs Nashwaahmed, in size L, you will work : the last 13 sts in M.3, then repeat 5 times the 18 sts of the whole diagram and finish with the first 13 sts in M.3 + 2 edge st = 118 sts. Happy knitting!
02.03.2013 - 10:26Doris Gonzalez wrote:
En mi país, no hay tienda de lana drops, entonces con quién me contacto por dudas?...y hay respuestas a comentarios o preguntas por parte de ustedes?. gracias
01.03.2013 - 03:09Nashwaahmed wrote:
I am sorry but i have a new question...i am knitting the front side now of the sweater and i don't understand the part which says AT THE SAME TIME cast off on every row from neck: 2 sts then 1 st. how would i work it ? does it mean that every row starting from the neck i should bind off 2 stitches?? and where should i bind off that other stitch ? please help me as i am stuck at this point...thank you :)
24.02.2013 - 01:27DROPS Design answered:
Dear Mrs Nashwaahmed, you are correct, every row starting from the neck you will bind off 2 sts 5 times in size S, 6 times in size M etc... then every row starting from the neck you will dec 1 st 8 times in size S, 7 times in size M etc... Happy knitting !
25.02.2013 - 10:56
|
||||||||||
Sir Lancelot#sirlancelotsweater |
||||||||||
|
|
||||||||||
Men's knitted sweater with textured pattern and v-neck, in DROPS Karisma. Sizes S to XXXL
DROPS 135-36 |
||||||||||
|
GARTER ST (back and forth on needle): K all rows. PATTERN: See diagrams M.1 to M.3 – diagrams show pattern from RS. M.1 = 24 sts in width, M.2 = 12 sts in width and M.3 = 18 sts in width. -------------------------------------------------------- BACK PIECE: Worked back and forth on needle. Cast on 110-122-134-146-158-170 sts (includes 1 edge st in each side) on needle size 3 mm / US 2or3 with Karisma. Work rib as follows (seen from from RS): 1 edge st in GARTER ST - see explanation above, * K 1, P 3 *, repeat from *-*, finish with 1 edge st in garter st. When rib measures approx. 5 cm / 2" (adjust so that next row is worked from WS), switch to needle size 4 mm / US 6. P 1 row from WS while at the same time dec 12 sts evenly = 98-110-122-134-146-158 sts. Work next row as follows (from RS): SIZE S: 1 edge st in garter st, diagram M.1, M.2, M.1, M.2, M.1 and 1 edge st in garter st. SIZE M: 1 edge st in garter st, 6 sts in stockinette st, diagram M.1, M.2, M.1, M.2, M.1, 6 sts in stockinette st and 1 edge st in garter st. SIZE L: 1 edge st in garter st, diagram M.2, M.1, M.2, M.1, M.2, M.1, M.2 and 1 edge st in garter st. SIZE XL: 1 edge st in garter st, 6 sts in stockinette st, diagram M.2, M.1, M.2, M.1, M.2, M.1, M.2, 6 sts in stockinette st and 1 edge st in garter st. SIZE XXL: 1 edge st in garter st, 12 sts of diagram M.1 – start in the 13th st from the right side in diagram, diagram M.2, M.1, M.2, M.1, M.2, M.1, M.2 and 12 sts of diagram M.1 – start in first st in diagram - and 1 edge st in garter st. SIZE XXXL: 1 edge st in garter st, 18 sts of diagram M.1 – start in the 7th st from the right side in diagram, diagram M.2, M.1, M.2, M.1, M.2, M.1, M.2 and 18 sts of diagram M.1 – start in first st in diagram - and 1 edge st in garter st. ALL SIZES: Continue to work the same way until piece measures 48-49-50-51-52-53 cm / 19"-19¼"-19¾"-20"-20½"-21". REMEMBER THE GAUGE! Now bind off 1-2-2-3-4-5 sts in each side for armholes (i.e. Bind off at the beg of the next 2 rows) = 96-106-118-128-138-148 sts. Continue the pattern as before with 1 edge st in garter st in each side. When piece measures approx. 58-60-62-64-66-68 cm / 22¾"-23⅝"-24⅜"-25¼"-26"-26¾" (adjust after 1 half repetition or 1 whole repetition of diagram M.1 and M.2 vertically), work 2 rows in stockinette st, then continue with diagram M.3 over all sts (except edge st) – see arrow for your size; this marks the stitch in witch to begin in the diagram. AT THE SAME TIME when 4 rows remain of diagram M.3, bind off the middle 36-38-40-42-44-46 sts for neck and finish each shoulder separately. Continue to bind off 2 sts on next row from neck = 28-32-37-41-45-49 sts remain on the shoulder. When diagram M.3 has been worked, work approx. 1 cm / ⅜" in stockinette st, then bind off. Piece measures approx. 68-70-72-74-76-78 cm / 26¾"-27½"-28⅜"-29⅛"-30"-30¾". FRONT PIECE: Cast on and work as back piece. Bind off for armhole each side as on back piece and continue until piece measures approx. 58-60-62-64-66-68 cm / 22¾"-23⅝"-24⅜"-25¼"-26"-26¾". On next row from RS K1 row over all sts and on this row bind off the middle 4 sts for neck. Now finish each shoulder separately. From WS P back and then work pattern as on back piece (make sure that diagram M.3 is worked the same way on each side of neck) – AT THE SAME TIME bind off on every row starting from neck: 2 sts 5-6-7-8-9-10 times and then 1 st 8-7-6-5-4-3 times = 28-32-37-41-45-49 sts remain on shoulder. Bind off when same no of rows has been worked as on back piece. SLEEVE: Worked back and forth on needle. Cast on 62 sts for all sizes (includes 1 edge st in each side) on needle size 3 mm / US 2or3 with Karisma. Work rib as follows (seen from from RS): 1 edge st in garter st, * K 1, P 3 *, repeat from *-*, finish with 1 edge st in garter st. When piece measures approx. 5 cm / 2" (adjust so that next row is worked from WS), switch to needle size 4 mm / US 6. P 1 row from WS. Work next row as follows: 1 edge st in garter st, diagram M.1, M.2, M.1 and 1 edge st in garter st, continue like this. When piece measures 9 cm / 3½", inc 1 st in each side. Repeat inc every 9th-8th-6th-5th-4th-4th row a total of 12-14-16-18-20-21 times - work the inc sts in stockinette st = 86-90-94-98-102-104 sts. When piece measures approx. 46-46-44-42-40-39 cm / 18"-18"-17¼"-16½"-15¾"-15¼" (adjust after 1 half or 1 whole repetition of diagram M.1 and M.2 vertically, inc should be finished), work 2 rows in stockinette st, then continue with diagram M.3 – start in first st on right side of diagram (the pattern will not fit at the end of row). After diagram M.3 work (if there is room) in stockinette st until piece measures 56-56-54-52-50-49 cm / 22"-22"-21¼"-20½"-19¾"-19¼" (shorter measurements in the larger sizes because of broader shoulder width), bind off. ASSEMBLY: Sew the shoulder seams. NECK: Pick up approx. 119 to 139 sts (divisible by 4 + 3) around the neck on circular needle size 3 mm / US 2or3 with Karisma – beg mid front. Then the piece is worked back and forth from mid front. First row from WS is worked as follows: 1 edge st in garter st, * P 1, K 3 *, repeat from *-* and finish with P 1 and 1 edge st in garter st. Continue with K over K and P over P and edge st in garter st until neck edge measures approx. 6 cm / 2½". Bind off with K over K and P over P. Place the neck on top of each other mid front, left side over right, fasten with neat stitches from both WS and RS. Sew the sleeves inside 1 edge st. Sew sleeve and side seams in one inside 1 edge st. |
||||||||||
Diagram explanations |
||||||||||
|
||||||||||
 |
||||||||||
Have you finished this pattern?Tag your pictures with #dropspattern #sirlancelotsweater or submit them to the #dropsfan gallery. Do you need help with this pattern?You'll find 18 tutorial videos, a Comments/Questions area and more by visiting the pattern on garnstudio.com. © 1982-2026 DROPS Design A/S. We reserve all rights. This document, including all its sub-sections, has copyrights. Read more about what you can do with our patterns at the bottom of each pattern on our site. |
||||||||||


With over 40 years in knitting and crochet design, DROPS Design offers one of the most extensive collections of free patterns on the internet - translated to 17 languages. As of today we count 324 catalogs and 12290 patterns - 12280 of which are translated into English (US/in).
We work hard to bring you the best knitting and crochet have to offer, inspiration and advice as well as great quality yarns at incredible prices! Would you like to use our patterns for other than personal use? You can read what you are allowed to do in the Copyright text at the bottom of all our patterns. Happy crafting!
Post a comment to pattern DROPS 135-36
We would love to hear what you have to say about this pattern!
If you want to leave a question, please make sure you select the correct category in the form below, to speed up the answering process. Required fields are marked *.