
Popular categories
Looking for a yarn?


Comments / Questions (129)
![]() Teunie Noordam wrote:
Teunie Noordam wrote:
Ik heb dit vest in maat xl gebreid maar kom 2 bolletjes te kort. Je hebt dus ipv 600 gram, 700 gram nodig. Jammer van de verzendkosten....?
10.05.2022 - 15:30
![]() Lucia wrote:
Lucia wrote:
Mi piacerebbe realizzare il modello nel colore proposto ma non trovo corrispondenza tra le indicazioni fornite e la cartella colori del filato indicato.
21.02.2022 - 14:44DROPS Design answered:
Buonasera Lucia, il modello è realizzato con il filato Muskat nel colore 76: il nome del colore è cambiato, forse per questo non trova corrispondenza. Buon lavoro!
22.02.2022 - 22:38
![]() Cara wrote:
Cara wrote:
I am ready to begin the back piece but an confused on the directions for bind off and decrease for the armholes. I am making a size XXL sweater. What sequence am I supposed to follow!
15.09.2021 - 23:14DROPS Design answered:
Dear Cara, it will help, if you read through the pattern first and highlight the numbers that goes with the size you are making (in this case size XXL are the number before the last. Happy Knitting!
16.09.2021 - 00:16
![]() Gerd Röndahl wrote:
Gerd Röndahl wrote:
Hej, trots noggrann stickfasthet så räckte inte garnet i stl M. Riktigt surt att behöva betala 90kr (garnkostnad +frakt) när det saknas garn till 3 v halsringning :-(
06.05.2021 - 10:01
![]() Susanne wrote:
Susanne wrote:
Meine Maschenprobe stimmt genau mit der Anleitung überein. Wenn ich aber ca. 2cm für Größe XL gestrickt habe, ergibt sich ein Gesamtumfang von 260cm. Das ist natürlich viel zu breit. Was mache ich falsch?
09.02.2019 - 12:34DROPS Design answered:
Liebe Susanne, es stimmt aber, das Muster M.1 stricken Sie zuerst über alle Maschen, nach M.1 sind es nur noch 237 M. Viel Spaß beim stricken!
11.02.2019 - 08:23
![]() Susanne wrote:
Susanne wrote:
Wieso kann ich meine Lieblingsmodelle nicht mehr sehen?
21.01.2019 - 11:00DROPS Design answered:
Liebe Susanne, die Favoriten kommen gleich wieder, danke für Ihr Verständnis. Viel Spaß beim stricken!
21.01.2019 - 12:41
![]() Kim Altobello wrote:
Kim Altobello wrote:
What is the gauge? I do not see it listed in the pattern. Thanks
26.05.2018 - 01:07DROPS Design answered:
Dear Kim, gauge is 22 sts x 30 rows in stocking st with needles 3,5 mm = 10 x 10 cm and 18 sts in lace pattern (M.4) = width 10 cm. Happy knitting!
26.05.2018 - 17:56
![]() Verrier Frederic Et Valerie wrote:
Verrier Frederic Et Valerie wrote:
Bonjour je commence le tricot et je ne comprends pas Combien de fois doit on faire le m1a le m1b et m1c Que veut dire m1b AU DESSUS DES 312 mailles suivantes Merci de votre aide
13.04.2017 - 20:06DROPS Design answered:
Bonjour Mr et Mme Verrier, vous répétez les 12 m de M.1b 26 fois en largeur au total, soit 12 m x 26 = 312 m. Bon tricot!
18.04.2017 - 09:11
![]() Katrin wrote:
Katrin wrote:
Hallo. Trotz korrekter Maschenprobe und stricken nach Anleitung hatte die Jacke bereits nach 3/4 der M2 eine Gesamtlänge von 30 cm. Lt. Anleitung sollte M2 3x gestrickt werden. Mir ist aufgefallen, dass in dieser und auch in anderen Anleitungen nur die Hinreihen berechnet werden. Zählt man die Rückreihen mit, kommt man auf die doppelte Höhe. Auch in der Breite hatte ich bei dieser Jacke 25 cm zuviel, einfach gemessen. Und das bei exakter Maschenprobe. Bin sehr enttäuscht.
06.09.2016 - 18:03DROPS Design answered:
Liebe Katrin, 1 Kästchen im Diagram steht für 1 M + 1 R, dh M.1 = 21 R + 3 X M.2 (= 28 R) = 105 Reihe, dann muss der Stück lautend der Maschenprobe ca 31 cm messen - lesen Sie mehr über Diagrams here.
07.09.2016 - 09:02
![]() Yuliya wrote:
Yuliya wrote:
Vielen Dank für die Anleitung. Alles super geklappt. Die Größenangabe stimmt auch. Ist leichter zu stricken, als ich am Anfang dachte ; )
05.09.2016 - 23:48
|
||||||||||||||||
So Serene#soserenecardigan |
||||||||||||||||
 |
 |
|||||||||||||||
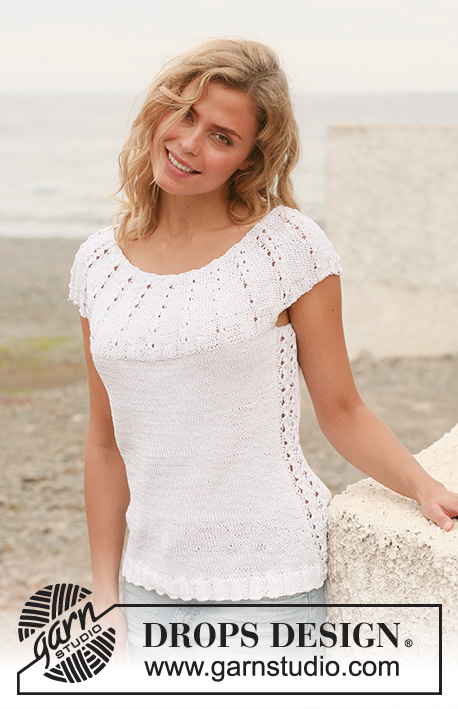
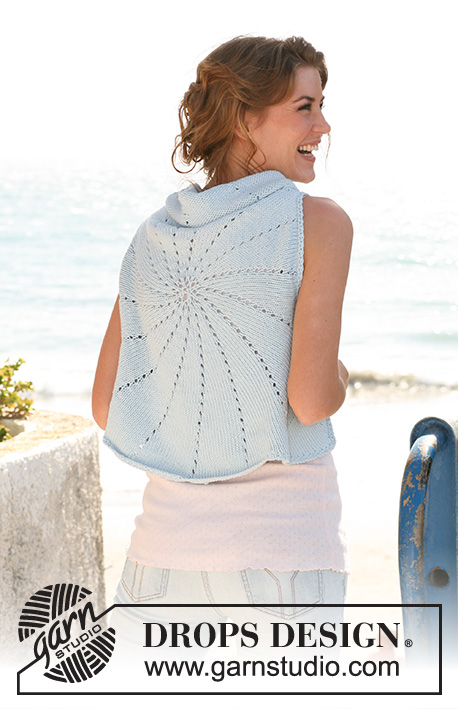
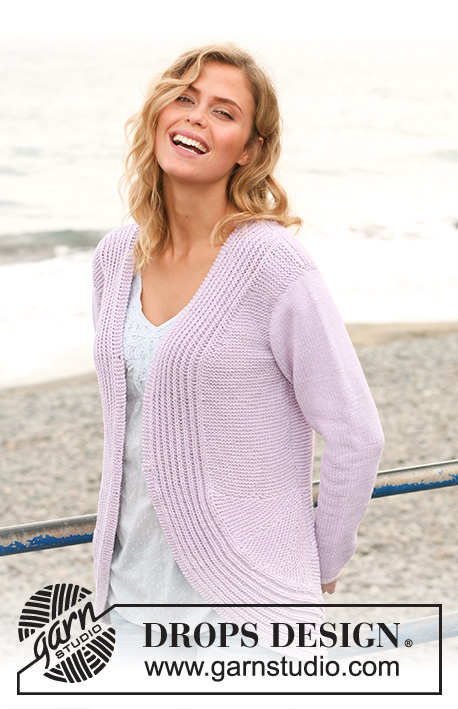
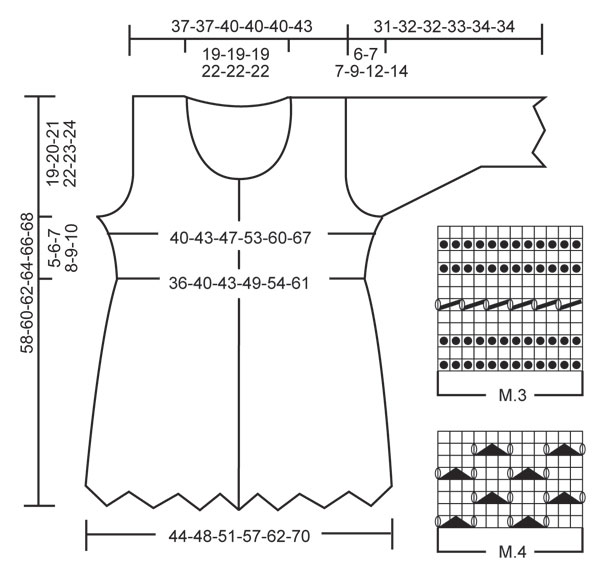
Knitted DROPS jacket with textured pattern, wavy edge and ¾ sleeves in ”Muskat”. Size: S - XXXL.
DROPS 128-2 |
||||||||||||||||
|
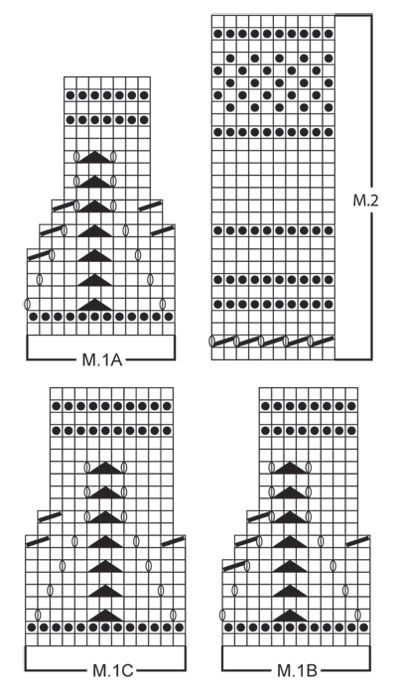
GARTER ST (back and forth on needle): K all rows. PATTERN: See diagram M.1 to M.4. The diagrams shows the pattern from RS. DECREASE TIP (applies to sides of body): All dec are done from RS. Adjust so that dec are done on a K row from RS. Dec as follows before marker: K 2 tog. Dec as follows after marker: Slip 1 st as if to K, K 1, psso. BUTTON HOLES: bind off for button holes on right front band. 1 button hole = K tog third and fourth st from edge and make 1 YO. bind off for button holes when piece measures: SIZE S: 33, 37, 41 and 45 cm / 13", 14½", 16⅛" and 17¾". SIZE M: 33, 37, 42 and 47 cm / 13", 14½", 16½" and 18½". SIZE L: 33, 38, 43 and 48 cm / 13", 15", 17" and 19". SIZE XL: 33, 38, 42, 46 and 50 cm / 13", 15", 16½", 18" and 19¾". SIZE XXL: 33, 37, 42, 46 and 51 cm / 13", 14½", 16½", 18" and 20". SIZE XXXL: 33, 38, 43, 48 and 53 cm / 13", 15", 17", 19" and 21". I.e. bottom button hole is approx. in the middle of M.3 and upper button hole is approx. 1 cm / ⅜" from neckline. -------------------------------------------------------- JACKET: Worked back and forth on circular needle from mid front. Cast on 301-325-349-385-421-469 sts (includes 6 band sts in each side towards mid front) on 2 circular needles size 3.5 mm / US 4 with Muskat - to avoid a tight cast on edge. Pull out one of the needles and work first row as follows from RS: 6 band sts in GARTER ST - see explanation above -, diagram M.1A (= 12 sts), M.1B over the next 264-288-312-348-384-432 sts, M.1C (= 13 sts) and finish with 6 band sts in garter st. Continue the pattern like this. After M.1, there are 205-221-237-261-285-317 sts on needle. Insert 2 markers in the piece; 54-58-62-68-74-82 sts in from each side (= 97-105-113-125-137-153 sts between markers on back piece). Then work M.2 (1st row = WS) with 6 band sts in each side towards mid front as before. NOTE! On 2nd row in M.2, K last st before front band at the end of row. REMEMBER THE GAUGE! When piece measures approx. 10 cm / 4" from bottom tip, dec 1 st on each side of both markers - READ DECREASE TIP! (= 4 sts dec). Repeat dec approx. every 6 cm / 2⅜" a total of 4 times = 189-205-221-245-269-301 sts. When M.2 has been worked a total of 3 times vertically (now piece measures approx. 31 cm / 12¼" from bottom tip), work M.3 (1st row = WS) with 6 band sts in each side towards mid front. AT THE SAME TIME on 2nd row (RS), dec 20 sts evenly (do not dec over band sts) = 169-185-201-225-249-281 sts. NOTE! Remember to bind off for BUTTON HOLES - see explanation above. After M.3, P 1 row from WS (work band sts as before) while AT THE SAME TIME dec 13-17-21-21-21-29 sts evenly = 156-168-180-204-228-252 sts. Now remove the old markers and insert 2 new markers; 42-45-48-54-60-66 sts in from each side (= 72-78-84-96-108-120 sts between markers on back piece). Then work next row as follows from RS: 6 band sts, work M.4 over the next 144-156-168-192-216-240 sts and finish with 6 band sts. Continue the pattern like this. When piece measures 39-40-41-42-43-44 cm / 15¼"-15¾"-16⅛"-16½"-17"-17¼" from bottom tip (i.e. approx. 5-6-7-8-9-10 cm / 2"-2⅜"-2¾"-3⅛"-3½"-4" measured after M.3), bind off (on next row from WS) 4-6-6-6-6-6 sts in each side for armholes (i.e. 2-3-3-3-3-3 sts on each side of both markers). Finish each part separately. BACK PIECE: = 68-72-78-90-102-114 sts. Continue in pattern as before (NOTE! work the sts in each side that do not fit the pattern in stockinette st). AT THE SAME TIME bind off and dec for armholes at the beg of every row in each side as follows: 3 sts 0-0-0-0-0-1 time, 2 sts 0-0-0-3-6-6 times and dec 1 st 0-2-2-2-2-2 times = 68-68-74-74-74-80 sts remain on needle. Continue M.4 with 1 edge st in each side. When piece measures 56-58-60-62-64-66 cm / 22"-22¾"-23⅝"-24⅜"-25¼"-26" from bottom tip (approx. 22-24-26-28-30-32 cm / 8¾"-9½"-10¼"-11"-11¾"-12½" measured after M.3), bind off the middle 32-32-32-32-38-38 sts for neck and finish each shoulder separately. Continue to dec 1 st on next row from neck = 17-17-20-20-17-20 sts remain on the shoulder. Continue pattern with 1 edge st in each side until piece measures 58-60-62-64-66-68 cm / 22¾"-23⅝"-24⅜"-25¼"-26"-26¾". Then bind off. RIGHT FRONT PIECE: = 40-42-45-51-57-63 sts. Continue pattern as before while AT THE SAME TIME dec at beg of every row from the side as on back piece = 40-40-43-43-43-46 sts remain on needle. Continue the pattern with 1 edge st towards armhole and 6 band sts as before. When piece measures 46-48-49-51-52-54 cm / 18"-19"-19¼"-20"-20½"-21¼" (approx. 12-14-15-17-18-20 cm / 4¾"-5½"-6"-6¾"-7"-8" after M.3), slip the outermost 12 sts towards mid front on a stitch holder for neck (work sts before slipping them on the stitch holder to avoid cutting the thread). Continue to bind off and dec for neck at the beg of every row from mid front as follows: 2 sts 3-3-3-3-4-4 times and dec 1 st 5-5-5-5-6-6 times = 17-17-20-20-17-20 sts – NOTE! Work sts that do not fit the pattern in stockinette st when casting/binding off. After last dec, continue the pattern as before with 1 edge st in each side. Bind off when front piece is the same length as back piece. LEFT FRONT PIECE: Work as right front piece but reversed. SLEEVE: Worked back and forth on circular needle. READ ALL OF THE FOLLOWING SECTION BEFORE CONTINUING! Cast on 99-99-99-111-111-111 sts (includes 1 edge st in each side) on 2 circular needles size 3.5 mm / US 4 with Muskat - to avoid a tight cast on edge. Pull out one of the needles and work first row as follows from RS: 1 edge st, M.1A (= 12 sts), M.1B over the next 72-72-72-84-84-84 sts, M.1C (= 13 sts) and finish with 1 edge st. Continue the pattern like this. After M.1, there are 67-67-67-75-75-75 sts on needle. Then work M.2 with 1 edge st in each side while AT THE SAME TIME on 1st row, dec 6-4-2-6-4-2 sts evenly = 61-63-65-69-71-73 sts. When M.2 has been worked one time vertically, work M.3 (1st row = WS). AT THE SAME TIME on 2nd row in M.3, inc 4-4-4-6-6-6 sts evenly = 65-67-69-75-77-79 sts. And AT THE SAME TIME on last row in M.3, dec 3-2-1-4-3-2 sts evenly = 62-65-68-71-74-77 sts. After M.3, P 1 row from WS. Then continue with M.4 with 1 edge st in each side until finished measurements. Size XL + XXL + XXXL: AT THE SAME TIME when piece measures 19-19-18 cm / 7½"-7½"-7" from bottom tip, inc 1 st in each side. Repeat inc in each side every 1-½-½ cm / ⅜"-¼"-¼" a total of 3 times = 77-80-83 sts (NOTE! Work the inc sts in the pattern. Work the inc sts that do not fit the pattern in stockinette st until they fit the pattern). ALL SIZES: When piece measures 25-25-25-24-22-20 cm / 9¾"-9¾"-9¾"-9½"-8¾"-8" (NOTE! Shorter measurements in the larger sizes because of longer sleeve cap and broader shoulder width), bind off 4 sts at the beg of the next 2 rows. Continue to bind off for sleeve cap at beg of every row in each side as follows: 2 sts 3-3-4-4-2-1 times and 1 st 1-2-1-4-13-16 times. Continue to bind off 2 sts in each side at beg of every row until sleeve measures approx. 30-31-31-32-33-33 cm / 11¾"-12¼"-12¼"-12½"-13"-13". Now bind off 4 sts at beg of the next 2 rows before binding off all sts. Knit another sleeve. ASSEMBLY: Sew the shoulder seams. Sew underarm seams inside 1 edge st and sew in sleeves inside 1 edge st. Sew on buttons. NECK EDGE: Knit up from RS approx. 114 to 132 sts around the neck (incl sts on stitch holders at the front) on circular needle size 3 mm / US 2or3 with Muskat. K 3 rows before loosely binding off with K from RS. |
||||||||||||||||
Diagram explanations |
||||||||||||||||
|
||||||||||||||||
 |
||||||||||||||||
 |
||||||||||||||||
Have you finished this pattern?Tag your pictures with #dropspattern #soserenecardigan or submit them to the #dropsfan gallery. Do you need help with this pattern?You'll find 18 tutorial videos, a Comments/Questions area and more by visiting the pattern on garnstudio.com. © 1982-2026 DROPS Design A/S. We reserve all rights. This document, including all its sub-sections, has copyrights. Read more about what you can do with our patterns at the bottom of each pattern on our site. |
||||||||||||||||


With over 40 years in knitting and crochet design, DROPS Design offers one of the most extensive collections of free patterns on the internet - translated to 17 languages. As of today we count 325 catalogs and 12298 patterns - 12288 of which are translated into English (US/in).
We work hard to bring you the best knitting and crochet have to offer, inspiration and advice as well as great quality yarns at incredible prices! Would you like to use our patterns for other than personal use? You can read what you are allowed to do in the Copyright text at the bottom of all our patterns. Happy crafting!
Post a comment to pattern DROPS 128-2
We would love to hear what you have to say about this pattern!
If you want to leave a question, please make sure you select the correct category in the form below, to speed up the answering process. Required fields are marked *.