
Popular categories
Looking for a yarn?


Comments / Questions (129)
![]() Bernard wrote:
Bernard wrote:
Bonjour J'ai commencé ce modele avec de la laine belle coloris 31 bain 0520 mais j'ai peur de ne pas en avoir assez .J'ai contacté plusieurs revendeurs mais apparemment personne n'en a Pouvez-vous m'aider pour contacter drops ? Cordialement
28.03.2026 - 11:25DROPS Design answered:
Bonjour Mme Bernard, pensez à bien conserver la même tension que pour l'échantillon pendant que vous tricotez pour vous assurer de bien avoir suffisamment de fil. Vous pouvez également demander à d'autres tricoteuses via notre DROPS Workshop si l'une d'elles peut vous dépanner. Bon tricot!
07.04.2026 - 09:17
![]() Ghouali Meriem wrote:
Ghouali Meriem wrote:
Bjr svp est ce qu il faut tricoter le 1er rg de chaque gille M1A M2B et M3C ainsi de suite et combien de fois j arrive pas à trouver 205 mailles à la fin je coince et je voudrais tellement le faite merci
14.06.2025 - 14:27
![]() Ghouali Meriem wrote:
Ghouali Meriem wrote:
Bjr svp est ce qu il faut tricoter le 1er rg de chaque gille M1A M2B et M3C ainsi de suite et combien de fois j arrive pas à trouver 205 mailles à la fin je coince et je voudrais tellement le faite merci
14.06.2025 - 14:02
![]() Ghouali Meriem wrote:
Ghouali Meriem wrote:
Bjr svp est ce qu il faut tricoter le 1er rg de chaque gille M1A M2B et M3C ainsi de suite et combien de fois j arrive pas à trouver 205 mailles à la fin je coince et je voudrais tellement le faite merci
14.06.2025 - 13:06
![]() Sylvie wrote:
Sylvie wrote:
Bonjour. Est-ce que M2 se lit de haut en bas ou de bas en haut. Dans ce cas si le premier rang est à l’envers et le second à l’endroit pourquoi préciser de tricoter la dernière maille du rang 2 à l’endroit ?
05.04.2025 - 10:42DROPS Design answered:
Bonjour Sylvie, le diagramme M.2 se lit (comme les autres diagrammes) de bas en haut, mais le 1er rang de M.2 est tricoté sur l'envers; ainsi, le 2ème rang = rang ajouré se tricote sur l'endroit, on va donc tricoter (2 m ens à l'end, 1 jeté) tout le rang en terminant par 1 m endroit (ainsi le point ajouré est symétrique). Bon tricot!
07.04.2025 - 07:45
![]() Harriëtte Van Der Maat wrote:
Harriëtte Van Der Maat wrote:
Beste mensen van Drops Design, Ik zou bij de beschrijving van het rechtervoorpand nog een keer melden dat breisters denken aan het maken van knoopsgaten. Met vriendelijke groet, Harriette
24.02.2025 - 17:12
![]() Maren wrote:
Maren wrote:
Hallo Drops-Team! Ich bin verwirrt. Ich habe die gleiche Nadelstärke, das gleiche Garn und stricke relativ stramm, etwas zu stramm. Doch meine Maschenprobe ist in der Breite etwa 18-20 M und in der Höhe (gemessen an dem kraus recht gestrickten Teil) eher etwa 35 M. Mein Strickstück ist auch viel zu breit geworden! Ich weiß nicht, was ich tun kann. Vielen Dank im Voraus!
23.02.2025 - 20:52DROPS Design answered:
Liebe Maren, hier muss die Maschenprobe Glattrechts 22 M x 3O Reihen sein und beim M.4 sollen Sie 18 Maschen in der Breite haben, so bekommen Sie die richtigen Breiten/Maßen wie in der Maßskizze. Viel Spaß beim Stricken!
24.02.2025 - 09:24
![]() Sussi Beck wrote:
Sussi Beck wrote:
Så må der være fejl på målene på skitsen, da man ifølge opskriften skal tage ind før og efter M3. Blusen kan jo ikke blive 3-4 cm bredere ved en indtagning!?
10.12.2024 - 14:52DROPS Design answered:
Hej Sussi, Mønsteret i M.4 fylder mere, så arbejdet vil blive lidt bredere igen efter indtagningerne i siderne :)
11.12.2024 - 13:39
![]() Sussi Beck wrote:
Sussi Beck wrote:
Hej. Når man starter M3 tages der 20m ind og efter M3 tages der ml 23-29m ind. Men ifølge skitsen bliver der taget ud anden gang. Kan ikke få mål og opskrift til at passe sammen. Der må da være en fejl? Mvh Sussi Beck
09.12.2024 - 08:11DROPS Design answered:
Hei Sussi. Denne jakken er strikket med flere ulike strukturer, samt fellinger i sidene og i diagrammene. Målskissen gir et uttrykk på hvordan jakken ser ut til slutt med de mål den skal ha, men den vil ikke gi riktig tegning for hvert enkelt diagram. mvh DROPS Design
10.12.2024 - 13:38
![]() Birgit wrote:
Birgit wrote:
Jag har stickat koftan storlek M men den angivna garnmängden räcker inte till. Jag har inte gjort några ändringar i mönstret.
24.11.2024 - 11:05
|
||||||||||||||||
So Serene#soserenecardigan |
||||||||||||||||
 |
 |
|||||||||||||||
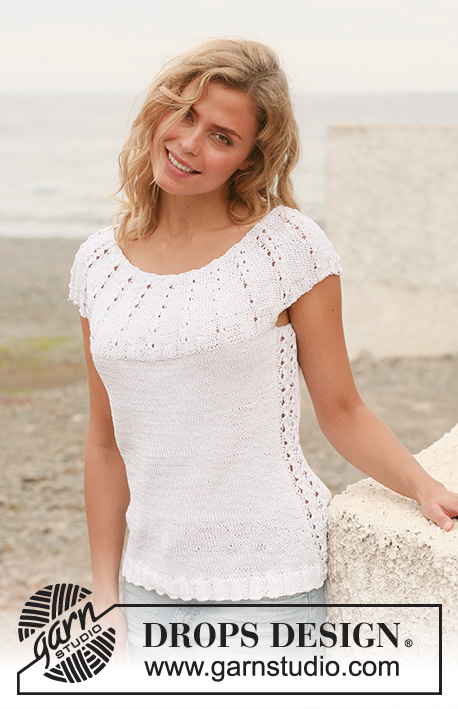
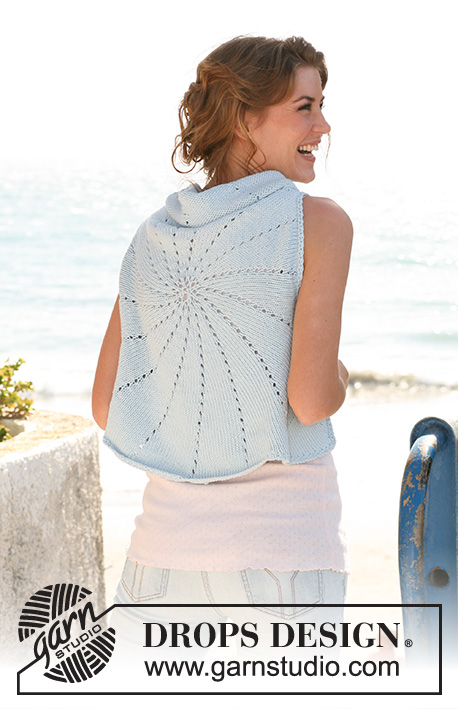
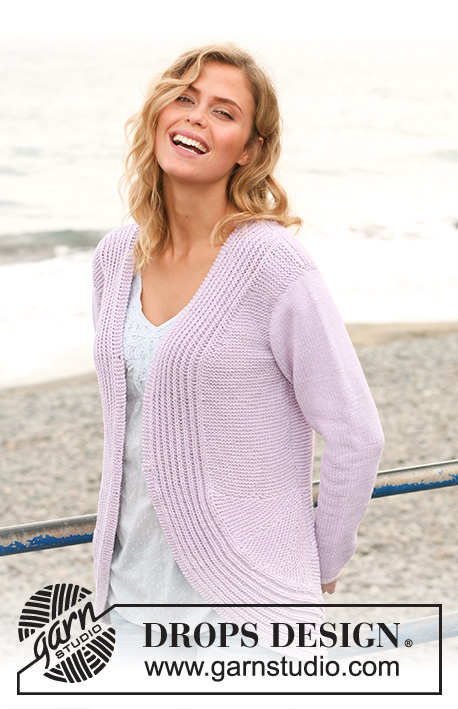
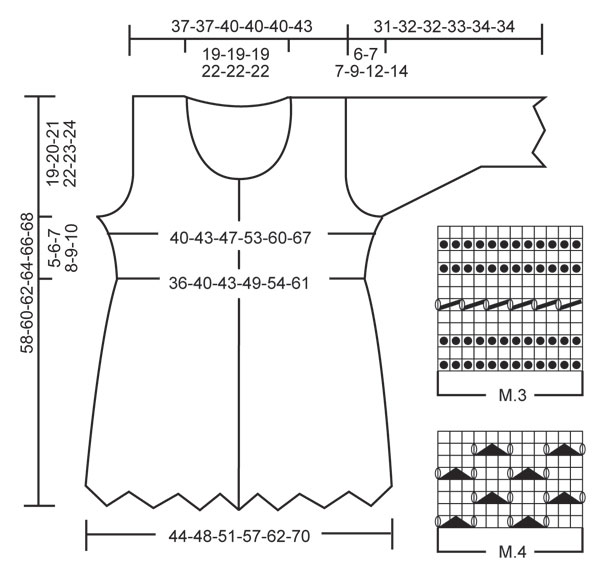
Knitted DROPS jacket with textured pattern, wavy edge and ¾ sleeves in ”Muskat”. Size: S - XXXL.
DROPS 128-2 |
||||||||||||||||
|
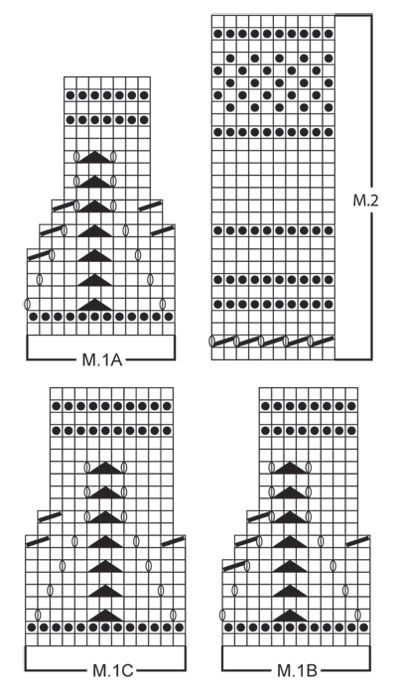
GARTER ST (back and forth on needle): K all rows. PATTERN: See diagram M.1 to M.4. The diagrams shows the pattern from RS. DECREASE TIP (applies to sides of body): All dec are done from RS. Adjust so that dec are done on a K row from RS. Dec as follows before marker: K 2 tog. Dec as follows after marker: Slip 1 st as if to K, K 1, psso. BUTTON HOLES: bind off for button holes on right front band. 1 button hole = K tog third and fourth st from edge and make 1 YO. bind off for button holes when piece measures: SIZE S: 33, 37, 41 and 45 cm / 13", 14½", 16⅛" and 17¾". SIZE M: 33, 37, 42 and 47 cm / 13", 14½", 16½" and 18½". SIZE L: 33, 38, 43 and 48 cm / 13", 15", 17" and 19". SIZE XL: 33, 38, 42, 46 and 50 cm / 13", 15", 16½", 18" and 19¾". SIZE XXL: 33, 37, 42, 46 and 51 cm / 13", 14½", 16½", 18" and 20". SIZE XXXL: 33, 38, 43, 48 and 53 cm / 13", 15", 17", 19" and 21". I.e. bottom button hole is approx. in the middle of M.3 and upper button hole is approx. 1 cm / ⅜" from neckline. -------------------------------------------------------- JACKET: Worked back and forth on circular needle from mid front. Cast on 301-325-349-385-421-469 sts (includes 6 band sts in each side towards mid front) on 2 circular needles size 3.5 mm / US 4 with Muskat - to avoid a tight cast on edge. Pull out one of the needles and work first row as follows from RS: 6 band sts in GARTER ST - see explanation above -, diagram M.1A (= 12 sts), M.1B over the next 264-288-312-348-384-432 sts, M.1C (= 13 sts) and finish with 6 band sts in garter st. Continue the pattern like this. After M.1, there are 205-221-237-261-285-317 sts on needle. Insert 2 markers in the piece; 54-58-62-68-74-82 sts in from each side (= 97-105-113-125-137-153 sts between markers on back piece). Then work M.2 (1st row = WS) with 6 band sts in each side towards mid front as before. NOTE! On 2nd row in M.2, K last st before front band at the end of row. REMEMBER THE GAUGE! When piece measures approx. 10 cm / 4" from bottom tip, dec 1 st on each side of both markers - READ DECREASE TIP! (= 4 sts dec). Repeat dec approx. every 6 cm / 2⅜" a total of 4 times = 189-205-221-245-269-301 sts. When M.2 has been worked a total of 3 times vertically (now piece measures approx. 31 cm / 12¼" from bottom tip), work M.3 (1st row = WS) with 6 band sts in each side towards mid front. AT THE SAME TIME on 2nd row (RS), dec 20 sts evenly (do not dec over band sts) = 169-185-201-225-249-281 sts. NOTE! Remember to bind off for BUTTON HOLES - see explanation above. After M.3, P 1 row from WS (work band sts as before) while AT THE SAME TIME dec 13-17-21-21-21-29 sts evenly = 156-168-180-204-228-252 sts. Now remove the old markers and insert 2 new markers; 42-45-48-54-60-66 sts in from each side (= 72-78-84-96-108-120 sts between markers on back piece). Then work next row as follows from RS: 6 band sts, work M.4 over the next 144-156-168-192-216-240 sts and finish with 6 band sts. Continue the pattern like this. When piece measures 39-40-41-42-43-44 cm / 15¼"-15¾"-16⅛"-16½"-17"-17¼" from bottom tip (i.e. approx. 5-6-7-8-9-10 cm / 2"-2⅜"-2¾"-3⅛"-3½"-4" measured after M.3), bind off (on next row from WS) 4-6-6-6-6-6 sts in each side for armholes (i.e. 2-3-3-3-3-3 sts on each side of both markers). Finish each part separately. BACK PIECE: = 68-72-78-90-102-114 sts. Continue in pattern as before (NOTE! work the sts in each side that do not fit the pattern in stockinette st). AT THE SAME TIME bind off and dec for armholes at the beg of every row in each side as follows: 3 sts 0-0-0-0-0-1 time, 2 sts 0-0-0-3-6-6 times and dec 1 st 0-2-2-2-2-2 times = 68-68-74-74-74-80 sts remain on needle. Continue M.4 with 1 edge st in each side. When piece measures 56-58-60-62-64-66 cm / 22"-22¾"-23⅝"-24⅜"-25¼"-26" from bottom tip (approx. 22-24-26-28-30-32 cm / 8¾"-9½"-10¼"-11"-11¾"-12½" measured after M.3), bind off the middle 32-32-32-32-38-38 sts for neck and finish each shoulder separately. Continue to dec 1 st on next row from neck = 17-17-20-20-17-20 sts remain on the shoulder. Continue pattern with 1 edge st in each side until piece measures 58-60-62-64-66-68 cm / 22¾"-23⅝"-24⅜"-25¼"-26"-26¾". Then bind off. RIGHT FRONT PIECE: = 40-42-45-51-57-63 sts. Continue pattern as before while AT THE SAME TIME dec at beg of every row from the side as on back piece = 40-40-43-43-43-46 sts remain on needle. Continue the pattern with 1 edge st towards armhole and 6 band sts as before. When piece measures 46-48-49-51-52-54 cm / 18"-19"-19¼"-20"-20½"-21¼" (approx. 12-14-15-17-18-20 cm / 4¾"-5½"-6"-6¾"-7"-8" after M.3), slip the outermost 12 sts towards mid front on a stitch holder for neck (work sts before slipping them on the stitch holder to avoid cutting the thread). Continue to bind off and dec for neck at the beg of every row from mid front as follows: 2 sts 3-3-3-3-4-4 times and dec 1 st 5-5-5-5-6-6 times = 17-17-20-20-17-20 sts – NOTE! Work sts that do not fit the pattern in stockinette st when casting/binding off. After last dec, continue the pattern as before with 1 edge st in each side. Bind off when front piece is the same length as back piece. LEFT FRONT PIECE: Work as right front piece but reversed. SLEEVE: Worked back and forth on circular needle. READ ALL OF THE FOLLOWING SECTION BEFORE CONTINUING! Cast on 99-99-99-111-111-111 sts (includes 1 edge st in each side) on 2 circular needles size 3.5 mm / US 4 with Muskat - to avoid a tight cast on edge. Pull out one of the needles and work first row as follows from RS: 1 edge st, M.1A (= 12 sts), M.1B over the next 72-72-72-84-84-84 sts, M.1C (= 13 sts) and finish with 1 edge st. Continue the pattern like this. After M.1, there are 67-67-67-75-75-75 sts on needle. Then work M.2 with 1 edge st in each side while AT THE SAME TIME on 1st row, dec 6-4-2-6-4-2 sts evenly = 61-63-65-69-71-73 sts. When M.2 has been worked one time vertically, work M.3 (1st row = WS). AT THE SAME TIME on 2nd row in M.3, inc 4-4-4-6-6-6 sts evenly = 65-67-69-75-77-79 sts. And AT THE SAME TIME on last row in M.3, dec 3-2-1-4-3-2 sts evenly = 62-65-68-71-74-77 sts. After M.3, P 1 row from WS. Then continue with M.4 with 1 edge st in each side until finished measurements. Size XL + XXL + XXXL: AT THE SAME TIME when piece measures 19-19-18 cm / 7½"-7½"-7" from bottom tip, inc 1 st in each side. Repeat inc in each side every 1-½-½ cm / ⅜"-¼"-¼" a total of 3 times = 77-80-83 sts (NOTE! Work the inc sts in the pattern. Work the inc sts that do not fit the pattern in stockinette st until they fit the pattern). ALL SIZES: When piece measures 25-25-25-24-22-20 cm / 9¾"-9¾"-9¾"-9½"-8¾"-8" (NOTE! Shorter measurements in the larger sizes because of longer sleeve cap and broader shoulder width), bind off 4 sts at the beg of the next 2 rows. Continue to bind off for sleeve cap at beg of every row in each side as follows: 2 sts 3-3-4-4-2-1 times and 1 st 1-2-1-4-13-16 times. Continue to bind off 2 sts in each side at beg of every row until sleeve measures approx. 30-31-31-32-33-33 cm / 11¾"-12¼"-12¼"-12½"-13"-13". Now bind off 4 sts at beg of the next 2 rows before binding off all sts. Knit another sleeve. ASSEMBLY: Sew the shoulder seams. Sew underarm seams inside 1 edge st and sew in sleeves inside 1 edge st. Sew on buttons. NECK EDGE: Knit up from RS approx. 114 to 132 sts around the neck (incl sts on stitch holders at the front) on circular needle size 3 mm / US 2or3 with Muskat. K 3 rows before loosely binding off with K from RS. |
||||||||||||||||
Diagram explanations |
||||||||||||||||
|
||||||||||||||||
 |
||||||||||||||||
 |
||||||||||||||||
Have you finished this pattern?Tag your pictures with #dropspattern #soserenecardigan or submit them to the #dropsfan gallery. Do you need help with this pattern?You'll find 18 tutorial videos, a Comments/Questions area and more by visiting the pattern on garnstudio.com. © 1982-2026 DROPS Design A/S. We reserve all rights. This document, including all its sub-sections, has copyrights. Read more about what you can do with our patterns at the bottom of each pattern on our site. |
||||||||||||||||


With over 40 years in knitting and crochet design, DROPS Design offers one of the most extensive collections of free patterns on the internet - translated to 17 languages. As of today we count 325 catalogs and 12298 patterns - 12288 of which are translated into English (US/in).
We work hard to bring you the best knitting and crochet have to offer, inspiration and advice as well as great quality yarns at incredible prices! Would you like to use our patterns for other than personal use? You can read what you are allowed to do in the Copyright text at the bottom of all our patterns. Happy crafting!
Post a comment to pattern DROPS 128-2
We would love to hear what you have to say about this pattern!
If you want to leave a question, please make sure you select the correct category in the form below, to speed up the answering process. Required fields are marked *.