
Popular categories
Looking for a yarn?


Comments / Questions (85)
![]() Tine wrote:
Tine wrote:
The shoulders are too wide for me
14.12.2010 - 12:04
![]() Hanne wrote:
Hanne wrote:
Dette er den flotteste bluse i denne omgang...
13.12.2010 - 22:27
![]() Framboise wrote:
Framboise wrote:
Celui-ci est vraiment très réussi, je suis partante pour le tricoter si vous m'envoyé les explications
13.12.2010 - 21:06
![]() Annie wrote:
Annie wrote:
Gör den längre och med omlottknytning - blir en fin morgonrock med den kragen. Kan även göra lång ärm och avskuren i midjan till kappa eller jacka.
12.12.2010 - 23:29
![]() Inger wrote:
Inger wrote:
Virker alt for kompakt og stor over skuldrene
12.12.2010 - 17:15
![]() Bernadette wrote:
Bernadette wrote:
Weer zo'n bijzonder ontwerp! Wil ik graag aan mijn collectie toevoegen. Bernadette
12.12.2010 - 15:58Zarrouk Trad wrote:
Bonjour Je vous félicite pour cette panoplie de jolis modèles et je vote pour z-541, que j'aimerai bien réaliser si vous voudrez bien me communiquer les explications afférentes. Avec tous mes encouragements et mes meilleurs vœux pour Noêl et le nouvel an 2011.
12.12.2010 - 09:48Malena wrote:
Es una belleza! esperamos pronto las instrucciones en español.gracias
11.12.2010 - 18:03
![]() Ecureuil wrote:
Ecureuil wrote:
Celui çi est une vraie merveille
11.12.2010 - 09:37
![]() Ingrid wrote:
Ingrid wrote:
Wunderschön mus natürlich, auch mit
10.12.2010 - 22:47
|
|||||||||||||||||||
Beautiful You!#beautifulyoucardigan |
|||||||||||||||||||
 |
 |
||||||||||||||||||
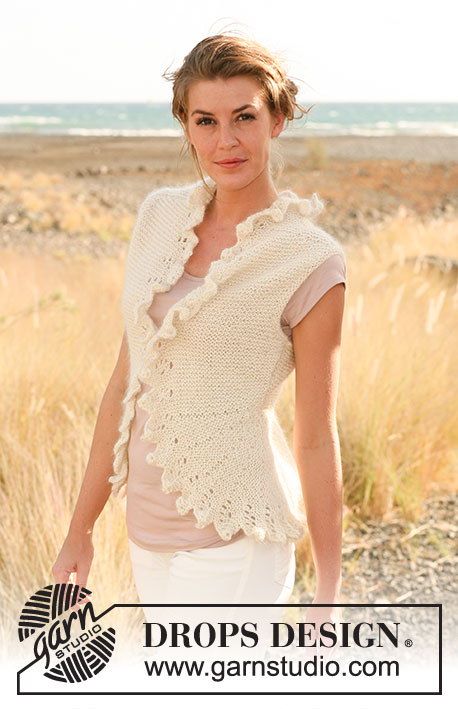
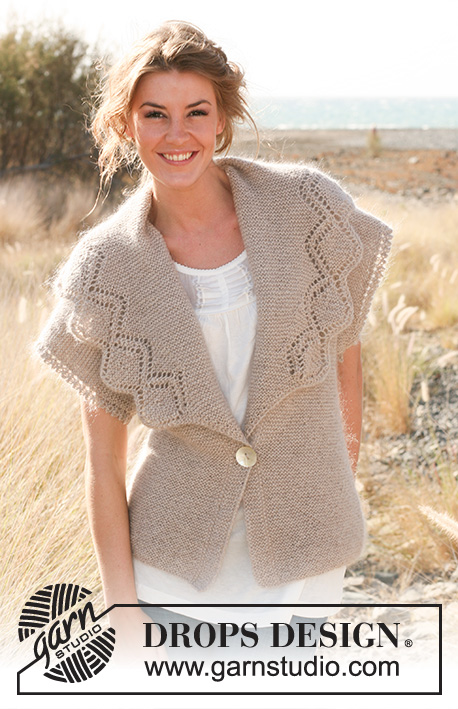
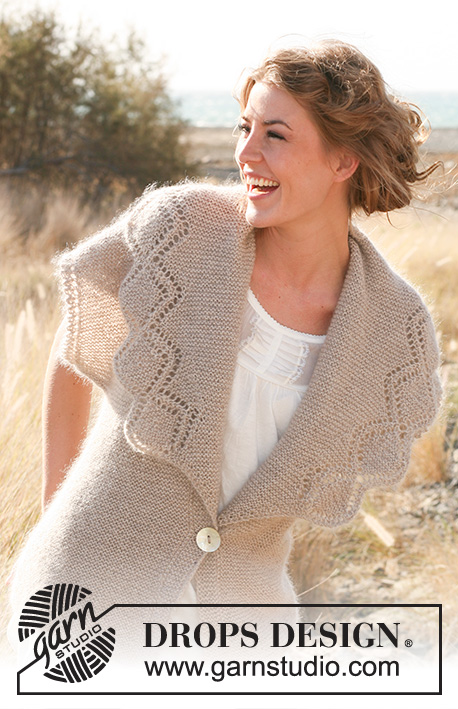
Knitted DROPS jacket in garter st with broad collar and lace pattern in "Alpaca" and "Kid-Silk". Size: S - XXXL.
DROPS 130-2 |
|||||||||||||||||||
|
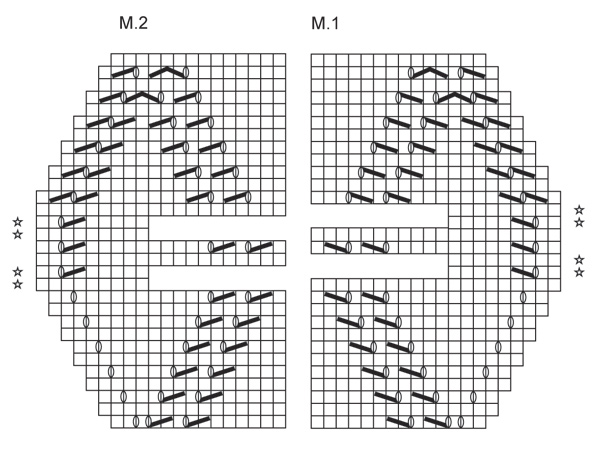
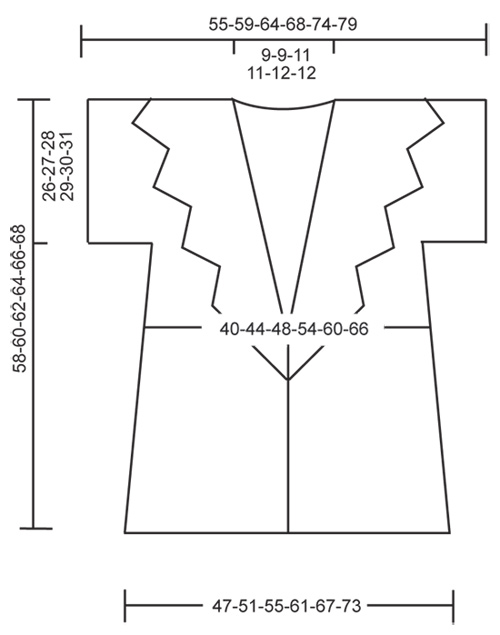
GARTER ST (back and forth on needle): K all rows. BUTTON HOLE: bind off for 1 button hole on right front band. 1 button hole = bind off 4th and 5th st from mid front. On next row cast on 2 new sts over the bound off sts. Bind off for button hole when piece measures 20 cm / 8" in all sizes. LACE PATTERN: See diagram M.1 and M.2 (= 14 sts). Diagram shows pattern seen from WS, i.e. 1st row = from WS. PICOT EDGE (back and forth on needle): Row 1 (= the last 4 sts on needle): K all sts. Row 2 (= the first 4 sts on needle): K all sts. Row 3 (= the last 4 sts on needle inc to 6 sts): K until 4 sts remain, work these sts as follows: K 2 tog, 1 YO, work 2 sts in each of the last 2 sts. Row 4 (= the first 6 sts on needle dec to 4 sts): Slip 1st st as if to K, K 1, psso, K 1 and slip the last st on right needle over the foremost st - then K the remaining sts. Repeat row 1-4 in each side. INCREASE TIP (applies to collar): Inc for collar from WS. Inc by making 1 YO after M.1 and 1 YO before M.2. On next row K YOs twisted (i.e. work in the back loop of st instead of front to avoid holes). Then work the inc sts in garter st. -------------------------------------------------------- JACKET: Worked back and forth on circular needle from mid front. Cast on 174-188-200-222-242-262 sts (includes 7 front band sts in each side) on circular needle size 4.5 mm / US 7 with 1 strand Alpaca and 1 strand Kid-Silk. Then work as follows, beg from RS: 6 sts in GARTER ST - see explanation above, P 1 (P on every row), work in garter st until 7 sts remain, finish with P 1 (P on every row) and 6 sts in garter st (the 6 sts in garter st + P 1 = front bands. Work these sts K over K and P over P until finished measurements). REMEMBER THE GAUGE! When piece measures 8 cm / 3⅛", insert 2 markers in the piece; after 47-51-53-59-64-69 sts in from each side (back piece = 80-86-94-104-114-124 sts). READ ALL OF THE FOLLOWING SECTION BEFORE CONTINUING! On next row from RS, dec 1 st on each side of marker in each side. Repeat dec every 4 cm / 1½" a total of 6 times. AT THE SAME TIME when piece measures 20 cm / 8", bind off for 1 BUTTON HOLE - see explanation above - on right front band. AT THE SAME TIME when piece measures 21 cm / 8¼", inc for collar from WS in each side at the beg and end of row as follows: K 2, 1 YO, K 1, 1 YO, work front band and in garter st as before until 3 sts remain, finish with 1 YO, K 1, 1 YO, K 2 (= 2 sts inc towards mid front in each side). Repeat inc of 2 sts at beg and end of every 4th row (i.e. work 3 rows without inc, inc again on next row from WS) a total of 10 times - work the inc sts in garter st (collar has now inc to a total of 20 sts in each side and piece measures approx. 31 cm / 12¼"). On next row from WS work LACE PATTERN - see explanation above - as follows: M.1, work in garter st until 14 sts remain (P sts on front bands are worked P as before), finish with M.2. AT THE SAME TIME inc again for collar from WS inside lace pattern in each side towards mid front - READ INCREASE TIP! Repeat inc every 4th row a total of 8-8-10-10-12-12 times. AT THE SAME TIME when piece measures 32-33-34-35-36-37 cm / 12½"-13½"-13⅜"-13¾"-14¼"-14½", divide the piece at the markers and finish each part separately. BACK PIECE: = 68-74-82-92-102-112 sts. Then cast on 13-13-13-12-12-11 new sts for sleeves at the end of the next 2 rows = 94-100-108-116-126-134 sts. Now work in garter st with PICOT EDGE - see explanation above - over the outermost 4 sts on row in each side until finished measurements (1st row of picot edge beg from RS in left side of piece and on next row from WS in right side of piece). When piece measures 56-58-60-62-64-66 cm / 22"-22¾"-23⅝"-24⅜"-25¼"-26", bind off the middle 14-14-16-16-18-18 sts for neck and finish each part separately. Then dec 1 st on next row from neck = 39-42-45-49-53-57 sts remain on needle (after one whole repetition of the picot edge in each side). Bind off when piece measures 58-60-62-64-66-68 cm / 22¾"-23⅝"-24⅜"-25¼"-26"-26¾" (finish after one whole repetition of the picot edge). LEFT FRONT PIECE: Cast on sts in the side as on back piece and continue M.1 and inc towards the side for collar while AT THE SAME TIME working picot edge over the last 4 sts on row towards the side as on back piece. When all inc are done, there are 68-72-76-81-88-92 sts + M.1 on needle (after one whole repetition of the picot edge in the side). Continue to work like this until piece measures 58-60-62-64-66-68 cm / 22¾"-23⅝"-24⅜"-25¼"-26"-26¾". Now bind off the first 39-42-45-49-53-57 sts for shoulder with start from RS = 29-30-31-32-35-35 sts + M.1 remain for collar. Work rest of row. Then work short rows with start from WS: Work 2 rows back and forth over M.1 + the next 8-8-9-9-10-10 sts, work 2 rows back and forth over all sts. Continue with lace pattern and collar sts in garter st until piece measures 7-7-8-8-8-8 cm / 2¾"-2¾"-3⅛"-3⅛"-3⅛"-3⅛", measured at the shortest and down to shoulder. Bind off. RIGHT FRONT PIECE: Work as left front piece but reversed (continue M.2 as before). ASSEMBLY: Sew shoulder seams and underarm seams. Sew collar tog mid back and sew on to back of neck. Sew the button on to left front piece. |
|||||||||||||||||||
Diagram explanations |
|||||||||||||||||||
|
|||||||||||||||||||
 |
|||||||||||||||||||
 |
|||||||||||||||||||
Have you finished this pattern?Tag your pictures with #dropspattern #beautifulyoucardigan or submit them to the #dropsfan gallery. Do you need help with this pattern?You'll find 18 tutorial videos, a Comments/Questions area and more by visiting the pattern on garnstudio.com. © 1982-2026 DROPS Design A/S. We reserve all rights. This document, including all its sub-sections, has copyrights. Read more about what you can do with our patterns at the bottom of each pattern on our site. |
|||||||||||||||||||


With over 40 years in knitting and crochet design, DROPS Design offers one of the most extensive collections of free patterns on the internet - translated to 17 languages. As of today we count 325 catalogs and 12298 patterns - 12288 of which are translated into English (US/in).
We work hard to bring you the best knitting and crochet have to offer, inspiration and advice as well as great quality yarns at incredible prices! Would you like to use our patterns for other than personal use? You can read what you are allowed to do in the Copyright text at the bottom of all our patterns. Happy crafting!
Post a comment to pattern DROPS 130-2
We would love to hear what you have to say about this pattern!
If you want to leave a question, please make sure you select the correct category in the form below, to speed up the answering process. Required fields are marked *.