
Popular categories
Looking for a yarn?


Comments / Questions (147)
![]() Angel wrote:
Angel wrote:
Bonjour, Sur les photos, pour le haut, il y a bien 2 bandes de 2 tours en écru. Alors que le tuto ne précise pas qu'il faut changer de couleur. Pourriez-vous me confirmer ce changement ? Merci pour votre réponse et passer de belles journées. Angel
21.07.2023 - 10:52DROPS Design answered:
Bonjour Angel, effectivement il y a 2 changements de couleur, de 2 tours chacun. Je vais envoyer une correction, cela doit etre ajoute dans le text. Bon tricot!
21.07.2023 - 11:25
![]() Inga wrote:
Inga wrote:
Ich habe grad diese wunderbare Anleitung gefunden und begonnen zu stricken. Meine Frage: Die erste Markierung nach 12 Maschen für Größe L ist das oben am Rock oder unten? Von meinem Gefühl her würde ich sagen, dass die Markierungen mit dem größeren Abstand am oberen Rockrand sein müssten, nach Anleitung sind aber die Markierungen 3-16 am oberen Rockrand? Hilfe wäre schön….
01.06.2023 - 08:11DROPS Design answered:
Liebe Inge, die 1. Reihe wird eine Rückreihe sein, so wird die 1. Markierung 12 Maschen nach Anfang der Rück-Reihe, oben am Rock und die 16. Markierung unten am Rock sein. Die Rückreihen beginnen dann bei einer Hinreihe und es wird immer weniger Maschen bis 16. Markierung gestrickt, dann stricken Sie immer mehr Maschen bis 1. Markierung. So wird der untere Rand longer als der obere. Viel Spaß beim stricken!
01.06.2023 - 09:19
![]() Elma Van Der Loos wrote:
Elma Van Der Loos wrote:
Hallo, hoeveel garen heb ik nodig als alleen het rokgedeelte wordt gebreid? Groeten, Elma
07.07.2022 - 16:33DROPS Design answered:
Dag Elma,
Het zal ongeveer 2/3 zijn van de totale hoeveelheden, maar precies weet ik het niet.
08.07.2022 - 08:21
![]() Katrin wrote:
Katrin wrote:
Eine tolle Anleitung, vorerst musste ich die Logik des entstehenden Rockteiles verstehen. Bei exaktem Nacharbeiten entsteht eine herrliche Weite. Ich habe das Kleid mit einem anderen Modell kombiniert, fand es mit Stricklochmuster im Oberteil und Spitze am Rock sowie 3/4 Ärmel abwechslungsreicher. Vielen Dank, es hat Spaß gemacht!
01.03.2022 - 08:42
![]() Manta wrote:
Manta wrote:
How I can make the dress' hem longer?
20.02.2022 - 13:52DROPS Design answered:
Dear Manta, we are unfortunately not able to adjust every pattern to every single request - you are welcome to contact your DROPS store for any individual help or even ask other knitters in our DROPS Workshop. Thanks for your comprehension. Happy knitting!
21.02.2022 - 10:38
![]() Katharina wrote:
Katharina wrote:
Liebes Drops Team, Wenn ich beim ersten Mal die verkürzten Reihen bei Marker 1 starte, entsteht ja ein schräges Teil -soweit logisch, weil der Rock ja unten weiter sein soll. Beginne ich danach aber mit den verkürzten Reihen bei Marker 16 und stricke das ganze nochmal "andersrum" , verschwindet doch die Schräge wieder und ich stehe mit einem Rechteck da? Ich traue mich nicht, es einfach zu probieren...
03.02.2022 - 22:34DROPS Design answered:
Liebe Katharina, wenn Sie die 1. Hälfte der verkürzten Reihen (bis 16. Markierer) stricken, stricken Sie immer mehr Maschen (= die 1. Hälfte von so einem Dreieck), dann stricken Sie die verkürzten Reihen vom 16 bis 1. Markierer, dh immer weniger Maschen (= 2. Hälfte vom Dreieck), so haben Sie immer mehr Reihen an der rechten Seite (von der Vorderseite gesehen) als an der linken Seite. Zwischen jeder Hälfte und jedem "Dreieck" mit verkürzten Reihen stricken Sie Reihen über alle Maschen. Viel Spaß beim stricken!
04.02.2022 - 08:57
![]() Cornelia wrote:
Cornelia wrote:
Hallo ,moet ik als de steken opgezet zijn beginnen met naturel. Groetjes cornelia
02.12.2021 - 13:47DROPS Design answered:
Dag Cornelia,
Nee, je zet de steken voor de rok op met ocean view.
07.12.2021 - 17:20
![]() Ute Marx wrote:
Ute Marx wrote:
Hallo liebes Drops-Team, kann es sein, dass der Farbwechsel zwischen natur und ocean view am Rocksaum erfolgt? Schöner wäre es doch an der oberen Kante, wo ja später die Maschen fürs Oberteil aufgenommen werden. Oder hab ich da irgendwas falsch verstanden?
16.07.2021 - 20:04DROPS Design answered:
Liebe Frau Marx, der Farbwechsel entsteht am Anfang einer Hinreihe, dh an der untere Kante - die 1. Reihe ist eine Rückreihe, dann stricken Sie die verkürzten Reihen (von *bis*) und damit mit einer Hinreihe (von unten nach oben). Viel Spaß beim stricken!
19.07.2021 - 08:07
![]() Camilla Velle wrote:
Camilla Velle wrote:
Hva menes med «skal felles SVÆRT LØST AV»? Skal man bruke pinner i dobbel tykkelse for å felle av, for eksempel?
03.07.2020 - 12:13DROPS Design answered:
Hei Camilla. Det er veldig viktig at ikke avfellingskanten felles av for stramt. Du kan enten felle av veldig løst eller du kan bruke en pinne som er større, eller du kan felle av med kast. Gå gjerne til våre Instruksjonsvideoer og velg "Strikkevideoer" - "Fell av" for å se video på de ulike avfellingsteknikker du kan bruke. God Fornøyelse!
06.07.2020 - 11:45
![]() Ria Agterberg wrote:
Ria Agterberg wrote:
U zegt op het einde van een patroon vaak "Bedankt dat u een patroon van DROPS Design kies". Maar ik wil u heel hartelijk bedanken want altijd als ik iets wil gaan haken of breien vind ik hier de mooiste patronen. Ze zijn altijd heel duidelijk en voor de iets moeilijkere dingen staat er vaak extra uitleg bij of een super handig video. Zoals in dit geval van de verkorte toeren, echt geweldig deze site vind ik, bedankt.
02.04.2020 - 02:29
|
|
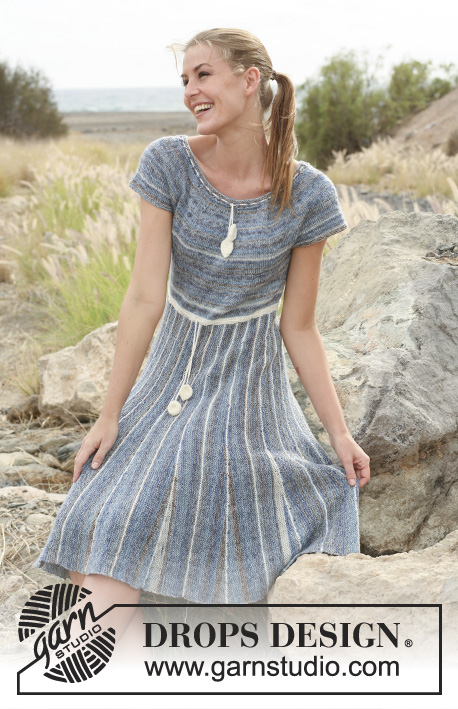
Dance With Me#dancewithmedress |
|
 |
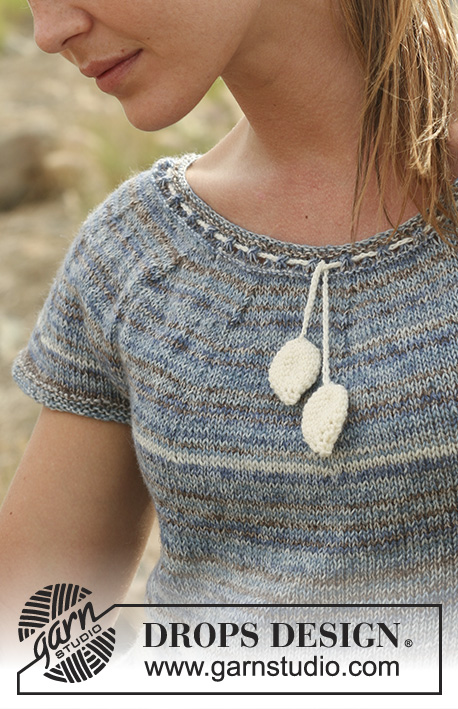 |
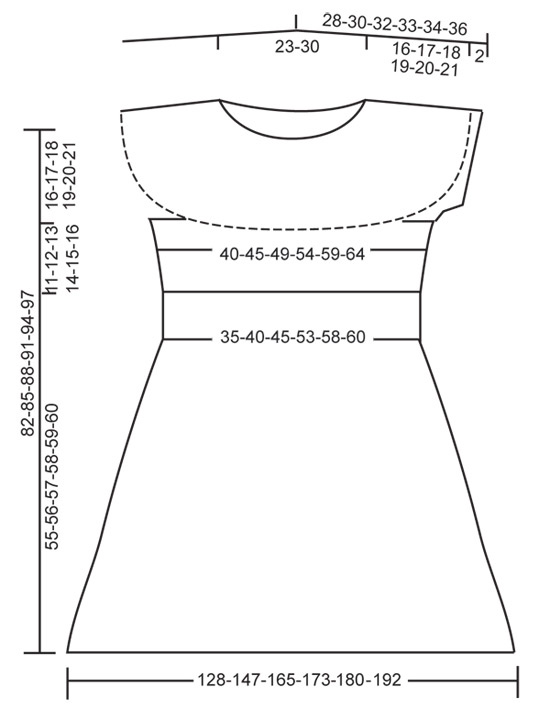
Knitted DROPS dress with skirt worked from side to side with short rows and stripes, and knitted top in stockinette st with round yoke in "Fabel". Size: S - XXXL
DROPS 128-1 |
|
|
GARTER ST (in the round): *K 1 round and P 1 round*, repeat from *-*. INCREASE TIP: Inc 1 st by making 1 YO, on next row knit YO twisted (i.e. work in the back loop of st instead front) to avoid holes. DECREASE TIP: Dec by K 2 sts tog. -------------------------------------------------------- DRESS: Beg by working a skirt back and forth on circular needle from side to side. To give the skirt width at the bottom work with short rows. Then work round yoke. LOOSELY cast on 132-134-136-140-142-144 sts on 2 circular needles size 3 mm / US 2or3 with 604, ocean view (to avoid a tight cast on edge). Pull out one of the needles and work as explained below. The entire skirt is worked in Garter st, i.e. K all rows. Work first row as follows (from waist down = WS): Work 8-10-12-14-16-18 sts, insert MARKER 1, work 14-14-14-16-16-16 sts, insert MARKER 2, work 18 sts, insert MARKER 3, work 10 sts, insert MARKER 4, work 10 sts, insert MARKER 5, work 6 sts, insert MARKER 6, work 6 sts, insert MARKER 7, work 6 sts, insert MARKER 8, work 6 sts, insert MARKER 9, work 6 sts, insert MARKER 10, work 6 sts, insert MARKER 11, work 6 sts, insert MARKER 12, work 6 sts, insert MARKER 13, work 6 sts, insert MARKER 14, work 6 sts, insert MARKER 15, work 6 sts, insert MARKER 16, work the remaining 6 sts. Move the markers upwards when working. Continue to work with short rows (NOTE! Tighten the thread on every turn in mid of piece before continuing, to avoid holes) as follows: * Work 2 rows with 100, off white back and forth over all sts (1st row = RS), work 10-10-10-12-12-14 rows with 604, ocean view back and forth over all sts (= a total of 12-12-12-14-14-16 rows in garter st over all sts). Then work until MARKER 1, turn and work back. Work until MARKER 2, turn and work back. Work until MARKER 3, turn and work back. Work until MARKER 4, turn and work back. Work until MARKER 5, turn and work back. Work until MARKER 6, turn and work back. Work until MARKER 7, turn and work back. Work until MARKER 8, turn and work back. Work until MARKER 9, turn and work back. Work until MARKER 10, turn and work back. Work until MARKER 11, turn and work back. Work until MARKER 12, turn and work back. Work until MARKER 13, turn and work back. Work until MARKER 14, turn and work back. Work until MARKER 15, turn and work back. Work until MARKER 16, turn and work back over the remaining 6 sts. Switch to off white and work 2 rows back and forth over all sts. Switch back to ocean view and work until MARKER 16, turn piece and work back. Then work until MARKER 15, turn and work back. Work until MARKER 14, turn and work back. Work until MARKER 13, turn and work back. Work until MARKER 12, turn and work back. Work until MARKER 11, turn and work back. Work until MARKER 10, turn and work back. Work until MARKER 9, turn and work back. Work until MARKER 8, turn and work back. Work until MARKER 7, turn and work back. Work until MARKER 6, turn and work back. Work until MARKER 5, turn and work back. Work until MARKER 4, turn and work back. Work until MARKER 3, turn and work back. Work until MARKER 2, turn and work back. Work until MARKER 1, turn and work back. Work 10-10-10-12-12-14 rows back and forth over all sts with ocean view *. Repeat from *-* until piece measures approx. 35-40-45-53-58-60 cm / 13¾"-15¾"-17¾"-21"-22¾"-23⅝" vertically (measured at the shortest when piece is flat on the table) - adjust after one whole repetition, but possibly round down to avoid longer measurements. Insert a marker (= side of dress). Repeat from *-* until piece measures approx. 35-40-45-53-58-60 cm / 13¾"-15¾"-17¾"-21"-22¾"-23⅝" from marker (i.e. front and back piece are the same length) then VERY LOOSELY bind off. ASSEMBLY: Sew skirt tog in the side - sew edge to edge in front loop of outermost st so that the seam is flat. BODY: Beg from RS at side seam and pick up 1 st in every ridge (i.e in every 2nd row in garter st) around the entire opening of the skirt on circular needle size 2.5 mm / US 1or2 with off white. P 1 round. K 2 rounds while AT THE SAME TIME adjusting the no of sts to 168-192-216-240-264-288 on 1st round. Then work an eyelet round as follows: * 1 YO, K 2 tog *, repeat from *-* the entire round. Then K 2 rounds. Then P 1 round and K 1 round. Now insert a marker in each side, i.e. at beg of round and after 84-96-108-120-132-144 sts - move the markers upwards when working. Switch to circular needle size 3 mm / US 2or3 and ocean view and work in stockinette st. AT THE SAME TIME on 2nd round, inc 1 st on each side each marker - READ INCREASE TIP! (= 4 sts inc). Repeat inc every 1½-1½-2½-2½-3-3 cm / ½"-½"-⅞"-⅞"-1⅛"-1⅛" a total of 6-6-5-5-5-5 times = 192-216-236-260-284-308 sts. When piece measures 11-12-13-14-15-16 cm / 4⅜"-4¾"-5⅛"-5½"-6"-6¼" from where sts were picked up for body, bind off 12 sts in each side (i.e. 6 sts on each side of both markers) = 84-96-106-118-130-142 sts remain for front and back piece. Put piece aside and knit the sleeves. SLEEVE: Worked in the round on double pointed needles. Cast on 74-79-84-89-94-99 sts on double pointed needles size 2.5 mm / US 1or2 with ocean view. Insert a marker at beg of round (= mid under sleeve). Work 6 rounds in GARTER ST - see explanation above. Switch to double pointed needles size 3 mm / US 2or3 and K 1 round while AT THE SAME TIME bind off 12 sts mid under sleeve (i.e. 6 sts each side of marker) = 62-67-72-77-82-87 sts. Put piece aside and knit another sleeve. YOKE: Slip sleeves on to same circular needle as body where armholes were bound off = 292-326-356-390-424-458 sts. Work in stockinette st with ocean view while AT THE SAME TIME dec 6-1-5-0-4-10 sts evenly on 1st round = 286-325-351-390-420-448 sts. Insert 11-13-13-13-14-14 markers in piece with 26-25-27-30-30-32 sts between each. After 5-8-5-5-8-5 rounds in stockinette st, dec 1 st before every marker - Read DECREASE TIP! Repeat dec on every 6th round a total of 6-6-7-7-7-8 times, then on every other round a total of 3-3-3-4-5-5 times = 187-208-221-247-252-266 sts. After last dec, switch to circular needle size 2.5 mm / US 1or2. K 2 rounds while AT THE SAME TIME adjusting the no of sts to 186-207-219-246-252-264 on last round. ELEVATION IN BACK OF NECK: Now work an elevation in back of neck, back and forth on needle as follows: Insert a marker in the middle st mid front. Start mid back and work until 19 sts remain before marker at the front, turn piece, tighten thread and work until 19 sts remain before marker in the other side. Turn piece, tighten thread and work until 46 sts remain before marker at the front, turn piece, tighten thread and work until 46 sts remain before marker in the other side. Turn piece, tighten thread and work until 67-75-79-85-87-90 sts remain before marker, turn piece, tighten thread and work back until 67-75-79-85-87-90 sts remain before marker in the other side. Turn piece, tighten thread and work until mid back. NECKLINE: P 1 round and K 2 rounds, then work eyelet round as follows: * 1 YO, K 3 tog *, repeat from *-* the entire round = 124-138-146-164-168-176 sts remain on needle. K 2 rounds while AT THE SAME TIME dec 6-8-10-20-18-20 sts evenly on the last round = 118-130-136-144-150-156 sts. P 1 round and K 1 round, and then loosely bind off with P sts. Piece measures approx. 82-85-88-91-94-97 cm / 32¼"-33½"-34⅝"-35¾"-37"-38¼" when flat, it will be longer when dress is worn. TIE WITH CONE: Crochet a ch-row on hook size 2.5 mm/C/2 with off white until row measures approx. 130 cm / 51" (or desired measurement around waist). Then work 1 sl st in 4th ch from hook (= beg of cone). ROUND 1: Work 6 sc in ch-ring. ROUND 2: Work 2 sc in every sc = 12 sc. ROUND 3: Work * 1 sc in first sc, 2 sc in next sc *, repeat from *-* the rest of the round = 18 sc. ROUND 4-7: Work 1 sc in every sc = 18 sc. ROUND 8: Work * 1 sc in first sc, then work the next 2 sc tog *, repeat from *-* the rest of the round = 12 sc. ROUND 9: Work 1 sc in every sc = 12 sc. ROUND 10: Crochet all sc tog 2 by 2 = 6 sc. ROUND 11: Work all sc tog 2 by 2 = 3 sc. Cut the yarn, baste it up and down through sts, pull the thread to tighten and fasten tightly. Crochet another cone. Begin by ch 4 and form a ring with 1 sl st in 1st ch. Then continue as explained above. Sew this cone to the ch-row after the tie has been inserted in the eyelet round. Work another tie for neck with a length of approx. 100 cm / 40". |
|
 |
|
Have you finished this pattern?Tag your pictures with #dropspattern #dancewithmedress or submit them to the #dropsfan gallery. Do you need help with this pattern?You'll find 22 tutorial videos, a Comments/Questions area and more by visiting the pattern on garnstudio.com. © 1982-2026 DROPS Design A/S. We reserve all rights. This document, including all its sub-sections, has copyrights. Read more about what you can do with our patterns at the bottom of each pattern on our site. |
|


With over 40 years in knitting and crochet design, DROPS Design offers one of the most extensive collections of free patterns on the internet - translated to 17 languages. As of today we count 325 catalogs and 12298 patterns - 12288 of which are translated into English (US/in).
We work hard to bring you the best knitting and crochet have to offer, inspiration and advice as well as great quality yarns at incredible prices! Would you like to use our patterns for other than personal use? You can read what you are allowed to do in the Copyright text at the bottom of all our patterns. Happy crafting!
Post a comment to pattern DROPS 128-1
We would love to hear what you have to say about this pattern!
If you want to leave a question, please make sure you select the correct category in the form below, to speed up the answering process. Required fields are marked *.