
Popular categories
Looking for a yarn?


Comments / Questions (27)
![]() Murphy wrote:
Murphy wrote:
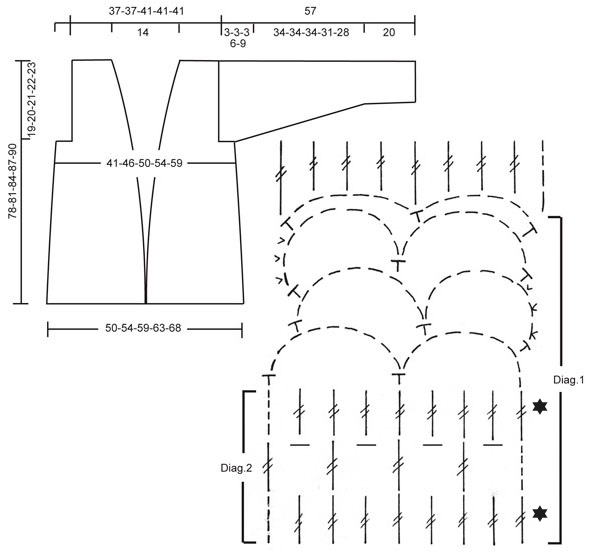
"When you have repeated Diagr.1 a total of 4 times (the piece measures approx. 75 cm), repeat the first row in Diagr.1 to finished measurements (that is, continue in tc, be sure the number of tc stays the same). When the piece measures 75-78-81-84-87 cm crochet the last row with only 10-10-12-12-12 tc at each side for shoulder. Cut yarn and fasten, the piece measures approx. 78-81-84-87-90 cm." Can someone give me a easier explanation within the quotes
20.08.2015 - 01:19DROPS Design answered:
Dear Mrs Murphy, after you have worked Diag. 1 a total of 4 times in height (you should get 75 cm in heith), continue in tc (as in row 1 in Diag A) make sure you keep correct number of sts. At the same time, when piece measures 75-87 cm (see your size), work 1 row over the outermost 10-12 tc in each side for the shoulders (= leave the middle tc unworked for neckline). Happy crocheting!
20.08.2015 - 13:58
![]() Emilie wrote:
Emilie wrote:
Bonjour, pourriez-vous me dire ce qu'est le diagramme M1? Il s'agit du diagramme complet? Car je ne vois nulle part écrit m1... Merci d'avance
05.04.2015 - 17:42DROPS Design answered:
Bonjour Emilie, M1 correspond à la partie encadrée soit Diag. 1 dans le diagramme et M2 à Diag.2. Bon crochet!
07.04.2015 - 09:23
![]() Kayla wrote:
Kayla wrote:
Would anyone here that has commented able to help I have no idea how to follow a diagram pattern was wondering if any one could convert it to written pattern I would so love to make this pattern if so please leave contact information
12.01.2015 - 20:02
![]() Kayla wrote:
Kayla wrote:
Is there a written pattern for the diagram I do not understand how to follow diagrams i can follow them like row 1 just need to know how to do pattern written Thank you so much for your time and consideration
06.01.2015 - 22:56DROPS Design answered:
Dear Kayla, each stitch is representated by a symbol - diagram text is above measurement chart - start reading diagram from the bottom corner on the left side (diag. 2) and read towards the right, on row 2, read from the right towards the left and so on. Remember you can get also help from your DROPS Store. Happy crocheting!
07.01.2015 - 10:25
![]() Sandy wrote:
Sandy wrote:
I would love to see this cardigan from the back, if possible please. Thank you
30.11.2014 - 19:06DROPS Design answered:
Dear Sandy, we do not have pictures from back piece, but back piece will be worked as front piece, with same pattern, so as you can see on the picture. Happy crocheting!
01.12.2014 - 13:58
![]() Elvira wrote:
Elvira wrote:
This was meant to be a knitted border!
04.07.2012 - 20:24
![]() Linda wrote:
Linda wrote:
I crocheted this sweater and am now at the edging, which the pattern has only in knitting. Can someone translate to crocheting for me ? I can't finish my sweater.
04.07.2012 - 05:43
![]() LInda wrote:
LInda wrote:
Denne oppskriften er knall fin, jeg lager denne jakken for 3 gang nå og ennå så er den populær:)
21.02.2012 - 08:54
![]() Drops Design wrote:
Drops Design wrote:
The translations for the Diagrams for all older Garnstudio patterns are included within the text of the Pattern itself. If you look you will find lines starting with an = sign. These are the translations, and they are given in the same vertical order as the chart symbols within the diagram.
13.03.2010 - 18:04
![]() Deniese Berry wrote:
Deniese Berry wrote:
I can read diagrams, but the keymap show v=1 kjm. What does the term kjm mean in American? Some kind of slip stitch? Thank-you,
13.03.2010 - 02:56
|
||||||||||||||||
DROPS 90-15 |
||||||||||||||||
|
|
||||||||||||||||
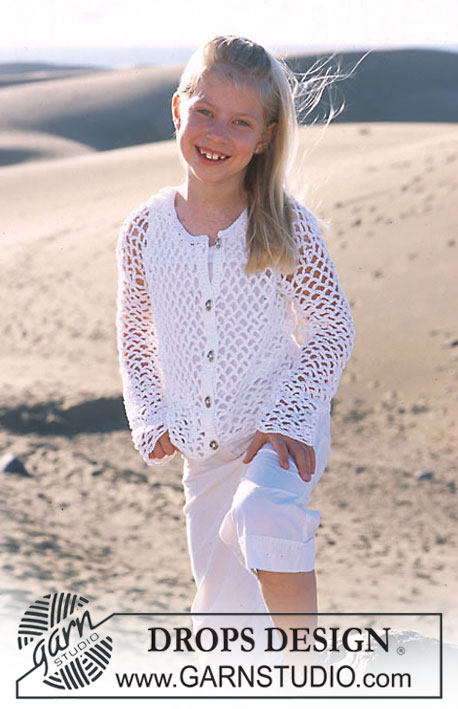
DROPS Long Crocheted Cardigan in Ice with Knit buttonband.
DROPS 90-15 |
||||||||||||||||
|
CARDIGAN: Crochet gauge: 9 tc = approx. 10 cm in width 1 row of tc measures approx. 3 cm in height. Pattern: See the Diagrams. The pattern is seen from the right side. Rib: * K 3, P 3 *, repeat * - *. Crochet tip: At the beginning of every row with tc replace 1st tc with ch 4. Crochets in every tc from previous row, not between them. Decreasing tips: Dec or bind off as follows: At the beginning of row: replace each tc to be decreased with 1 sl st. At the end of row: turn piece when the number of tc to be decreased remains, and crochet back. Measuring tips: measure piece when lying flat. Back: Ch 69-75-81-87-93. Crochet the first row as follows: 1 tc in 5th ch from hook, * skip over 1 ch, 1 tc in the next 2 ch *, repeat * - * and finish with 1 tc in last ch = 45-49-53-57-61 tc. Now crochet pattern following Diagr.1. At the same time on the 1st and 3 rows the 2nd and 3rd repeats of Diagr.1, dec 1 tc at each side = 37-41-45-49-53 tc – see decreasing tips above. When the piece measures approx. 59-61-63-65-67 cm – adjust length so that you bind off on a row with tc (if you bind off on the 2nd row of Diagr.1, 1 ch = 1 tc when bound off) – bind off 2-4-4-6-8 tc at each side for armhole = 33-33-37-37-37 tc. When you have repeated Diagr.1 a total of 4 times (the piece measures approx. 75 cm), repeat the first row in Diagr.1 to finished measurements (that is, continue in tc, be sure the number of tc stays the same). When the piece measures 75-78-81-84-87 cm crochet the last row with only 10-10-12-12-12 tc at each side for shoulder. Cut yarn and fasten, the piece measures approx. 78-81-84-87-90 cm. Right front: Read entire section before crocheting: Ch 33-39-39-45-51. Crochet the first row as follows: 1 tc in 5th ch from hook, * skip over 1 ch, 1 tc in the next 2 ch *, repeat * - * and finish with 1 tc in last ch = 21-25-25-29-33 tc. Now crochet pattern following Diagr.1. Side decs: On the 1st and 3 rows the 2nd and 3rd repeats of Diagr.1, dec 1 tc at the side as on back. Neck shaping: When the piece measures 20 cm dec 1 tc at the center front every row marked with a star (*) in Diagr.1 a total of 5-7-5-7-9 times – see decreasing tips above. When the piece measures approx. 59-61-63-65-67 cm – adjust to match back – bind off for armhole at the side as on back. After all decs 10-10-12-12-12 tc remain on shoulder. When you have repeated Diagr.1 a total of 4 times (the piece measures approx. 75 cm), repeat the first row in Diagr.1 to finished measurements as on back. Cut yarn and fasten when the piece measures 78-81-84-87-90 cm. Left front: Crochet same as the right, reversing shaping. Sleeve: Ch 33-39-39-45-51. Crochet the first row as follows: 1 tc in 5th ch from hook, * skip over 1 ch, 1 tc in the next 2 ch *, repeat * - * and finish with 1 tc in last ch = 21-25-25-29-33 tc. Repeat Diagr.1 a total of 2 times, and then follow Diagr.2 to finished measurements. At the same time when Diagr.1 has been crocheted 1 time (the piece measures approx. 21 cm) inc 1 tc at each side every row marked with a star (*) in diagram a total of 5-4-4-4-4 times at each side = 31-33-33-37-41 tc. When the piece measures approx. 54-54-54-51-48 cm put a marker at each side (markers show where the sleeves will be sewn into armhole). Crochet 1-1-1-2-3 row more, then cut yarn and fasten, the piece measures approx. 57 cm. Assembly: Sew shoulder seams edge to edge. Sew side seams edge to edge. Sew sleeve seams in the same manner up to the marker and sew in sleeves – the marker on sleeves should match up with the side seams on Body. Make sure the seams are not too tight. Edge: Pick up and knit approx. 195-219 sts (divisible by 6 + 3) along right front, back neck and down left front. K 2 rows (1st row = wrong side). Then knit rib, keeping 3 sts in garter st at each end, and begin rib with K 3 (as seen from the right side). When the rib measures approx. 7 cm inc all K 3 to K 4 (as seen from the right side) over the center 21 sts in back neck. When edge measures 12 cm, bind off all sts loosely in rib – as you are binding off, inc all P 3 to P 4 (as seen from the right side) over the center 21 sts in back neck. |
||||||||||||||||
Diagram explanations |
||||||||||||||||
|
||||||||||||||||
 |
||||||||||||||||
Have you finished this pattern?Tag your pictures with #dropspattern or submit them to the #dropsfan gallery. Do you need help with this pattern?You'll find 12 tutorial videos, a Comments/Questions area and more by visiting the pattern on garnstudio.com. © 1982-2026 DROPS Design A/S. We reserve all rights. This document, including all its sub-sections, has copyrights. Read more about what you can do with our patterns at the bottom of each pattern on our site. |
||||||||||||||||


With over 40 years in knitting and crochet design, DROPS Design offers one of the most extensive collections of free patterns on the internet - translated to 17 languages. As of today we count 324 catalogs and 12290 patterns - 12280 of which are translated into English (US/in).
We work hard to bring you the best knitting and crochet have to offer, inspiration and advice as well as great quality yarns at incredible prices! Would you like to use our patterns for other than personal use? You can read what you are allowed to do in the Copyright text at the bottom of all our patterns. Happy crafting!
Post a comment to pattern DROPS 90-15
We would love to hear what you have to say about this pattern!
If you want to leave a question, please make sure you select the correct category in the form below, to speed up the answering process. Required fields are marked *.