
Popular categories
Looking for a yarn?


Comments / Questions (64)
![]() DROPS Design wrote:
DROPS Design wrote:
Hej Monika, alla diagram skall stickas från höger till vänster, pilen markerar från vilken rad storlekarna XXL/XXXL börjar. Lycka till!
18.08.2011 - 11:31
![]() Drops Design France wrote:
Drops Design France wrote:
Les diagrammes tels qu'ils figurent en bas de page sont justes ainsi, on commence chaque diagramme par la 1ère case en bas à droite en lisant vers la gauche, tous les rangs sur l'endroit se liront ainsi, à partir de la droite vers la gauche.
03.08.2011 - 13:55
![]() Christine wrote:
Christine wrote:
Les sigles explicant le fait de faire glisser 3 m devant l' ouvrage ou 2 m derrière l' ouvrage ont été inversés. J' ai recommencé mon ouvrage 3 fois avant de comprendre!
03.08.2011 - 10:50
![]() Monika Pettersson wrote:
Monika Pettersson wrote:
Ang. mönsterdiagram för storlek S/M. M1 har pil till vänster M2 till hö -. Om jag stickar från vänster på M1 enligt anvisningarna blir flätan felvänd. Hur skall mönstret läsas. Gör jag något fel eller är diagrammet felaktigt? mvh
24.07.2011 - 12:44
![]() DROPS Deutsch wrote:
DROPS Deutsch wrote:
Ja, wenn nichts anderes erwähnt ist sind immer alle R. angegeben.
28.10.2010 - 09:05
![]() Elena wrote:
Elena wrote:
Wie es aussieht, sind auf dem Diagramm die R. der Vorderseite sowie der Rückseite angegeben.
27.10.2010 - 22:38
![]() DROPS Deutsch wrote:
DROPS Deutsch wrote:
Es ist möglich dass der Zopf etwas langstreckter wird damit das Muster oben am Nacken schön aufgeht.
27.10.2010 - 10:10
![]() Elena wrote:
Elena wrote:
Wenn man versucht die R. bis zur nächsten Verkreuzung auf dem Bild nachzuzählen (was natürlich sehr schwierig ist) kommt man, wenn überhaupt, auf die Hälfte deren im Diagramm. Dadurch gehen sich 3-4 Musterringe auf den 43-49 cm des Rückenteils aus. Vermute, daß die Anzahl der Verkreuzungen sehr wohl stimmt, nicht aber die Anzahl der Reihen. Bitte um Ihre geschätzte Meinung!
26.10.2010 - 19:20
![]() Elena wrote:
Elena wrote:
Wenn die Verkreuzung erst jede 13.R stattfindet sehen die Zöpfe sehr viel "gestreckter" aus, als auf der Abbildung. Kann es sein, dass das Diagramm mit dem Bild nicht übereinstimmen?
26.10.2010 - 14:22
![]() Elena wrote:
Elena wrote:
Ich stricke L/XL (ist ja mit S/M ident dem Diagramm M1). Mir kommt nur vor, das der Zopf auf der Abbildung mehr Verkreuzungen hat als laut Diagramm. Kann es sein?
26.10.2010 - 12:32
|
|||||||||||||||||||||||||||||||
Vest Divine#vestdivinevest |
|||||||||||||||||||||||||||||||
 |
 |
||||||||||||||||||||||||||||||
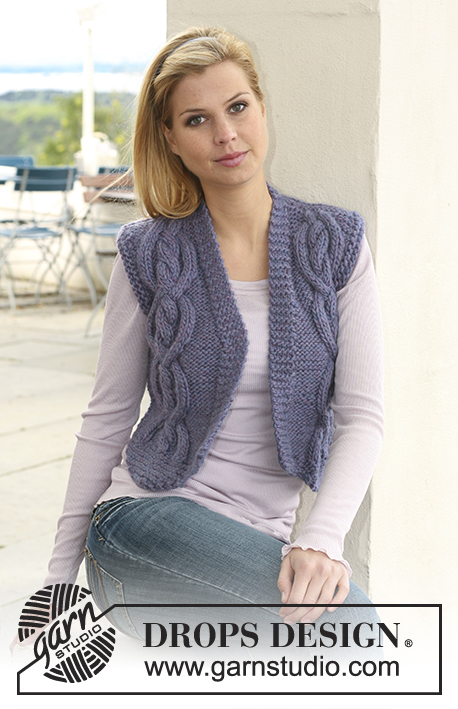
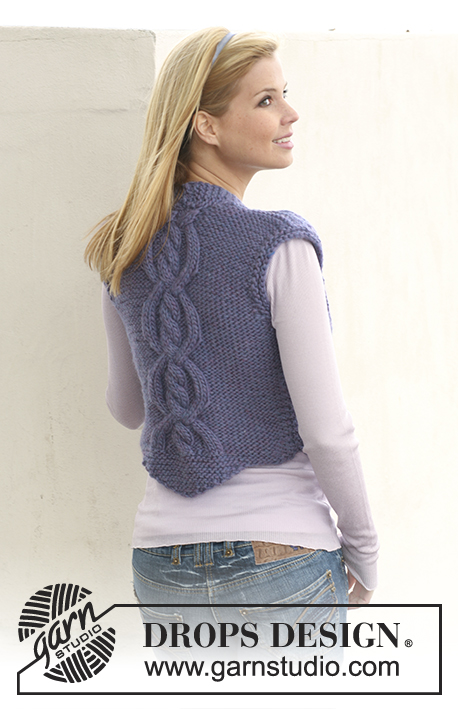
Knitted DROPS waistcoat with cables in ”Snow”. Size S/M - XXL/XXXL
DROPS 121-10 |
|||||||||||||||||||||||||||||||
|
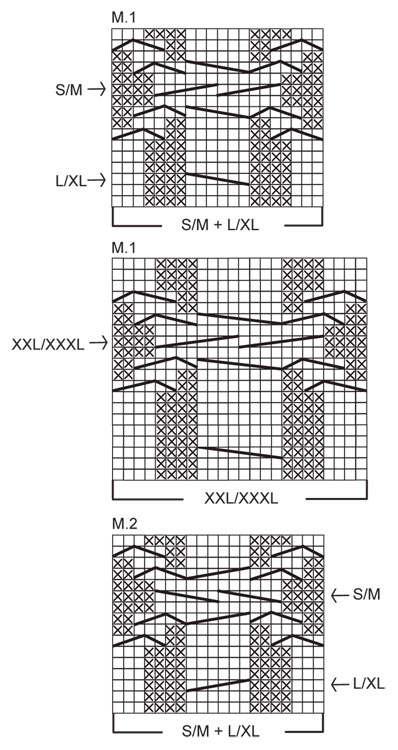
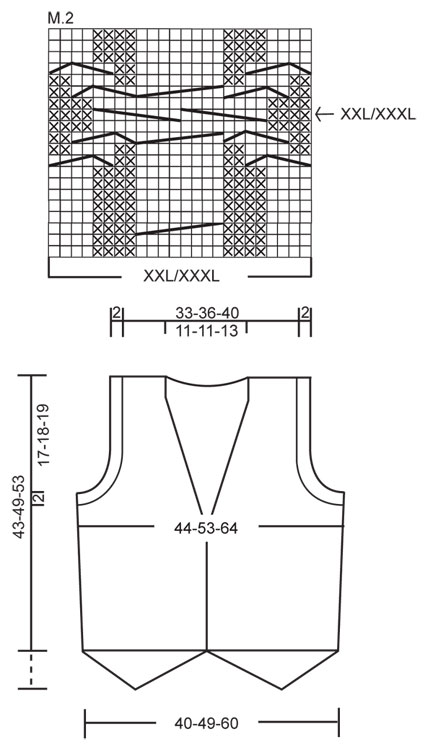
GARTER ST (back and forth on needle): K all rows. INCREASING TIP: Inc from RS inside edge st by making 1 YO. On next row K YO into back of loop to avoid a hole. PATTERN: See diagram M.1 and M.2 – see diagram for your size. Diagram shows the pattern from RS and row 1 in diagram = RS. DECREASING TIP (applies to neckline): Dec 1 st inside the 5 front band sts in garter st. Make all dec from RS. Dec as follows after 5 front band sts: P2 tog. Dec as follows before 5 front band sts: P2 tog into back of loop. -------------------------------------------------------- WAISTCOAT: BACK PIECE: Cast on 2 sts on needle size 8 mm / US 11 with Snow. K 1 row from RS, AT THE SAME TIME inc 2 sts by working 1 st in front and back loop of these 2 sts = 4 sts on needle. K 1 row from WS. Continue in GARTER ST - see above - AT THE SAME TIME inc 1 st each side - See INCREASING TIP. Repeat the inc each side on every row a total of 12-14-16 times = 28-32-36 sts. Now cast on 8-11-15 new sts at the end of the next 2 rows = 44-54-66 sts. Insert a marker in piece – now measure piece from here! Work 4 rows garter st on all sts, AT THE SAME TIME on last row (= WS) inc 8-8-10 sts evenly on the middle 12-12-14 sts = 52-62-76 sts. Work next row as follows from RS: 1 garter st, P 15-20-25, M.1 (= 20 sts in SIZE S/M + L/XL and 24 sts in SIZE XXL/XXXL), P 15-20-25 and 1 garter st. Continue in pattern like this (from WS = 1 garter st, K 15-20-25, M.1 (= 20-20-24 sts), K 15-20-25 and 1 garter st). When piece measures 5-5-6 cm / 2"-2"-2⅜" inc 1 st each side - See INCREASING TIP. Repeat the inc when piece measures 15-15-18 cm / 6"-6"-7" = 56-66-80 sts. Work inc sts in reverse stockinette st (as seen from RS). When piece measures 24-29-32 cm / 9½"-11⅜"-12½" bind off for armhole at the beg of every row each side as follows: 3 sts 1-1-2 times, 2 sts 1-2-2 times and 1 st 1-2-3 times = 44-48-54 sts. After row marked with arrow in diagram, piece now measures approx 40-46-50 cm / 15¾"-18"-19¾", dec (= WS) 8-8-10 sts evenly on sts in M.1 = 36-40-44 sts (work remaining sts as before). On next row (= RS) bind off the middle 10-10-12 sts for neck and complete each shoulder separately. Now K all rows until finished measurements (first row = WS). AT THE SAME TIME on first row from RS dec 1 st on neckline = 12-14-15 sts left on shoulder. Bind off when piece measures 43-49-53 cm / 17"-19¼"-21". RIGHT FRONT PIECE: Cast on 2 sts on needle size 8 mm / US 11 with Snow. K 1 row from RS, AT THE SAME TIME inc 2 sts by working 1 st in front and back loop of these 2 sts = 4 sts on needle. K 1 row from WS. Continue in GARTER ST - see above - AT THE SAME TIME inc 1 st each side - See INCREASING TIP. Repeat the inc each side on every row a total of 8-8-10 times = 20-20-24 sts. Work 2 rows garter st, AT THE SAME TIME cast on 1-4-7 new sts at the end of first row (= towards the side) and 6-8-7 new sts at the end of second row (= towards front edge) = 27-32-38 sts. Insert a marker in piece – now measure piece from here! Work 4 rows garter st on all sts, AT THE SAME TIME on last row (= WS) inc 8-8-10 sts evenly on the middle 12-12-14 sts on the triangle = 35-40-48 sts. Work next row as follows from RS (= from mid front): 5 garter sts (= front band), P 5-7-7, M.1 (= 20 sts in SIZE S/M + L/XL and 24 sts in SIZE XXL/XXXL), P 4-7-11 and 1 garter st. Continue in pattern like this (from WS = 1 garter st, K 4-7-11, M.1 (= 20-20-24 sts), K 5-7-7 and 5 garter sts). AT THE SAME TIME when piece measures 10-10-12 cm / 4"-4"-4¾" inc 1 st at the side - See INCREASING TIP. Repeat the inc when piece measures 20-20-24 cm / 8"-8"-9½" = 37-42-50 sts. Work inc sts in reverse stockinette st (as seen from RS). When piece measures 20-22-23 cm / 8"-8¾"-9" work 2 rows garter st back and forth on the 5 front band sts only (do not work remaining sts), then continue on all sts again. AT THE SAME TIME on next row from RS dec for neck - See DECREASING TIP. Repeat the dec on every 4-6-6 row a total of 6-6-7 times. AT THE SAME TIME when piece measures 24-29-32 cm / 9½"-11⅜"-12½" bind off for armhole at the beg of every row from the side as described for back piece. After all dec for armhole and neck are complete there are 25-27-30 sts left on needle. After the row in diagram marked with arrow, piece now measures approx 40-46-50 cm / 15¾"-18"-19¾", dec (from WS) 8-8-10 sts evenly on sts in M.1 (work remaining sts as before) = 17-19-20 sts left on needle. Now K all rows until piece measures 43-49-53 cm / 17"-19¼"-21" - adjust so that next row is from WS. Now bind off 12-14-15 sts from the side towards the neck for shoulder = 5 sts left on needle for neckline. Continue in garter st back and forth on these sts until neckline measures approx 8-8-9 cm / 3"-3"-3½" and slip sts on a stitch holder – NOTE: measure length from shoulder to mid back on garment and adjust length of neckline accordingly. LEFT FRONT PIECE: Cast on and work like right front piece, but mirrored. Work M.2 instead of M.1. ASSEMBLY: Sew shoulder seams inside bind off row. Graft neckline tog mid back and sew to neckline on back piece with neat sts. SLEEVE EDGES: Pick up from RS approx 40 to 50 sts along armhole inside 1 edge st on needle size 8 mm / US 11 with Snow. K 1 row from WS and K 1 row from RS, then bind off with K sts from WS - NOTE: make sure edge is nice and even. Sew side seams, edge to edge in outer loops of sts to avoid a chunky seam. |
|||||||||||||||||||||||||||||||
Diagram explanations |
|||||||||||||||||||||||||||||||
|
|||||||||||||||||||||||||||||||
 |
|||||||||||||||||||||||||||||||
 |
|||||||||||||||||||||||||||||||
Have you finished this pattern?Tag your pictures with #dropspattern #vestdivinevest or submit them to the #dropsfan gallery. Do you need help with this pattern?You'll find 20 tutorial videos, a Comments/Questions area and more by visiting the pattern on garnstudio.com. © 1982-2026 DROPS Design A/S. We reserve all rights. This document, including all its sub-sections, has copyrights. Read more about what you can do with our patterns at the bottom of each pattern on our site. |
|||||||||||||||||||||||||||||||


With over 40 years in knitting and crochet design, DROPS Design offers one of the most extensive collections of free patterns on the internet - translated to 17 languages. As of today we count 324 catalogs and 12290 patterns - 12280 of which are translated into English (US/in).
We work hard to bring you the best knitting and crochet have to offer, inspiration and advice as well as great quality yarns at incredible prices! Would you like to use our patterns for other than personal use? You can read what you are allowed to do in the Copyright text at the bottom of all our patterns. Happy crafting!
Post a comment to pattern DROPS 121-10
We would love to hear what you have to say about this pattern!
If you want to leave a question, please make sure you select the correct category in the form below, to speed up the answering process. Required fields are marked *.