
Popular categories
Looking for a yarn?


Comments / Questions (94)
![]() Andrea wrote:
Andrea wrote:
Hallo zusammen, die genannte Maschenanzahl kann unmöglich stimmen. Das würde ja ein 1-Mann-Zelt werden. Bitte um kurze Antwort.
30.08.2012 - 18:48DROPS Design answered:
Die grosse Maschenzahl kommt von dem Schösschen unten und wird wieder abgenommen. Folgen Sie einfach der Anleitung!
31.08.2012 - 09:37
![]() Joan Jørgensen wrote:
Joan Jørgensen wrote:
Kan det være rigtigt at man skal slå 699 masker op, til str. s? Jeg kan se den har været oppe at vende før, men der er ingen klare svar på maskeantal og opskriften er tilsyneladende ikke ændret, selvom spørgsmålene ligger flere år tilbage?
05.07.2012 - 00:59DROPS Design answered:
Ja! Maskeantallet stemmer, der kræves så mange masker hvis du vil have den lille flæse nederst på jakken. Bare følg opskriften!
18.07.2012 - 08:21
![]() Corinne wrote:
Corinne wrote:
In de de beschrijving staat dat bij een hoogte van 18 cm gemeerderd moet worden, en bij 26 cm weer geminderd. Geeft dit geen rare bolling?
13.06.2012 - 14:17DROPS Design answered:
Nee, het patroon klopt op deze manier.
13.06.2012 - 16:04
![]() Reidun Abrahamsen wrote:
Reidun Abrahamsen wrote:
Hei. Jeg tenkte å strikke denne jakken og gikk i gang og la opp 699 masker. Sjekket først strikkefasthet. Etter å ha strikke ca 6 cm syns jeg det så veldig mye ut og tok det av pinnen. det målte da omtrent 3 meter. Kan det være feil i oppskriften? Selvom maskeantallet reduseres fort, blir det altfor stort.
28.04.2012 - 15:40DROPS Design answered:
Maskeantallet stemmer. Etter alle fellingene har man feks i str s 231 m = 96 cm i vrbord.
02.05.2012 - 09:13
![]() Marie wrote:
Marie wrote:
Simple maths- if the garment is 69cm x 2 (front + back) = 138cm, and the tension is 24st = 10cm, this means the starting number of stitches should be 331, not 699.
23.03.2012 - 21:47DROPS Design wrote:
There are a lot of dec along the way. If you have the right gauge then the garment will get the measures given in the pattern.
07.02.2012 - 22:53
![]() Marie wrote:
Marie wrote:
I reduced the number of stitches and it still goes round me twice. Too many stitches!
07.02.2012 - 22:17
![]() Drops Design wrote:
Drops Design wrote:
Nej den bliver ikke forskubbet se også billedet.
24.02.2011 - 14:17
![]() Hanne wrote:
Hanne wrote:
Vil ribkant blive forskubbet i siden efter indtagning af 4 masker fra 39 til 35
23.02.2011 - 15:24
![]() Chantal Allaire wrote:
Chantal Allaire wrote:
Je viens de terminer ce modèle. Il tombe super.Vous m'avez conquise par l'originalité et la clarté des explications.Je repars de suite à la recherche d'un autre modèle.
22.01.2011 - 18:42
|
||||||||||||||||
Niagara Falls |
||||||||||||||||
|
|
||||||||||||||||
Knitted DROPS jacket with rib-pattern in ”Alpaca”. Size S - XXXL.
DROPS 123-1 |
||||||||||||||||
|
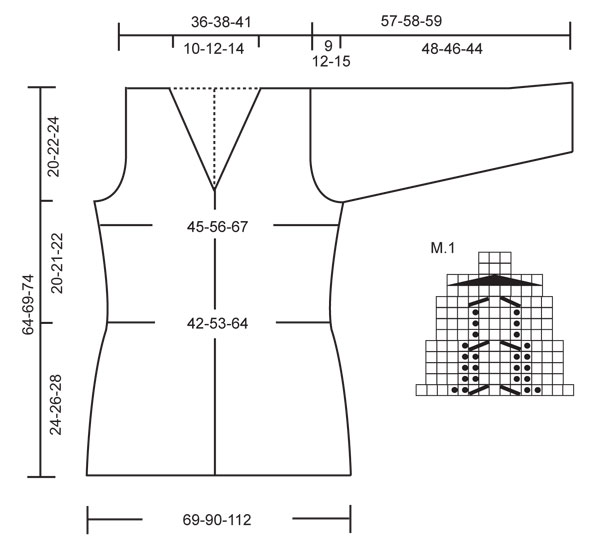
GARTER ST, back and forth on needle: K all rows. PATTERN: See diagram M.1. Diagram shows the pattern from RS. DECREASING TIP: Dec as follows after front band + K3 + P3: Slip 1 st as if to K, K1, psso. Dec as follows before P3 + K3 + front band: K2 tog. BUTTONHOLES: Make buttonholes on right front band. 1 buttonhole = bind off 3rd and 4th st from mid front and cast on 2 new sts on next row. Make buttonholes when piece measures: SIZE S/M: 8, 14, 20, 26, 32, 38, 44 cm / 3⅛",5½",8",10¼",12½",15",17¼". SIZE L/XL: 10, 16, 22, 28, 34, 40, 46 cm / 4",6¼",8¾",11",13⅜",15¾",18". SIZE XXL/XXXL: 8, 15, 22, 29, 36, 43, 50 cm / 3⅛",6",8¾",11⅜",14¼",17",19¾". -------------------------------------------------------- JACKET: Worked back and forth on circular needle from mid front. Cast on 699-915-1131 sts (includes 6 front band sts each side) on circular needle size 3 mm / US 2or3 with Alpaca. Work front bands in GARTER ST – see above – throughout. P 1 row from WS with 6 front band sts each side and continue in rib as follows (from RS): 6 front band sts, * K3, P3 *, repeat from *-* and finish with K3 and 6 front band sts. Continue like this until piece measures approx 2-3-4 cm / ¾"-1⅛"-1½". Now continue as follows (from RS): 6 front band sts, 12 sts in rib as before, * M.1, 39 sts in rib as before *, repeat from *-* and finish with M.1, 12 sts in rib as before and 6 front band sts. After 1 vertical repeat of M.1 there are 543-711-879 sts on needle. Continue with K over K and P over P until piece measures 7-8-9 cm / 2¾"-3⅛"-3½". Now continue as follows (from RS): 6 front band sts, 6 sts in rib as before, * M.1, 27 sts in rib as before *, repeat from *-* and finish with M.1, 6 sts rib as before and 6 front band sts. Remember BUTTONHOLES - see above. After M.1 there are 387-507-627 sts on needle. Continue with K over K and P over P until piece measures 12-13-14 cm / 4¾"-5⅛"-5½". Now continue as follows (from RS): 6 front band sts, * M.1, 15 sts in rib as before *, repeat from *-* and finish with M.1 and 6 front band sts. After M.1 there are 231-303-375 sts on needle. Continue with K over K and P over P until piece measures approx 17-18-19 cm / 6¾"-7"-7½". On next row from RS inc 1 st in each P-section by making 1 YO after P3 = 267-351-435 sts. On next row (from WS) work all YO into back of loop to avoid a hole. Continue with K over K and P over P until piece measures 24-26-28 cm / 9½"-10¼"-11". On next row from RS dec 1 st in each P-section by P tog the last 2 P sts = 231-303-375 sts. Work 1 row from WS with K over K and P over P. Now insert a marker in the 62nd-80th-98th st from each side (back piece = 107-143-179 sts). Continue as follows (from RS): 6 front band sts, K3, P3, stockinette st on the next 39-57-75 sts AT THE SAME TIME dec 4-8-13 sts evenly, P3, K3, P3, K3 (marker sits in the middle of these sts), P3, K3, P3, stockinette st on the next 87-123-159 sts AT THE SAME TIME dec 6-15-25 sts evenly, P3, K3, P3, K3 (marker sits in the middle of these sts), P3, K3, P3, stockinette st on the next 39-57-75 sts AT THE SAME TIME dec 4-8-13 sts evenly, P3, K3 and 6 front band sts. There are now 217-272-324 sts on needle. Continue with K over K, P over P and stockinette st over stockinette st, and front bands as before. When piece measures 27-29-31 cm / 10⅝"-11⅜"-12¼" inc 1 st before and after rib-section (= 21 sts) each side (= 4 inc). Inc by making 1 YO. On next row work YO into back of loop and continue to work inc sts in stockinette st. Repeat the inc on every 6 cm / 2⅜" a total of 3 times = 229-284-336 sts. Continue as before until piece measures 44-47-50 cm / 17¼"-18½"-19¾". Now bind off 9 sts each side (i.e. st with markers + 4 sts each side of marker) for armhole and complete each piece separately. BACK PIECE: = 99-126-152 sts. Continue back and forth on needle with K over K, P over P and stockinette st over stockinette st. AT THE SAME TIME bind off for armhole at beg of every row each side: 2 sts 2-4-8 times and 1 st 2-9-11 times = 87-92-98 sts. Now continue in stockinette st on all sts. When piece measures 62-67-72 cm / 24⅜"-26⅜"-28⅜" bind off the middle 19-24-30 sts for neck and complete each shoulder separately. Continue in stockinette st and bind off to shape the neckline at the beg of every row from mid front: 1 st 2 times = 32 sts left on shoulder. Piece measures approx 64-69-74 cm / 25¼"-27⅛"-29⅛". Bind off remaining sts. RIGHT FRONT PIECE: = 56-70-83 sts. Continue back and forth on needle with K over K, P over P and stockinette st over stockinette st. AT THE SAME TIME bind off for armhole at the side as described for back piece. AT THE SAME TIME when piece measures 46-48-52 cm / 18"-19"-20½" work 2 rows back and forth on the 6 front band sts only. Now dec for neck and inc for collar as follows: Inc 1 st by making 1 YO inside 6 front band sts, on next row K YO into back of loop to avoid a hole, and then include inc sts in garter st on front band. Dec 1 st inside front band + K3/P3 - See DECREASING TIP! Inc 1 st and dec 1 st on approx every 1 cm / ⅜" a total of 12-15-18 times = 18-21-24 front band sts. When piece measures 64-69-74 cm / 25¼"-27⅛"-29⅛" bind off 32 sts for shoulder, work the 18-21-24 front band sts and now continue with collar as follows (Row 1 = from RS): * Work back and forth on 8-10-12 sts only, work back and forth on all sts *, repeat from *-* until collar measures approx 6-7-8 cm / 2⅜"-2¾"-3⅛" (measured where shortest). Bind off. LEFT FRONT PIECE: Like right front piece, but mirrored. SLEEVE: Worked in the round. Cast on 91-103-103 sts on circular needle size 3 mm / US 2or3 with Alpaca. K 1 round. Insert a marker at beg of round = mid under sleeve. Continue as follows: P2, * K3, P3 *, repeat from *-* and finish with K3 and P2. Continue like this until piece measures 2-3-4 cm / ¾"-1⅛"-1½". Now continue as follows: 17-23-23 stockinette sts, rib as before on the next 21 sts, M.1, rib as before on the next 21 sts and 17-23-23 stockinette sts. AT THE SAME TIME when piece measures approx 3 cm / 1⅛" inc 2 sts mid under sleeve (i.e. 1 st each side of marker). Repeat the inc on every 2.5-2-1.5 cm / 1"-¾"-½" a total of 18-19-25 times (work inc sts in stockinette st). After M.1 continue with K over K, P over P and stockinette st over stockinette st until piece measures 7-8-9 cm / 2¾"-3⅛"-3½". Now continue as follows: stockinette st to the rib, 15 sts in rib as before, M.1, 15 sts in rib as before and stockinette st to the end of round. After M.1 continue with K over K, P over P and stockinette st over stockinette st until piece measures 12-13-14 cm / 4¾"-5⅛"-5½". Now continue as follows: stockinette st to the rib, 9 sts in rib, M.1, 9 sts in rib and stockinette st to the end of round. After M.1 continue with stockinette st each side and 21 sts in rib mid upper sleeve. When all inc and dec are complete there are 91-105-117 sts on needle. Continue until piece measures 48-46-44 cm / 19"-18"-17¼" (less for the larger sizes because of longer sleeve cap and wider shoulders). Now bind off 8 sts mid under sleeve (i.e. 4 sts each side of marker) and continue back and forth on needle. AT THE SAME TIME bind off for sleeve cap at the beg of every row each side: 2 sts 4-5-5 times and 1 st 4-8-13 times, then 2 sts each side until sleeve measures 56-57-58 cm / 22"-22½"-22¾". Now bind off 4 sts at beg of the next 2 rows and bind off remaining sts. Piece measures approx 57-58-59 cm / 22½"-22¾"-23¼". ASSEMBLY: Sew shoulder seams. Set in sleeves. Sew tog collar mid back and sew to neck on back piece. Sew on buttons. |
||||||||||||||||
Diagram explanations |
||||||||||||||||
|
||||||||||||||||
 |
||||||||||||||||
Have you finished this pattern?Tag your pictures with #dropspattern or submit them to the #dropsfan gallery. Do you need help with this pattern?You'll find 21 tutorial videos, a Comments/Questions area and more by visiting the pattern on garnstudio.com. © 1982-2026 DROPS Design A/S. We reserve all rights. This document, including all its sub-sections, has copyrights. Read more about what you can do with our patterns at the bottom of each pattern on our site. |
||||||||||||||||


With over 40 years in knitting and crochet design, DROPS Design offers one of the most extensive collections of free patterns on the internet - translated to 17 languages. As of today we count 324 catalogs and 12290 patterns - 12280 of which are translated into English (US/in).
We work hard to bring you the best knitting and crochet have to offer, inspiration and advice as well as great quality yarns at incredible prices! Would you like to use our patterns for other than personal use? You can read what you are allowed to do in the Copyright text at the bottom of all our patterns. Happy crafting!
Post a comment to pattern DROPS 123-1
We would love to hear what you have to say about this pattern!
If you want to leave a question, please make sure you select the correct category in the form below, to speed up the answering process. Required fields are marked *.