
Popular categories
Looking for a yarn?


Comments / Questions (216)
Debora wrote:
Estoy muy enojada por qué ya tejí la espalda y el delantero derecho tal como dice y no están bien las instrucciones por qué no lo arreglan o lo quitan
25.03.2017 - 03:26
![]() Regina wrote:
Regina wrote:
Ich bin es schon wieder. Ärmel werden in Hin- und Rückreihen gestrickt. Im M.3 ist somit nur die vordere Reihe, links gestrickt, angezeigt, die hintere Reihe wird gestrickt wie die Maschen erscheinen, also meistens rechts. Und im M.1 und M.2 wird ja in Runden gestrickt und dort ist jede Runde angezeigt. Ist das richtig so? Vielen Dank. Regina
04.02.2017 - 14:34DROPS Design answered:
Liebe Regina, Alle Reihen sind im Diagramme gezeigt, im M.3 beginnen Sie mit 1 Rückreihe: von links nach rechts lesen, dann von der Vorderseite (= Hinreihen) rechts nach links stricken. Mehr über Diagramme lesen Sie hier. Viel Spaß beim stricken!
06.02.2017 - 09:28
![]() Regina wrote:
Regina wrote:
Super und nochmals Danke. Die Wolle ist soeben eingetroffen dann kann ich jetzt loslegen. Grüße an alle. Regina
02.02.2017 - 12:04
![]() Regina wrote:
Regina wrote:
Entschuldigung, aber ich bin es noch einmal. Es gibt aber unterschiedliche Zeichen im Diagramm für die Umschläge. Gibt es da einen Unterschied? Danke Regina
01.02.2017 - 15:33DROPS Design answered:
Liebe Regina, ja, einige Umschläge (= 3. Symbol) sollen Löcher bilden, und die andere (= 6. Symbol) werden verschränkt gestrickt um Löcher zu vermeiden. Viel Spaß beim stricken!
02.02.2017 - 09:53
![]() Regina wrote:
Regina wrote:
Danke für die schnelle Antwort. Noch eine Frage. Bei der Zeichenerklärung gibt es zwei Symbole für einen Umschlag. Das erste ist klar. Wie ist das zweite gemeint "1 Umschlag, Vorder- und Rückenteil: bei der nächsten R. den Umschlag verschränkt li. stricken. " Das Muster ist doch nur im Rücken? Danke nochmals. Regina
31.01.2017 - 18:51DROPS Design answered:
Liebe Regina, dieser Umschlag wird im M.1 gestrickt, dh am Rückenteil, aber auch im M.3 gestrickt, dh am Ärmel. Viel Spaß beim stricken!
01.02.2017 - 08:53
![]() Regina wrote:
Regina wrote:
Hallo, ich habe schon 2 Modell von hier gestrickt und alles super. Jetzt habe ich mir die Wolle für diese Jacke bestellt und bis diese bei mir ankommt habe ich mir die Anleitung schon mal genau angeschaut. Dabei ist eine Frage aufgetreten bei den Ärmeln. Was ist gemeint mit "glatt mit der Rückseite nach aussen" stricken? Danke für die Hilfe. Regina
31.01.2017 - 15:57DROPS Design answered:
Liebe Regina, die Ärmel werden li. gestrickt, dh li von der Vorderseite und re. von der Rückseite. Viel Spaß beim stricken!
31.01.2017 - 16:32Alica007 wrote:
Hi, I have finished all the parts and are now at assembly of the sleeves. I'm not sure if I understood well. I think I should put one sleeve, middle of the cap, where there is the shortest part of the armhole, and then, the side seam of sleeve, there where is cast of and cast of of armhole and finished where there is the shortest part of armhole but the opposite side. Am I correct? Thanks and regards Alica
20.01.2017 - 13:20DROPS Design answered:
Dear Alica007, you are right, middle of sleeve cap will be on top of armhole, at the shorterst part of the armhole (on top of armhole when jacket is laying), and the sleeve seams (end of rows tog) should come at the bottom of armhole, at the largest part between both armholes. Happy knitting!
20.01.2017 - 16:28
![]() Alica007 wrote:
Alica007 wrote:
Hi, could you pls show a video how to make reverse stockinette stitch? thank you, best regards, Alica
09.01.2017 - 21:23DROPS Design answered:
Dear Alica007, when working reverse stockinette stitch back and forth on needle, P all sts from RS and K all sts from WS - when working reverse stockinette st in the round, P all sts. Happy knitting!
10.01.2017 - 09:32
![]() Gisela wrote:
Gisela wrote:
Komme noch einmal auf meine Frage zurück, ob es cm-Angaben für das Annähen der Knöpfe gibt. Aus der Sizze läßt sich dies leider nicht ermitteln. Die Sternchen in der Skizze sind nicht mit cm-Angaben beziffert. Vielen Dank!
22.10.2016 - 20:02DROPS Design answered:
Liebe Gisela, die Knöpfen müssen 5 cm unter den Ärmel sein - am besten ziehen Sie die Jacke an und so können Sie dann die genauen Stellen der Knöpfe einstellen.
24.10.2016 - 09:43
![]() Gisela wrote:
Gisela wrote:
Habe diese tolle Jacke jetzt fertig gestrickt. Nur mit den Maßen für die Knöpfe komme ich nicht zurecht. 5 cm vom unteren Armloch nach unten - das ist klar. Jedoch wieviel cm im rechten Winkel - da wo der Knopf angenäht werden soll? Kann mir da bitte jemand helfen? Vielen Dank!
17.10.2016 - 00:18DROPS Design answered:
Liebe Gisela, Knopflöcher und Knöpfe sind beide in der Skizze gezeight, dh die Sterne = Knöpfe und die Knopflöcher sehen Sie an der letzten Runde (kleine Bögen).
17.10.2016 - 10:51
|
|||||||||||||||||||||||||
Fleur du Népal#fleurdunepaljacket |
|||||||||||||||||||||||||
 |
 |
||||||||||||||||||||||||
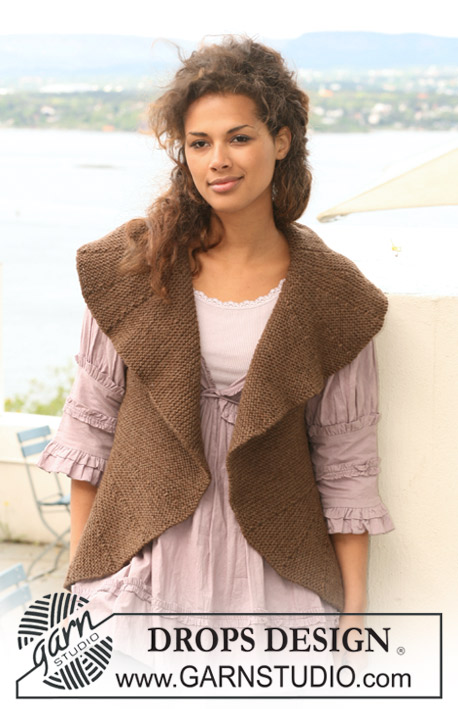
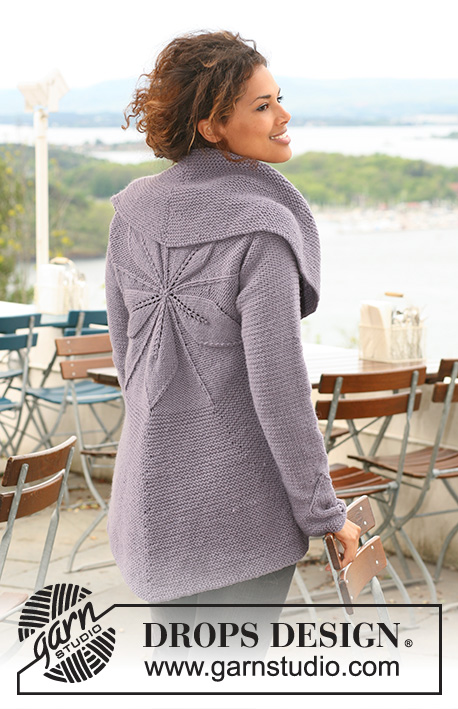
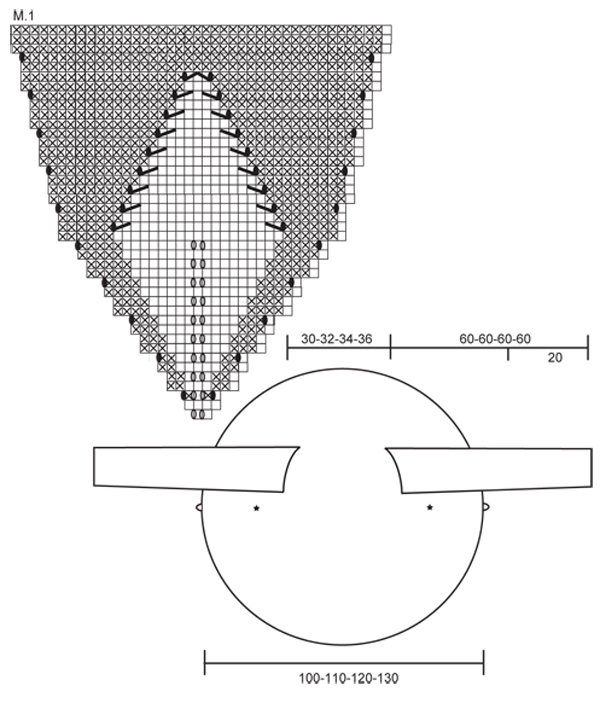
DROPS jacket knitted in a circle in ”Nepal” with leaf pattern. Size S to XXXL
DROPS 126-1 |
|||||||||||||||||||||||||
|
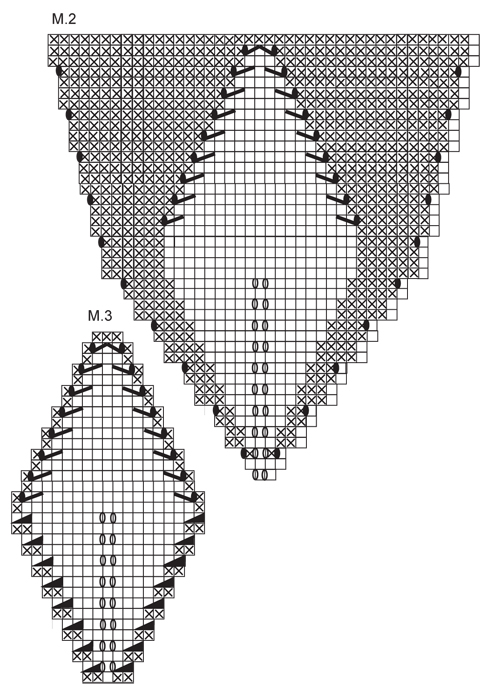
PATTERN: See diagram M.1, M.2 and M.3 - diagrams show 1 pattern repeat from RS. GARTER ST (in the round): K 1 round, P 1 round. INCREASING TIP (applies to after M.1 and M.2): Inc 1 st by each marker per inc (i.e. inc 10 sts per round) – inc alternately to the left and to the right of all markers by making 1 YO – on next round work YO into back of loop to avoid a hole. -------------------------------------------------------- BODY PIECE: Worked in the round as a circle from mid back. Cast on 10 sts with Nepal and distribute them on 4 double pointed needles size 5 mm / US 8. Insert a marker at beg of round = mid piece towards the neck. Continue as follows in the round: M.1, M.2, M.2, M.2 and M.1 (= a total of 5 repeats across the round). Change to circular needle as you inc sts. REMEMBER THE GAUGE! When M.1/M.2 is complete piece measures approx 19 cm / 7½" from the middle and there are 210 sts on needle. Now insert a marker in each of the 5 stockinette sts in the middle of pattern repeat (the inc were made each side of this st), and a marker in st mid between the first 5 markers (= a total of 10 markers). READ ALL OF THE FOLLOWING SECTION BEFORE CONTINUING! PATTERN: Continue in GARTER ST – see above – at the same time on first round after M.1/M.2 inc by all markers - SEE INCREASING TIP - and repeat the inc on every 4th round as you go along. ARMHOLE: At the same time after 2-6-10-14 rows garter st (= 220-230-240-250 sts on needle) work next round as follows (this is a round without inc): Work 25-27-29-31 sts, bind off 32-34-37-40 sts (= armhole), work 106-108-108-108 sts, bind off 32-34-37-40 sts (= armhole) and work 25-27-29-31 sts. On next round cast on 32-34-37-40 new sts over each armhole. Continue and inc as before until there is a total of 480-520-560-600 sts on needle – piece now measures approx 50-55-60-65 cm / 19½"-21½"-23½"-25½"" from the middle, finish after a P round and bind off LOOSELY with K sts. SLEEVE: Worked back and forth on needle. Cast on 45-47-49-51 sts (includes 1 edge st each side) on needle size 5 mm / US 8 with Nepal, K 6 rows (first row = WS). Continue as follows (first row = WS): 1 edge st, 19-20-21-22 sts in reverse stockinette st , M.3, 19-20-21-22 sts in reverse stockinette st and 1 edge st. Continue in pattern like this. After M.3 continue in reverse stockinette st on all sts. AT THE SAME TIME when piece measures 20 cm / 8" inc 1 st each side, repeat the inc on every 4-3.5-3-2.5 cm / 1½"-1¼"-1⅛"-⅞" a total of 8-9-11-13 times = 61-65-71-77 sts. When piece measures 52 cm / 20½" for all sizes bind off for sleeve cap at beg at beg of every row each side: 4 sts 1 time, then 2 sts each side until piece measures approx 60 cm / 23½". Bind off remaining sts. ASSEMBLY: Sew sleeve seams inside 1 edge st. Set in sleeves placing the middle of sleeve cap where the distance between armholes is shortest (i.e. where the first st was bind off on the first armhole and the last st was bind off on the other sleeve) and with the sleeve seams where the distance between the armholes is longest (i.e. the opposite side). BUTTONS: Place the jacket as shown in chart with RS facing up. Measure approx 5 cm / 2" down from the bottom of armhole on the left side of piece and then 10 cm / 4" out in a 90 degree angle and sew 1 button on here from RS – see the marking. Sew on the other button on the other side in the same position, but sew it on from WS. BUTTONHOLE LOOPS: Crochet 1 buttonhole loop with hook size 4 mm / G/6 in bind off row each side to fit the buttons (see chart). 1 LOOP = 1 sc in bind off row on jacket, ch 5, skip approx 1 cm / ⅜" and fasten with 1 sc in bind off row. |
|||||||||||||||||||||||||
Diagram explanations |
|||||||||||||||||||||||||
|
|||||||||||||||||||||||||
 |
|||||||||||||||||||||||||
 |
|||||||||||||||||||||||||
Have you finished this pattern?Tag your pictures with #dropspattern #fleurdunepaljacket or submit them to the #dropsfan gallery. Do you need help with this pattern?You'll find 26 tutorial videos, a Comments/Questions area and more by visiting the pattern on garnstudio.com. © 1982-2026 DROPS Design A/S. We reserve all rights. This document, including all its sub-sections, has copyrights. Read more about what you can do with our patterns at the bottom of each pattern on our site. |
|||||||||||||||||||||||||


With over 40 years in knitting and crochet design, DROPS Design offers one of the most extensive collections of free patterns on the internet - translated to 17 languages. As of today we count 324 catalogs and 12284 patterns - 12274 of which are translated into English (US/in).
We work hard to bring you the best knitting and crochet have to offer, inspiration and advice as well as great quality yarns at incredible prices! Would you like to use our patterns for other than personal use? You can read what you are allowed to do in the Copyright text at the bottom of all our patterns. Happy crafting!
Post a comment to pattern DROPS 126-1
We would love to hear what you have to say about this pattern!
If you want to leave a question, please make sure you select the correct category in the form below, to speed up the answering process. Required fields are marked *.