
Popular categories
Looking for a yarn?


Comments / Questions (58)
![]() Anna wrote:
Anna wrote:
Buon giorno Non ho capito dove mettere i segni x gli aumenti sto facendo la prima misura grazie
06.08.2019 - 09:12DROPS Design answered:
Buongiorno Anna. Per la taglia 1/3 mesi deve inserire un segno tra la 11a e la 12a maglia alta, un segno tra la 17a e la 18a m.a (contate sempre dall’inizio della riga), un segno tra la 31a e la 32a m.a, e l’ultimo segno tra la 37a e la 38a m.a. Buon lavoro!
06.08.2019 - 09:17
![]() Ellen wrote:
Ellen wrote:
Ik ben het babyvestje aan het haken maar ik snap echt niks van het hele patroon. Kunnen jullie het misschien beter uitleggen dat ik het wel snapt. Het is ook voor het eerst dat ik een kledingstuk maakt. Ik hoor het graag van jullie. Ik vind het zo'n leuk vestje. Maar zo gaat het niet lukken en ik ga het voor een baby van 6 tot 9 maand haken. Met vriendelijke groeten van Ellen Burggraaf
22.07.2019 - 14:01DROPS Design answered:
Dag Ellen,
We doen ons best om de patronen zo duidelijk mogelijk te beschrijven. Als je een specifieke vraag hebt over waar je tegenaan loopt in het patroon dan kunnen we je beter helpen.
Lees het patroon eerst even goed door, maak een proeflapje en pas evt. de naalddikte aan zodat de stekenverhouding klopt, Bekijk evt. de video's die je aan de linkerkant van het patroon vindt en kijk evt. ook bij de veelgestelde vragen die in de tab naast de opmerkingen staan. Of kijk bij tips en hulp op de site.
23.07.2019 - 12:21
![]() Stephanie wrote:
Stephanie wrote:
Hej, Jeg har brugt dette mønster til dåbskjole istedet for en cardigan, men dette har jo så resulteret i at kjolen går ret op og ned - ved I hvordan jeg kan lave udtagninger i i mønsteret så jeg får noget bredde og fylde istedet for? Ved selvfølgelig godt at jeg skal pille det hele (viftemønsteret) op, for at lave udtagningerne.. Men hvordan laver man dem? Jeg forstår det virkelig ikke... Håber I kan hjælpe..
21.10.2018 - 20:22DROPS Design answered:
Hej Stephanie, du skulle evt kunne prøve at hækle hver 2. st gruppe med 5 dbl-st (istedet for 4 dbl-st) men du er da nok nødt til at prøve dig lidt frem. Og så efter nogle cm kan du hækle de andre dbl-st med 5 i gruppen istedet for 4. God fornøjelse!
23.10.2018 - 16:12
![]() Emma wrote:
Emma wrote:
Hej, vad menas med att det ska minskas med x antal cm på ärmen? Går det att förklaras på annat vis?
01.10.2018 - 22:54DROPS Design answered:
Hei Emma. Det betyr at du gjør den første fellingen når arbeidet måler 3 cm (det felles 1 stav i hver side). Du skal felle på samme måte hver 3.-4.-2. (2.-2.) cm målt fra forrige felling) til du har felt totalt 3-3-6 (7-10) ganger - inkludert den første fellingen. God fornøyesle.
02.10.2018 - 08:19
![]() Ingrid wrote:
Ingrid wrote:
Hallo, irgendwie muss ich einen Gedankenfehler haben, ich komme bei der Passe nach der Aufnahme nicht auf die angegebene Maschenzahl, ich habe viel weniger. Wenn ich oben die Anleitung durchlese und die Maschen addiere komme ich auch nicht auf die angebenen 160 Stäbchen, wo könnte mein Fehler liegen? vielen dank schon mal .
27.09.2018 - 10:37DROPS Design answered:
Liebe Ingrid, in der 1. Größe haben Sie 48 M, dann werden (4 Stb x 4 Markierungen x 4 Mal insgesamt = 64 Zunahmen) und (2 Stb x 4 Markierungen x 6 Mal insgesamt = 48 Zunahmen): 48 + 64 +48= 160 Stb. Viel Spaß beim häkeln!
27.09.2018 - 15:58Tessa Brown wrote:
Hi I'm from New Zealand and wondering if I can use a New Zealand baby merino 4 ply wool instead of the drops baby merino yarn?
24.09.2018 - 03:57DROPS Design answered:
Dear Mrs Brown, we are happy to let you know that you can get our yarn all around the world - see DROPS stores shipping worldwide here. Happy crocheting!
24.09.2018 - 10:06
![]() Sidsel wrote:
Sidsel wrote:
Hej Jeg tror spørgsmålet er stillet på andre sprog, men forstår det stadig ikke helt. I første række står der at antallet at lm er inklusiv 4 Stm i hver side mod midt foran til forkant. Hvad betyder det? Jeg forstår ikke helt præcis hvor de 4 Stm skal laves og hvordan man får dem til at være i begge sider. Kan I hjælpe mig med det?
21.09.2018 - 22:00DROPS Design answered:
Hej Sidsel, Når du hækler første række med stangmasker ifølge opskriften, så er de yderste 4 stangmasker i hver side selve forkanten (du hækler knaphuller på den ene forkant og syr knapper i på den anden) God fornøjelse!
24.09.2018 - 11:17
![]() Patricia A Bertolini wrote:
Patricia A Bertolini wrote:
My gauge in width or stitched is exact but my rows or height is 12 rows measures 4 and 1/2 inches. I don't think that is too bad but is your advice please? Thanks so much!
24.03.2018 - 17:35DROPS Design answered:
Dear Mrs Berolini, because of the raglan yoke may not get correct measurements if tension is not correct in height. Try to make tigher sts in height (try to not make the sts too long) when crocheting to keep correct tension and correct finished measurements. Happy crocheting!
26.03.2018 - 11:11
![]() Jenny wrote:
Jenny wrote:
Hallo, in der Anleitung steht nach der 1. Reihe hätte ich 48 Stäbchen inklusive 4 Stäbchen auf jeder Seite für die Blende. Vorher steht aber gar nix von einer Blende. Ich soll die 1. Reihe beginnen, in dem ich in die 4. Luftmasche von der Nadel ein Stäbchen häkel. Am Ende das gleiche, ich soll eine Luftmasche überspringen und ein Stäbchen in die letzte Luftmasche häkeln. Lese ich die Anleitung falsch? Soll ich am Anfang und am Ende einfach 4 Stäbchen häkeln und dann erst der Anleitung folgen?
22.07.2017 - 17:13DROPS Design answered:
Liebe Jenny, Am Anfang der R. wird das erste Stb mit 3 Lm ersetzt und die Reihe wird mit 1 Stb in die 3. Lm abgeschlossen (siehe HÄKELINFO), dh am Anfang der R häkeln Sie 3 Lm, dann 3 Stb = 4 Stb für die Blende, am Ende der Reihe häkeln Sie 4 Stb und die 4. Stb wird in die 3. Lm am Anfang der vorrigen Reihen gehäkelt. Viel Spaß beim häkeln!
24.07.2017 - 09:29
![]() Gun Hansson wrote:
Gun Hansson wrote:
Hur får jag 4 st i varje sida!?? Stämmer inte , blir 2 i den ena och 3 i den andra / Gun
03.03.2017 - 17:14DROPS Design answered:
Hej Gun. Se mit svar herunder.
06.03.2017 - 15:07
|
|
Sweet Buttercup#sweetbuttercupset |
|
 |
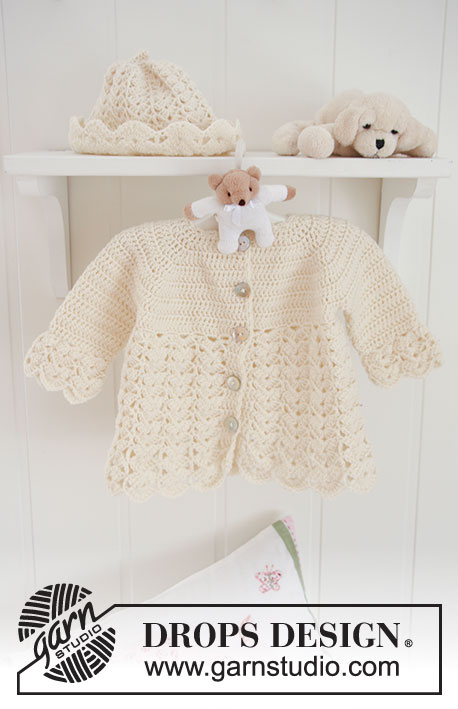 |
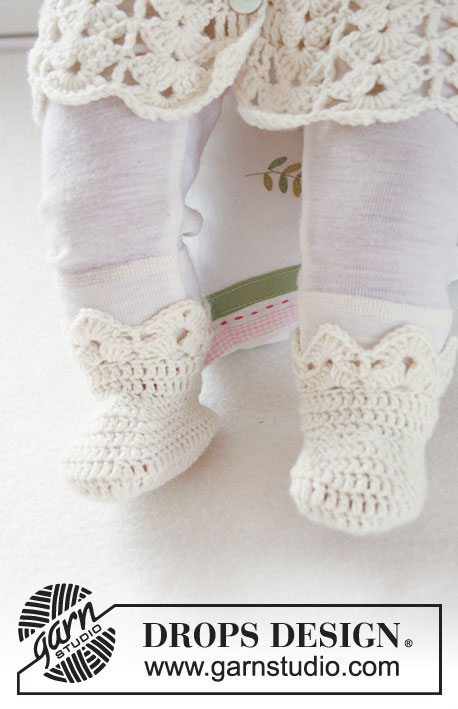
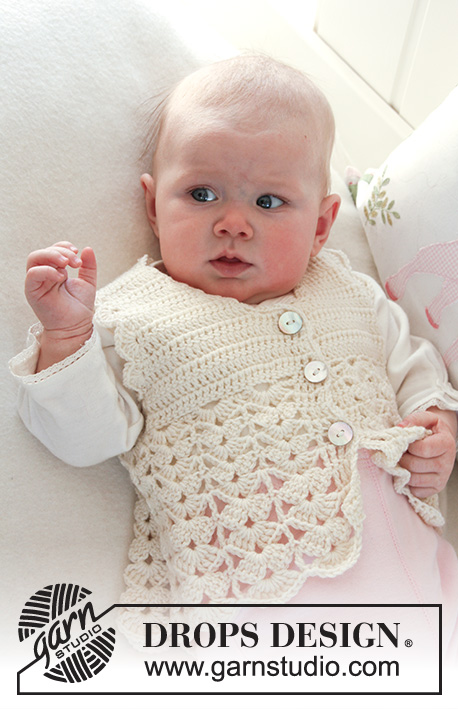
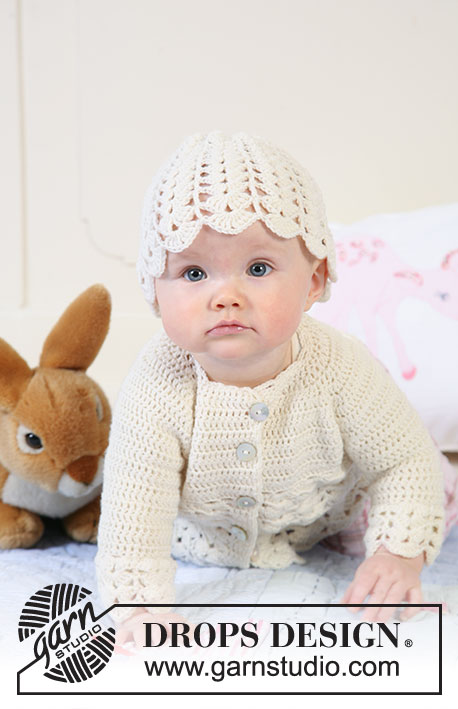
Set of crochet jacket with raglan, and hat with fan pattern for baby and children in DROPS BabyMerino
DROPS Baby 19-8 |
|
|
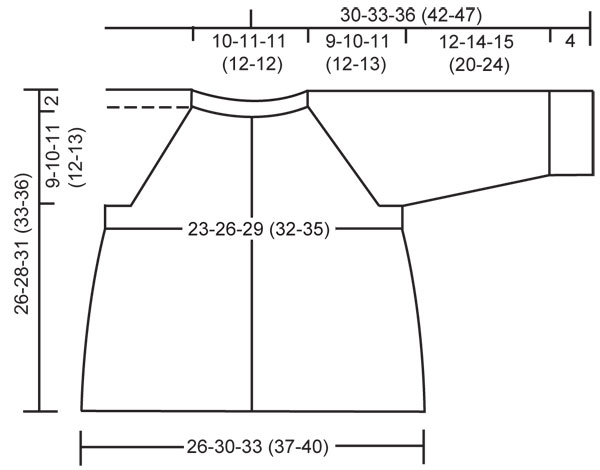
JACKET: CROCHET INFO (applies to yoke and sleeves): Replace first dc on row with ch 3 and finish each row with 1 dc in 3rd ch from beg of previous row. INCREASING TIP-1 (applies to raglan): Inc for raglan on each side of all 4 markers. INC 4 DC BY EACH MARKER AS FOLLOWS: Beg inc in 3rd dc before marker and work 2 dc in this dc, 2 dc in next dc, 1 dc in each of the next 2 dc (marker sits between these 2 dc), 2 dc in next dc and 2 dc in next dc (= 16 dc inc on row). INC 2 DC BY EACH MARKER AS FOLLOWS: Beg inc in 2nd dc before marker and work 2 dc in this dc, 1 dc in each of the next 2 dc (marker sits between these 2 dc), 2 dc in next dc (= 8 dc inc on row). INCREASING TIP-2: Inc 1 dc by working 2 dc in 1 dc. DECREASING TIP (applies to sleeve): Dec 1 dc at beg of row by replacing 1 dc with 1 sl st. Dec 1 dc at the end of row by turning piece when 1 dc remain on row and work return row as before with 1 dc in each dc. BUTTONHOLES: Make buttonholes on right front band. 1 BUTTONHOLE = replace 3rd dc from mid front with ch 1. On next row crochet 1 dc in this ch. Make buttonholes when piece approx measures: SIZE 1/3 MONTHS: 2, 7, 12, 17 og 22 cm/3/4",2¾",4¾",6¾" and 8¾". SIZE 6/9 MONTHS: 2, 8, 13, 19 og 24 cm/3/4",3⅛",5⅛",7½" and 9½". SIZE 12/18 MONTHS: 2, 8, 14, 20 og 26 cm/3/4",3⅛",5½",8" and 10¼". SIZE 2 YEARS: 2, 7, 12, 17, 22 og 27 cm/3/4",2¾",4¾",6¾",8¾" and 10⅝" SIZE 3/4 YEARS: 2, 8, 13, 19, 24 og 30 cm/3/4",3⅛",5⅛",7½",9½" and 11¾". ---------------------------------------------------------- JACKET: Crochet in dc from shoulders towards bottom edge. Beg with yoke, then crochet sleeves from the top towards sleeve edges, and then body piece, back and forth from mid front in fan patterns. YOKE: Ch 66-71-71 (76-76) LOOSE with hook size 3.5 mm/E/4 and Baby Merino. ROW 1 (= WS): Crochet 1 dc in 4th ch from hook, *skip 1 ch, 1 dc in each of following 3 ch*, repeat *-* until 2-3-3 (4-4) ch remains, skip 1 ch and then 1 dc in each of 1-2-2 (3-3) last ch = 48-52-52 (56-56) dc on row (includes 4 dc each side towards mid front for front band), turn piece. Now insert 4 markers in piece as follows (from RS): SIZE 1/3 MONTHS: marker A between 11th and 12 dc, marker B between 17th and 18th dc, marker C between 31st and 32nd dc, and marker D between 37th and 38th dc. SIZE 6/9 + 12/18 MONTHS: marker A between 12th and 13th dc, marker B between 18th and 19th dc, marker C between 34th and 35th dc, and marker D between 40th and 41st dc. SIZE 2 + 3/4 YEARS: marker A between 13th and 14th dc, marker B between 19th and 20th dc, marker C between 37th and 38th dc, and marker D between 43rd and 44th dc. Let the markers follow the piece as you go along. Now continue as follows - See CROCHET INFO AND REMEMBER THE CROCHET GAUGE! Crochet 1 dc in each dc, AT THE SAME TIME on first row inc 4 dc for raglan by each marker – See INCREASING TIP-1! Repeat the inc on every row a total of 4-5-7 (8-10) times – remember BUTTONHOLES on right front band. Now inc 2 dc by each marker on every row a total of 6-6-5 (5-4) times = 160-180-204 (224-248) dc on row. There are now 11-12-13 (14-15) rows on piece and piece measures approx 11-12-13 (14-15) cm / 4⅜"-4¾"-5⅛" (5½"-6") from shoulder (piece will measure approx 9-10-11 (12-13) cm / 3½"-4"-4⅜" (4¾"-5⅛") from neckline). Cut the thread. SLEEVE: Now measure piece from here! Crochet 1 dc in each dc back and forth on the 34-38-44 (48-54) dc between marker A and B. AT THE SAME TIME when piece measures 3 cm / 1⅛" dec 1 dc each side – See DECREASING TIP. Repeat the dec each side on every 3-4-2 (2-2) cm / 1⅛"-1½"-¾" (3/4"-¾") a total of 3-3-6 (7-10) times = 28-32-32 (34-34) dc. Continue with 1 dc in each dc. When sleeve measures 12-14-15 (20-24) cm / 4¾"-5½"-6" (8"-9½") crochet cuff with Fan Pattern as follows: ROW 1: * ch 2, skip approx 1 to 3 dc, 1 sc in next dc *, repeat from *-* so that you end up with 11-11-11 (13-13) ch-loops. ROW 2: Crochet sl sts to the middle of first ch-loop, ch 3, * 4 dc + ch 2 + 4 dc in next ch-loop, 1 dc in next ch-loop *, repeat from *-*, turn piece. ROW 3: ch 3, * 4 dc + ch 2 + 4 dc in the middle of the dc-group (i.e. in ch-loop at the top of fan), 1 dc in dc from previous row *, repeat from *-*, turn piece. Repeat row 3 one more time, cut the thread and crochet the other sleeve in the same way between marker C and D. BODY PIECE: Continue in Fan Pattern back and forth from mid front as follows: ROW 1: crochet 1 dc in each of the 25-28-31 (34-37) dc on left front piece to marker A, AT THE SAME TIME inc 4-4-5 (5-6) dc evenly (do not inc on front band) – See INCREASING TIP-2 = 29-32-36 (39-43) dc, crochet 1 dc in each of the 42-48-54 (60-66) dc on back piece from marker B to marker C, AT THE SAME TIME inc 8-8-10 (10-12) dc evenly = 50-56-64 (70-78) dc and crochet 1 dc in each of the 25-28-31 (34-37) dc on right front piece from marker D, AT THE SAME TIME inc 4-4-5 (5-6) dc evenly = 29-32-36 (39-43) dc = 108-120-136 (148-164) dc in total on row, turn piece. ROW 2: ch 3, 1 dc in each of the next 3 dc (= front band), ch 3, skip 2 dc, * 1 sc in next dc, ch 3, skip approx 2 dc (skip 3 dc occasionally) *, repeat from *-* so that you end up with 30-34-38 (42-46) ch-loops and 6 or 7 dc remain on row, ch 3 and finish with 1 dc in each of the last 4 dc (= front band). There are now 31-35-39 (43-47) ch-loops with 4 dc each side for front band, turn piece. ROW 3: ch 3, 1 dc in each of the next 3 dc, skip first ch-loop, * 4 dc + ch 2 + 4 dc in next ch-loop, 1 dc in next ch-loop *, repeat from *-* until 2 ch-loops remain, crochet 4 dc + ch 2 + 4 dc in next ch-loop and finish with 1 dc in each of the 4 dc on front band = 15-17-19 (21-23) fans with 4 dc each side towards mid front for front bands, turn piece. ROW 4: ch 3, 1 dc in each of the next 3 dc, * 4 dc + ch 2 + 4 dc in the middle of the next dc-group (i.e. in ch-loop at the top of fan), 1 dc in dc from previous row *, repeat from *-* until 1 dc-group remain, 4 dc + ch 2 + 4 dc in the middle of this dc-group and finish with 1 dc in each of the 4 dc on front band, turn piece. Repeat row 4 until piece measures approx 21-23-24 (26-28) cm / 8¼"-9"-9½" (10¼"-11"). CROCHET NEXT ROW AS FOLLOWS: ch 4, 1 tr in each of the next 3 dc, * 4 tr + ch 2 + 4 tr in the middle of next dc-group, 1 tr in dc from previous row *, repeat from *-* until 1 dc-group remain, 4 tr + ch 2 + 4 tr in the middle of this dc-group and finish with 1 tr in each of the 4 dc on front band, turn piece. Repeat this row until piece measures approx 26-28-31 (33-36) cm / 10¼"-11"-12¼" (13"-14¼") from shoulder. Cut and fasten threads. CROCHET BORDER: Crochet a border with hook size 3.5 mm/E/4 and Baby Merino round opening of jacket as follows – beg at bottom of right front piece, round neckline on front and back pieces, and down along left front piece: 1 sc in first st, * ch 3, skip approx 1 cm / ⅜", 1 sc in next st *, repeat from *-*. ASSEMBLY: Sew sleeve seams and cuffs tog, edge to edge with neat sts. Sew on buttons. --------------------------------------------------------- HAT: CROCHET INFO: Replace first sc on row with ch 1 and finish each round with 1 sl st in ch from beg of round. --------------------------------------------------------- Hat crochet from the top down. With hook size 3.5 mm/E/4 and Baby Merino ch 4 and form a ring with 1 sl st in first ch. ROUND 1: 6 sc in ring – See CROCHET INFO. ROUND 2-4: 1 sc in each sc = 6 sc. ROUND 5: 2 sc in each sc = 12 sc. ROUND 6: 2 sc in each sc = 24 sc. ROUND 7: * 1 sc in first sc, 2 sc in next sc *, repeat from *-* = 36 sc. ROUND 8: * 1 sc in each of the first 2 sc, 2 sc in next sc *, repeat from *-* = 48 sc. ROUND 9: * 1 sc in each of the first 3 sc, 2 sc in next sc *, repeat from *-* = 60 sc. ROUND 10: ch 3, * skip 2 sc (skip 1 sc instead at regular intervals a total of 6-12-18 (24) times), 1 sc in next sc, ch 2 *, repeat from *-* so that you end up with 22-24-26 (28) ch-loops, finish with 1 sl st in ch from beg of round. ROUND 11: Crochet sl sts to the middle of the first ch-loop, ch 1, * 2 dc + ch 1 + 2 dc in next ch-loop, 1 sc in next ch-loop *, repeat from *-* and finish with 2 dc + ch 1 + 2 dc in the last ch-loop and 1 sl st in ch from beg of round = 11-12-13 (14) fans. ROUND 12-15: ch 3, * 3 dc + ch 1 + 3 dc in the middle of next dc-group (i.e. in ch at the top of fan), 1 dc in sc/dc from previous round *, repeat from *-* and finish with 3 dc + ch 1 + 3 dc in the middle of the last dc-group and 1 sl st in 3rd ch from beg of round. ROUND 16: ch 3, * 3 dc + ch 2 + 3 dc in the middle of next dc-group, 1 dc in dc from previous round *, repeat from *-* and finish with 3 dc + ch 2 + 3 dc in the middle of the last dc-group and 1 sl st in 3rd ch from beg of round. ROUND 17: ch 3, * 4 dc + ch 2 + 4 dc in the middle of next dc-group, 1 dc in dc from previous round *, repeat from *-* and finish with 4 dc + ch 2 + 4 dc in the middle of the last dc-group and 1 sl st in 3rd ch from beg of previous round. Repeat ROUND 17 until hat measures approx 10-11-12 (13) cm / 4"-4⅜"-4¾" (5⅛") from the top of head. CROCHET NEXT ROUND AS FOLLOWS: ch 4, * 4 tr + ch 2 + 4 tr in the middle of next dc-group, 1 tr in dc from previous round *, repeat from *-* and finish with 4 tr + ch 2 + 4 tr in the middle of the last dc-group and 1 sl st in 4th ch from beg of round. Repeat this round until hat measures approx 14-15-16 (18) cm / 5½"-6"-6¼" (7") from the top of head. Cut and fasten thread. |
|
 |
|
Have you finished this pattern?Tag your pictures with #dropspattern #sweetbuttercupset or submit them to the #dropsfan gallery. Do you need help with this pattern?You'll find 11 tutorial videos, a Comments/Questions area and more by visiting the pattern on garnstudio.com. © 1982-2026 DROPS Design A/S. We reserve all rights. This document, including all its sub-sections, has copyrights. Read more about what you can do with our patterns at the bottom of each pattern on our site. |
|


With over 40 years in knitting and crochet design, DROPS Design offers one of the most extensive collections of free patterns on the internet - translated to 17 languages. As of today we count 324 catalogs and 12285 patterns - 12275 of which are translated into English (US/in).
We work hard to bring you the best knitting and crochet have to offer, inspiration and advice as well as great quality yarns at incredible prices! Would you like to use our patterns for other than personal use? You can read what you are allowed to do in the Copyright text at the bottom of all our patterns. Happy crafting!
Post a comment to pattern DROPS Baby 19-8
We would love to hear what you have to say about this pattern!
If you want to leave a question, please make sure you select the correct category in the form below, to speed up the answering process. Required fields are marked *.