
Popular categories
Looking for a yarn?


Comments / Questions (58)
![]() Danae Contreras wrote:
Danae Contreras wrote:
No entiendo la primera instrucción del chaleco . Antes del marcador en el 3er pto tejo p.a. En el que sigue 2 más en el 3ero 1 y eso entre los dos puntos …. Ya pasó tres puntos cuáles dos? …. Y que hago con el punto marcado tejo sobre el antes de el y cuantos puntos porq si tejo 2 +2+1 =5 y entre 4 marcadores es 20 no 16 . Como lo hago
12.05.2024 - 06:07DROPS Design answered:
Hola Danae, empiezas 3 puntos antes del marcapuntos. En este punto aumentas 1 punto (trabajas 2 p.a en 1 p.a), en el siguiente aumentas otro punto (2 p.a en 1 p.a), después trabajas 1 p.a en el p.a a cada lado del marcapuntos (no aumentas). Ahora aumentas 1 punto en el siguiente p.a (2 p.a en 1 p.a) y aumentas otro punto en el siguiente p.a (2 p.a en 1 p.a). Por lo tanto, has aumentado 4 puntos.Trabajar de este modo en cada marcapuntos. Como hay 4 marcapuntos en cada vuelta aumentas 16 puntos en cada vuelta.
12.05.2024 - 21:07
![]() Elisabetta Clementel wrote:
Elisabetta Clementel wrote:
Hello, I find it very difficult to make the hat. I don't really understand row 10, why "instead"? Do I have to skip one or two stitches? And why that first row about the chain one and slip into the first stitch, isn't that the usual way to do it? Thank you
29.04.2024 - 22:42DROPS Design answered:
Dear Mrs Clementel, to increase on 10th round, you will have to skip 6-12-18 (24) times in total the whole round 1 stitch only instead of 2, so that you will get a total of 22-24-26 (28) ch-spaces at the end of this round. At the beg of this round start with 3 chains (= 1 dc (UK-English) + 2 chains) and finish the round with 1 slip stitch in the 1st chain from beg of round. Happy crocheting!
30.04.2024 - 08:09
![]() Marta wrote:
Marta wrote:
Nella spiegazione c’è scritto ca. Cosa significa? Grazie
29.04.2024 - 15:04DROPS Design answered:
Buonasera Marta, ca è un acronimo per circa. Buon lavoro!
30.04.2024 - 19:15
![]() Bianca Nägeli wrote:
Bianca Nägeli wrote:
Ein einfaches und wunderschönes Muster! Vielen Dank für die genaue Anleitung, so macht Häkeln Spass!
12.04.2023 - 21:05
![]() Cayla Annie wrote:
Cayla Annie wrote:
Empiècements: rang 1, vous dites : , *sauter 1 ml, 1 B dans chacune des 3 ml suiv*, Doit-on fait une ml après la bride avant de sauter la ml ? Ce qui ferait : faire une B dans la 4ème ml à partir du crochet, faire 1 ml, sauter 1ml, 1B dans les 3ml suivantes. Ainsi on conserve les 68ml sinon on perd des m’l sur le rang Merci pour votre reponse
27.05.2022 - 19:13DROPS Design answered:
Bonjour Mme Cayla, comme la chaînette de base est souvent plus serrée que le 1er rang, on crochète volontairement davantage de mailles en l'air que l'on a besoin de brides au 1er rang, autrement dit, au 1er rang, sautez les mailles en l'air indiquée, sans les remplacer, vous avez ainsi entre 48 à 56 brides sur la chaînette de 66 à 76 mailles en l'air en fonction de la taille. Bon crochet!
30.05.2022 - 07:45
![]() Mireille MONIER wrote:
Mireille MONIER wrote:
Bonjour je n'arrive pas à faire le rang 10 du bonnet impossible d'arriver à 26 arceau si je saute 6 fois uniquement 1 maille serrée. Pouvez vous m'aider merci. Sinon vos modèles sont magnifiques
25.04.2022 - 10:06DROPS Design answered:
Bonjour Mme Monier, il y avait malheureusement une erreur dans la correction de ce tour, vous devez en fait sauter 18 fois 1 maille serrée (au lieu de 6 en taille 12/18 mois), la correction est faite et le texte est juste désormais, merci pour votre retour. Bon crochet!
25.04.2022 - 12:10
![]() Ines Hannusch wrote:
Ines Hannusch wrote:
Hallo IhrLieben, ich muss leider einigen Kommentatorinnen recht geben, dass die Anleitung gruselig ist. DieJacke ist zuckersüß und ich häkele wirklich schon sehr lange, fast alles Großprojekte wie Decken und auch ganz filigrane aufwendige Sachen aber so eine Anleitung hat mir noch nciht vorgelegen. gibt es die nicht besser, mit anschaulichen Skizzen zur Beschreibung ???
24.02.2022 - 14:22
![]() Ana Cecilia Ramirez wrote:
Ana Cecilia Ramirez wrote:
I bolen når man skal lage buer har jeg 158 masker om jeg deler det med tre så er det 51 buer men dere mener at det skal bli 30 buer. Også hekler jeg for stramt, det ble ikke 1 cm pr rad.
02.02.2022 - 18:22
![]() Claudia wrote:
Claudia wrote:
Wenn ich 2 Stb aufnehme wiederhole ich das doch 4 x und nicht 6x, ich hab doch nur 4 Markierungen? So eine süße Jacke aber diese Anleitung finde ich leider nicht so gut
06.12.2021 - 14:15DROPS Design answered:
Liebe Claudia, es wird zuerst 4 Stb bei jeder Markierung 4 Mal zugenommen, dh 48 Stb + 4 x 16 Stb = 112 Stb; dann jeweils 2 Stb x 4 Markierung = jeweils 8 Stb x 6 = 48 Stb +112= 160 Stb. Kann das Ihnen helfen?
06.12.2021 - 15:33
![]() Claudia wrote:
Claudia wrote:
Leider verstehe ich nicht ganz die Blende. Ich mache 3 Lm als Ersatz für das 1. Stb + 3 Stb in die 4. Lm von Reihe 1? Am Ende der Reihe 4 Stb in die 3. Lm der Vorrunde? Diese Stb werden dann mitgezählt? Da komme ich auf 52 Stb bei der kleinsten Größe. Sehr verwirrend das die Stb für die Blende nicht aufgeschrieben sind.
06.12.2021 - 14:10DROPS Design answered:
Liebe Claudia, die Luftmaschenkette ist oft so fest, daß man hier mehr Luftmaschen (66) häkelt als man Stäbchen (48) braucht, so häkeln Sie: 1 Stb in das 4. Lm (= 2 Stb über 4 Lm), dann *1 Lm überspringen, 1 Stb in die je nächsten 3 Lm* x 15 (= 3 Stbx15 = 45Stb über 4x15=60 Lm), 1 lm überspringen, 1 Stb in die letzte Lm (= 1 Stb über 2 Lm) = 2+45+1=48 Stäbchen über 4+60+2=66 Lm. Viel Spaß beim häkeln!
06.12.2021 - 15:23
|
|
Sweet Buttercup#sweetbuttercupset |
|
 |
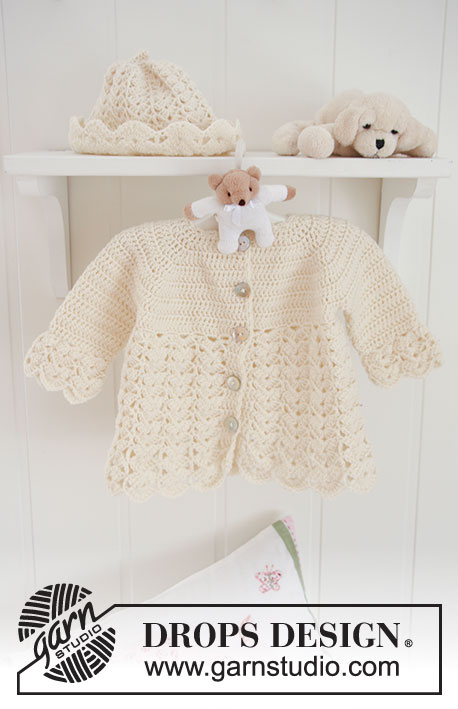 |
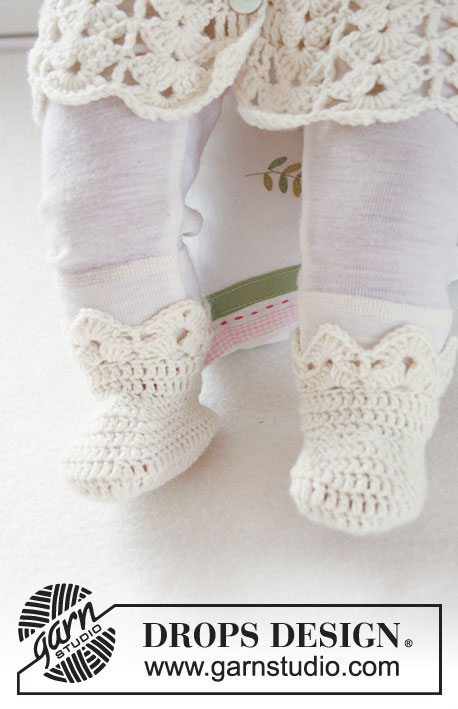
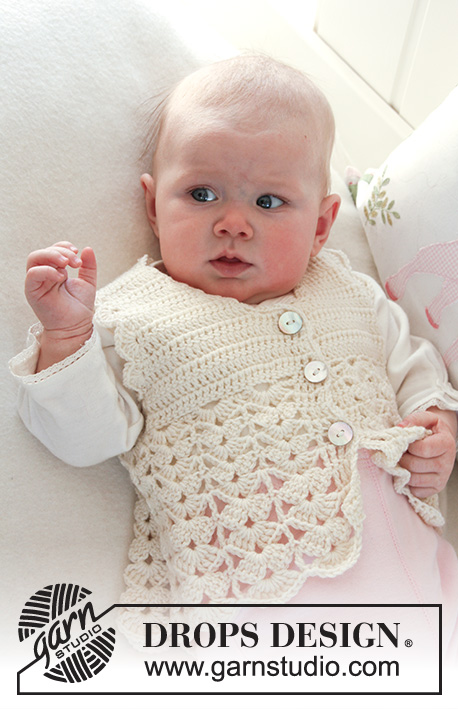
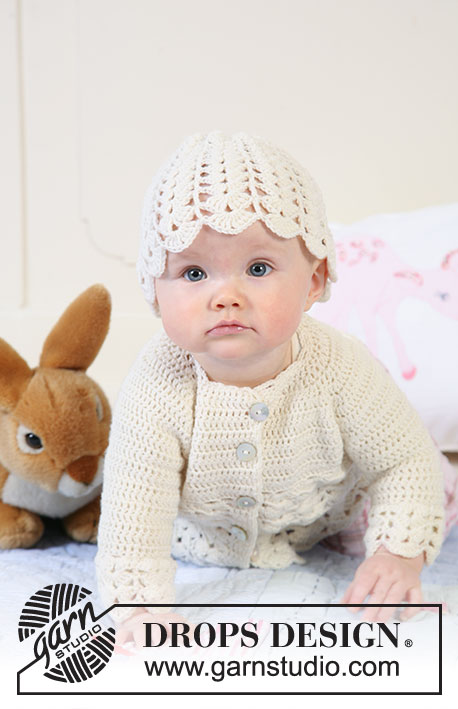
Set of crochet jacket with raglan, and hat with fan pattern for baby and children in DROPS BabyMerino
DROPS Baby 19-8 |
|
|
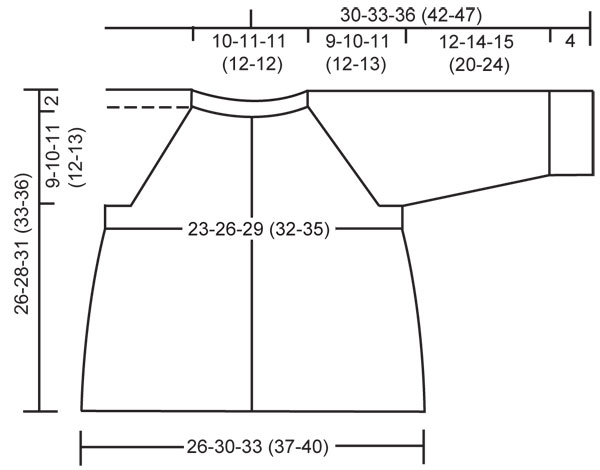
JACKET: CROCHET INFO (applies to yoke and sleeves): Replace first dc on row with ch 3 and finish each row with 1 dc in 3rd ch from beg of previous row. INCREASING TIP-1 (applies to raglan): Inc for raglan on each side of all 4 markers. INC 4 DC BY EACH MARKER AS FOLLOWS: Beg inc in 3rd dc before marker and work 2 dc in this dc, 2 dc in next dc, 1 dc in each of the next 2 dc (marker sits between these 2 dc), 2 dc in next dc and 2 dc in next dc (= 16 dc inc on row). INC 2 DC BY EACH MARKER AS FOLLOWS: Beg inc in 2nd dc before marker and work 2 dc in this dc, 1 dc in each of the next 2 dc (marker sits between these 2 dc), 2 dc in next dc (= 8 dc inc on row). INCREASING TIP-2: Inc 1 dc by working 2 dc in 1 dc. DECREASING TIP (applies to sleeve): Dec 1 dc at beg of row by replacing 1 dc with 1 sl st. Dec 1 dc at the end of row by turning piece when 1 dc remain on row and work return row as before with 1 dc in each dc. BUTTONHOLES: Make buttonholes on right front band. 1 BUTTONHOLE = replace 3rd dc from mid front with ch 1. On next row crochet 1 dc in this ch. Make buttonholes when piece approx measures: SIZE 1/3 MONTHS: 2, 7, 12, 17 og 22 cm/3/4",2¾",4¾",6¾" and 8¾". SIZE 6/9 MONTHS: 2, 8, 13, 19 og 24 cm/3/4",3⅛",5⅛",7½" and 9½". SIZE 12/18 MONTHS: 2, 8, 14, 20 og 26 cm/3/4",3⅛",5½",8" and 10¼". SIZE 2 YEARS: 2, 7, 12, 17, 22 og 27 cm/3/4",2¾",4¾",6¾",8¾" and 10⅝" SIZE 3/4 YEARS: 2, 8, 13, 19, 24 og 30 cm/3/4",3⅛",5⅛",7½",9½" and 11¾". ---------------------------------------------------------- JACKET: Crochet in dc from shoulders towards bottom edge. Beg with yoke, then crochet sleeves from the top towards sleeve edges, and then body piece, back and forth from mid front in fan patterns. YOKE: Ch 66-71-71 (76-76) LOOSE with hook size 3.5 mm/E/4 and Baby Merino. ROW 1 (= WS): Crochet 1 dc in 4th ch from hook, *skip 1 ch, 1 dc in each of following 3 ch*, repeat *-* until 2-3-3 (4-4) ch remains, skip 1 ch and then 1 dc in each of 1-2-2 (3-3) last ch = 48-52-52 (56-56) dc on row (includes 4 dc each side towards mid front for front band), turn piece. Now insert 4 markers in piece as follows (from RS): SIZE 1/3 MONTHS: marker A between 11th and 12 dc, marker B between 17th and 18th dc, marker C between 31st and 32nd dc, and marker D between 37th and 38th dc. SIZE 6/9 + 12/18 MONTHS: marker A between 12th and 13th dc, marker B between 18th and 19th dc, marker C between 34th and 35th dc, and marker D between 40th and 41st dc. SIZE 2 + 3/4 YEARS: marker A between 13th and 14th dc, marker B between 19th and 20th dc, marker C between 37th and 38th dc, and marker D between 43rd and 44th dc. Let the markers follow the piece as you go along. Now continue as follows - See CROCHET INFO AND REMEMBER THE CROCHET GAUGE! Crochet 1 dc in each dc, AT THE SAME TIME on first row inc 4 dc for raglan by each marker – See INCREASING TIP-1! Repeat the inc on every row a total of 4-5-7 (8-10) times – remember BUTTONHOLES on right front band. Now inc 2 dc by each marker on every row a total of 6-6-5 (5-4) times = 160-180-204 (224-248) dc on row. There are now 11-12-13 (14-15) rows on piece and piece measures approx 11-12-13 (14-15) cm / 4⅜"-4¾"-5⅛" (5½"-6") from shoulder (piece will measure approx 9-10-11 (12-13) cm / 3½"-4"-4⅜" (4¾"-5⅛") from neckline). Cut the thread. SLEEVE: Now measure piece from here! Crochet 1 dc in each dc back and forth on the 34-38-44 (48-54) dc between marker A and B. AT THE SAME TIME when piece measures 3 cm / 1⅛" dec 1 dc each side – See DECREASING TIP. Repeat the dec each side on every 3-4-2 (2-2) cm / 1⅛"-1½"-¾" (3/4"-¾") a total of 3-3-6 (7-10) times = 28-32-32 (34-34) dc. Continue with 1 dc in each dc. When sleeve measures 12-14-15 (20-24) cm / 4¾"-5½"-6" (8"-9½") crochet cuff with Fan Pattern as follows: ROW 1: * ch 2, skip approx 1 to 3 dc, 1 sc in next dc *, repeat from *-* so that you end up with 11-11-11 (13-13) ch-loops. ROW 2: Crochet sl sts to the middle of first ch-loop, ch 3, * 4 dc + ch 2 + 4 dc in next ch-loop, 1 dc in next ch-loop *, repeat from *-*, turn piece. ROW 3: ch 3, * 4 dc + ch 2 + 4 dc in the middle of the dc-group (i.e. in ch-loop at the top of fan), 1 dc in dc from previous row *, repeat from *-*, turn piece. Repeat row 3 one more time, cut the thread and crochet the other sleeve in the same way between marker C and D. BODY PIECE: Continue in Fan Pattern back and forth from mid front as follows: ROW 1: crochet 1 dc in each of the 25-28-31 (34-37) dc on left front piece to marker A, AT THE SAME TIME inc 4-4-5 (5-6) dc evenly (do not inc on front band) – See INCREASING TIP-2 = 29-32-36 (39-43) dc, crochet 1 dc in each of the 42-48-54 (60-66) dc on back piece from marker B to marker C, AT THE SAME TIME inc 8-8-10 (10-12) dc evenly = 50-56-64 (70-78) dc and crochet 1 dc in each of the 25-28-31 (34-37) dc on right front piece from marker D, AT THE SAME TIME inc 4-4-5 (5-6) dc evenly = 29-32-36 (39-43) dc = 108-120-136 (148-164) dc in total on row, turn piece. ROW 2: ch 3, 1 dc in each of the next 3 dc (= front band), ch 3, skip 2 dc, * 1 sc in next dc, ch 3, skip approx 2 dc (skip 3 dc occasionally) *, repeat from *-* so that you end up with 30-34-38 (42-46) ch-loops and 6 or 7 dc remain on row, ch 3 and finish with 1 dc in each of the last 4 dc (= front band). There are now 31-35-39 (43-47) ch-loops with 4 dc each side for front band, turn piece. ROW 3: ch 3, 1 dc in each of the next 3 dc, skip first ch-loop, * 4 dc + ch 2 + 4 dc in next ch-loop, 1 dc in next ch-loop *, repeat from *-* until 2 ch-loops remain, crochet 4 dc + ch 2 + 4 dc in next ch-loop and finish with 1 dc in each of the 4 dc on front band = 15-17-19 (21-23) fans with 4 dc each side towards mid front for front bands, turn piece. ROW 4: ch 3, 1 dc in each of the next 3 dc, * 4 dc + ch 2 + 4 dc in the middle of the next dc-group (i.e. in ch-loop at the top of fan), 1 dc in dc from previous row *, repeat from *-* until 1 dc-group remain, 4 dc + ch 2 + 4 dc in the middle of this dc-group and finish with 1 dc in each of the 4 dc on front band, turn piece. Repeat row 4 until piece measures approx 21-23-24 (26-28) cm / 8¼"-9"-9½" (10¼"-11"). CROCHET NEXT ROW AS FOLLOWS: ch 4, 1 tr in each of the next 3 dc, * 4 tr + ch 2 + 4 tr in the middle of next dc-group, 1 tr in dc from previous row *, repeat from *-* until 1 dc-group remain, 4 tr + ch 2 + 4 tr in the middle of this dc-group and finish with 1 tr in each of the 4 dc on front band, turn piece. Repeat this row until piece measures approx 26-28-31 (33-36) cm / 10¼"-11"-12¼" (13"-14¼") from shoulder. Cut and fasten threads. CROCHET BORDER: Crochet a border with hook size 3.5 mm/E/4 and Baby Merino round opening of jacket as follows – beg at bottom of right front piece, round neckline on front and back pieces, and down along left front piece: 1 sc in first st, * ch 3, skip approx 1 cm / ⅜", 1 sc in next st *, repeat from *-*. ASSEMBLY: Sew sleeve seams and cuffs tog, edge to edge with neat sts. Sew on buttons. --------------------------------------------------------- HAT: CROCHET INFO: Replace first sc on row with ch 1 and finish each round with 1 sl st in ch from beg of round. --------------------------------------------------------- Hat crochet from the top down. With hook size 3.5 mm/E/4 and Baby Merino ch 4 and form a ring with 1 sl st in first ch. ROUND 1: 6 sc in ring – See CROCHET INFO. ROUND 2-4: 1 sc in each sc = 6 sc. ROUND 5: 2 sc in each sc = 12 sc. ROUND 6: 2 sc in each sc = 24 sc. ROUND 7: * 1 sc in first sc, 2 sc in next sc *, repeat from *-* = 36 sc. ROUND 8: * 1 sc in each of the first 2 sc, 2 sc in next sc *, repeat from *-* = 48 sc. ROUND 9: * 1 sc in each of the first 3 sc, 2 sc in next sc *, repeat from *-* = 60 sc. ROUND 10: ch 3, * skip 2 sc (skip 1 sc instead at regular intervals a total of 6-12-18 (24) times), 1 sc in next sc, ch 2 *, repeat from *-* so that you end up with 22-24-26 (28) ch-loops, finish with 1 sl st in ch from beg of round. ROUND 11: Crochet sl sts to the middle of the first ch-loop, ch 1, * 2 dc + ch 1 + 2 dc in next ch-loop, 1 sc in next ch-loop *, repeat from *-* and finish with 2 dc + ch 1 + 2 dc in the last ch-loop and 1 sl st in ch from beg of round = 11-12-13 (14) fans. ROUND 12-15: ch 3, * 3 dc + ch 1 + 3 dc in the middle of next dc-group (i.e. in ch at the top of fan), 1 dc in sc/dc from previous round *, repeat from *-* and finish with 3 dc + ch 1 + 3 dc in the middle of the last dc-group and 1 sl st in 3rd ch from beg of round. ROUND 16: ch 3, * 3 dc + ch 2 + 3 dc in the middle of next dc-group, 1 dc in dc from previous round *, repeat from *-* and finish with 3 dc + ch 2 + 3 dc in the middle of the last dc-group and 1 sl st in 3rd ch from beg of round. ROUND 17: ch 3, * 4 dc + ch 2 + 4 dc in the middle of next dc-group, 1 dc in dc from previous round *, repeat from *-* and finish with 4 dc + ch 2 + 4 dc in the middle of the last dc-group and 1 sl st in 3rd ch from beg of previous round. Repeat ROUND 17 until hat measures approx 10-11-12 (13) cm / 4"-4⅜"-4¾" (5⅛") from the top of head. CROCHET NEXT ROUND AS FOLLOWS: ch 4, * 4 tr + ch 2 + 4 tr in the middle of next dc-group, 1 tr in dc from previous round *, repeat from *-* and finish with 4 tr + ch 2 + 4 tr in the middle of the last dc-group and 1 sl st in 4th ch from beg of round. Repeat this round until hat measures approx 14-15-16 (18) cm / 5½"-6"-6¼" (7") from the top of head. Cut and fasten thread. |
|
 |
|
Have you finished this pattern?Tag your pictures with #dropspattern #sweetbuttercupset or submit them to the #dropsfan gallery. Do you need help with this pattern?You'll find 11 tutorial videos, a Comments/Questions area and more by visiting the pattern on garnstudio.com. © 1982-2026 DROPS Design A/S. We reserve all rights. This document, including all its sub-sections, has copyrights. Read more about what you can do with our patterns at the bottom of each pattern on our site. |
|


With over 40 years in knitting and crochet design, DROPS Design offers one of the most extensive collections of free patterns on the internet - translated to 17 languages. As of today we count 324 catalogs and 12285 patterns - 12275 of which are translated into English (US/in).
We work hard to bring you the best knitting and crochet have to offer, inspiration and advice as well as great quality yarns at incredible prices! Would you like to use our patterns for other than personal use? You can read what you are allowed to do in the Copyright text at the bottom of all our patterns. Happy crafting!
Post a comment to pattern DROPS Baby 19-8
We would love to hear what you have to say about this pattern!
If you want to leave a question, please make sure you select the correct category in the form below, to speed up the answering process. Required fields are marked *.