
Popular categories
Looking for a yarn?


Comments / Questions (209)
![]() Carmen wrote:
Carmen wrote:
Dankeschön für die schnelle Antwort, ich habe es nun verstanden. Ich bin begeistert über eueren Service. Herzliche Grüße Carmen
01.07.2025 - 09:19
![]() Carmen wrote:
Carmen wrote:
Bitte um Erklärung, nach 29cm 1Masche im M1in den Kragen einstricken, Maschenzahl bleibt konstant. 14 mal wiederholen gleich 20 Krausrippen.
30.06.2025 - 19:44DROPS Design answered:
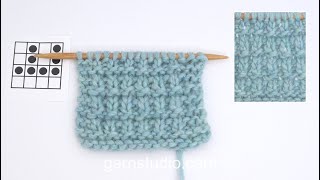
Liebe Carmen, man soll hier nur die Maschenanzahl von Maschen krausrechts zunehmen, so wird man in jeder 2 cm 1 Masche krausrechts mehr stricken und so wird 1 Masche weniger in M.1 gestrickt werden, bis es 16 bis 21 M krausrechts für die Blende ist (einschl. die 6 Blenden-Maschen vom Anfang). Schauen Sie mal das 3. Foto, es kann Ihnen helfen, man kan sehen daß das Teil krausrechts grösser wird, und das Teil im Muster kleiner wird. Viel Spaß beim Stricken!
01.07.2025 - 08:12
![]() Cinzia wrote:
Cinzia wrote:
Molto bello
26.06.2025 - 19:23
![]() Christine wrote:
Christine wrote:
I beskrivningen står det strumpstickor. Går det med rundstickor. Står inget om rundstickor i beskrivningen. Tacksam för svar på svenska
12.06.2025 - 15:11
![]() Christine wrote:
Christine wrote:
Kan jag sticka ärmar på rundstickor?
09.06.2025 - 12:51DROPS Design answered:
Hej Christine, ja ærmerne er beskrevet på rundpinde :)
12.06.2025 - 09:33
![]() Christine wrote:
Christine wrote:
Jag har kommit till bakstycket o ska maska av 6 maskor i var sida om markören. Jag förstår inte den här beskrivningen. tacksam för snabbt svar.
04.06.2025 - 20:11DROPS Design answered:
Hej Christine, jo du maskar av 6 m för ärmhål i varje sida såhär. Sticka framstycket, maska av de sista 3 m innan markören och de första 3 m efter markören = 6 m, stickar bakst, maska av de sista 3 m innan markören och de första 3 m efter markören = 6 m, stickar framstykcet :)
11.06.2025 - 12:03
![]() Christine Olander wrote:
Christine Olander wrote:
Hej Beträffande resåren står det att sticka 1 avig o en rät. Då blir det slätstickning på avigsidan ska det se ut så? Tacksam för snabbt svar. Vänligen Christin
28.05.2025 - 10:15DROPS Design answered:
Hei Christine. Fint om du skal skrive nøyaktig hvor i oppskriften du er. Om du mener resåren nederst på plagget skal du strikke 8 varv med RÄTST. Husk å lese RÄTST (på rundst) øverst i oppskriften. (skal ikke bli slätstickning). mvh DROPS Design
02.06.2025 - 08:19
![]() Christine Olander wrote:
Christine Olander wrote:
Hej Stickar på rundstickor. Resåren ser ut som slätstickning på avigsidan, skall det vara så? Tacksam för snabbt svar. Vänligen Christin
28.05.2025 - 07:37DROPS Design answered:
Hej Christine. Menar du diagrammet? Sett från rätsidan är första varvet räta maskor, andra aviga maskor, 3:e och 4:e varvet varannan maska rät och varannan avig. Mvh DROPS Design
28.05.2025 - 08:37
![]() Christine Olander wrote:
Christine Olander wrote:
Hur får jag kanterna på resåren lika på framstyckena? Tacksam för support. Vänligen Christin
25.05.2025 - 14:58
![]() Christine Olander wrote:
Christine Olander wrote:
Hur fungerar diagrammet till Model Marit jag får inte till det Behöver verkligen support. Christin
24.05.2025 - 21:14DROPS Design answered:
Hei Christine. Klikk på Videor til høyre / under bildet, og deretter klikk på videoen: Hur man stickar ett enkelt strukturmönster med räta och aviga maskor Der viser vi hvordan vi strikker etter diagramet. mvh DROPS Design
26.05.2025 - 13:14
|
|||||||
Marit#maritcardigan |
|||||||
 |
 |
||||||
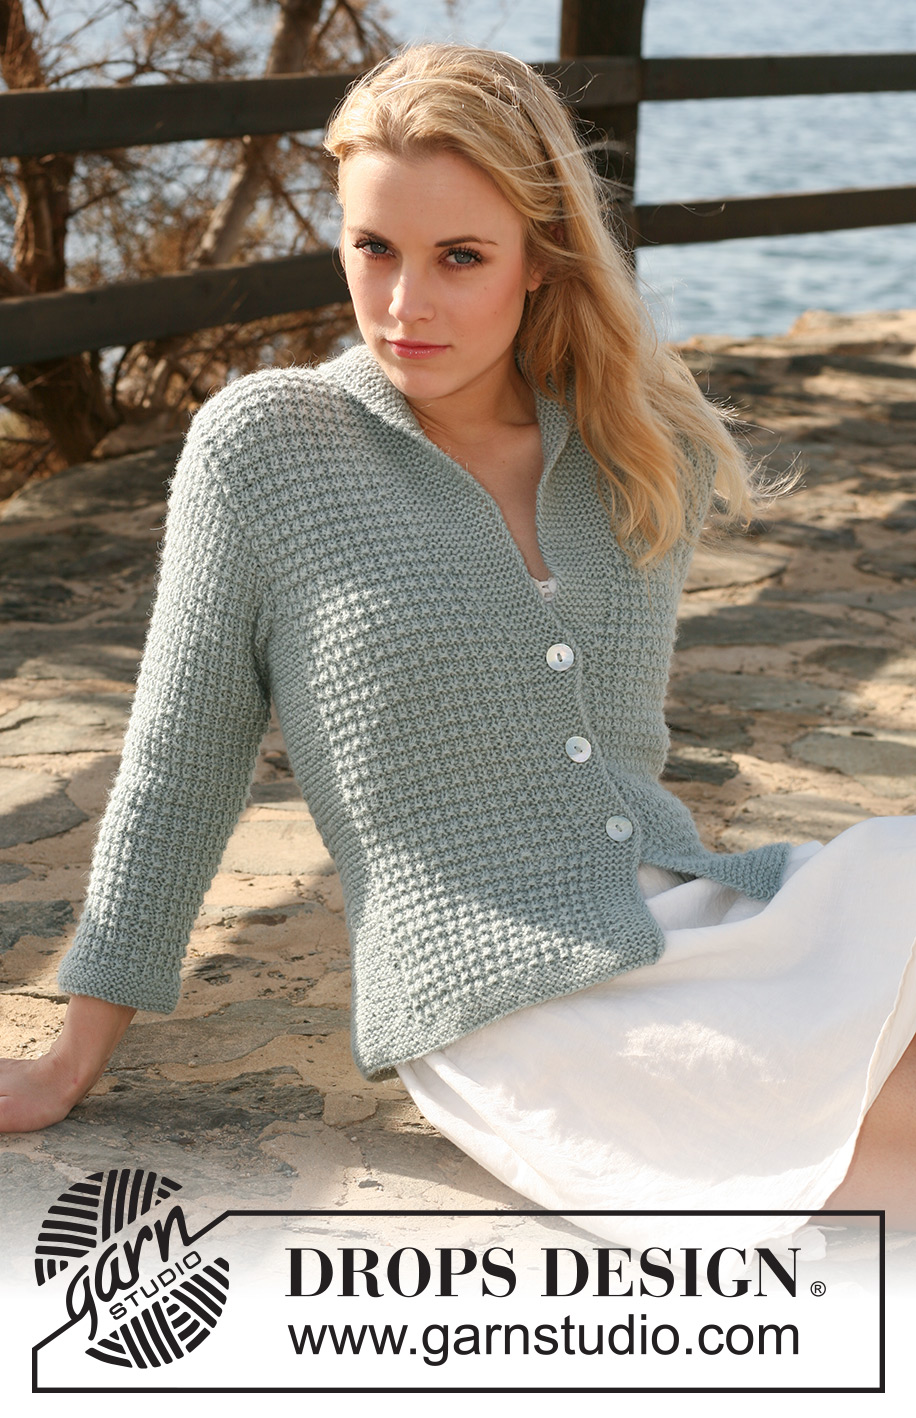
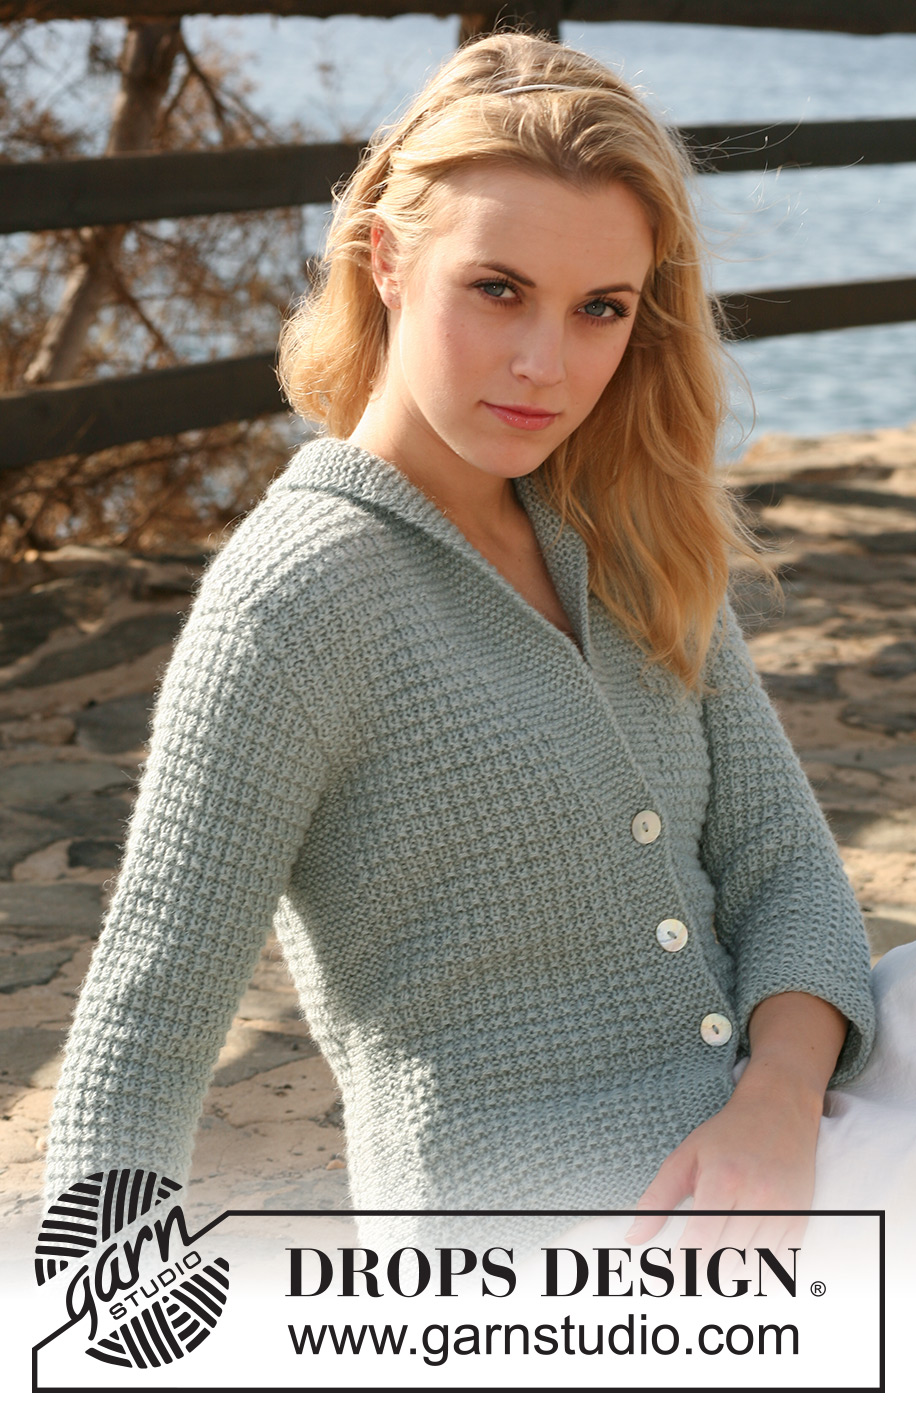
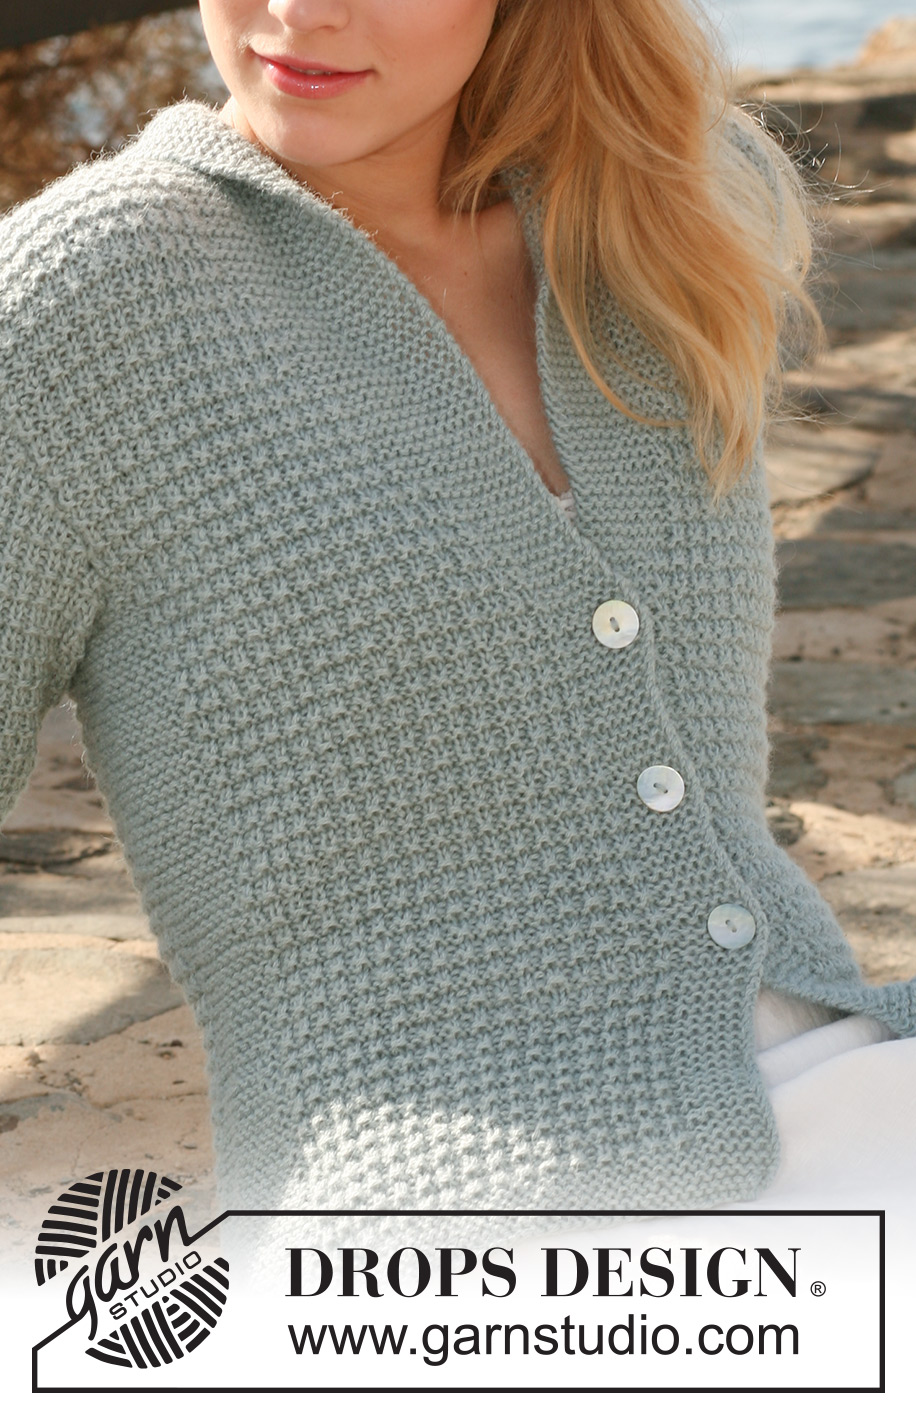
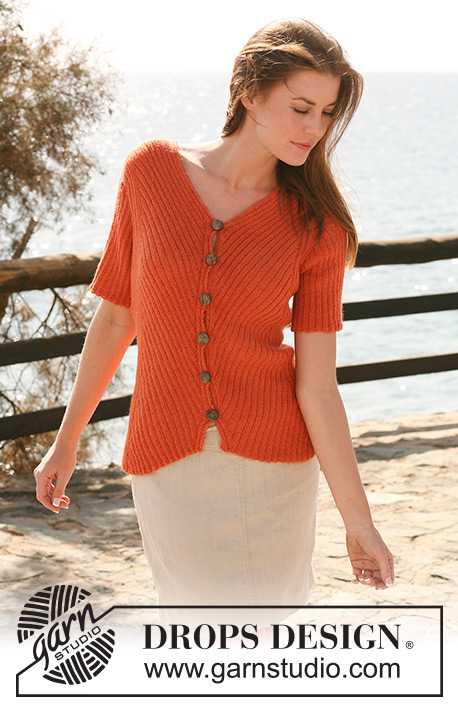
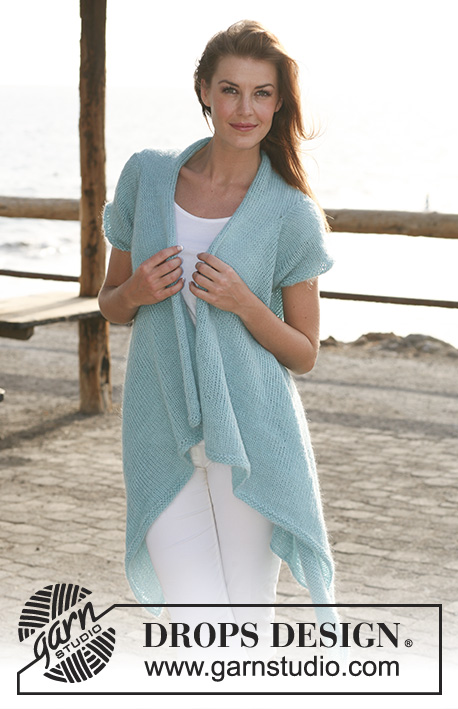
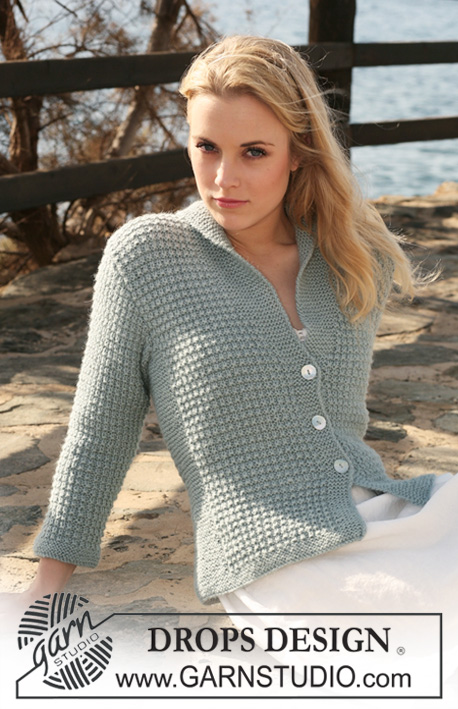
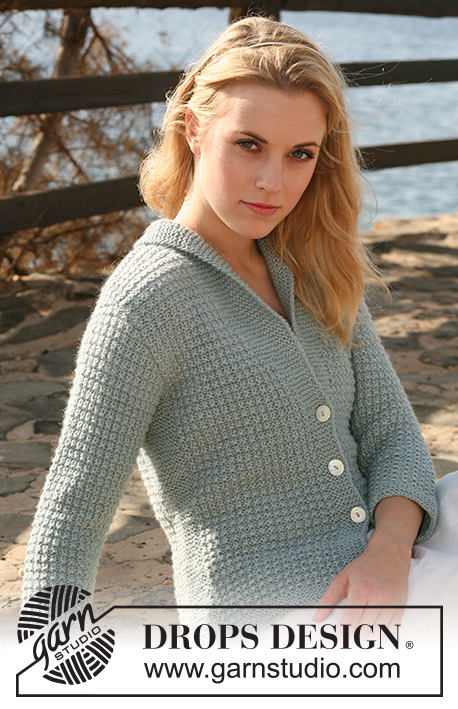
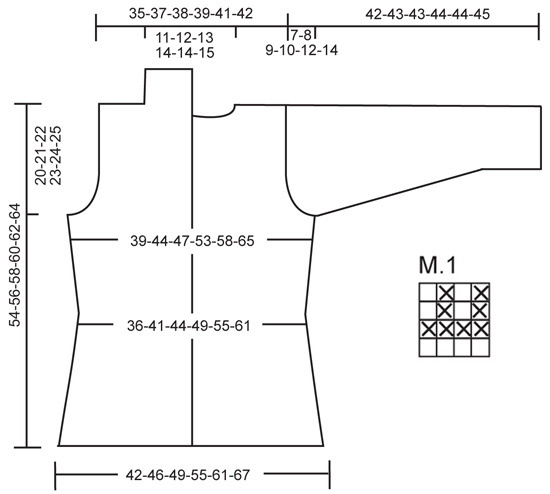
Knitted DROPS jacket with textured pattern and collar in 2 threads ”Alpaca”. Size S - XXXL.
DROPS 119-6 |
|||||||
|
GARTER ST (back and forth on needle): K all rows. GARTER ST (in the round): K 1 round, P 1 round. PATTERN: See diagram M.1. Diagram shows the pattern from RS. BUTTONHOLES: Make buttonholes on right front band. 1 buttonhole = bind off 3rd front band st from mid front and cast on 1 new st on return row. Make buttonholes when piece measures: SIZE S, M, L: 14, 21 and 28 cm / 5½", 8¼" and 11". SIZE XL, XXL, XXXL: 15, 22 and 29 cm / 6", 8¾" and 11⅜". -------------------------------------------------------- -------------------------------------------------------- BODY PIECE: Worked back and forth on circular needle from mid front. Cast on 163-179-193-211-233-257 sts on circular needle size 4.5 mm / US 7 with 2 threads Alpaca. Insert a marker 44-48-52-56-62-68 sts in from each side (back piece = 75-83-89-99-109-121 sts). Work 8 rows GARTER ST – SEE ABOVE, and continue as follows from RS: 6 garter sts, M.1 on the next 29-33-37-41-47-53 sts, 18 garter sts (marker sits in the middle of these sts), M.1 on the next 57-65-71-81-91-103 sts, 18 garter sts (marker sits in the middle of these sts), M.1 on the next 29-33-37-41-47-53 sts, and finish with 6 garter sts. REMEMBER THE GAUGE! Continue in pattern like this, AT THE SAME TIME when piece measures 5 cm / 2" dec 1 st each side of garter sts each side by K2 tog, repeat the dec on every 2.5 cm / ⅞" a total of 5 times = 143-159-173-191-213-237 sts. Remember BUTTONHOLES on right front band – SEE ABOVE!! When piece measures 20 cm / 8" inc 1 st each side of garter sts each side, and repeat the inc on every 6-6-6-7-7-7 cm / 2⅜"-2⅜"-2⅜"-2¾"-2¾"-2¾" a total of 3 times = 155-171-185-203-225-249 sts. AT THE SAME TIME when piece measures 28-28-28-29-29-29 cm / 11"-11"-11"-11⅜"-11⅜"-11⅜" work 1 st from M.1 into front band (i.e. number of sts remain the same but no of garter sts on front band inc and no of sts in M.1 dec), and repeat this on every 2 cm / ¾" a total of 10-11-13-13-14-15 times (= 16-17-19-19-20-21 garter sts on front band). Continue in M.1 and garter st until piece measures 34-35-36-37-38-39 cm / 13⅜"-13¾"-14¼"-14½"-15"-15¼". Now bind off 6 sts each side for armhole (= 3 sts each side of marker) and complete each piece separately. BACK PIECE: = 65-73-79-89-99-111 sts. Continue in M.1 on all sts. Bind off for armhole each side at the beg of every row: 2 sts 0-1-2-3-4-6 times and 1 st 0-1-1-3-5-6 times = 65-67-69-71-73-75 sts. When piece measures 52-54-56-58-60-62 cm / 20½"-21¼"-22"-22¾"-23⅝"-24⅜" bind off the middle 17-19-21-23-23-25 sts for neck and complete each shoulder separately. Bind off 1 st on neckline on next row = 23-23-23-23-24-24 sts left on shoulder. Bind off when piece measures 54-56-58-60-62-64 cm / 21¼"-22"-22¾"-23⅝"-24⅜"-25¼". LEFT FRONT PIECE: Continue with garter st on front band and M.1 on remaining sts. Bind off for armhole at the side as described for back piece = 39-40-42-42-44-45 sts. When piece measures 54-56-58-60-62-64 cm / 21¼"-22"-22¾"-23⅝"-24⅜"-25¼" bind off the first 23-23-23-23-24-24 sts from RS for shoulder = 16-17-19-19-20-21 sts left on collar. Work remaining sts on row. Now work shortened rows on collar (with start from WS) as follows: * 2 rows on the first 8-8-8-9-9-10 sts only, 2 rows on all sts *, repeat from *-* until collar measures approx 6-6-7-7-8-8 cm / 2½"-2½"-2¾"-2¾"-3"-3" on the shorter side (measured from shoulder). Bind off. RIGHT FRONT PIECE: Like left front piece, but mirrored. SLEEVE: Worked in the round on double pointed needles. Cast on 44-46-48-50-52-54 sts on double pointed needles size 4.5 mm / US 7 with 2 threads Alpaca. Insert a marker at beg of round = mid under sleeve. Work 8 rows GARTER ST – SEE ABOVE, and continue in M.1 on all sts. When piece measures 5 cm / 2" inc 1 st each side of marker, and repeat the inc on every 3-2.5-2-2-1.5-1.5 cm / 1⅛"-⅞"-¾"-¾"-½"-½" a total of 9-11-12-14-15-16 times = 62-68-72-78-82-86 sts. Incorporate inc sts in M.1 as you go along. When piece measures 35-35-34-34-32-31 cm / 13¾"-13¾"-13⅜"-13⅜"-12½"-12¼" - NOTE! Less for the larger sizes because of longer sleeve cap and wider shoulder – bind off for sleeve cap each side at the beg of every row: 3 sts 1 time, 2 sts 3 times, 1 st 0-1-2-4-5-7 times, then 2 sts each side until piece measures 41-42-42-43-43-44 cm / 16⅛"-16½"-16½"-17"-17"-17¼", now bind off 3 sts 1 time each side and bind off remaining sts. Piece measures approx 42-43-43-44-44-45 cm / 16½"-17"-17"-17¼"-17¼"-17¾". ASSEMBLY: Sew shoulder seams. Set in sleeves. Sew collar tog mid back and sew to neckline on back piece. Sew on buttons. |
|||||||
Diagram explanations |
|||||||
|
|||||||
 |
|||||||
Have you finished this pattern?Tag your pictures with #dropspattern #maritcardigan or submit them to the #dropsfan gallery. Do you need help with this pattern?You'll find 17 tutorial videos, a Comments/Questions area and more by visiting the pattern on garnstudio.com. © 1982-2026 DROPS Design A/S. We reserve all rights. This document, including all its sub-sections, has copyrights. Read more about what you can do with our patterns at the bottom of each pattern on our site. |
|||||||


With over 40 years in knitting and crochet design, DROPS Design offers one of the most extensive collections of free patterns on the internet - translated to 17 languages. As of today we count 325 catalogs and 12298 patterns - 12288 of which are translated into English (US/in).
We work hard to bring you the best knitting and crochet have to offer, inspiration and advice as well as great quality yarns at incredible prices! Would you like to use our patterns for other than personal use? You can read what you are allowed to do in the Copyright text at the bottom of all our patterns. Happy crafting!
Post a comment to pattern DROPS 119-6
We would love to hear what you have to say about this pattern!
If you want to leave a question, please make sure you select the correct category in the form below, to speed up the answering process. Required fields are marked *.