
Popular categories
Looking for a yarn?


Comments / Questions (158)
![]() Rita Rutter wrote:
Rita Rutter wrote:
È possibile vedere la parte dietro del colletto per capire come deve essere cucito? La parte sembra uguale a quella del disegno, ma sono in difficoltà perché sembra non coincidere con la parte dietro. Una fotografia mi sarebbe di grande aiuto. Grazie.
12.04.2020 - 13:50DROPS Design answered:
Buongiorno Rita. Purtroppo non abbiamo una fotografia dettagliata della parte dietro del colletto. Deve lavorare le maglie del colletto fino a raggiungere il punto centrale dello scollo sul dietro. Cucirà le due estremità tra loro e poi cucirà il colletto allo scollo. Buon lavoro!
14.04.2020 - 09:41
![]() Sylke wrote:
Sylke wrote:
Die Jacke gefällt mir sehr gut. Ich würde sie aber gerne als Pullover in Gr. XXL stricken. Könnt Ihr da was machen bzw. mir helfen?
14.03.2020 - 14:28DROPS Design answered:
Liebe Sylke, leider können wir jeder Anleitung nach jedem individuellen Frage anpassen und einzelne Modelle auf individuellen Wunsch hin umrechnen. Wenn sie Hilfe damit brauchen, wenden Sie sich bitte an dem Laden wo Sie die Wolle gekauft haben, dort hilft man Ihnen gerne weiter. Viel Spaß beim stricken!
16.03.2020 - 09:38
![]() Rosita wrote:
Rosita wrote:
Buongiorno,vorrei chiedere se il pezzo del colletto ( per il collo rimangono 18-19-20-21-22-23 m. Proseguire a ferri accorciati per il colletto, iniziando sul diritto del lavoro, ) va' eseguito anche sul lato sinistro,sul disegno è solo a destra,grazie,saluti
07.02.2020 - 18:39DROPS Design answered:
Buongiorno Rosita. Sì, va eseguito anche sul lato sinistro. Buon lavoro !
08.02.2020 - 20:59
![]() Rosita wrote:
Rosita wrote:
Buongiorno,sto eseguendo una Tg.xl dal centro davanti, sul diritto del lavoro: 6 m a punto legaccio, 11-13-15-18-21-24 m a dir, M.1 (= 6 m), 23 m a rov, M.2 (= 6 m), 12-14-16-19-22-25 m a dir e finire con 1 m vivagno a punto legaccio.il ferro dopo (SUL ROVESCIO)cosa devo fare?un ferro tutto rovescio o cosa?grazie, ciao
07.01.2020 - 14:24DROPS Design answered:
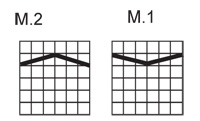
Buongiorno Rosita. Deve lavorare le maglie come si presentano , seguendo le indicazioni dei diagrammi M1 e M2 per le maglie lavorate nei diagrammi. Se riesce a ingradire la fotografia, può vedere meglio le parti lavorate a maglia rasata diritta e quelle lavorate a maglia rasata rovescia. Buon lavoro!
07.01.2020 - 16:34
![]() Patricia HO wrote:
Patricia HO wrote:
Bonsoir, je débute en torsades et ne comprends pas comment tricoter les rangs suivants ni à combien de rangs je fais les torsades suivantes.
20.04.2019 - 22:31DROPS Design answered:
Bonjour Patricia! Vous tricotez les torsades selon le diagram M.1 et M.2. La technique est demonstree sur le tutorial video ICI. Bon tricot!
23.04.2019 - 08:36
![]() Anne Zweers wrote:
Anne Zweers wrote:
Is het juist dat bij beide voorpanden bij de biezen zo nu en dan verkorte toeren moeten worden gebreid? Bij mij wordt het werk anders scheef; de tricotsteek komt hoger dan de ribbelsteek. Daardoor wordt de bies middenvoor anders niet recht.
06.03.2019 - 12:30DROPS Design answered:
Dag Anne,
Nee, bij dit patroon worden er geen verkorte toeren op de biezen gebreid. Het klopt wel dat ribbelsteek vaak wat in elkaar trekt t.o.v. tricotsteek, maar dit kun je, als het werk klaar is, corrigeren door het heel voorzichtig op te persen (met een natte theedoek ertussen en dan heel voorzichtig met het strijkijzer deppen).
07.03.2019 - 20:54
![]() Ute Raimar wrote:
Ute Raimar wrote:
Sehr schöne Jacke . Ich stricke in XXXL und ich bin mit dem Vorderteil fast fertig, aber ich werde es wohl nochmal aufziehen müssen, da die Maschenanzahl nicht stimmt. Bis 69 M komme ich noch mit, aber wenn ich genau wie beim Rückenteil ab und zu nehmen soll (-6 +6) das gibt bei mir wieder 69 und nicht 75. Vielen Dank für die Antwort und viele Grüsse, Ute
25.02.2019 - 15:18DROPS Design answered:
Liebe Frau Raimar, beim rechten Vorderteil müssen Sie auf die Seite zunehmen: 6 Maschen werden zugenommen (es sind keine Masche auf die Seite abgenommen nur zugenommen), so haben Sie 91 M - 22 M (M1) = 69 M + 6 M (Seite) = 75 M. Viel Spaß beim stricken!
25.02.2019 - 16:17
![]() Gudru Rehmet wrote:
Gudru Rehmet wrote:
Hallo, ihr Lieben, ich bin beim rechten Vorderteil am Anfang der Zunahmen für den Kragen und es fehlen mir 6 Maschen. Kann es sein, dass bei den Vorderteilen die seitliche Abnahme wegfällt und nur die Zunahmen gestrickt werden? Dann käme die Maschenzahl hin. Danke für eure Antwort.
21.11.2018 - 18:58DROPS Design answered:
Liebe Frau Rehmet, wenn Sie 43-47-51-57-63-69 M haben (Vorderteil), dann nehmen Sie 6 M (seitlich) zu + 3 M für den Hals und 4-7-10-15-12-16 M werden für das Armloch abgekettet = es sind noch 48-49-50-51-52-53 M übrig. Viel Spaß beim stricken!
22.11.2018 - 08:37
![]() Gudrun wrote:
Gudrun wrote:
Hallo, ihr Lieben, diese Jacke hat mir sofort gefallen, als ich sie gesehen habe. Jetzt stricke ich das re Vorderteil und es fehlen 6 Maschen. Meine Erklärung wäre, dass die seitl. Abnahme wegfällt und nur die Zunahme gestrickt wird. Ist das richtig? Liebe Grüße Gudrun
18.11.2018 - 15:33DROPS Design answered:
Liebe Gudrun, können Sie uns bitte sagen, welche Größe Sie stricken, und wo genau Sie beim rechten Vorderteil sind? Herzlichen Dank im voraus!
19.11.2018 - 09:05
![]() Debora wrote:
Debora wrote:
Liebes Drops-Team, stricke gerade das Rückenteil und habe jetzt erst bemerkt: es ist viel zu groß. Meine Maschenprobe bei 21x28 Maschen ist 13 cm und nicht 10. Ich wollte S stricken, ich trage eigentlich XS/S. Kann man dieses Muster irgendwie umrechnen, dass es trotzdem passt? Ich bin Anfänger und habe bisher die Drops-Muster immer so gestrickt, wie sie angegeben waren, da hat alles gepasst. Danke für Ihre Hilfe!
28.12.2017 - 22:41DROPS Design answered:
Liebe Debora, am besten versuchen Sie mit kleineren Nadeln damit Sie die richtige Maschenprobe bekommen. Mehr über die Maschenprobe lesen Sie hier. Viel Spaß beim stricken!
02.01.2018 - 09:57
|
||||||||||
Keira |
||||||||||
 |
 |
|||||||||
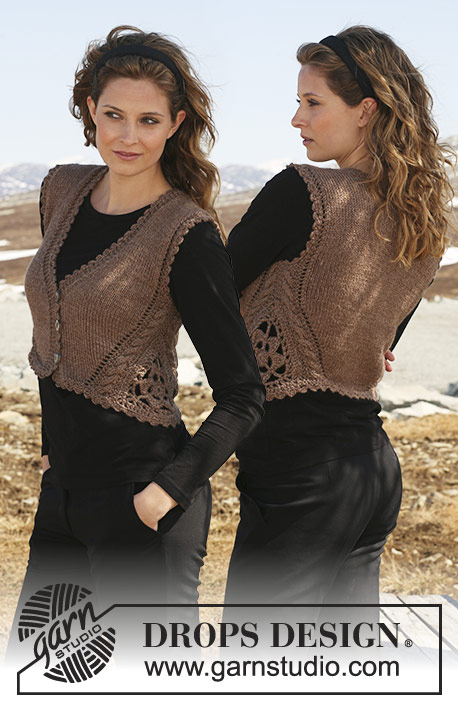
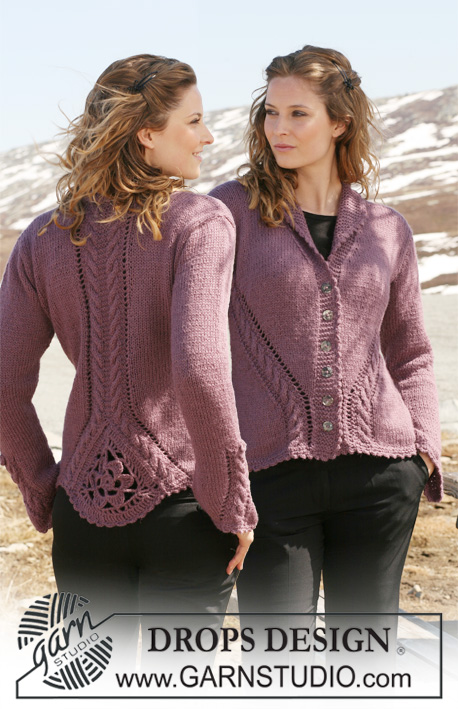
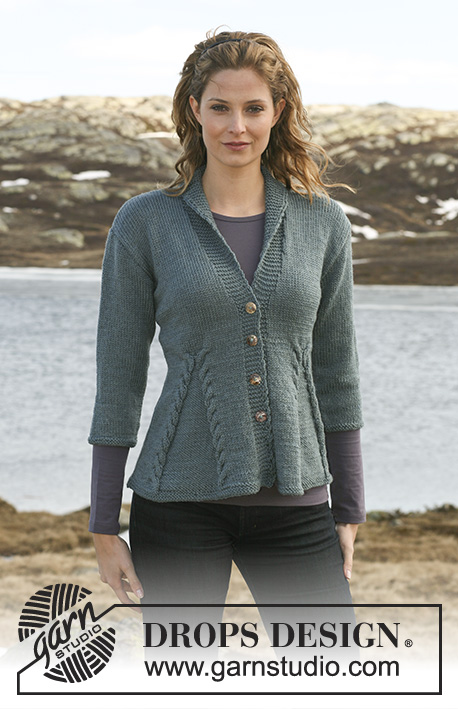
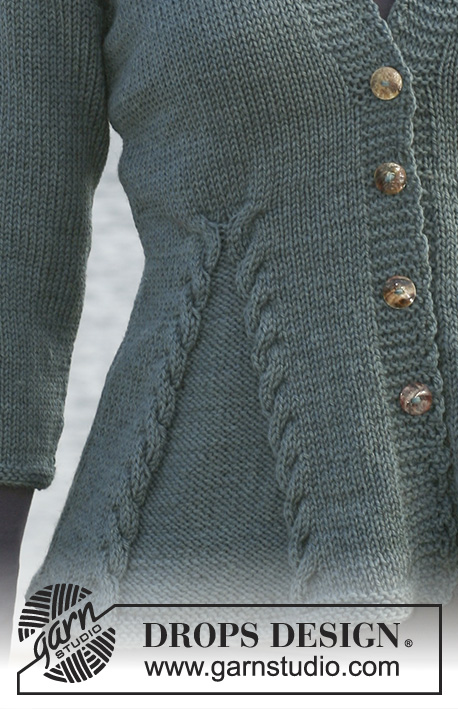
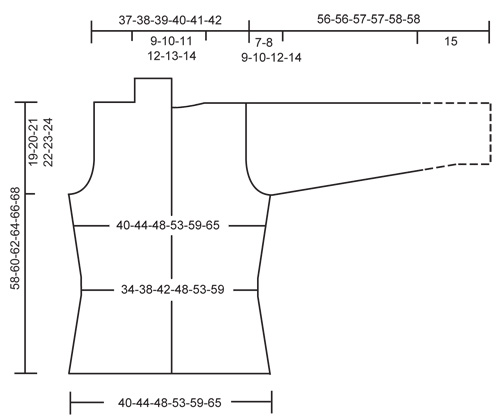
Knitted DROPS Jacket with cables in ”Karisma” with 3/4 or long sleeves. Size S – XXXL.
DROPS 115-1 |
||||||||||
|
GARTER ST (back and forth on needle): K all rows. PATTERN: See diagram M.1 and M.2. Diagram shows the pattern from RS. BUTTONHOLES: Make buttonholes on right front band. 1 BUTTONHOLE = bind off 3rd st from mid front and cast on 1 new st on return row. Make buttonholes when piece measures: SIZE S: 12, 18, 24 and 30 cm / 4¾", 7", 9½" and 11¾". SIZE M: 12, 18, 24 and 31 cm / 4¾", 7", 9½" and 12 ¼". SIZE L: 12, 18, 25 and 32 cm / 4¾", 7", 9¾" and 12½". SIZE XL: 12, 19, 26 and 33 cm / 4¾", 7½", 10¼" and 13". SIZE XXL: 12, 19, 27 and 34 cm / 4¾", 7½", 10⅝" and 13⅜". SIZE XXXL: 12, 19, 27 and 35 cm / 4¾", 7½", 10⅝" and 13¾" -------------------------------------------------------- -------------------------------------------------------- BACK PIECE: Worked back and forth on needle. Cast on 86-94-102-114-126-138 sts (includes 1 edge st each side) on needle size 4 mm / US 6 with Karisma. Work 6 rows GARTER ST – see above – and continue in stockinette st. REMEMBER THE GAUGE! When piece measures 6 cm / 2⅜" dec 1 st each side, and repeat the dec on every 2.5 cm / ⅞" a total of 6 times = 74-82-90-102-114-126 sts. When piece measures 24 cm / 9½" inc 1 st each side, and repeat the inc on every 2.5-2.5-2.5-3-3-3 cm / ⅞"-⅞"-⅞"-1⅛"-1⅛"-1⅛" a total of 6 times = 86-94-102-114-126-138 sts. When piece measures 39-40-41-42-43-44 cm / 15¼"-15¾"-16⅛"-16½"-17"-17¼" bind off for armhole each side at the beg of every row: 3 sts 1 time, 2 sts 0-1-2-4-6-8 times and 1 st 1-2-3-4-5-6 times = 78-80-82-84-86-88 sts. When piece measures 56-58-60-62-64-66 cm / 22"-22¾"-23⅝"-24⅜"-25¼"-26" bind off the middle 16-18-20-22-24-26 sts for neck, and complete each shoulder separately. Bind off 1 st on neckline on next row = 30 sts left on shoulder for all sizes. Bind off when piece measures 58-60-62-64-66-68 cm / 22¾"-23⅝"-24⅜"-25¼"-26"-26¾". RIGHT FRONT PIECE: Worked back and forth on needle. Cast on 65-69-73-79-85-91 sts (includes 1 edge st at the side and 6 front band sts towards mid front) on needle size 4 mm / US 6 with Karisma. Work 6 rows garter st and continue as follows – from mid front and RS: 6 garter sts, K 11-13-15-18-21-24, M.1 (= 6 sts), P 23, M.2 (= 6 sts), K 12-14-16-19-22-25 and finish with 1 edge st in garter st. Next row from WS: 1 edge st in garter st, P 12-14-16-19-22-25, M.2, K23, M.1, P 11-13-15-18-21-24, 6 garter sts. Continue in pattern like this, AT THE SAME TIME when piece measures 4 cm / 1½" dec 1 st each side of the 23 sts between cables – dec from RS by P2 tog each side – and repeat the dec on every 2 cm / ¾" a total of 11 times = 43-47-51-57-63-69 sts. Remember BUTTONHOLES – see above. READ ALL OF THE FOLLOWING SECTION BEFORE CONTINUING! After all dec between cables piece measures approx 24 cm / 9½". Continue in stockinette st on all sts with front band as before. AT THE SAME TIME inc 1 st at the side as described for back piece = 49-53-57-63-69-75 sts. AT THE SAME TIME when piece measures 31-32-33-34-35-36 cm / 12¼"-12½"-13"-13⅜"-13¾"-14¼" work 1 extra st into front band (i.e. number of sts remain the same, but no of front band sts inc and no of stockinette sts dec), and repeat on every 1.5 cm / ½" a total of 15-16-17-18-19-20 times. AT THE SAME TIME when piece measures 34-36-38-40-42-44 cm / 13⅜"-14¼"-15"-15¾"-16½"-17 ¼" inc 1 st towards mid front – work inc st in garter st - and repeat the inc on every 8 cm / 3⅛" a total of 3 times. AT THE SAME TIME when piece measures 39-40-41-42-43-44 cm / 15¼"-15¾"-16⅛"-16½"-17"-17¼" bind off for armhole at the side as described for back piece. When all inc and dec are complete there are 48-49-50-51-52-53 sts on needle. When piece measures 58-60-62-64-66-68 cm / 22¾"-23⅝"-24⅜"-25¼"-26"-26¾" bind off 30 sts from shoulder towards neckline = 18-19-20-21-22-23 sts left on collar. Continue with shortened rows on collar, beg from RS, as follows: * work 2 rows garter st on all sts, work 2 rows garter st on the 9-10-10-11-11-12 sts towards mid front only *, repeat from *-*. Bind off when collar measures 6-7-7-8-8-9 cm / 2⅜"-2¾"-2¾"-3⅛"-3⅛"-3½" (measured where shortest) from shoulder. LEFT FRONT PIECE: Like right front piece but mirrored and without buttonholes. Work first pattern row as follows – from the side and RS: 1 edge st, K 12-14-16-19-22-25, M.1 (= 6 sts), P 23, M.2 (= 6 sts), K 11-13-15-18-21-24, 6 garter sts. 3/4 -SLEEVE: Worked back and forth on needle. Cast on 56-58-60-62-64-66 sts (includes 1 edge st each side) on needle size 4 mm / US 6. Work 4 rows garter st and continue in stockinette st. When piece measures 5 cm / 2" inc 1 st each side, and repeat the inc on every 3.5-3-2.5-2-1.5-1.5 cm / 1¼"-1⅛"-⅞"-¾"-½"-½" a total of 8-9-10-13-14-16 times = 72-76-80-88-92-98 sts. When piece measures 34-33-33-32-31-29 cm / 13⅜"-13"-13"-12½"-12¼"-11⅜" (less for the larger sizes because of longer sleeve cap and wider shoulder) bind off for sleeve cap each side at the beg of every row: 3 sts 1 time, 2 sts 4-4-4-4-4-5 times, 1 st 0-1-3-4-5-6 times, then 2 sts each side until piece measures 40-40-41-41-42-42 cm / 15¾"-15¾"-16⅛"-16⅛"-16½"-16½", now bind off 3 sts 1 time each side, and bind off remaining sts of. Piece measures approx 41-41-42-42-43-43 cm / 16⅛"-16⅛"-16½"-16½"-17"-17". LONG SLEEVE: Worked back and forth on needle. Cast on 50-52-54-56-58-60 sts (includes 1 edge st each side) on needle size 4 mm / US 6. Work 4 rows garter st and continue in stockinette st. When piece measures 8 cm / 3⅛" inc 1 st each side, and repeat the inc on every 3.5-3-3-2-2-1.5 cm / 1¼"-1⅛"-1⅛"-¾"-¾"-½" a total of 11-12-13-16-17-19 times = 72-76-80-88-92-98 sts. When piece measures 49-48-48-47-46-44 cm / 19¼"-19"-19"-18½"-18"-17¼" (less for the larger sizes because of longer sleeve cap and wider shoulder) bind off for sleeve cap each side at the beg of every row: 3 sts 1 time, 2 sts 4-4-4-4-4-5 times, 1 st 0-1-3-4-5-6 times, then 2 sts each side until piece measures 55-55-56-56-57-57 cm / 21⅝"-21⅝"-22"-22"-22½"-22½", now bind off 3 sts 1 time each side, and bind off remaining sts of. Piece measures approx 56-56-57-57-58-58 cm / 22"-22"-22½"-22½"-22¾"-22¾". ASSEMBLY: Sew shoulder seams. Set in sleeves. Sew side and sleeve seams inside 1 edge st. Sew collar tog mid back and sew collar to neckline. Sew on buttons to fit buttonholes. CROCHET BORDER: Crochet a border along front bands and collar with Karisma and crochet hook size 4 mm / G/6 as follows: * 1 sc, 3 ch, skip approx 1-1.5 cm / ⅜"-½" *, repeat from *-* and finish with 1 sc. |
||||||||||
Diagram explanations |
||||||||||
|
||||||||||
 |
||||||||||
 |
||||||||||
Have you finished this pattern?Tag your pictures with #dropspattern or submit them to the #dropsfan gallery. Do you need help with this pattern?You'll find 22 tutorial videos, a Comments/Questions area and more by visiting the pattern on garnstudio.com. © 1982-2026 DROPS Design A/S. We reserve all rights. This document, including all its sub-sections, has copyrights. Read more about what you can do with our patterns at the bottom of each pattern on our site. |
||||||||||


With over 40 years in knitting and crochet design, DROPS Design offers one of the most extensive collections of free patterns on the internet - translated to 17 languages. As of today we count 324 catalogs and 12290 patterns - 12280 of which are translated into English (US/in).
We work hard to bring you the best knitting and crochet have to offer, inspiration and advice as well as great quality yarns at incredible prices! Would you like to use our patterns for other than personal use? You can read what you are allowed to do in the Copyright text at the bottom of all our patterns. Happy crafting!
Post a comment to pattern DROPS 115-1
We would love to hear what you have to say about this pattern!
If you want to leave a question, please make sure you select the correct category in the form below, to speed up the answering process. Required fields are marked *.