
Popular categories
Looking for a yarn?


Comments / Questions (94)
![]() Mari Kärkkäinen wrote:
Mari Kärkkäinen wrote:
"Ainaoikeaa" Aina oikeaa tarkoittaa, että työssä neulotaan pelkästään oikeilla silmukoilla. Suomen kielellä ei ole olemassa silmukkaa nimeltä ainaoikea, vaan silmukat neulotaan joko oikein tai nurin eli ei neulota 1 tai 3 silmukkaa ainaoikeaa, vaan ne neulotaan oikein. Termin käyttö on hämäävä.
31.10.2019 - 21:11
![]() Charlotte Rendil wrote:
Charlotte Rendil wrote:
Jeg er nået til rapport M3 og M4 ,men det virker som volapyk for mig . Jeg kan ikke få krydsene til at passe oven på hinanden . Hvor mange masker er der mellem rapporterne , det kan man ikke se på diagrammet . Kan jeg få en forklaring hvordan jeg kommer videre . Der må også skulle tages nogle masker ind ved hulmønsteret ellers bliver der for mange masker . Håber på hurtigt svar ,da jeg skal have sjalet færdigt til en konfirmation . Venlig hilsen Charlotte Rendil
21.02.2019 - 23:44DROPS Design answered:
Hej Charlotte, Hvis du sørger for at få de 9 midterste masker (med de 6 midterste omslag) over hinanden, så skal der på første møsterpind strikkes 8 masker sammen 2 og 2 imellem. Sæt gerne en mærketråd for hver gang du starter diagrammet forfra igen, så er det lettere at holde styr på. Husk at du på første pind skal have 17 masker mellem mærketrådene. God fornøjelse!
05.04.2019 - 12:02
![]() Sabine Adam wrote:
Sabine Adam wrote:
Vielen Dank - in der Anleitung ist das leider nicht klar ausgedrückt.
14.02.2019 - 12:27
![]() Sabine wrote:
Sabine wrote:
Guten Tag, können Sie mir sagen, was in M4 bedeutet 'Die neuen Maschen werden nach und nach ins Muster eingearbeitet'? Danke!
14.02.2019 - 09:37DROPS Design answered:
Liebe Sabine, wenn Sie M.4 stricken, nehmen Sie immer neuen Maschen zu (auf beiden Seiten + beidseitig der mittleren Maschen), diese Maschen stricken Sie wie im M.4, dh rechts oder links, aber erst wenn Sie genügend Maschen für ein ganzes Muster (21 M) werden diese Maschen wie im M.4 gestrickt. Viel Spaß beim stricken!
14.02.2019 - 11:43
![]() Sabine Adam wrote:
Sabine Adam wrote:
Tut mir Leid, aber lt. 1. Symbol (leeres Karo = re. auf re. und li. auf li.) müsste ich doch die 6 Maschen von M2 (je 3 am Anfang u 3 am Ende v M2) m d Kreuz, die auf der Vorderseite links erscheinen, in der 1. R. v M3 links stricken (li auf li)?
31.01.2019 - 16:50DROPS Design answered:
Liebe Frau Adam, nach M.2 stricken Sie M.3 mit je 1 Masche rechts (glatt rechts) auf beiden Seiten von den 170 M in M.3, die 2 ersten Reihen in M.3 stricken Sie glatt rechts. Bei der 3. Reihe in M.3 (= Hinreihe) werden die Maschen in M.3 entweder 2 li zs oder rechts gestrickt. Die Maschen auf beiden Seiten der 170 M stricken Sie immer noch glatt rechts. Viel Spaß beim stricken!
01.02.2019 - 08:26
![]() Sabine wrote:
Sabine wrote:
Hallo, ich beginne mit M3, d.h. die ersten beiden Reihen sind re. auf re. und li. auf li. Bei der ersten Hinreihe erscheinen von M2 jeweils 6 Maschen links - muss ich diese in der ersten Hinreihe auch links stricken bzw. auf der Rückreihe rechts?
30.01.2019 - 17:56DROPS Design answered:
Liebe Sabine, ja genau, jetzt stricken Sie M.3 über M.2, dh alle Maschen werden jetzt glatt rechts gestrickt, wie im Muster und wie in der schrifftlichen Anleitung erklärt. Viel Spaß beim stricken!
31.01.2019 - 09:25
![]() Sabiane wrote:
Sabiane wrote:
Ja, danke - so hatte ich es auch verstanden.
28.01.2019 - 16:01
![]() Sabine wrote:
Sabine wrote:
Hallo; Sie schreiben am 21.1., dass die mittlere M. in M2 auch glatt links gestrickt wird (was ja heißt hin links, zurück rechts bzw. umgekehrt, oder?). Bezieht sich das nur auf die mittlere M. von M2? Das verstehe ich nicht. Die mittlere M.hat doch ein Kreuz für li. auf re./re. auf li. wie die M. daneben auch und ist nicht anders als diese. Danke.
24.01.2019 - 17:00DROPS Design answered:
Liebe Sabine, die 9. Reihe in M.2 stricken Sie so: 1 Abnahme, 1 Umschlag, 4 M re, 1 Abnahme, 1 Umschlag, 1 M li, 1 Umschlag, 1 Abnahme, 4 M re, 1 Umschlag, 1 Abnahme. Bei der 10. Reihe (Rückreihe) stricken Sie die 3 mittleren Maschen rechts: 7 M li, 3 M re, 7 M li. Viel Spaß beim stricken!
25.01.2019 - 08:43
![]() Sabine Adam wrote:
Sabine Adam wrote:
Danke für Ihre Antwort. Sie schreiben, die mittlere M. in M2 wird glatt rechts gestrickt -aber sie hat doch ein Kreuz, also muss sie doch kraus gestrickt werden (hin re, zurück auch re)?
21.01.2019 - 19:44DROPS Design answered:
Liebe Frau Adam, die Maschen mit dem Kreuz sollen links bei Hinreichen und rechts bei Rückreihen gestrickt werden, dh glatt links, nicht krausrechts. siehe 5. Symbol. Viel Spaß beim stricken!
22.01.2019 - 08:00
![]() Sabine Adam wrote:
Sabine Adam wrote:
Hallo, wie stricke ich in Muster 2 in der Rückreihe die Zunahmen in der Mitte des Musters (ich meine die zwischen den Maschen, die links auf rechts und rechts auf links gestrickt werden). Ich stricke sie ja rechts - steche ich wie beim Rechtsstricken vorne in die Masche (dann werden die Löcher sehr groß) oder hinten? Danke
19.01.2019 - 21:35DROPS Design answered:
Liebe Frau Adam, die Zunahmen zwischen den linken Maschen in der Mitte M.2 sollen links bei den Hinreihen und rechts ben den Rückreihen gestrickt (= kreuz im Diagram), beachten Sie nur daß die Umschläge nicht zu locker sind, die mittlere Masche im M.2 wird auch glatt links gestrickt. Viel Spaß beim stricken!
21.01.2019 - 10:26
|
||||||||||||||||||||||
Wisteria |
||||||||||||||||||||||
|
|
||||||||||||||||||||||
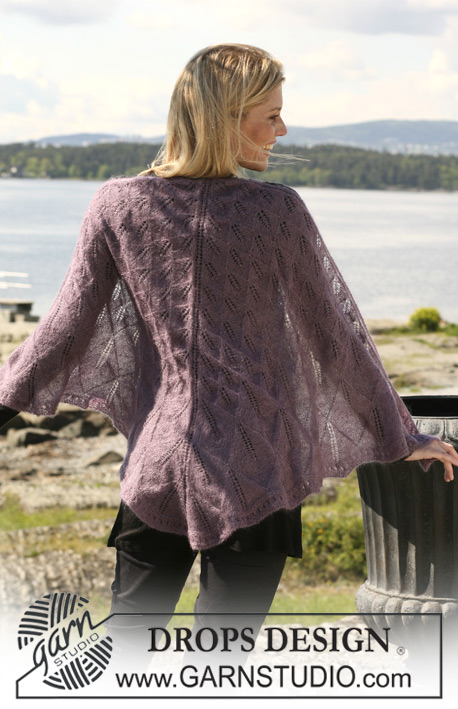
Knitted DROPS shawl with lace pattern in ”Kid-Silk”.
DROPS 108-47 |
||||||||||||||||||||||
|
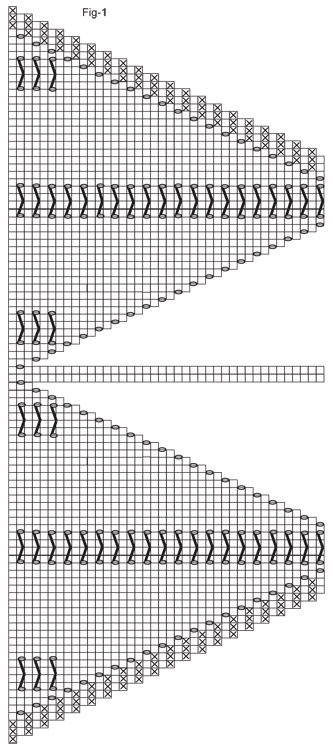
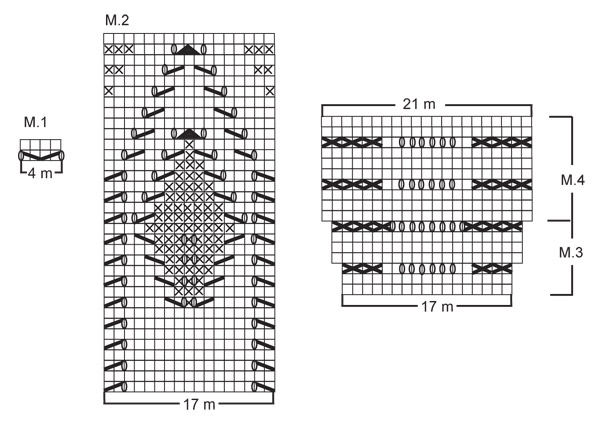
Pattern: See diagram M.1 to M.4. Diagram shows the pattern from the RS. Fig-1 shows how to work the beg of shawl. Garter st, back and forth on needle: K all rows. Increasing tip: Make all inc from RS. Inc 4 sts on every other row throughout as follows: Inc 1 st at beg of row: 3 garter sts, 1 YO. P YO on return row. Inc 2 sts in the middle of piece: 1 YO, 2 stockinette sts (= middle sts), 1 YO. P YO on return row. Inc 1 st at the end of row: 1 YO, 3 garter sts. P YO on return row. SHAWL: Worked back and forth on circular needle (to fit in all sts). Beg at neck mid back. Note! Always start a new ball of yarn at beg of row and not in the middle of piece. Cast on 10 sts on circular needle size 3 mm [US 2or3] with Kid-Silk. Insert 1 Marking Thread after the 5th st (marks the middle of shawl). Work first row as follows (= RS): 3 garter sts, 1 YO, 4 garter sts, 1 YO, 3 garter sts = 12 sts. Now continue in stockinette st with 3 garter sts each side, at the same time inc 4 sts on every other row - see Increasing tip. Remember the knitting gauge! Continue like this until there are 20 sts on row. Now continue as follows from RS: 3 garter sts, 1 YO, K1, M.1, K1, 1 YO, K2 (= middle sts), 1 YO, K1, M.1 and finish with K1, 1 YO, 3 garter sts. Continue with inc at sides and mid back – see Fig 1. After 17 repeats of M.1 (= 88 sts) work next row as follows from RS: 3 garter sts, 1 YO, K1, * M.1, K13 *, repeat from *-* a total of 2 times, M.1, K1, 1 YO, K2 (= middle sts), 1 YO, 1K, * M.1, K13 *, repeat from *-* a total of 2 times, M.1,K1, 1 YO, 3 garter sts. Work 17 vertical repeats of M.1 like this (= 6 repeats across the row) = 156 sts. Now work next row as follows from RS: 3 garter sts, 1 YO, K1, * M.1, K13 *, repeat from *-* a total of 4 times, M.1, K1, 1 YO, K2 (= middle sts), 1 YO, K1, * M.1, K13 *, repeat from *-* a total of 4 times, M.1, K1, 1 YO, 3 garter sts. Work 17 vertical repeats of M.1 like this (= 10 repeats across the row) = 224 sts. Now work next row as follows from RS: 3 garter sts, 1 YO, K1, * M.1, K13 *, repeat from *-* a total of 6 times, M.1, K1, 1 YO, K2 (= middle sts), 1 YO, K1 * M.1, K13 *, repeat from *-* a total of 6 times, M.1, K1, 1 YO, 3 garter sts. Work 15 vertical repeats of M.1 like this (= 14 repeats across the row) = 284 sts. Now work next row as follows from RS: 3 garter sts, 1 YO, K1, M.2 on the next 136 sts, K1, 1 YO, K2 (= middle sts), 1 YO, K1, M.2 on the next 136 sts, K1, 1 YO, 3 garter sts. Work 1 vertical repeat of M.2 = 352 sts. Now work next row as follows from RS: 3 garter sts, 1 YO, K1, M.3 on the next 170 sts, K1, 1 YO, K2 (= middle sts), 1 YO, K1, M.3 on the next 170 sts, K1, 1 YO, 3 garter sts. Work 1 vertical repeat of M.3, and now continue in M.4. Work inc sts not fitting into pattern in stockinette st until there are enough new sts for a full repeat. Continue in M.4 and with inc at sides and in the middle until the wavy pattern measures approx 18 cm [7"]. Bind off loosely. |
||||||||||||||||||||||
Diagram explanations |
||||||||||||||||||||||
|
||||||||||||||||||||||
 |
||||||||||||||||||||||
 |
||||||||||||||||||||||
Have you finished this pattern?Tag your pictures with #dropspattern or submit them to the #dropsfan gallery. Do you need help with this pattern?You'll find 11 tutorial videos, a Comments/Questions area and more by visiting the pattern on garnstudio.com. © 1982-2026 DROPS Design A/S. We reserve all rights. This document, including all its sub-sections, has copyrights. Read more about what you can do with our patterns at the bottom of each pattern on our site. |
||||||||||||||||||||||


With over 40 years in knitting and crochet design, DROPS Design offers one of the most extensive collections of free patterns on the internet - translated to 17 languages. As of today we count 325 catalogs and 12298 patterns - 12288 of which are translated into English (US/in).
We work hard to bring you the best knitting and crochet have to offer, inspiration and advice as well as great quality yarns at incredible prices! Would you like to use our patterns for other than personal use? You can read what you are allowed to do in the Copyright text at the bottom of all our patterns. Happy crafting!
Post a comment to pattern DROPS 108-47
We would love to hear what you have to say about this pattern!
If you want to leave a question, please make sure you select the correct category in the form below, to speed up the answering process. Required fields are marked *.