
Popular categories
Looking for a yarn?


Comments / Questions (28)
![]() Helle Hansen wrote:
Helle Hansen wrote:
Opskriften til pandebåndet er rodet. Det kan da ikke passe hvad I svarer en læser d. 15.11.12 for så ender man jo op med flere masker end de 19. Er det meningen allerede på 2. pind ? Og de norske svar nederst skriver at to masker strikkes sammen inden den løse maske trækkes over, hvor der på dansk står to ret og derefter den løse over. Noget værre rod, desværre.
01.04.2015 - 22:58DROPS Design answered:
Hej Helle. I det svar skriver vi ikke hvordan du strikker förste pind (hvor du tager ind), men hvordan hun skulle strikke pinden fra vrangen (pind 2). Hvis du ellers synes noget er fejl eller noget du ikke forstaar, angiv saa gerne praecis hvor i mönstret, saa skal vi kigge paa det og pröve at hjaelpe dig videre ;-)
29.04.2015 - 14:50
![]() Patricia Livesay wrote:
Patricia Livesay wrote:
A little, but if you start with 19 cast on sts, how can you M1 4 times and end with 2 garter sts. Also the increase tip says to YO to the left and right of the P st alternately. Won't that give me 2 increases. Sorry but I am having difficulty with the directions. You said to YO on row 2. Thought the increases didn't sart until piece measured 2-3/4"
16.12.2014 - 19:54DROPS Design answered:
Dear Mrs Livesay, work M1 over 19 sts as follows: K2 (garter sts edge), *M1 (over 3 sts), P1*, repeat from *-* a total of 4 times, then M1 (over 3 sts), K2 (garter st edge). Inc are made with a YO (not same YO as in M1), First inc will be done after P1 (to the left of Pst), 2nd inc will be done before P st (to the right of Psts). Happy knitting!
17.12.2014 - 09:33
![]() Patricia Livesay wrote:
Patricia Livesay wrote:
Is there a better explanation for this pattern. I don't understand the pattern after the first row.
16.12.2014 - 07:08DROPS Design answered:
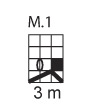
Dear Mrs Livesay, do you mean diagram M.1? M1 is worked over 3 sts. On row 1, slip 1 st as if to K, K2, psso (2 sts remain) - on row 2, P1, YO, P1 (=3 sts) - on row 3: K3 - on row 4: P3. Hope it helps. Happy knitting!
16.12.2014 - 09:55
![]() Patricia Livesay wrote:
Patricia Livesay wrote:
I am not understanding these directions. If first row says 2 garter sts, I asume you mean knit 2, then M.1, P1 until 5 sts remain, then M.1, 2 garter sts. I still have 3 sts left. Can someone explain what I am not understanding.
16.12.2014 - 04:11DROPS Design answered:
Dear Mrs Livesay, you work as follows: K2 (garter sts edge), *M1 (over 3 sts), P1*, repeat from *-* a total of 4 times, then M1 (over 3 sts), K2 (garter st edge) = 19 sts. Happy knitting!
16.12.2014 - 10:05
![]() Diane Orr wrote:
Diane Orr wrote:
I find the instructions very difficult for the ear warmer. After I knit the 2 3/4" I don't understand "increase all P1 to P2 - which P stiches are you referring to? Row 1 of the Chart where I psso or 2nd row where I do YO? Very confusing
24.09.2014 - 17:17DROPS Design answered:
Dear Mrs Orr, you inc in the Purl sections seen from RS, so that you will have at the end of this row P2 between each M1. In M1, you work a double dec (sl 1, K2 tog, psso) = 2 sts remain, then on next row, make a yo = 3 sts again. Happy knitting!
25.09.2014 - 08:45Fanta wrote:
Die Deutsche Version ist falsch! 2 Maschen (nicht zusammen)= 2 M. Dann mit 1 Umschlag= 3 M.
25.06.2014 - 19:29
![]() Claudia wrote:
Claudia wrote:
Leider verstehe ich M1 nicht ganz: Wenn ich, wie dort steht, in der ersten Reihe "1 M. re. abheben, 2 re. zusammen, die abgehobene über die gestrickte ziehen" befolge, dann bleibt ja von den 3 Maschen nur noch eine übrig. Wo kommen dann die zwei Maschen her, zwischenen denen ich den Umschlag anbringen soll? Sprich: Wie komme ich wieder auf die 3 Maschen von M1???
25.06.2014 - 18:20DROPS Design answered:
Liebe Claudia, leider war die Beschreibung auch nicht zu verstehen, denn sie war nicht korrekt. Der Diagrammtext wurde gerade berichtigt. Sie nehmen in der 1. R von M1 nur 1 M ab und diese erhalten Sie in der nächsten R von M1 durch den Umschlag zurück. Nun viel Spaß beim Weiterstricken und gutes Gelingen!
25.06.2014 - 21:57
![]() Maryse wrote:
Maryse wrote:
Augmenter en faisant un jeté sur l'end alternativement à droite et à gauche des m env. : Est ce à droite et à gauche sur le même rang ou à chaque rang d'augm par exemple à gauche à 7 cm haut totale, à droite à 10 cm, à gauche à 13? D'avance merci
04.04.2014 - 22:30DROPS Design answered:
Bonjour Maryse, on augmente 1 m env dans chaque section env, la 1ère augm se fera à gauche dans la section env et l'augm suivante (en hauteur) se fera à droite. Bon tricot!
05.04.2014 - 10:05
![]() Tine Friis Jensen wrote:
Tine Friis Jensen wrote:
Hvordan strikkes vrangpindene?
13.11.2012 - 23:45DROPS Design answered:
Du strikker 1.p nederst i diagrammet fra retsiden. Næste p strikkes fra vrangen således: 1vr, 1oms, 1vr, og forfra 1vr, 1oms, 1vr osv. God fornøjelse!
15.11.2012 - 10:24
![]() Maria wrote:
Maria wrote:
Helt uforståelig oppskrift!
26.10.2012 - 13:17
|
|||||||||||||
DROPS 108-14 |
|||||||||||||
|
|
|||||||||||||
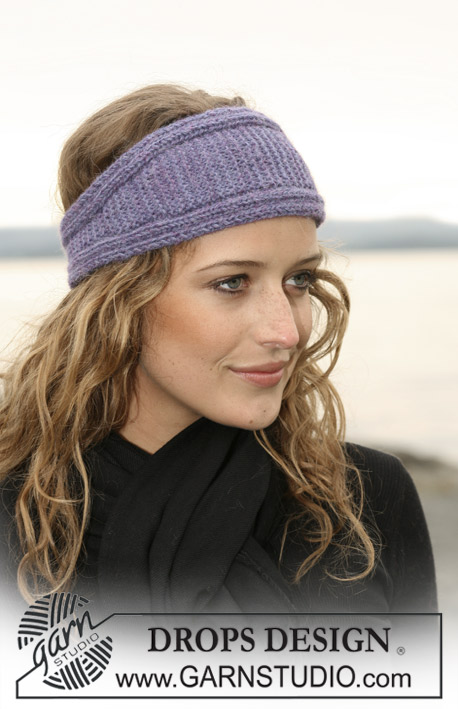
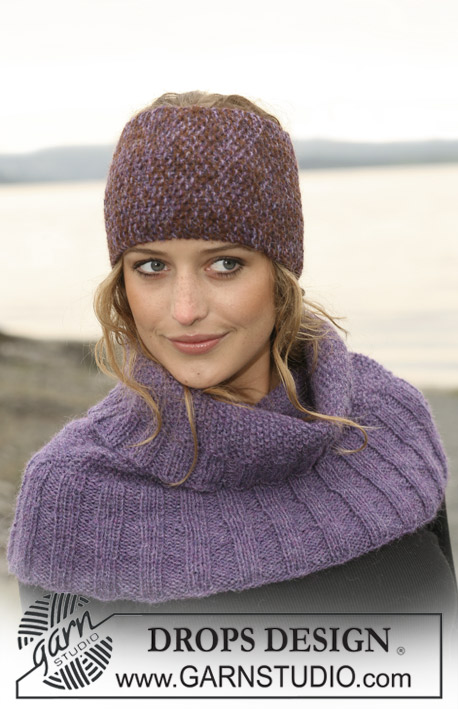
DROPS neck warmer and ear warmer with cables in 2 threads ”Alpaca”.
DROPS 108-14 |
|||||||||||||
|
Garter st, back and forth on needle: K all rows. Cable: See diagram M.1. Diagram shows the pattern from RS. Increasing tip: Inc 1 st by making 1 YO from RS to the left and right of P sts alternately. K YO into back of loop on return row. Decreasing tip: Dec 1 st by K2 tog. The dec mirror the inc on the other side of the middle of ear warmer. EAR WARMER Worked back and forth on needle. Beg mid back and cast on 19 sts on needle size 3.5 mm [US 4] with 2 threads Alpaca. Work first row as follows: 2 garter sts – see above – * M.1, P1 *, repeat from *-* until 5 sts remain, M.1, 2 garter sts. Continue in pattern like this with 2 garter sts each side. When piece measures 7 cm [2¾"] inc all P1 to P2 – see Increasing tip = 22 sts. When piece measures 10 cm [4"] inc all P2 to P3 = 25 sts. When piece measures 13 cm [5⅛"] inc all P3 to P4 = 28 sts. When piece measures 16 cm [6 ¼"] inc all P4 to P5 = 31 sts. When piece measures 19 cm [7½"] inc all P5 to P6 = 34 sts. When piece measures 23 cm [9"], insert 1 MT to mark the middle of piece. Now mirror the piece, i.e. dec 3 sts when piece measures 27, 30, 33, 36 and 39 cm [10⅝", 11¾",13",14¼" and 15¼"] = 19 sts. Note! If you want the ear warmer longer, work piece before the middle slightly longer and remember to dec according to the new measurements. When piece measures 46 cm [18"] slip sts on a stitch holder. Sew sts from stitch holder to cast-on edge with 1 st in each st to make the seam elastic. NECK WARMER Decreasing tip-1: Dec by P tog the last 2 sts in each P-section. Decreasing tip-2: Dec by P tog the first 2 sts in each P-section. Moss st: Row 1 * K1, P1 *, repeat from *-*. Row 2: K over P and P over K. Repeat row 2. Increasing tip: Inc by making 1 YO. Work YO into back of loop on return row to avoid a hole. NECK WARMER Worked in the round on circular needle. Cast on 216 sts on circular needle size 4.5 mm [US 7] with 2 threads Alpaca. K 1 row and continue in rib, K3/P5 for 4 cm [1½"]. On next row dec 1 st in each P-section – see Decreasing tip-1 = 189 sts. Repeat the dec when piece measures 8 cm [3⅛"] – see Decreasing tip-2 = 162 sts. Continue in rib, K3/P3 until piece measures 12 cm [4¾"]. K 1 row, at the same time dec 25 sts evenly = 137 sts. Change to needle size 4 mm [US 6]. Remember the knitting gauge! Continue in moss st – see above – until piece measures 36 cm [14¼"]. Change to needle size 4.5 mm [US 7], K 1 row, at the same time inc 25 sts evenly – see Increasing tip = 162 sts. Now work rib, K3/P3, until piece measures approx 40 cm [15¾"]. Bind off in rib. |
|||||||||||||
Diagram explanations |
|||||||||||||
|
|||||||||||||
 |
|||||||||||||
Have you finished this pattern?Tag your pictures with #dropspattern or submit them to the #dropsfan gallery. Do you need help with this pattern?You'll find 12 tutorial videos, a Comments/Questions area and more by visiting the pattern on garnstudio.com. © 1982-2026 DROPS Design A/S. We reserve all rights. This document, including all its sub-sections, has copyrights. Read more about what you can do with our patterns at the bottom of each pattern on our site. |
|||||||||||||


With over 40 years in knitting and crochet design, DROPS Design offers one of the most extensive collections of free patterns on the internet - translated to 17 languages. As of today we count 324 catalogs and 12290 patterns - 12280 of which are translated into English (US/in).
We work hard to bring you the best knitting and crochet have to offer, inspiration and advice as well as great quality yarns at incredible prices! Would you like to use our patterns for other than personal use? You can read what you are allowed to do in the Copyright text at the bottom of all our patterns. Happy crafting!
Post a comment to pattern DROPS 108-14
We would love to hear what you have to say about this pattern!
If you want to leave a question, please make sure you select the correct category in the form below, to speed up the answering process. Required fields are marked *.