
Popular categories
Looking for a yarn?


Comments / Questions (59)
![]() Helle wrote:
Helle wrote:
Skøn jakek - skøn kvalitet - skøn farve
05.07.2012 - 11:17Marilena Coppola wrote:
You could have an Italian translation of the model? is very cute! thanks si potrebbe avere la traduzione in italiano del modello? è molto carino! grazie
28.03.2012 - 10:56DROPS Design answered:
Our Italian translators are working their way back, starting with the newest first. This one will be translated too in not too long :)
13.04.2012 - 00:34
![]() DROPS Design NL wrote:
DROPS Design NL wrote:
Er staat vermeldt in het patroon waar u moet afkanten voor de KNOOPSGATEN. Het is geen fout in het patroon, maar vindt u dit niet mooi en wilt u de knoopsgaten dan in 7e en 8e st laten komen, dan bent u helemaal vrij om dit zelf aan te passen zodat het bij uw voorkeuren past! I probeer altijd snel, duidelijk en netjes antwoord te geven, jammer dat u hier zo op reageert! Gr. Tine
30.11.2010 - 13:04
![]() DROPS Design NL wrote:
DROPS Design NL wrote:
Mevrouw. Ik denk dat u ons niet begrijpt! De ene keer heeft u het over knopen op het andere pand, de andere keer over knoopsgaten, dat maakt het voor ons ook lastig. Wij zijn twee personen, die uw vragen hebben bekeken en wij zijn het hier over eens. Zowel de knopen als de knoopsgaten komen recht boven elkaar en niet schuin. Door de ruimvallende hals, kan het bovenste knoopsgat wat verder naar de zijkant vallen tijdens het dragen.
30.11.2010 - 13:04
![]() Cecilia wrote:
Cecilia wrote:
U heeft niet goed gelezen. Waar komt dan het knoopsgat, de 8ste en 7de voorbiesst. van het andere pand? op het linkerpand, maar dàt was de vraag niet! Dit (knoopsgaten maken) heb ik gedaan, U: ik kan het later doen! zitten ze wel boven elkaar? U: op het linkerpand, maar dat was weer de vraag niet! Een DROPS verkooppunt zit er niet onder de grote rivieren, behalve Geffen en dat is 55km bij ons vandaan, niet echt praktisch! Ik zal u dus niets meer vragen, want u leest niet goed!
29.11.2010 - 17:18
![]() DROPS Design NL wrote:
DROPS Design NL wrote:
Hallo. Ik heb al de moeite genomen om beide uw vragen snel en duidelijk te beantwoorden. Zie hieronder. Ik kon geen fout vinden en er staat waar en wanneer u moet afkanten enz. Zoals ik het ziet op de foto, dan zitten de knoopsgaten ook goed. U bent natuurlijk vrij om dit zelf aan te passen - dat is wat zo fijn is met een breipatroon. Of u mag naar uw DROPS verkooppunt gaan. Vaak is het makkelijker om het probleem te zien en hulp te bieden als zij kunnen zien wat u doet. Gr. Tine
29.11.2010 - 16:27
![]() Cecilia wrote:
Cecilia wrote:
Ja, dàt is logisch... Ik bedoelde dat knoopsgaten altijd boven elkaar zitten, en dat lijkt hier niet, dus op welke voorbiessteek komen ze dan, maar ik zal het dan zelf wel uitzoeken als het teveel moeite is. Dank u.
29.11.2010 - 15:56
![]() DROPS Design NL wrote:
DROPS Design NL wrote:
Hoi. U naait de knopen aan de linker voorbies zodat ze passen bij de knoopsgaten. Gr. Tine
29.11.2010 - 15:49
![]() DROPS Design NL wrote:
DROPS Design NL wrote:
Hoi. U naait de knopen aan de linker voorbies zodat ze passen bij de knoopsgaten. Gr. Tine
29.11.2010 - 15:49
![]() DROPS Design NL wrote:
DROPS Design NL wrote:
Hoi. U naait de knopen aan de linker voorbies zodat ze passen bij de knoopsgaten. Gr. Tine
29.11.2010 - 15:49
|
|
DROPS 105-29 |
|
|
|
|
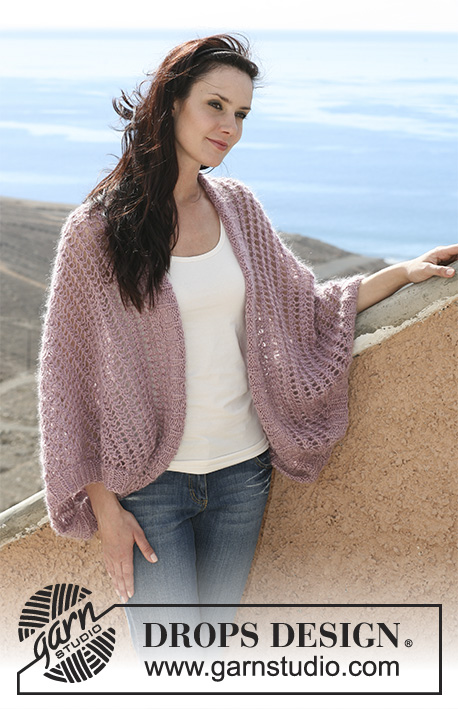
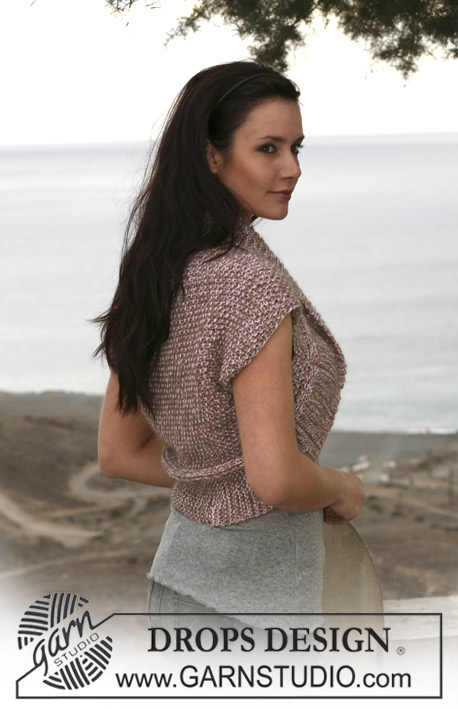
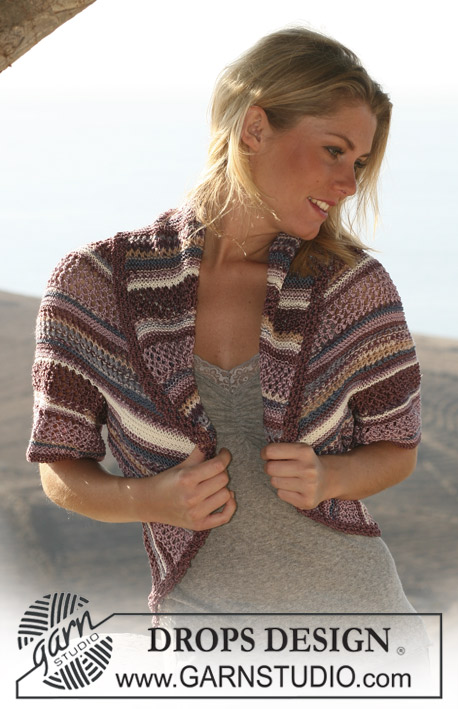
DROPS jacket in “Alpaca” and “Vivaldi”. Size S – XXXL
DROPS 105-29 |
|
|
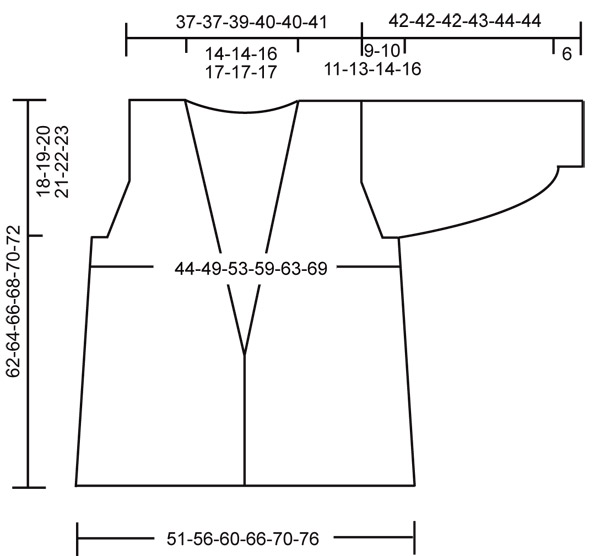
Moss st: First row: *K1, P1*, repeat from *-*. Second row: P over K and K over P. Repeat second row. Tip: On the sleeves you dec sts in sides (instead of inc), since there are a large number of sts inc first row after the moss st. Decreasing tip-1 (applies to neckline): Make all dec from RS! Dec as follows after 10 front band sts: slip 1 st as if to knit, K1, psso Dec as follows before 10 front band sts: K2 tog. Decreasing tip-2 (applies to armhole): Make all dec from RS! Dec as follows after 4 sts: slip 1 st as if to knit, K1, psso Dec as follows before 4 sts: K2 tog. Increasing tip (applies to sleeve): Inc 1 st by making 1 yo between 2 sts. On return row work into back of yo in order to avoid a hole. Buttonholes: Make buttonholes on right front band. 1 buttonhole = bind off 3rd and 4th st from mid front and cast on 2 new sts on return row. Make buttonholes when piece measures 9" and 11.75" for all sizes. Back piece: Cast on 74-80-86-94-100-108 sts (includes 1 edge st each side) on needle size 7 mm [US 10 ½] with 1 thread of each quality. P 1 row from WS and now work 4" moss st – see above. Remember the knitting gauge! Continue in stockinette st, at the same time when piece measures 4.4" dec 1 st each side on every 2.75"-2.75"-2.75"-3.1"-3.1"-3.1" a total of 5 times = 64-70-76-84-90-98 sts. When piece measures 17.2"-17.7"-18"-18½"-19"-19.2" bind off 3-3-3-4-4-4 sts each side for armhole and dec to shape the armhole on every other row – see Decreasing tip-2: 1 st 3-6-8-10-13-16 times = 52-52-54-56-56-58 sts. When piece measures 22½"-23.2"-24"-24.7"-25½"-26.4" work moss st on the middle 40-40-42-44-44-44 sts with remaining sts as before. When piece measures 23.6"-24.4"-25.2"-26"-26.7"-27½" bind off the middle 18-18-20-22-22-22 sts for neck. Continue with 11 moss sts towards neckline and dec 1 st on neckline on next row = 16-16-16-16-16-17 sts left on each shoulder. Continue with 10 moss sts towards neckline until piece measures 24.4"-25.2"-26"-26.7"-27½"-28.4", and bind off. Left front piece: Cast on 43-46-50-53-56-60 sts (includes 1 edge st at side and 10 front band sts towards mid front) on needle size 7 mm [US 10 ½] with 1 thread of each quality. P 1 row from WS and now work 4" moss st. Continue in stockinette st with 10 front band sts in moss st. At the same time dec at side as described for back piece. When piece measures 9½" for all sizes dec 1 st for neckline - see Decreasing tip-1 - on every 0.75" a total of 16-16-18-18-18-18 times. At the same time when piece measures 17.2"-17.7"-18"-18½"-19"-19.2" bind off for armhole as described for back piece. After all dec = 16-16-16-16-16-17 sts left on shoulder. Bind off when piece measures 24.4"-25.2"-26"-26.7"-27½"-28.4". Right front piece: Cast on and work like left front piece, but mirrored. Remember buttonholes! Sleeve: Cast on 32-32-34-34-36-36 sts (includes 1 edge st each side) on needle size 7 mm [US 10 ½] with 1 thread of each quality. P 1 row from WS and now work 2.4" moss st. Continue in stockinette st, at the same time inc 31-31-33-33-35-35 sts evenly on first row – see Increasing tip = 63-63-67-67-71-71 sts. When piece measures 4.75"-5½"-5½"-5½"-5½"-5½" dec 1 st each side on every 0.75"-0.75"-0.75"-0.9"-0.9"-0.9" a total of 10-8-8-6-6-5 times = 43-47-51-55-59-61 sts. When piece measures 13"-12½"-12.2"-11.75"-11.75"-11" (less on the larger sizes because of larger sleeve cap) dec to shape the sleeve cap each side on every other row: 3 sts 1 time, 2 sts 1 time, 1 st 4-5-6-8-9-10 times, then 2 sts each side until piece measures 16.1"-16.1"-16.1"-16½"-17"-17". Now bind off 3 sts each side 1 time and bind off remaining sts on next row. Sleeve measures approx 16½"-16½"-16½"-17"-17.2"-17.2". Assembly: Sew shoulder seams. Set in sleeves. Sew sleeve and side seams inside 1 edge st. Sew on buttons. |
|
 |
|
Have you finished this pattern?Tag your pictures with #dropspattern or submit them to the #dropsfan gallery. Do you need help with this pattern?You'll find 14 tutorial videos, a Comments/Questions area and more by visiting the pattern on garnstudio.com. © 1982-2026 DROPS Design A/S. We reserve all rights. This document, including all its sub-sections, has copyrights. Read more about what you can do with our patterns at the bottom of each pattern on our site. |


With over 40 years in knitting and crochet design, DROPS Design offers one of the most extensive collections of free patterns on the internet - translated to 17 languages. As of today we count 324 catalogs and 12290 patterns - 12280 of which are translated into English (US/in).
We work hard to bring you the best knitting and crochet have to offer, inspiration and advice as well as great quality yarns at incredible prices! Would you like to use our patterns for other than personal use? You can read what you are allowed to do in the Copyright text at the bottom of all our patterns. Happy crafting!
Post a comment to pattern DROPS 105-29
We would love to hear what you have to say about this pattern!
If you want to leave a question, please make sure you select the correct category in the form below, to speed up the answering process. Required fields are marked *.