
Popular categories
Looking for a yarn?


Comments / Questions (23)
![]() Pia Blomkvist wrote:
Pia Blomkvist wrote:
Hej! Jag har stickat framstycke, ärm och till halva bakstycket men det stämmer inte i halsen. Jag har för vid hals. När halva ryggstycket är stickat är det 36 cm i halsen. Jag har läst mönstret otaliga gånger o kan inte se att jag gjort något fel. Varför stämmer det inte??? Tacksam för svar . Hälsningar Pia
04.08.2023 - 07:01DROPS Design answered:
Hej Pia, halsen er ret vid, hvis ellers de andre mål stemmer, så justerer du halsen med en tvinnad snodd :)
10.08.2023 - 13:31
![]() Robin Weiss wrote:
Robin Weiss wrote:
I do not understand what we are supposed to do after casting on the 14 stitches on the left sleeve. When do we add the extra 15+15+17 stitches? And what do you mean about the short rows? I am stuck. Can you do a row by row description please?
30.07.2023 - 21:14DROPS Design answered:
Dear Mrs Weiss, you will first work a small gusset for under sleeve, so cast on 14 sts then cast on at the end of every row from WS: 15 sts 2 times and 17 sts 1 time, and at the same time, when piece measures 2 cm from cast on edge, work the stitches on needle for yoke and continue short rows as before - happy knitting!
31.07.2023 - 11:38
![]() Robin wrote:
Robin wrote:
I am struggling with the pattern instructions and would like to see what others have asked and the answers given. Is there a way to translate the ones that are not in English?
30.06.2023 - 13:43DROPS Design answered:
Dobrý den, Robin, unfortunately, we do not have the possibility to translate all questions and answers into English, but you can use Google translate or another online application. If you have any problems with the instructions yourself, please try to describe them to us - we'll do our best to advise you on how to proceed. Happy knitting!
30.06.2023 - 14:16
![]() Sharon wrote:
Sharon wrote:
I haven’t started this pattern yet, I am confused as the pattern states start at the bottom edge but at the same time knit the picot border at the neck edge. Can you just briefly explain the order of garment construction. I can’t see how I can knit from the bottom and at the same time knit the picot border at the neck . Thank You Sharon
14.11.2021 - 00:14DROPS Design answered:
Dear Sharon, the pattern is knitted sideways Start at the left front edge, doing the left front, left sleeve, back, right sleeve, right front. Shaping is done with short rows, and casting stitches on/off for the sleeve. Happy Stitching!
14.11.2021 - 00:34
![]() Cheryl wrote:
Cheryl wrote:
As soon as I saw this lovely cardigan I thought ‘Snow White’ It’s gorgeous and I think it would be a fitting name 😊
11.06.2021 - 14:23
![]() Donatella wrote:
Donatella wrote:
Buonasera, vorrei sapere se in questo modello si può fare la scollatura dietro più accollata del davanti; se si, come? Grazie mille
08.01.2021 - 20:26DROPS Design answered:
Buongiorno Donatella, può lavorare dei ferri accorciati sul collo per renderlo un pò più alto del davanti. Buon lavoro!
09.01.2021 - 12:37
![]() Élisabeth wrote:
Élisabeth wrote:
Bonjour, je fais la manche de ce modèle pour le modèle 134-4 ( donc avec un nb de mailles un peu différent). Les mailles sont montées pour ensuite joindre cette bande au haut du travail, là où sont placés les marqueurs, n'est-ce pas ? Les 2 cm requis sont donc du même côté du travail, pas au-dessus des m en attente? Merci de l'éclairer sur ces points.
25.02.2019 - 21:31DROPS Design answered:
Bonjour Elisabeth, vous montez 14 m (dans le modèle) pour la manche, et montez en même temps pour la longueur de la manche 3 fois des mailles en fin de rang, 2 cm après avoir monté les 14 mailles, vous continuez sur toutes les mailles (les nouvelles + celles qui étaient en attente côté empiècement) en tricotant les rangs raccourcis. Bon tricot!
26.02.2019 - 11:04
![]() Marie wrote:
Marie wrote:
Je ne vois pas bien l'image en blanc; est-ce qu'il y a une bordure picot dans le bas du gilet?
21.04.2017 - 18:58DROPS Design answered:
Bonjour Marie, la bordure picot se fait côté mais aussi en bas du dos et des devants. Bon tricot!
24.04.2017 - 08:46
![]() Daisy wrote:
Daisy wrote:
Daisy 23.06.2015 kl. 11:19: Bonjour Je voudrais être sûre de bien comprendre ceci: pour le devant gauche le 22 cm avant de mettre en attente les mailles pour le dos se mesurent bien du côté le plus court, c'est à dire côté encolure ? Merci d'avance de votre réponse Daisy
23.06.2015 - 11:52DROPS Design answered:
Bonjour Daisy, ces 22 cm se mesurent en bas, à la bordure picot (soit environ 10.5 cm en haut), ces indications supplémentaires manquaient et ont été ajoutées. Bon tricot!
23.06.2015 - 19:23
![]() Daisy wrote:
Daisy wrote:
Bonjour Je voudrais être sûre de bien comprendre ceci: pour le devant gauche le 22 cm avant de mettre en attente les mailles pour le dos se mesurent bien du côté le plus court, c'est à dire côté encolure ? Merci d'avance de votre réponse Daisy
23.06.2015 - 11:19
|
|||||||||||||
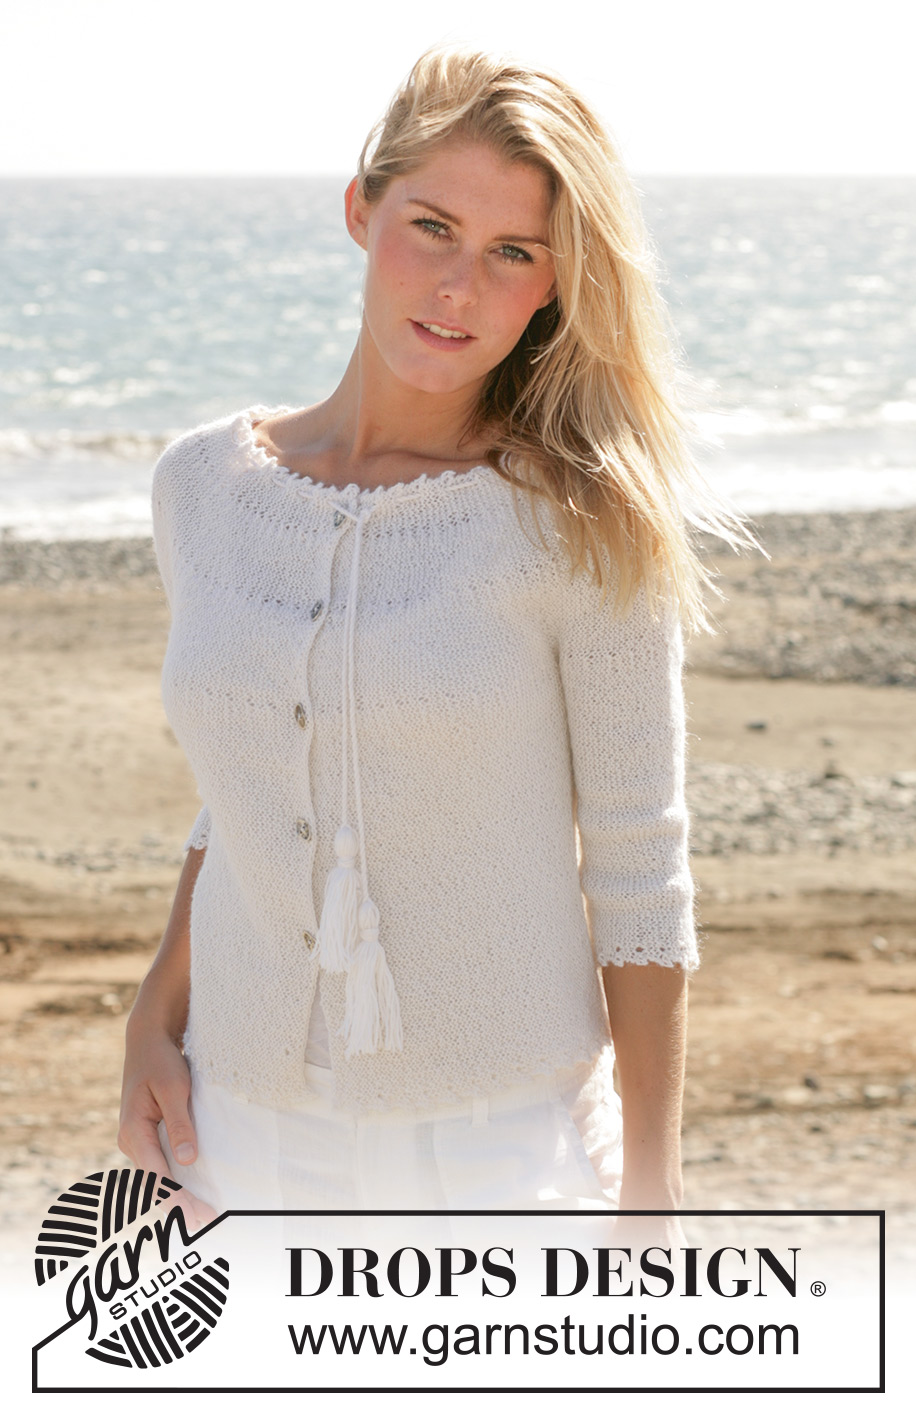
Tossed Tassel Cardigan#tossedtasselcardigan |
|||||||||||||
|
|
|||||||||||||
DROPS jacket in garter sts knitted from side to side with picot borders in “Alpaca”.
DROPS 100-7 |
|||||||||||||
|
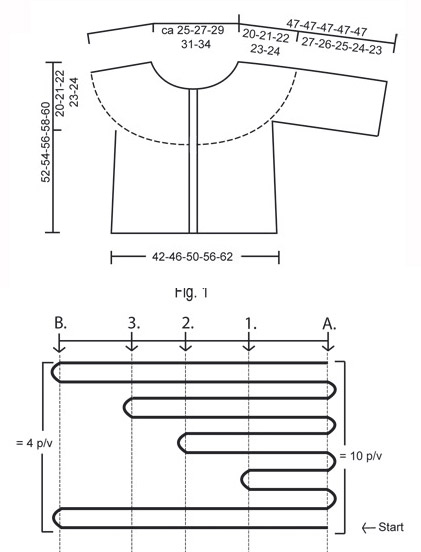
Knitting gauge: 23 sts x 45 rows on needles size 3 mm / US 2or3 in garter sst = 10 x 10 cm / 4" x 4". Knitting tips -1: After every turn slip first st as if to knit and tighten the yarn in order to avoid a hole at the turning point. Turnings: See Fig. 1. Knit with short rows in the middle of piece to slightly shape the jumper. *knit from bottom edge on all sts to neckline, turn and knit return row. - knit to marker-1, turn and knit return row turn – see Knitting tip - knit to marker-2, turn and knit return row - knit to marker-3, turn, knit return row - knit on all sts, turn and knit return row* Repeat from *-*. Picot border: When knitting the picot border on neckline, only the 4 rows knitted all the way to neckline (see Fig.1) are part of the pattern. Knit picot border as follows: Row 1 to 6: garter sts Row 7: knit garter sts until 4 sts left on needle and knit these as follows: K2 tog, yo, and knit 2 sts in each of the remaining 2 sts = 2 new sts on row Row 8: slip 1 st as if to knit, K1, psso, K1, lift 2nd st on right needle over 1st st = 2 dec sts on row. Finish row in garter st. Repeat row 1-8. The jacket is knitted in garter st sideways, with rows starting at the bottom edge and worked towards neck edge. Beg at front edge on left front piece, continue on left sleeve, back piece, the other sleeve, and then right front piece. Left front piece: Loosely cast on 110-115-120-124-129 sts on needle size 3 mm / US 2or3 with Alpaca. The garment is knitted in garter sts through out, i.e. knit on all rows. Insert 3 markers, counted from bottom edge towards the neck edge, as follows: Marker-1 after 68-71-74-76-78 sts Marker-2 after 87-92-95-97-101 sts Marker-3 after 101-106-110-113-117 sts Leave all markers in the same place until piece is completed to make sure the short rows are in line throughout. The number of sts before and after the markers will vary because of the picot border. 1st row = RS (from bottom edge towards neckline). Knit approx 2.5 cm / ⅞" over all sts = front band (last row should be from neckline towards bottom edge). Now continue (from RS = from bottom edge) with turnings as described above, at the same time knit picot border – see above - at the end of each row (i.e. at neckline on 1st row and at bottom edge on 2nd row). Continue like this until piece measures approx 22.5-24.5-26.5-29.5-32.5 cm / 8⅞"-9⅝"-10½"-11½"-12¾" (measured inside the picot border at bottom edge). Piece measures approx 10.5-11.5-12-13.5-14.5 cm / 4¼"-4½"-4¾"-5¼"-5¾" from casting on row measured at neckline. Now continue with side piece as follows: Knit 1 cm / ⅜" but only on the 63-66-69-71-73 sts towards bottom edge. Insert a marker (= mid side). Knit 1 cm / ⅜" on the 63-66-69-71-73 sts and put them on a stitch holder (to be used for back piece). Continue with sleeve. Left sleeve: = 47-49-51-53-56 sts on needle. Loosely cast on 14 new sts over sts on holder. Continue but only on the new 14 sts (= edge under sleeve), at the same time cast on new sts at the end of every row toward the sleeve edge: 15-14-14-13-13 sts 2 times and 17-17-15-15-12 sts 1 time. At the same time after 2 cm / ¾" continue on all sts on needle. Knit with short rows - see explanation above - and picot border at neckline. After all inc are complete = 108 sts on needle. Now also knit picot border at the bottom of sleeve. Continue like this until piece measures approx 22-24-24-25-26 cm / 8¾"-9½"-9½"-9¾"-10¼" from the last row with inc for sleeve (adjust to after a full repeat of the picot border pattern at sleeve). Loosely bind off the lower 17-17-15-15-12 sts on sleeve and bind off sts on every other row: 15-14-14-13-13 sts 2 times and 14 sts 1 time = 47-49-51-53-56 sts left on needle. Back piece: Put the 63-66-69-71-73 sts from holder back on needle = 110-115-120-124-129 sts. Continue with short rows and picot border at neckline and bottom edge. When piece measures approx 21-23-25-28-31 cm / 8¼"-9"-9¾"-11"-12¼" (measured from inside the picot border at bottom edge) from marker at the side, insert a new marker = mid back (piece measures approx. 28-31-33-35-37 cm/11"-12¼"-13"-13¾"-14½" at the neck, measured from the casting on edge mid front). Continue until piece measures approx 20-22-24-27-30 cm / 8"-8¾"-9½"-10½"-11¾" (measured from inside the picot border at bottom edge) from marker mid back. Now knit side piece as follows: 1 cm / ⅜" but only on the 63-66-69-71-73 towards bottom edge. Insert a marker (= mid side). Knit 1 cm / ⅜" on the same 63-66-69-71-73 sts and then put these sts on a stitch holder. Right sleeve: Knit like left sleeve. Right front piece: Put the 63-66-69-71-73 sts from thread or stitch holder back on needle = 110-115-120-124-129 sts. Continue with short rows as on back piece. Knit the same number of rows as on left front piece and then knit front band as follows: Knit 1.5 cm / ½" on all sts. On next row make 5-5-6-6-6 buttonholes as follows (beg from bottom edge): Knit 27-28-23-27-27 sts, K2 tog, make a yo, knit 17-18-16-16-17 sts, K2 tog, make a yo, knit 17-18-16-16-17 sts, K2 tog, make a yo, knit 17-18-16-16-17 sts, K2 tog, make a yo, knit 17-18-16-16-17 sts, K2 tog, make a yo. Size L, XL and XXL: Knit 16-16-17 sts, K2 tog, make a yo. All sizes: Now knit the 5 last sts towards neckline. Turn and knit return row. Then knit approx 1 cm / ⅜" on all sts (adjust to a full repeat of the picot border pattern) and bind off loosely. Assembly: Sew under arm seams with small, neat sts. Seam will be displaced 1 cm / ⅜" off the middle of sleeve because of the edge knitted under the sleeve. Sew opening under the arms. Sew on buttons. Band: Cut 2 strands of yarn measuring approx 300 cm / 3.3 yds each. Twist until they resist and fold them double. Tie a knot either end and pull band through the picot border at neckline. Tassel: Make a tassel for each end: Cut a total of 28 threads measuring 20 cm / 8" each. Fold them double and wind one of the strands around the top of tassel to keep it in place. Attach to each end of band. |
|||||||||||||
Diagram explanations |
|||||||||||||
|
|||||||||||||
 |
|||||||||||||
Have you finished this pattern?Tag your pictures with #dropspattern #tossedtasselcardigan or submit them to the #dropsfan gallery. Do you need help with this pattern?You'll find 16 tutorial videos, a Comments/Questions area and more by visiting the pattern on garnstudio.com. © 1982-2026 DROPS Design A/S. We reserve all rights. This document, including all its sub-sections, has copyrights. Read more about what you can do with our patterns at the bottom of each pattern on our site. |
|||||||||||||


With over 40 years in knitting and crochet design, DROPS Design offers one of the most extensive collections of free patterns on the internet - translated to 17 languages. As of today we count 324 catalogs and 12290 patterns - 12280 of which are translated into English (US/in).
We work hard to bring you the best knitting and crochet have to offer, inspiration and advice as well as great quality yarns at incredible prices! Would you like to use our patterns for other than personal use? You can read what you are allowed to do in the Copyright text at the bottom of all our patterns. Happy crafting!
Post a comment to pattern DROPS 100-7
We would love to hear what you have to say about this pattern!
If you want to leave a question, please make sure you select the correct category in the form below, to speed up the answering process. Required fields are marked *.