
Popular categories
Looking for a yarn?


Comments / Questions (28)
![]() Bart wrote:
Bart wrote:
Wo finde ich das Modell, des Mantels/Pullover, das das Model trägt? Schöne Weihnachten bart.a
24.12.2012 - 18:23DROPS Design answered:
Hallo, leider konnte ich das Modell im Archiv auch nicht finden, aber wenn Sie in unserer Suchmasche nach "Muster:nordisch" suchen, finden Sie ähnliche Modelle.
26.12.2012 - 08:59
![]() Majbrit wrote:
Majbrit wrote:
Hej Giver det ikke 108m ved 54cm?? 20m=10cm 2m=1cm 54cm*2m=108 Jeg forstår heller ikke helt antallet af m der skal samles op. M1 er på 8m+19m = 27m, skal det ikke gå op i de 89m?? Skulle der have stået 21? Måske er det mig der har misforstået opskriften? Vh Majbrit
22.10.2012 - 18:50DROPS Design answered:
M.1 strikker du først som et pandebånd over de 20 m du slår op, du ser at snoningen ligger ned. Bagefter samler du 89 m op langs kanten hele vejen rundt og strikker huen. God fornøjelse!
16.11.2012 - 09:31
![]() Ragnhild Sund wrote:
Ragnhild Sund wrote:
I lueoppskriften står det at man skal plukke opp 89 masker på høyre side av M1. Kan dette stemme?
16.10.2012 - 18:46DROPS Design answered:
Heisann. Det stemmer. Man legger først opp 20 m før man skal strikke M.1 i 54 cm. Ser man på strikkefastheten er 20 m = 10 cm, slik at strikker man 54 cm har man litt over 120 masker når man har 54 cm.
19.10.2012 - 13:13
![]() Sara Goodwin wrote:
Sara Goodwin wrote:
I am unable to view the diagrams for DROPS hat pattern 0-96 and the narrative 'M1' and 'M2' does not make sense. I assume that these are references to cable patterns but there is no description. Can you help please? Many thanks.
02.01.2012 - 12:27
![]() DROPS Design wrote:
DROPS Design wrote:
Oppskriften finnes på svensk og oversettes ved annledning til dansk og norsk.
28.12.2010 - 19:17
![]() Merete Vatshelle wrote:
Merete Vatshelle wrote:
Jeg har også lett etter mønsteret her... Kan dere legge det ut igjen? Hilsen fra Merete
26.12.2010 - 23:39
![]() Rikke Thorup wrote:
Rikke Thorup wrote:
Hejsa.. Den smukke hue mangler opskrift - der er kun diagram at finde på siden. Kan i hjælpe mig? Mange hilsner Rikke
22.12.2010 - 14:37
![]() Suna wrote:
Suna wrote:
Jeg har laget luen fra dette mønsteret i dobbel tråd tynn alpakka på pinnestørrelse 4. Jeg måtte redusere omkretsen på luen til ca 47 cm for at luen skulle sitte (omkrets på hode - 55 cm). Jeg måtte også endre siste del av luen, da den ville blitt for stor om jeg hadde redusert som mønsteret sier. Jeg reduserte før og etter mønster hver omgang fra 5 "flette", altså mønsterrad 4 i diagrammet. Etter disse endringene passet luen perfekt =)
15.08.2008 - 17:16
|
|||||||||||||
DROPS Extra 0-96 |
|||||||||||||
 |
 |
||||||||||||
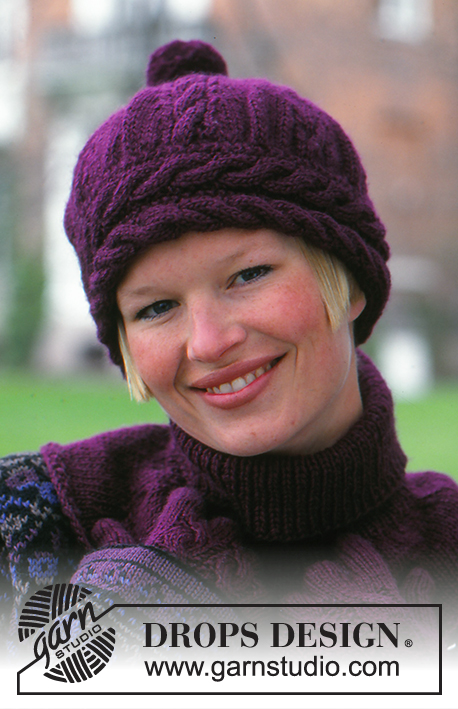
DROPS hat, neck warmer and gloves in Karisma Superwash.
DROPS Extra 0-96 |
|||||||||||||
|
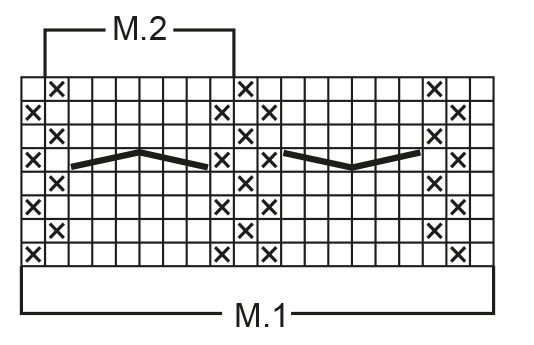
HAT: Pattern: See diagram. The diagram shows all the rows in the pattern from the RS. Hat: Cast on 20 sts on needle size 4 mm / US 6 and work diagram M.1 back and forth on needle for 54 cm / 21¼". Bind off. Sew piece tog to from a ring. Pick up 189 sts on double pointed needles size 4 mm / US 6 inside the edge st on the RS of M.1. Work first round as follows: * diagram M.2, 19 stockinette sts *, repeat from *-*, at the same time dec 1 st on each side of all M.2 on every 3rd and 4th round alternately a total of 13 times (when no sts left next to M.2 dec sts in M.2) = 7 sts left. Cut the yarn, pull through remaining sts and fasten. Make a pompom with a diameter of approx 5 cm / 2" and attach to the top of hat --------------------------------------------------------- GLOVES: Gauge: 22 sts in stockinette st on needle size 3 mm / US 2or3 = width 10 cm / 4". Rib: *K1, P1 *, repeat from *-*. Seed st: Row 1: * K1, P1 *, repeat from *-*. Row 2: K over P and P over K. Repeat row 2. Gloves: Cast on 54-58 sts on double pointed needles size 2.5 mm / US 1 and work 2 cm / ¾" seed st and then 2 cm / ¾" rib, at the same time dec 10 sts evenly on last row in rib = 44-48 sts. Work next round as follows: 3-4 stockinette sts, M.2, M.2, 3-4 stockinette sts (= 22-24 sts on upper hand), 1 stockinette st (= thumb st, insert a marker in this st), 21-23 stockinette sts (= palm of hand). Now measure piece from here! When piece measures 3 cm / 1⅛" from marker inc 1 st on each side of thumb st on every 4th-3rd round a total of 5-6 times = 54-60 sts – work inc sts in stockinette st. Now slip the middle 11 sts by thumb on a stitch holder and cast on 1 new st behind these on next round = 44-50 sts. Continue until piece measures 10-11 cm / 4"-4⅜" from marker, now discontinue M.2 and complete piece in stockinette st. Work fingers as follows: Little finger: slip 4-6 sts from upper hand and 4-5 sts from palm of hand on needles and pick up 1 st towards ring finger = 9-12 sts on needles. Work 5-6 cm / 2"-2⅜" stockinette st, at the same time dec 1 st on first round. After 5-6 cm / 2"-2⅜" K2 tog all the way round, cut the thread, pull through remaining sts and fasten. Now work 3 rounds on all sts before working ring finger. Ring finger: slip 6-6 sts from upper hand and 6-7 sts from palm of hand on needles and pick up 1 st towards little finger and 1 st towards middle finger = 14-15 sts on needles. Work 6-7 cm / 2⅜"-2¾" stockinette st, at the same time dec 2 sts on first round. After 6-7 cm / 2⅜"-2¾" K2 tog all the way round, cut the thread, pull through remaining sts and fasten. Middle finger: Like ring finger, but work 7-8 cm / 2¾"-3⅛" stockinette st. Index finger: slip 6-6 sts from upper hand and 6-7 sts from palm of hand on needles and pick up 1 st towards middle finger = 13-14 sts on needles. Work like ring finger. Thumb: Pick up 12-14 sts (incl sts on stitch holder) round thumb and work 6-6.5 cm / 2⅜"-2½" stockinette st, K2 tog all the way round, cut thread, pull through remaining sts and fasten. Sew openings between fingers. ----------------------------------------------- NECK WARMER: Rib: *K1, P1 *, repeat from *-*. Cast on 112 sts on circular needle size 3.5 mm / US 4 and work 14 cm / 5½" rib – see above. Insert a marker in every 16th st = 7 markers, and continue in stockinette st. Now measures piece from here! When piece measures 2 cm / ¾" from markers inc 1 st on each side of all markers and repeat the inc when piece measures 4 and 6 cm / 2⅜" = 154 sts. When piece measures 8 cm / 3⅛" from markers work 3 rounds rib and then bind off. English explanation to pattern diagram: = K1 = P1 = slip 3 sts on cable needle in front of piece, K3, K3 from cable needle. |
|||||||||||||
Diagram explanations |
|||||||||||||
|
|||||||||||||
 |
|||||||||||||
Have you finished this pattern?Tag your pictures with #dropspattern or submit them to the #dropsfan gallery. Do you need help with this pattern?You'll find 20 tutorial videos, a Comments/Questions area and more by visiting the pattern on garnstudio.com. © 1982-2026 DROPS Design A/S. We reserve all rights. This document, including all its sub-sections, has copyrights. Read more about what you can do with our patterns at the bottom of each pattern on our site. |
|||||||||||||


With over 40 years in knitting and crochet design, DROPS Design offers one of the most extensive collections of free patterns on the internet - translated to 17 languages. As of today we count 324 catalogs and 12239 patterns - 12229 of which are translated into English (US/in).
We work hard to bring you the best knitting and crochet have to offer, inspiration and advice as well as great quality yarns at incredible prices! Would you like to use our patterns for other than personal use? You can read what you are allowed to do in the Copyright text at the bottom of all our patterns. Happy crafting!
Post a comment to pattern DROPS Extra 0-96
We would love to hear what you have to say about this pattern!
If you want to leave a question, please make sure you select the correct category in the form below, to speed up the answering process. Required fields are marked *.