
Popular categories
Looking for a yarn?


Comments / Questions (49)
![]() Karin Van Lemmeren wrote:
Karin Van Lemmeren wrote:
Goedemiddag, kunt u mij zeggen of alleen de pas in het voorpand in ribbels gebreid wordt en het achterpand en de mouwen in tricotsteek? Alvast bedankt voor de moeite!
03.04.2014 - 12:16DROPS Design answered:
Hoi Karin. De voorpanden, acherpand en mouwen worden allemaal in tricotst gebreid na het breien van de kabels. Dit staat ook vermeld in het patroon. Veel breiplezier.
04.04.2014 - 10:59
![]() Heida wrote:
Heida wrote:
Hello. Is it possible to make this without the glitter thread, without it affecting the tension ? I see there are several questions in different languages, were there any problems or faults with this pattern ? It looks lovely anyway! Kind regards. Heida
06.03.2014 - 15:48DROPS Design answered:
Dear Heida, Glitter just gives a glitter effect to the jacket, it won't affect tension to not use it. Pattern is correct and has already been worked several times successfully. Should you have any question about this pattern, just do not hesitate to ask here. Happy knitting!
06.03.2014 - 16:13
![]() DELAHAYE wrote:
DELAHAYE wrote:
Bonsoir une derniere question Pourquoi avons nous 5 m mousse (bande de boutonnage) - X M1 - 3 m jersey - 5 m mousse (bande de boutonnage) ce n'est pas symétrique ne devrions nous pas avoir plus tot : 5 m mousse (bande de boutonnage)- 3 m de jersey - X M1 - 3 m jersey - 5 m mousse (bande de boutonnage) merci d'avance Agnès
30.01.2014 - 23:00DROPS Design answered:
Bonjour Mme Delahaye, M.1 commence par 3 m end, on a donc les 3 m end en début de rang, juste après la bordure devant. Mais M.1 se termine par 5 m env, on rajoute donc 3 m end pour que les devants soient identiques. Bon tricot!
31.01.2014 - 09:53
![]() Delahaye wrote:
Delahaye wrote:
Merci beaucoup Agnès
30.01.2014 - 22:03
![]() DELAHAYE wrote:
DELAHAYE wrote:
Bonjour, je ne comprends pas les diminutions apres M1 diminuer 1m envers dans chaque section de m envers 17 fois M1 :255m 1 dim dans chaque section = 17m 255m - 17m = 238 m je ne retombe pas sur les 234m pour continuer en M2 merci de m'eclairer agnés
30.01.2014 - 11:02DROPS Design answered:
Bonjour Mme Delahaye, dans M1, on a 2 x 4 m env, on tricote 17 fois M1, on va diminuer 2 m env dans chaque motif M1, il restera 13 m et on aura 2 x 3 m env (au lieu de 2 x 4 m env), soit : 5 m de bordure + 17 x 13 m (M1) + 3 m jersey + 5 m de bordure = 234 m. Bon tricot!
30.01.2014 - 11:15
![]() Maja wrote:
Maja wrote:
Kann man das Model auch ohne Glitter stricken und dafür dann ein Garn aus der Garngruppe B nehmen? Wieviel Material müsste ich dann etwa für das Jäckchen verwenden?
15.11.2013 - 10:09DROPS Design answered:
Liebe Maja, Glitter ist so dünn, dass sich die Garngruppe nicht ändert, aber machen Sie eine Maschenprobe.
15.11.2013 - 16:21
![]() Fey wrote:
Fey wrote:
Circular needles 3.5 and 4.5mm dut how many cm? 60 or 80?
01.10.2013 - 22:25DROPS Design answered:
Dear Mrs Fey, since circular needle is used here to work back and forth, you can use either 60 or 80 cm. Happy knitting!
02.10.2013 - 09:30
![]() Lisa Cohen wrote:
Lisa Cohen wrote:
What is the gauge for this pattern? Thanks, Lisa
17.06.2013 - 00:46Lisa Cohen answered:
Please disregard my question regarding the gauge. I found it in the pattern. Thank you, Lisa Cohen
17.06.2013 - 00:50
![]() Eva wrote:
Eva wrote:
Underbar kofta (av bilden att döma)! Kan man sticka den utan glittertråd eller blir den sladdrig då/kräver andra stickor eller nåt? (Beautiful cardigan, judging from the picture; can you omit the 'glitter' strand or will it lose its shape/ require adjusted needle size etc?)
04.09.2012 - 01:34DROPS Design answered:
Det går bra att sticka den utan glittertråden, se bara som vanligt till att hålla stickfastheten.
07.09.2012 - 14:52
![]() Karin wrote:
Karin wrote:
Er zitten rare vertalingen in het patroon, dit zorgt voor onduidelijkheden! Kunnen jullie dit corrigeren
12.07.2012 - 14:16DROPS Design answered:
Het patroon is een oude vertaling. Het Nederlandse taalgebruik is niet altijd even gelukkig gekozen, maar het patroon is correct. Hebt u vragen over een specifiek gedeelte in het patroon, dan kunnen wij u helpen of u kunt met uw vraag naar uw DROPS verkooppunt gaan. Wij vertalen patronen niet opnieuw op persoonlijk verzoek, maar richten ons op het vertalen van alle nieuwe patronen die steeds toegevoegd worden.
12.07.2012 - 16:12
|
||||||||||
DROPS 88-4 |
||||||||||
|
|
||||||||||
Cardigan and Brooch in Alpaca and Glitter
DROPS 88-4 |
||||||||||
|
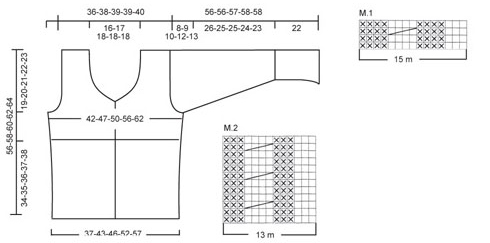
Gauge: 23 sts x 30 rows with 1 strand each Alpaca and Glitter on smaller needles in stockinette st = 10 x 10 cm 20 sts x 26 rows with 1 strand each Alpaca and Glitter on larger needles in stockinette st = 10 x 10 cm. Buttonband: The buttonband is knit in garter st. To keep the edge neat, knit a little tight. Buttonhole: Make buttonholes on right button band as follows from right side: K 1, K 2 tog, yo, K 2. On the next row, knit the yo. Make buttonholes when the piece measures: Size XS/S: 10, 20, 30 and 40 cm Size S/M: 11, 21, 31 and 41 cm Size M/L: 10, 18, 26, 34 and 42 cm Size XL: 10, 19, 27, 35 and 43 cm Size XXL: 10, 18, 27, 36 and 45 cm Pattern: See charts. The pattern is seen from the right side. Knitting tip (for neckband): * knit to end of row, turn piece and put the first st on a st holder *, repeat * - * to finished measurements. Body: Cast on 223-253-268-313-343 sts on smaller circular needles with 1 strand each Alpaca and Glitter (2 strands). P 1 row (wrong side row), then establish pattern on the next row as follows: K 5 (buttonband sts knit in garter st), Pattern 1 over the following 210-240-255-300-330 sts, K 3 (stockinette st) and K 5 (buttonband sts knit in garter st). When Pattern 1 is complete, dec all P 4 (seen from the right side) to P 3 = 195-221-234-273-299 sts. Then knit as follows: K 5 (buttonband sts), Pattern 2 over the following 182-208-221-260-286 sts, K 3 (stockinette st) and K 5 (buttonband sts knit in garter st). Make buttonholes on right buttonband – see instructions above. Read the entire next section before knitting: Yoke: When the piece measures approx. 34-35-36-37-38 cm – adjust so that you have knit 1 row after a cable – put the 5 buttonband sts at each side on st holders = 185-211-224-263-289 sts. K 2 rows garter st, change to larger needles and continue in stockinette st, decreasing 17-23-24-39-41 sts evenly distributed on the 1st row = 168-188-200-224-248 sts. Put a marker 42-47-50-56-62 sts in from each side = 84-94-100-112-124 sts between markers on back. Armhole: When the piece measures 37-38-39-40-41 cm bind off 6-6-6-8-10 sts at each side for armhole (3-3-3-4-5 sts at each side of each marker) = 78-88-94-104-114 sts on back and 39-44-47-52-57 sts on each front. Back: = 78-88-94-104-114 sts. Bind off for armhole at each side every other row: 2 sts 0-1-2-3-4 times and 1 st 3-4-4-7-9 times = 72-76-78-78-80 sts. When the piece measures 54-56-58-60-62 cm bind off the center 28-30-32-32-32 sts for the neck. Then dec 1 st at each neck edge every other row 2 times = 20-21-21-21-22 sts remain on each shoulder. Bind off when the piece measures 56-58-60-62-64 cm. Right front: = 39-44-47-52-57 sts. Bind off for armhole at the side as on back. When the piece measures 41-42-43-44-46 cm put the outermost 5-6-7-7-7 sts at the center front on a st holder for the neck. Then bind off at neck edge every other row: 2 sts 2 times and 1 st 4 times, then every 4th row: 1 st 3 times. After all armhole and neck shaping is complete 20-21-21-21-22 sts remain on shoulder. Bind off when the piece measures 56-58-60-62-64 cm. Left front: Knit the same as the right, reversing shaping. Sleeve: Loosely cast on 77-77-77-92-92 sts on smaller needles with 1 strand each Alpaca and Glitter (2 strands). P 1 row (wrong side), then knit Pattern 1, keeping 1 edge st at each side in garter st. When Pattern 1 is complete, dec all P 4 (seen from the right side) to P 3 = 67-67-67-80-80 sts. Continue with Pattern 2, keeping 1 edge st at each side in garter st. When the piece measures approx. 20 cm - adjust so that you have knit 1 row after a cable – knit 2 rows garter st. Change to larger needles and stockinette st, decreasing 13-9-7-18-16 sts evenly distributed on the 1st row = 54-58-60-62-64 sts. When the piece measures 22 cm inc 1 st at each side every 4-3-2.5-2-1.5 cm a total of 7-8-9-11-13 times = 68-74-78-84-90 sts. When the piece measures 48-47-47-46-45 cm bind off for sleeve cap at each side every other row: 4 sts 1 time, 3 sts 1 time, 2 sts 2 times and 1 st 2-4-4-7-8 times, then bind off 2 sts at each side until the piece measures 55-55-56-57-57 cm, and then bind off 3 sts 1 time at each side. Bind off the remaining sts, the piece measures approx. 56-56-57-58-58 cm. Assembly: Sew shoulder seams. Buttonband: Put the 5 sts from left front back on smaller needles. Knit garter st over all sts for approx. 7-7-7-7-8 cm (to match length up to the beginning of neck shaping), put sts on a st holder. Repeat on the right front – make buttonhole. Sew buttonbands to front edges. Neckband: Pick up approx. 116-128 sts (incl. sts from st holders) around the neck on smaller needles with 1 strand each Alpaca and Glitter (2 strands)– start on right front and pick up from right side. Knit reverse stockinette st, putting the outermost st at the end of each row on a st holder – read Knitting tip. When neckband measures 2 cm inc 1 st in every 4th st – inc 1 st by pulling up and knitting a st from the previous row = approx. 137-152 sts. When neckband measures 4 cm put sts on st holders at each side back on needles, knit 1 row stockinette st over all sts and then bind off all sts. So that the bound-off edge is not too tight, make a yo approx. every 8 sts and bind off the yo as a st – the neckband will roll. Sew sleeve seams using edge sts as seam allowance. Sew in sleeves. Sew on buttons. CROCHETED BLOSSOM: Materials: Garnstudio ALPACA small amount (approx. 10 gr) nr 3720, old rose and use: Garnstudio GLITTER small amount nr 07, lilac DROPS 3.5 mm [US D] crochet hook, or size needed to obtain correct gauge. Blossom: Ch 4 ch with 1 strand each Alpaca and Glitter (2 strands) and join into a ring with 1 sl st. 1st row: 6 sc in ring, finish with 1 sl st in 1st sc. 2nd row: 1 sc in first sc, * ch 3, 1 sc in the next sc *, repeat * - * a total of 5 times and finish with ch 3 and 1 sl st in first sc at start of row = 6 ch-loops. 3rd row: ch 1, then crochet as follows in each ch-loop: 1 sc, ch 1, 3 dc, ch 1 and 1 sc, finish with 1 sl st in first ch at start of row. 4th row: * 1 sc in sc from 2nd row (crochet on the backside of petal around sts from 3rd row, pull yarn tight), ch 5 *, repeat * - * a total of 6 times and finish with 1 sl st in first sc at start of row. 5th row: ch 1, then crochet as follows in each ch-loop: 1 sc, ch 1, 5 dc, ch 1 and 1 sc, finish with 1 sl st in first ch at start of row. 6th row: * 1 sc in sc from 2nd row (follow instructions for 4th row), ch 7 *, repeat * - * a total of 6 times and finish with 1 sl st in first sc at start of row. 7th row: ch 1, then crochet as follows in each ch-loop: 1 sc, ch 1, 1 dc, 5 tc, 1 st, ch 1 and 1 sc, finish with 1 sl st in first ch at start of row. 8th row: * 1 sc in sc from 2nd row (follow instructions for 4th row), ch 8 *, repeat * - * a total of 6 times and finish with 1 sl st in first sc at start of row. 9th row: ch 1, then crochet as follows in each ch-loop: 1 sc, ch 1, 1 dc, 3 tc, 1 ddc, 3 tc, 1 dc, ch 1 and 1 sc, finish with 1 sl st in first ch at start of row. Cut and fasten yarn. You can sew the blossom directly to the cardigan, or sew a safety pin to the back of the blossom. |
||||||||||
Diagram explanations |
||||||||||
|
||||||||||
 |
||||||||||
Have you finished this pattern?Tag your pictures with #dropspattern or submit them to the #dropsfan gallery. Do you need help with this pattern?You'll find 31 tutorial videos, a Comments/Questions area and more by visiting the pattern on garnstudio.com. © 1982-2026 DROPS Design A/S. We reserve all rights. This document, including all its sub-sections, has copyrights. Read more about what you can do with our patterns at the bottom of each pattern on our site. |
||||||||||


With over 40 years in knitting and crochet design, DROPS Design offers one of the most extensive collections of free patterns on the internet - translated to 17 languages. As of today we count 325 catalogs and 12298 patterns - 12288 of which are translated into English (US/in).
We work hard to bring you the best knitting and crochet have to offer, inspiration and advice as well as great quality yarns at incredible prices! Would you like to use our patterns for other than personal use? You can read what you are allowed to do in the Copyright text at the bottom of all our patterns. Happy crafting!
Post a comment to pattern DROPS 88-4
We would love to hear what you have to say about this pattern!
If you want to leave a question, please make sure you select the correct category in the form below, to speed up the answering process. Required fields are marked *.