
Popular categories
Looking for a yarn?


Comments / Questions (46)
![]() Waltraud wrote:
Waltraud wrote:
Herzlichen Dank für diese schnelle und kompetente Antwort .....und ja, jetzt ergibt das Sinn (3 M vor Ende der Runde) .....und geht sich rechnerisch jetzt aus. Danke , danke LG Waltraud
26.06.2025 - 11:59
![]() Waltraud wrote:
Waltraud wrote:
Diese Anleitung stimmt inclusive der Zunahmen für die Passe. In meinem Fall Gr. 134/140 Gesamtzahl der Maschen 256. Also Ok. Leider Stimmen die Maschenzahlen bei der Aufteilung nicht. Gibt es dazu eine Ergänzung ? Herzlichen Dank im Voraus und freundliche Grüße aus Österreich Waltraud
25.06.2025 - 18:05DROPS Design answered:
Liebe Waltraud, die letzte Runde vor der Aufteilung endet 3 Maschen vor Ende der Runde, so gehören die letzten 3 M vom Rückenteil sowie die 3 ersten Maschen vom Vorderteil zum Ärmel: 3+45+3= 51 Maschen. Vorder- und Rückenteil waren 83 Maschen minus 3 Maschen beidseitig für die Ärmel sind nur noch 77 Maschen. Viel Spaß beim Stricken!
26.06.2025 - 08:57
![]() Noella wrote:
Noella wrote:
Bonjour, j’aimerais tricoter ce pull en drops Nord qui est groupe A et le modèle est en laine groupe B.Merci
02.05.2025 - 08:13DROPS Design answered:
Bonjour Noella, les laines du groupe de fils A ne sont malheureusement pas une alternative à celles du groupe B, vous devrez alors recalculer les explications en fonction de votre tension, vous pouvez vous aider et/ou vous inspirer d'un modèle dans la tension du groupe de fils A (26-23 m) ici. Bon tricot!
02.05.2025 - 08:57
![]() Linda Parkhouse wrote:
Linda Parkhouse wrote:
On Yoke Increases in the smallest size, I can’t seem to keep the two lovely rows of knitted pattern continuous at that point. Do they split there?
22.01.2025 - 18:27DROPS Design answered:
Dear Linda, A.1 is worked as before, so the rib pattern should still be correct. As you can see in the photo the sleeves and body are not continuous from each other, since the very beginning, due to the difference in increased stitches. However, the stitches in the same section should still be continuous. Remember that, when increasing in the rib chart, you will maintain the pattern (so when increasing before a knit stitch the new stitch is purled, while increasing after a purl stitch the new stitch is knitted). So the pattern stays in place over the other stitches. Happy knitting!
25.01.2025 - 17:57
![]() Angelika Steenbuck wrote:
Angelika Steenbuck wrote:
Wo finde ich das Diagramm A1?
11.12.2024 - 12:27DROPS Design answered:
Liebe Frau Steenbuck, das Diagram A.1 finden Sie rechts der Maßskizze, unter den Ärmel. Viel Spaß beim Stricken!
12.12.2024 - 08:51
![]() Bitte wrote:
Bitte wrote:
"...de 4 merkene sitter i den ytterste masken i hver side på forstykket og bakstykket. Det er nå 37-37-31-37-39-39 masker mellom maskene med merke i på hvert erme. På neste omgang økes det 8 masker til bærestykke ved å øke både før og etter hver av de 4 maskene med merke i – husk ØKETIPS-2." Blir masken som blir under den merkede masken den nye merkede masken, eller blir den nye ytterste masken på f.eks. fortykket den nye mekede masken?
13.11.2024 - 17:53
![]() Rosalie wrote:
Rosalie wrote:
Bonjour, pour l'augmentation de l'empiècement, vous écrivez : augmenter 8 mailles, en augmentant à la fois avant et après chacune des 4 mailles avec un marqueur. Je dois augmenter une maille 4 mailles après et avant les marqueurs, mais de ce fait l'augmentation se verra, car à distance des augmentations précédentes, et elles vont créer un décalage pour le dessin A1 ? je n'ai pas du bien comprendre. merci pour vos précieuses explications
08.09.2024 - 22:24DROPS Design answered:
Bonjour Rosalie, les mailles avec un marqueur vont se tricoter à l'endroit et celles augmentées avant/après le marqueur vont se tricoter dans la continuité du point fantaisie du dos/du devant et des manches; donc il est possible que vous ayez parfois 3 mailles endroit au niveau du marqueur, mais ce n'est pas grave, ce qui compte, c'est que le point fantaisie continue sur chaque pièce, la maille avec le marqueur sera une maille endroit. Bon tricot!
09.09.2024 - 10:56
![]() Rosalie wrote:
Rosalie wrote:
Bonjour, pourriez-vous me préciser s.il vous plaît, si au tout début de l’empiecement on doit tricoter les 33 premières mailles en jersey endroit, placer tous les marqueurs et à partir de la 34 ème maille, commencer le diagramme A1, ou doit on le commencer dès la 1 ère maille. Merci pour votre réponse
11.08.2024 - 22:50DROPS Design answered:
Bonjour Rosalie, on ne doit pas tricoter les mailles lorsque l'on met les marqueurs; le tout premier marqueur se met au début du tour = avant les mailles de l'épaule droite; le 2ème marqueur après les 15 premières mailles (cf taille) pour l'épaule; le 3ème marqueur se met après les 33 mailles du devant, le 4ème marqueur après les 15 mailles de la 2ème épaule = il vous reste 33 m après le dernier marqueur. Vous augmentez ensuite seulement pour le devant et le dos, autrement dit, vous gardez 15 m pour les épaules mais vous aurez 35, 37, 39 etc.. mailles pour le devant et le dos. Bon tricot!
12.08.2024 - 08:30
![]() Annika Schygge wrote:
Annika Schygge wrote:
Mönster40-20 Masktäthet på bredden stämmer men höjden skiljer flera cm, kan det vara mönsterstickningen som påverkar? Efter sadelökning och ärmökning ska måttet vara 5+13 cm på st 110/116. Jag får 8 cm och stickar inte särskilt hårt ( stämmer ju på bredden) fel mått i mönstret?
04.07.2024 - 18:33
![]() Lisa Ducros wrote:
Lisa Ducros wrote:
Désolée pour ma précédente demande, je viens de voir le diagramme.
15.01.2024 - 15:33
|
|||||||||||||||||||
Weekend Games Jumper#weekendgamesjumper |
|||||||||||||||||||
 |
 |
||||||||||||||||||
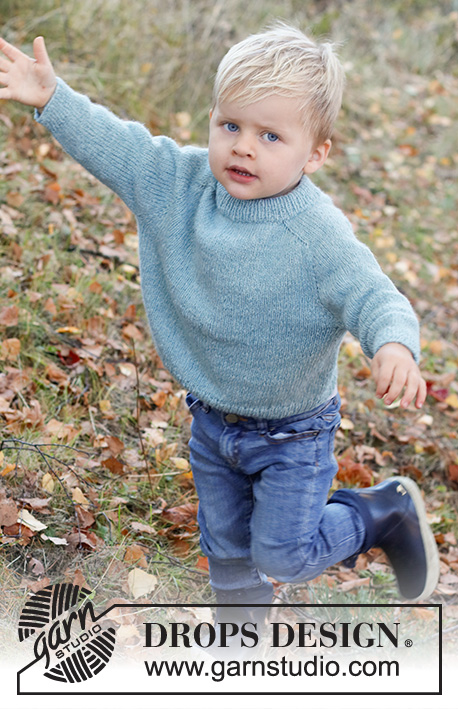
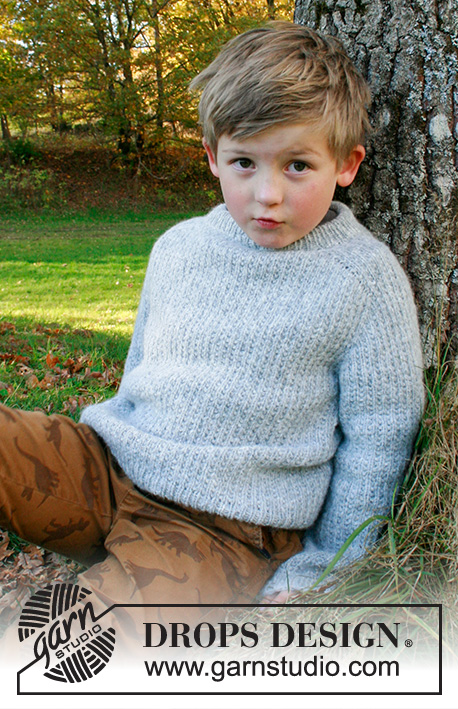
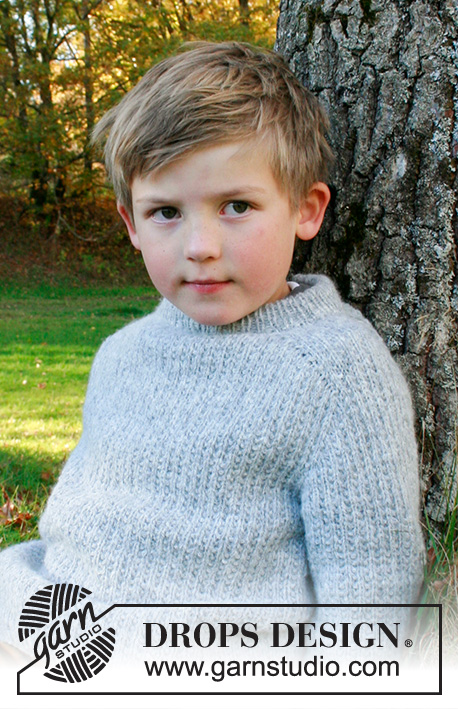
Knitted sweater for children in DROPS Sky. The piece is worked top down with double neck, textured pattern and saddle shoulders. Sizes 3 – 14 years.
DROPS Children 40-20 |
|||||||||||||||||||
|
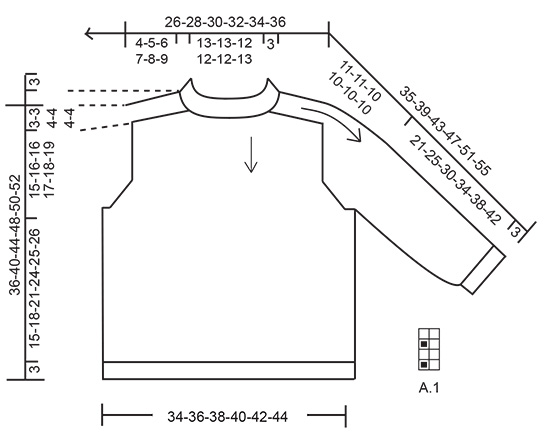
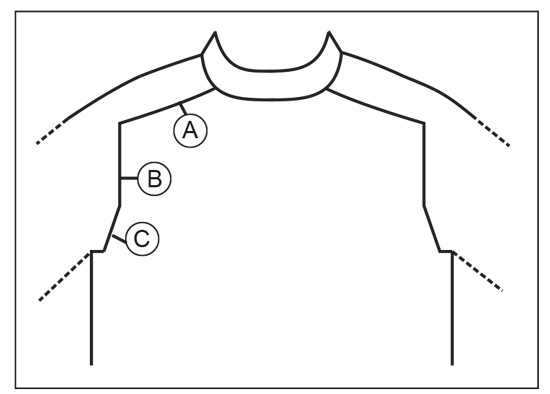
------------------------------------------------------- EXPLANATIONS FOR THE PATTERN: ------------------------------------------------------- PATTERN: See diagram A.1. INCREASE TIP-1 (evenly spaced): To work out how to increase evenly, count the total number of stitches on the needle (e.g. 78 stitches) and divide by the number of increases to be made (e.g. 18) = 4.3. In this example, increase by making 1 yarn over after approx. each 4th stitch. On the next round work the yarn overs twisted to avoid holes. INCREASE TIP-2 (for saddle shoulders, sleeves and yoke): BEFORE MARKER: The new stitch twists to the right. Use the left needle to pick up the strand between 2 stitches from the previous round, pick up the back strand and knit in the front loop. AFTER MARKER: The new stitch twists to the left. Use the left needle to pick up the strand between 2 stitches from the previous round, pick up the front strand and knit in the back loop. DECREASE TIP (for sleeves): Start 2 stitches before the marker thread, knit 2 together, work the marker-stitch as before, slip 1 stitch as if to knit, knit 1 and pass the slipped stitch over the knitted stitch (2 stitches decreased). BINDING-OFF TIP: To avoid the bind-off edge being tight you can bind off with a larger size needle. If the edge is still tight, make 1 yarn over after approx. each 6th stitch at the same time as binding off; the yarn overs are bind off as normal stitches. ------------------------------------------------------- START THE PIECE HERE: ------------------------------------------------------- SWEATER – SHORT OVERVIEW OF THE PIECE: The neck and yoke are worked in the round with circular needle, from the right shoulder and top down. Stitches are increased for the saddle shoulders, then for the sleeves and finally for the yoke. The yoke is divided for the body and sleeves and the body continued in the round. The sleeves are worked in the round with double pointed needles, top down. DOUBLE NECK: Cast on 78-80-82-84-86-88 stitches with short circular needle size 3 MM = US 2.5 and Sky. Knit 1 round. Work rib in the round (knit 1, purl 1) for 7 cm = 2¾". When the rib is finished, knit 1 round where you increase 18-20-22-24-22-24 stitches evenly spaced – read INCREASE TIP-1 = 96-100-104-108-108-112 stitches. Knit 1 round (yarn overs knitted twisted). Now work the yoke as described below. YOKE: Change to circular needle size 4 MM = US 6. Insert 1 marker after the first 32-33-35-37-37-38 stitches on the round = mid-front. The yoke is measured from this marker! In addition insert 4 other markers, without working the stitches, as follows – each marker is inserted between 2 stitches, is used when increasing for the saddle shoulders and should have a different color to the marker on the neck. Marker 1: Insert the marker before the first stitch on the round = back of right shoulder. Marker 2: Count 15-15-17-19-19-19 stitches from marker 1 (= shoulder), insert the marker before the next stitch. Marker 3: Count 33-35-35-35-35-37 stitches from marker 2 (= front piece), insert the marker before the next stitch. Marker 4: Count 15-15-17-19-19-19 stitches from marker 3 (= shoulder), insert the marker before the next stitch. There are 33-35-35-35-35-37 stitches left on the round after marker 4 (= back piece). Allow these 4 markers to follow your work onwards. SADDLE-SHOULDER INCREASES: Read the whole section before continuing! Work A.1 in the round. AT THE SAME TIME, on the first round, increase 4 stitches for the shoulders as follows: Increase BEFORE markers 1 and 3 and AFTER markers 2 and 4 – read INCREASE TIP-2. You are only increasing on the front and back pieces, the number of shoulder stitches remains the same. Increase like this EVERY round a total of 12-14-16-20-22-26 times = 144-156-168-188-196-216 stitches – the increased stitches are worked into A.1. REMEMBER THE KNITTING GAUGE! After the last increase the piece measures approx. 4-5-6-7-8-9 cm = 1½"-2"-2⅜"-2¾"-3⅛"-3½" from the marker mid-front. Now increase for the sleeves as follows. SLEEVE INCREASES: Continue A.1 in the round. AT THE SAME TIME on the next round increase 4 stitches for the sleeves as follows: Increase AFTER markers 1 and 3 and BEFORE markers 2 and 4. You increase only on the sleeves and the number of stitches on the front and back pieces remains the same. The new stitches are worked into A.1. Increase like this every 2nd round a total of 11-11-7-9-10-10 times = 188-200-196-224-236-256 stitches. The piece measures approx. 12-13-11-13-15-16 cm = 4¾"-5⅛"-4⅜"-5⅛"-6"-6¼" from the marker mid-front. Now increase for the yoke as described below. YOKE INCREASES: Move each marker so they are inserted in the outermost stitch on each side of the front and back pieces. There are 37-37-31-37-39-39 stitches between the marker-stitches on each sleeve. On the next round increase 8 stitches, by increasing both before and after all 4 marker-stitches – remember INCREASE TIP-2. You are now increasing on the front/back pieces and on the sleeves; the increased stitches are worked into A.1. Increase like this every 2nd round a total of 5-5-7-4-4-3 times = 228-240-252-256-268-280 stitches. When all the increases are finished, the piece measures approx. 15-16-16-16-18-18 cm = 6"-6¼"-6¼"-6¼"-7"-7" from the marker mid-front. Continue working, without further increases, until the piece measures 15-16-16-17-18-19 cm = 6"-6¼"-6¼"-6¾"-7"-7½" from the marker mid-front – finish the last round when there are 0-1-3-3-3-5 stitches left on the round. Now divide the yoke for the body and sleeves as follows: Place the first 47-49-51-51-53-55 stitches on 1 thread for the sleeve, cast on 5-5-5-7-7-7 new stitches (= in side under sleeve), work the next 67-71-75-77-81-85 stitches as before (= front piece), place the next 47-49-51-51-53-55 stitches on 1 thread for the sleeve, cast on 5-5-5-7-7-7 new stitches (= in side under sleeve), work the last 67-71-75-77-81-85 stitches (= back piece). Cut the strand. The body and sleeves are finished separately. THE PIECE IS NOW MEASURED FROM HERE. BODY: = 144-152-160-168-176-184 stitches. Start on the one side of the piece, in the middle of the 5-5-5-7-7-7 stitches cast on under the sleeve and continue A.1 in the round until the piece measures 15-18-21-24-25-26 cm = 6"-7"-8¼"-9½"-9¾"-10¼" from the division. There is approx. 3 cm = 1⅛" left to finished length; try the sweater on and work to desired length. Change to circular needle size 3 MM = US 2.5 and work rib (knit 1, purl 1) for 3 cm = 1⅛" - make sure the rib fits neatly over A.1, with knit over knit and purl over garter stitch. Bind off with knit over knit and purl over purl – read BINDING-OFF TIP! The sweater measures approx. 36-40-44-48-50-52 cm = 14¼"-15¾"-17¼"-19"-19¾"-20½" from the shoulder down. SLEEVES: Place the 47-49-51-51-53-55 stitches from the thread on the one side of the piece on double pointed needles size 4 MM = US 6 and knit up 1 stitch in each of the 5-5-5-7-7-7 stitches cast on under the sleeve = 52-54-56-58-60-62 stitches. Insert a marker thread in the middle of the 5-5-5-7-7-7 new stitches under the sleeve. Start at the marker thread and work A.1 in the round – make sure the pattern continues the pattern on the yoke. When the sleeve measures 3 cm = 1⅛" from the division, decrease 2 stitches mid-under the sleeve – read DECREASE TIP. Decrease like this every 2½-2½-3½-3½-4-4 cm = 1"-1"-1¼"-1¼"-1½"-1½" a total of 7-8-8-9-9-10 times = 38-38-40-40-42-42 stitches. Continue working without further decreases until the sleeve measures 21-25-30-34-38-42 cm = 8¼"-9¾"-11¾"-13⅜"-15"-16½" from the division. There is approx. 3 cm = 1⅛" left to finished length; try the sweater on and work to desired length. Change to double pointed needles size 3 MM = US 2.5 and work rib (knit 1, purl 1) for 3 cm = 1⅛", making sure the rib matches neatly over A.1. Bind off with knit over knit and purl over purl – remember BINDING-OFF TIP! The sleeve measures approx. 24-28-33-37-41-45 cm = 9½"-11"-13"-14½"-16⅛"-17¾" from the division. Work the other sleeve in the same way. ASSEMBLY: Fold the neck double to the wrong side and sew down. To avoid the neck being tight and rolling outwards, it is important the seam is elastic. |
|||||||||||||||||||
Diagram explanations |
|||||||||||||||||||
|
|||||||||||||||||||
 |
|||||||||||||||||||
 |
|||||||||||||||||||
Have you finished this pattern?Tag your pictures with #dropspattern #weekendgamesjumper or submit them to the #dropsfan gallery. Do you need help with this pattern?You'll find 31 tutorial videos, a Comments/Questions area and more by visiting the pattern on garnstudio.com. © 1982-2026 DROPS Design A/S. We reserve all rights. This document, including all its sub-sections, has copyrights. Read more about what you can do with our patterns at the bottom of each pattern on our site. |
|||||||||||||||||||


With over 40 years in knitting and crochet design, DROPS Design offers one of the most extensive collections of free patterns on the internet - translated to 17 languages. As of today we count 325 catalogs and 12291 patterns - 12281 of which are translated into English (US/in).
We work hard to bring you the best knitting and crochet have to offer, inspiration and advice as well as great quality yarns at incredible prices! Would you like to use our patterns for other than personal use? You can read what you are allowed to do in the Copyright text at the bottom of all our patterns. Happy crafting!
Post a comment to pattern DROPS Children 40-20
We would love to hear what you have to say about this pattern!
If you want to leave a question, please make sure you select the correct category in the form below, to speed up the answering process. Required fields are marked *.