DROPS Sky
DROPS Sky
74% Alpaca, 18% Polyamide, 8% Wool
from 5.10 £ /50g
Get the yarn to make this pattern from 15.30£.

The yarn cost is calculated from the pattern’s smallest size and the yarn’s cheapest product type. Looking for an even better price? You might find it on the DROPS Deals!

DROPS SS24

Weekend Games Jumper

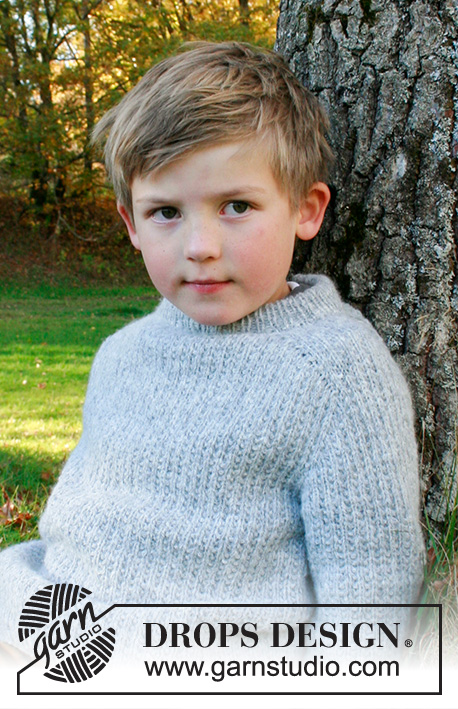
Knitted jumper for children in DROPS Sky. The piece is worked top down with double neck, textured pattern and saddle shoulders. Sizes 3 – 14 years.

DROPS Children 40-20
DROPS Design: Pattern no sk-017-bn
Yarn group B
-------------------------------------------------------

SIZES:
3/4 - 5/6 - 7/8 - 9/10 - 11/12 - 13/14 years
Equivalent to child’s height in cm:
98/104 - 110/116 - 122/128 - 134/140 - 146/152 - 158/164

MATERIALS:
DROPS SKY from Garnstudio (belongs to yarn group B)
150-200-200-250-300-300 g colour 02, pearl grey

KNITTING TENSION:
21 stitches in width and 28 rows in height with textured pattern = 10 x 10 cm.

NEEDLES:
DROPS DOUBLE POINTED NEEDLES SIZE 4 MM.
DROPS CIRCULAR NEEDLE SIZE 4 MM: Length 40 cm and 60 cm or 80 cm for textured pattern.
DROPS DOUBLE POINTED NEEDLES SIZE 3 MM.
DROPS CIRCULAR NEEDLE SIZE 3 MM: Length 40 cm and 60 cm or 80 cm for rib.
Needle size is only a guide. If you get too many stitches on 10 cm, change to a larger needle size. If you get too few stitches on 10 cm, change to a smaller needle size.

-------------------------------------------------------

Alternative Yarn – See how to change yarns here
Yarn Groups A to F – Use the same pattern and change the yarn here
Yarn usage using an alternative yarn – Use our yarn converter here

-------------------------------------------------------

DROPS Sky
DROPS Sky
74% Alpaca, 18% Polyamide, 8% Wool
from 5.10 £ /50g
Get the yarn to make this pattern from 15.30£.

The yarn cost is calculated from the pattern’s smallest size and the yarn’s cheapest product type. Looking for an even better price? You might find it on the DROPS Deals!

Pattern instructions

NOTE: This pattern is written in British English. All measurements in charts are in cm. For conversion from cm to inches - click here. There are different terms for crocheting in British and American English. If this pattern includes crochet, click for "crochet terms" here. For this pattern in American English, please click here.
-------------------------------------------------------

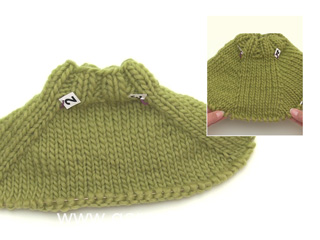
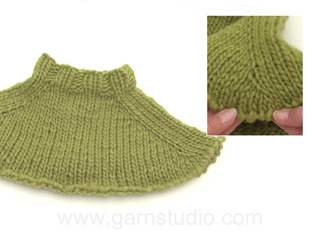
EXPLANATIONS FOR THE PATTERN:

-------------------------------------------------------

PATTERN:
See diagram A.1.

INCREASE TIP-1 (evenly spaced):
To work out how to increase evenly, count the total number of stitches on the needle (e.g. 78 stitches) and divide by the number of increases to be made (e.g. 18) = 4.3. 
In this example, increase by making 1 yarn over after approx. each 4th stitch. On the next round work the yarn overs twisted to avoid holes.

INCREASE TIP-2 (for saddle shoulders, sleeves and yoke):
BEFORE MARKER:
The new stitch twists to the right.
Use the left needle to pick up the strand between 2 stitches from the previous round, pick up the back strand and knit in the front loop.
AFTER MARKER:
The new stitch twists to the left.
Use the left needle to pick up the strand between 2 stitches from the previous round, pick up the front strand and knit in the back loop.

DECREASE TIP (for sleeves): 
Start 2 stitches before the marker thread, knit 2 together, work the marker-stitch as before, slip 1 stitch as if to knit, knit 1 and pass the slipped stitch over the knitted stitch (2 stitches decreased).

CASTING-OFF TIP:
To avoid the cast-off edge being tight you can cast off with a larger size needle. If the edge is still tight, make 1 yarn over after approx. each 6th stitch at the same time as casting off; the yarn overs are cast off as normal stitches.


-------------------------------------------------------

START THE PIECE HERE:

-------------------------------------------------------

JUMPER – SHORT OVERVIEW OF THE PIECE:
The neck and yoke are worked in the round with circular needle, from the right shoulder and top down. Stitches are increased for the saddle shoulders, then for the sleeves and finally for the yoke.
The yoke is divided for the body and sleeves and the body continued in the round. The sleeves are worked in the round with double pointed needles, top down.

DOUBLE NECK:
Cast on 78-80-82-84-86-88 stitches with short circular needle size 3 mm and Sky.
Knit 1 round.
Work rib in the round (knit 1, purl 1) for 7 cm.
When the rib is finished, knit 1 round where you increase 18-20-22-24-22-24 stitches evenly spaced – read INCREASE TIP-1 = 96-100-104-108-108-112 stitches.
Knit 1 round (yarn overs knitted twisted). Now work the yoke as described below.

YOKE:
Change to circular needle size 4 mm.
Insert 1 marker after the first 32-33-35-37-37-38 stitches on the round = mid-front. The yoke is measured from this marker!
In addition insert 4 other markers, without working the stitches, as follows – each marker is inserted between 2 stitches, is used when increasing for the saddle shoulders and should have a different colour to the marker on the neck.
Marker 1: Insert the marker before the first stitch on the round = back of right shoulder.
Marker 2: Count 15-15-17-19-19-19 stitches from marker 1 (= shoulder), insert the marker before the next stitch.
Marker 3: Count 33-35-35-35-35-37 stitches from marker 2 (= front piece), insert the marker before the next stitch.
Marker 4: Count 15-15-17-19-19-19 stitches from marker 3 (= shoulder), insert the marker before the next stitch.
There are 33-35-35-35-35-37 stitches left on the round after marker 4 (= back piece).
Allow these 4 markers to follow your work onwards.

SADDLE-SHOULDER INCREASES:
Read the whole section before continuing! Work A.1 in the round.
AT THE SAME TIME, on the first round, increase 4 stitches for the shoulders as follows:
Increase BEFORE markers 1 and 3 and AFTER markers 2 and 4 – read INCREASE TIP-2. You are only increasing on the front and back pieces, the number of shoulder stitches remains the same.
Increase like this EVERY round a total of 12-14-16-20-22-26 times = 144-156-168-188-196-216 stitches – the increased stitches are worked into A.1. REMEMBER THE KNITTING TENSION!
After the last increase the piece measures approx. 4-5-6-7-8-9 cm from the marker mid-front. Now increase for the sleeves as follows.

SLEEVE INCREASES:
Continue A.1 in the round.
AT THE SAME TIME on the next round increase 4 stitches for the sleeves as follows:
Increase AFTER markers 1 and 3 and BEFORE markers 2 and 4.
You increase only on the sleeves and the number of stitches on the front and back pieces remains the same. The new stitches are worked into A.1.
Increase like this every 2nd round a total of 11-11-7-9-10-10 times = 188-200-196-224-236-256 stitches.
The piece measures approx. 12-13-11-13-15-16 cm from the marker mid-front. Now increase for the yoke as described below.

YOKE INCREASES:
Move each marker so they are inserted in the outermost stitch on each side of the front and back pieces. There are 37-37-31-37-39-39 stitches between the marker-stitches on each sleeve.
On the next round increase 8 stitches, by increasing both before and after all 4 marker-stitches – remember INCREASE TIP-2.
You are now increasing on the front/back pieces and on the sleeves; the increased stitches are worked into A.1.
Increase like this every 2nd round a total of 5-5-7-4-4-3 times = 228-240-252-256-268-280 stitches.
When all the increases are finished, the piece measures approx. 15-16-16-16-18-18 cm from the marker mid-front.
Continue working, without further increases, until the piece measures 15-16-16-17-18-19 cm from the marker mid-front – finish the last round when there are 0-1-3-3-3-5 stitches left on the round.
Now divide the yoke for the body and sleeves as follows: Place the first 47-49-51-51-53-55 stitches on 1 thread for the sleeve, cast on 5-5-5-7-7-7 new stitches (= in side under sleeve), work the next 67-71-75-77-81-85 stitches as before (= front piece), place the next 47-49-51-51-53-55 stitches on 1 thread for the sleeve, cast on 5-5-5-7-7-7 new stitches (= in side under sleeve), work the last 67-71-75-77-81-85 stitches (= back piece). Cut the strand.
The body and sleeves are finished separately. THE PIECE IS NOW MEASURED FROM HERE.

BODY:
= 144-152-160-168-176-184 stitches.
Start on the one side of the piece, in the middle of the 5-5-5-7-7-7 stitches cast on under the sleeve and continue A.1 in the round until the piece measures 15-18-21-24-25-26 cm from the division. There is approx. 3 cm left to finished length; try the jumper on and work to desired length.
Change to circular needle size 3 mm and work rib (knit 1, purl 1) for 3 cm - make sure the rib fits neatly over A.1, with knit over knit and purl over garter stitch.
Cast off with knit over knit and purl over purl – read CASTING-OFF TIP! The jumper measures approx. 36-40-44-48-50-52 cm from the shoulder down.

SLEEVES:
Place the 47-49-51-51-53-55 stitches from the thread on the one side of the piece on double pointed needles size 4 mm and knit up 1 stitch in each of the 5-5-5-7-7-7 stitches cast on under the sleeve = 52-54-56-58-60-62 stitches. Insert a marker thread in the middle of the 5-5-5-7-7-7 new stitches under the sleeve.
Start at the marker thread and work A.1 in the round – make sure the pattern continues the pattern on the yoke.
When the sleeve measures 3 cm from the division, decrease 2 stitches mid-under the sleeve – read DECREASE TIP. Decrease like this every 2½-2½-3½-3½-4-4 cm a total of 7-8-8-9-9-10 times = 38-38-40-40-42-42 stitches.
Continue working without further decreases until the sleeve measures 21-25-30-34-38-42 cm from the division.
There is approx. 3 cm left to finished length; try the jumper on and work to desired length.
Change to double pointed needles size 3 mm and work rib (knit 1, purl 1) for 3 cm, making sure the rib matches neatly over A.1.
Cast off with knit over knit and purl over purl – remember CASTING-OFF TIP! The sleeve measures approx. 24-28-33-37-41-45 cm from the division. Work the other sleeve in the same way.


ASSEMBLY:
Fold the neck double to the wrong side and sew down. To avoid the neck being tight and rolling outwards, it is important the seam is elastic.

Diagram

symbols = knit
symbols = purl
symbols = knitting direction
symbols = increase for saddle-shoulders
symbols = increase for sleeves
symbols = increase for yoke
diagram
diagram

Each of our patterns has specific tutorial videos to help you.

Do you have a question? See a list of frequently asked questions (FAQ)

Knitting tension is what determines the final measurements of your work, and is usually measured per 10 x 10 cm. It is provided like so: number of stitches in width x number of rows in height - eg: 19 stitches x 26 rows = 10 x 10 cm.

The knitting tension is very individual; some people knit/crochet loosely while others work tightly. You adjust the knitting tension with the needle size, which is why the suggested needle size is only meant as a guide! You need to adjust this (up or down) to ensure that YOUR knitting tension matches the knitting tension provided in the pattern. If you work with a different knitting tension than provided you will have a different yarn consumption, and your work will have different measurements than what the pattern suggests.

The knitting tension also determines which yarns can replace each other. As long as you achieve the same knitting tension you can replace one yarn with another.

See DROPS lesson: How to measure your tension/gauge

See DROPS video: How to make a gauge tension swatch

The required amount of yarn is provided in grams, eg: 450 g. To calculate how many balls you’ll need you first need to know how many grams are in 1 ball (25g, 50g or 100g). This information is available if you click on the individual yarn quality on our pages. Divide the amount required with the amount of each ball. For example, if each ball is 50g (the most common amount), the calculation will be as follows: 450 / 50 = 9 balls.

The important thing when changing from one yarn to another is that the knitting/crochet tension remains the same. This is so that the measurements of the finished piece will be the same as on the sketch provided. It is easier to achieve the same knitting tension using yarns from the same yarn group. It is also possible to work with multiple strands of a thinner yarn to achieve the knitting tension of a thicker one. Please try our yarn converter. We recommend you to always work a test swatch.

Please NOTE: when changing yarn the garment might have a different look and feel to the garment in the photo, due to individual properties and qualities of each yarn.

See DROPS lesson: Can I use a different yarn than the one mentioned in the pattern?

All our yarns are categorised into yarn groups (from A to F) according to thickness and knitting tension – group A contains the thinnest yarns and group F the thickest. This makes it easier for you to find alternative yarns to our patterns, should you wish to switch yarn. All yarns within the same group have a similar knitting tension and can easily replace each other. However, different yarn qualities have different structures and properties which will give the finished work a unique look and feel.

Click here for an overview of the yarns in each yarn group

At the top of all our patterns you’ll find a link to our yarn calculator, which is a helpful tool should you wish to use a different yarn than suggested. By filling in the yarn quality you wish to replace, the amount (in your size) and number of strands, the calculator will present good alternative yarns with the same knitting tension. Additionally it will tell you how much you’ll require in the new qualities and whether you’ll need to work with multiple strands. Most skeins are 50g (some are 25g or 100g).

If the pattern is worked with multiple colours, every colour will have to be calculated separately. Similarly, if the pattern is worked with several strands of different yarns (for example 1 strand Alpaca and 1 strand Kid-Silk) you will have to find alternatives for each, individually.

Click here to see our yarn calculator

Since different yarns have different qualities and textures we have chosen to keep the original yarn in our patterns. However, you can easily find options among our available qualities by using our yarn calculator, or simply pick a yarn from the same yarn group.

It is possible that some retailers still have discontinued yarns in stock, or that someone has a few skeins at home that they would like to find patterns for.

The yarn calculator will provide both alternative yarn as well as required amount in the new quality.

If you think it's hard to decide what size to make, it can be a good idea to measure a garment you own already and like the size of. Then you can pick the size by comparing those measures with the ones available in the pattern's size chart.

You'll find the size chart at the bottom of the pattern.

See DROPS lesson: How to read size chart

The needle size provided in the pattern serves only as a guide, the important thing is to follow the knitting tension. And since knitting tension is very individual, you will have to adjust the needle size to ensure that YOUR tension is the same as in the pattern – maybe you’ll have to adjust 1, or even 2 needle sizes, up or down to achieve the correct tension. For this, we recommend that you work test swatches.

Should you work with a different knitting tension than the one provided, the measurements of the finished garment might deviate from the measurement sketch.

See DROPS lesson: How to measure your tension/gauge

See DROPS video: How to make a tension/gauge swatch

Working a garment top-down provides more flexibility and room for personal adjustment. For example it is easier to try the garment on while working, as well as making adjustments to length of yoke and shoulder caps.

The instructions are carefully explaining every step, in the correct order. Diagrams are adjusted to the knitting direction and are worked as usual.

The diagram depicts all rows/rounds, and every stitch seen from the right side. It is read from bottom to top, from right to left. 1 square = 1 stitch.

When working back and forth, every other row is worked from the right side and every other row is worked from the wrong side. When working from the wrong side, the diagram will have to be worked reversed: from left to right, knit stitches are purled, purl stitches are knit etc.

When working in the round every round is worked from the right side and the diagram are worked from right to left on all rounds.

See DROPS lesson: How to read knitting diagrams

The diagram depicts all rows/rounds, and every stitch seen from the right side. It is worked from bottom to top, from right to left.

When working back and forth every other row is worked from the right side: from right to left and every other row is worked from the wrong side: from left to right.

When working in the round, every row in the diagram are worked from the right side, from right to left.

When working a circular diagram you start in the middle and work your way outwards, counter clockwise, row by row.

The rows usually start with a given number of chain stitches (equivalent to the height of the following stitch), this will either be depicted in the diagram or explained in the pattern.

See DROPS lesson: How to read crochet diagrams

Instructions for working several diagrams after each other on the same row/round, will often be written like so: “work A.1, A.2, A.3 a total of 0-0-2-3-4 times". This means you work A.1 once, then A.2 is worked once, and A.3 is repeated (in width) the number of times provided for your size – in this case like so: S = 0 times, M = 0 times, L=2 times, XL= 3 times and XXL = 4 times.

The diagrams are worked as usual: begin with the first row in A.1, then work the first row in A.2 etc.

See DROPS lesson: How to read knitting diagrams

See DROPS lesson: How to read crochet diagrams

The total width of the garment (from wrist-to-wrist) will be larger in the larger sizes, despite the actual sleeves being shorter. The larger sizes have longer sleeve caps and wider shoulders, so there will be a good fit in all sizes.

The measurement sketch/schematic drawing provides information regarding the full length of the garment. If it’s a jumper or a jacket the length is measured from the highest point on the shoulder closest to the neckline, and straight down to the bottom of the garment. It is NOT measured from the tip of shoulder. Similarly, the length of yoke is measured from the highest point on the shoulder and down to where yoke is split into body and sleeves.

On a jacket measures are never taken along bands, unless specifically stated. Always measure inside band stitches when measuring the length.

See DROPS lesson: How to read a schematic drawing

Diagrams are often repeated on the round or in height. 1 repeat is the diagram the way it appears in the pattern. If it says to work 5 repeats of A.1 in the round, then you work A.1 a total of 5 times after/next to each other in the round. If it says to work 2 repeats of A.1 vertically/in height you work the entire diagram once, then begin again at the start and work the entire diagram one more time.

Chain stitches are slightly narrower than other stitches and to avoid working the cast-on edge too tight, we simply chain more stitches to begin with. The stitch count will be adjusted on the following row to fit the pattern and measurement sketch.

The rib edge is more elastic and will contract slightly compared to, for example, stocking stitch. By increasing before the rib edge, you avoid a visible difference in width between the rib edge and the rest of the body.

It’s very easy to cast off too tightly, and by making yarn overs while casting off (and simultaneously casting these off) you avoid a too tight cast off edge.

See DROPS video: How to bind off with yarn overs (yo)

To achieve an even increase (or decrease) you can increase on, for example: every 3rd and 4th row alternately, like so: work 2 rows and increase on the 3rd row, work 3 rows and increase on the 4th. Repeat this until the increase is complete.

See DROPS lesson: Increase or decrease 1 st on every 3rd and 4th row alternately

Should you prefer to work in the round instead of back and forth, you may of course adjust the pattern. You’ll need to add steeks mid-front (usually 5 stitches), and follow the instructions. When you would normally turn and work from the wrong side, simply work across the steek and continue in the round. At the end you’ll cut the piece open, pick up stitches to work bands, and cover the cut edges.

See DROPS video: How to knit steeks and cut open

Should you prefer to work back and forth instead of in the round, you may of course adjust the pattern so you work the pieces separately and then assemble them at the end. Divide the stitches for the body in 2, add 1 edge stitch in each side (for sewing) and work the front and back pieces separately.

See DROPS lesson: Can I adapt a pattern for circular needles into straight needles?

Pattern repeats can vary slightly in the different sizes, in order to get the correct proportions. If you’re not working the exact same size as the garment in the photo, yours might deviate slightly. This has been carefully developed and adjusted so that the complete impression of the garment is the same in all sizes.

Make sure to follow instructions and diagrams for your size!

If you have found a pattern you like which is available in women’s size it’s not very difficult to convert it to men’s size. The biggest difference will be the length of sleeves and body. Start working on the women size that you think would fit across the chest. The additional length will be worked right before you cast off for the armhole/sleeve cap. If the pattern is worked top-down you can add the length right after the armhole or before the first decrease on sleeve.

Regarding additional yarn amount, this will depend on how much length you add, but it is better with a skein too many than too few.

All yarns will have excess fibres (from production) that might come off as lint or shedding. Brushed yarns (ie hairier yarns) have more of these loose, excess fibres, causing more shedding.

Shedding also depends on what is worn under or over the garment, and whether this pulls at the yarn fibres. It’s therefore not possible to guarantee that there will be no shedding

Below are some tips on how to get the best result when working with hairier yarns:

1. When the garment is finished (before you wash it) shake it vigorously so the looser hairs come off. NOTE: do NOT use a lint roller, brush or any method that pulls at the yarn.

2. Place the garment in a plastic bag and put it in your freezer - the temperature will cause the fibres to become less attached to each other, and excess fibres will come off easier.

3. Leave in the freezer for a few hours before taking it out and shaking it again.

4. Wash the garment according to the instructions on the yarn label.

Pilling is a natural process that happens to even the most exclusive of fibers. It's a natural sign of wear and tear that is hard to avoid, and that is most visible in high friction areas of your garment like a sweater's arms and cuffs.

You can make your garment look as new by removing the pilling, using a fabric comb or a pill/lint remover.

Still can't find the answer you need? Then scroll down and leave your question so one of our experts can try to help you. This will be done normally within 5 to 10 working days.
In the meantime, you can read the questions and answers that others have left to this pattern or join the DROPS Workshop on Facebook to get help from fellow knitters/crocheters!

You might also like...

Post a comment to pattern DROPS Children 40-20

We would love to hear what you have to say about this pattern!

If you want to leave a question, please make sure you select the correct category in the form below, to speed up the answering process. Required fields are marked *.

Comments / Questions (27)

country flag Lisa Ducros wrote:

Désolée pour ma précédente demande, je viens de voir le diagramme.

15.01.2024 - 15:33

country flag Lisa Ducros wrote:

Je ne trouve pas le diagramme A1 pour le modèle

15.01.2024 - 15:12

country flag Sam wrote:

Bonjour, pour l'augmentation épaules il y a marqué 16 x TOUS les tours. on obtient 168 m et 6 cm de hauteur au milieu devant. c'est ce que j'ai fait. augmentation manches il y a marqué 7 x tous les 2 tours. puisque c est tous les 2 tours on a toujours à 2m endroit qui se suivent.

10.01.2024 - 19:51

DROPS Design answered:

Bonjour Sam, tant que vous augmentez en respectant le point fantaisie des manches, tout est bien juste, vous aurez effectivement 2 mailles identiques (celle du raglan et celle de la manche), mais ce n'est pas important, tricotez bien les augmentations comme indiqué. Bon tricot!

11.01.2024 - 07:50

country flag Sam wrote:

Bonjour, je tricote t 7/8 ans. je commence avec les augmentation épaule. je dois augmenter 7x tous les 2 rgs. du coup le patron n'est plus juste. pour la 2ème augmentation j'aurai 2 mailles endroit l' une à côté de l'autre.merci

10.01.2024 - 15:06

DROPS Design answered:

Bonjour Sam, pour les augmentations des épaules/manches marteau, vous devez augmenter 16 fois tous les 2 tours (pas 7 x tous les 2 rangs), les augmentations se tricotent progressivement au point fantaisie, autrement dit, le nombre de mailles du devant/du dos va augmenter, quand la 1ère / la dernière de ces mailles est la 1ère maille de A.1, l'augmentation sera tricotée comme la 2ème maille de A.1 et quand la 1ère/dernière de ces mailles est la 2ème maille de A.1, l'augmentation sera tricotée comme la 1ère maille de A.1, ainsi le motif continue en s'élargissant. Bon tricot!

10.01.2024 - 16:25

country flag Sam wrote:

Bonjour, je n'ai pas très bien compris où faut-il mettre le 1er marquer

08.01.2024 - 14:44

DROPS Design answered:

Bonjour Sam, le 1er marqueur se met après les 32-33-35-37-37-38 premières mailles du tour, il sert de repère au milieu du devant. On va ensuite placer 4 autres marqueurs pour délimiter les épaules. Bon tricot!

09.01.2024 - 07:03

country flag Nicole Jank wrote:

Hallo, ich kann das Strukturmuster nicht finden. Wo ist die Strickschrift abgedruckt? Herzliche Grüße

06.01.2024 - 21:48

DROPS Design answered:

Liebe Frau Jank, das Diagram finden Sie neben der Maßskizze, unter dem Ärmel. Viel Spaß beim stricken!

08.01.2024 - 10:24

country flag Marcela wrote:

Encuentro que las instrucciones que aparecen en este patrón para aumentar en las mangas, no coinciden con las que están en el video guía. Cuál de las dos es la correcta? He tenido que desbaratar el tejido 3 veces!

30.11.2023 - 18:25

country flag Bitten wrote:

Hej. Jeg strikker str 122/128. Efter at have taget ud til bærestykket har jeg nu det korrekte antal masker 252 og skal strikke videre uden yderligere udtagninger. Problemet er, at efter at have markeret sidste maske på for- og bagstykke (en retmaske med vrang på hver side iflg. A1) har jeg efterfølgende taget ud 7 gange (et ulige antal). Nu har jeg derfor tre retmasker efter hinanden, hvilket ikke er i overensstemmelse med mønsteret. Hvad er det, jeg ikke forstår? :)

22.09.2023 - 22:10

DROPS Design answered:

Hej Bitten, det er lidt svært at forestille sig, men skal du ikke bare strikke den midterste af de 3 ind i mønsteret så den bliver vrang?

05.10.2023 - 08:34

country flag LISA R CUSHMAN wrote:

I can't see what stitch pattern you are using in this pattern. Where is the explanation in the pattern. Is it a fisherman's rib or a broken rib? Lisa

11.08.2023 - 17:11

DROPS Design answered:

Dear Mrs Cushman, the pattern used in that jumper is worked following diagram A.1 (over 2 sts and 4 rows). Read more about diagrams here. Happy knitting!

14.08.2023 - 08:24

country flag Xenia wrote:

Jeg kan ikke se strikkediagrammet A1

17.05.2023 - 08:06

DROPS Design answered:

Hej Xenia, jo det er nederst i opskriften til højre for måleskitsen :)

17.05.2023 - 09:24