
Popular categories
Looking for a yarn?


Comments / Questions (69)
![]() Sandra wrote:
Sandra wrote:
Patroon A1 aan zijkant onder mouw over 7 steken: is het de bedoeling dat ik 2 omslagen direct achter elkaar maak?
31.03.2026 - 02:03
![]() Barbara wrote:
Barbara wrote:
Buonasera ho finito di lavorare i due pezzi in piano , ma non capisco come unirli partendo dalla metà dietro, avete un video ? Grazie
13.03.2026 - 22:45DROPS Design answered:
Buonasera Barbara, deve iniziare come spiegato nel lavoro, con le magli indicate. Buon lavoro!
14.03.2026 - 11:05
![]() Marta wrote:
Marta wrote:
Buenos días, Normalmente uso la talla S de drops, la más pequeña. Pero según las medidas que pone en el croquis en esta prenda debería usar la L porque tengo contorno de pecho 90. ¿Es esto normal? ¿Qué talla debería tejer? Muchas gracias
01.03.2026 - 11:49DROPS Design answered:
Hola Marta, dependiendo del modelo puede ser que se necesite una talla más grande o más pequeña. Nosotros establecemos las tallas a partir de las medidas obtenidas, pero una S en un patrón no tiene por qué ser igual que la S en otro modelo, ya que pueden ser diseños muy diferentes. Por ejemplo, esta prenda es muy entallada, y otros tops similarmente entallados en DROPS Design tienen también un esquema de medidas similar. Por lo que puede ser que requieras una talla más grande. Por otro lado, los jerseys en DROPS suelen ser más holgados y por lo tanto, las tallas más pequeñas pueden ser más amplias que los tops, lo que significa que puedes trabajar una prenda de menor talla pero que es adecuada para tus medidas. Tienes que elegir la talla a tejer según el esquema de medidas del propio patrón.
09.03.2026 - 00:08
![]() Nat wrote:
Nat wrote:
Hi, I\'m working on the front piece and have finished binding off on both sides. The pattern asks me cut the strand and continue working on the garter stitch. I\'m not sure how to continue from this point. Do I have to reattach the yarn to the live stitches to continue working? If so, how do I do it? I\'m still a beginner. Thank you.
26.02.2026 - 03:25
![]() Perret wrote:
Perret wrote:
MANCHES: Monter 33-33-37-37-40-40 mailles avec l'aiguille circulaire 3 en Safran. ...augmentant ...24-24-26-26-29-29 ... = 57-57-63-63-69-69 mailles. Tricoter maintenant et augmenter ainsi: 1 maille lisière... A.2 au-dessus des 3 mailles suivantes, A.3 au-dessus des 48-48-54-54-60-60 mailles suivantes Il y a une erreur dans le calcul des mailles. On est à 57, puis de nouveau à 48...? Ceci pourrait être corrigé pour plus de clarté. Merci!
01.10.2025 - 12:16DROPS Design answered:
Bonjour Mme Perret, vous continuez à tricoter les 57 mailles que vous aviez auparavant ainsi: 1 m lisière, les 3 m de A.2, 8 fois les 6 m de A.3, les 4 m de A.4 et 1 m lisière soit: 1+3+(6x8)+4+1=57 mailles. Bon tricot!
01.10.2025 - 16:49
![]() Zoe wrote:
Zoe wrote:
Should the pattern read to garter stitch for 5 cm on the front piece before casting on for the armhole to match the back piece please. It doesn't say to on the pattern but can't see how it will match up otherwise. Thanks
30.07.2025 - 19:37DROPS Design answered:
Dear Zoe, back piece will be longer than front piece so that neckline is deeper on front piece, reason why you don't work these extra 5 cm on front piece. Happy knitting!
31.07.2025 - 09:20
![]() Abi wrote:
Abi wrote:
Hi, new knitter here. I'm confused on the cast on part. Cast on 1-1-1-1-2-2 stitches 4 times. Is that cast on 1 stitch in each end in 4 rows? Thank you.
29.06.2025 - 06:21DROPS Design answered:
Dear Abi, you cast on 4 stitches for each side (1 stitch 4 times) Since you only cast on at the end of each row, you will need to work 8 rows, casting on 1 stitch on each side 4 times (8 stitches cast on in total). Happy knitting!
29.06.2025 - 19:04
![]() Abby wrote:
Abby wrote:
New knitter here.. can you please explain Cast on 1-1-1-1-2-2 stitches 4 times on each side.. Thank you for your response.
28.06.2025 - 09:49DROPS Design answered:
Dear Abby, it indicates the number of stitches that you will need to cast on for each side. Since you cast on at the end of each row, you will work as many rows as necessary to get the needed number of stitches for each side. For the right side you cast on 1 stitch (or 2 for the larger sizes) at the end of the 1st, 3rd, 5th and 7th row; for the wrong side 1 stitch (or 2) at the end of the 2nd, 4th, 6th and 8th row. That way you have 4 stitches cast on on each side (you have worked 8 rows for this). Happy knitting!
29.06.2025 - 19:16
![]() Lilli Østergård Jacobsen wrote:
Lilli Østergård Jacobsen wrote:
Kunne godt bruge man kunne se blusen bagfra. ???
31.03.2025 - 07:04DROPS Design answered:
Hei Lilli. Takk for ditt innspill. Vi skal se i bildearkivet vårt om vi finner et bilde bakfra som kan brukes (Oppdatert: var dessverre ingen bilder bakfra i vårt bildearkiv). mvh DROPS Design
31.03.2025 - 19:18
![]() Tiny wrote:
Tiny wrote:
Voor het lijf moet ik gesloten verder op de rondbreinaald en patroon A1 bij armsgat. Er staat 1e naald de omslag en volgende naald de omslag averechts breien voor een gaatje. Als ik in de rondte brei is 2e naald ajour toch altijd rechts?? of nu uitzondering en omslag dan toch averechts /breien aan GOEDE kant
26.03.2025 - 18:03DROPS Design answered:
Dag Tiny,
Ja, je hebt gelijk. Je breit inderdaad de omslag recht wanneer je in de rondte breit, zodat er een gaatje ontstaat.
30.03.2025 - 10:42
|
|||||||||||||||||||
Mariposa#mariposatop |
|||||||||||||||||||
 |
 |
||||||||||||||||||
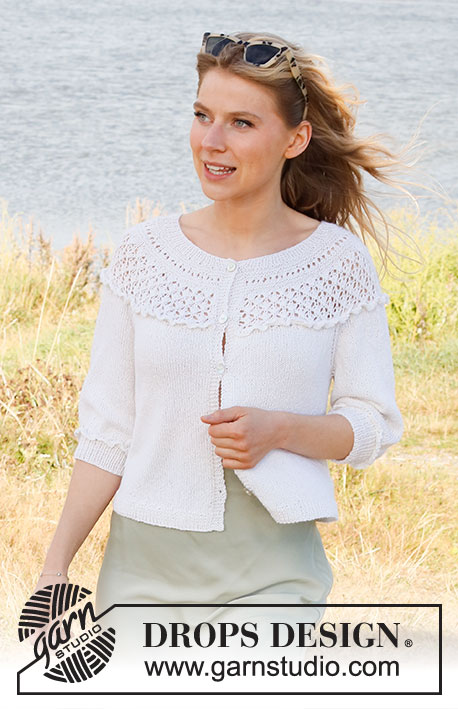
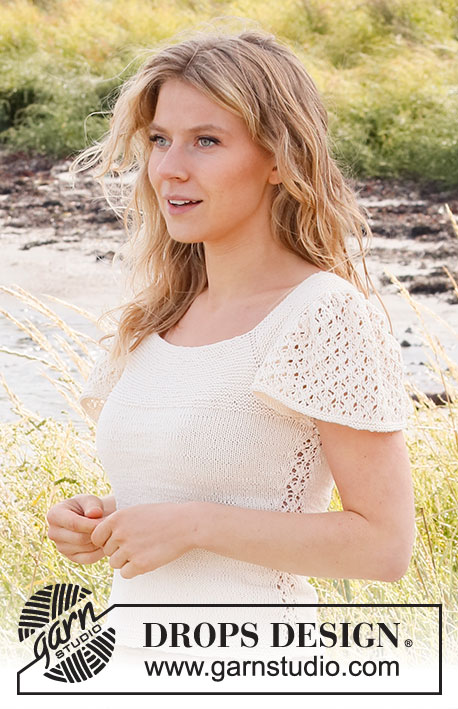
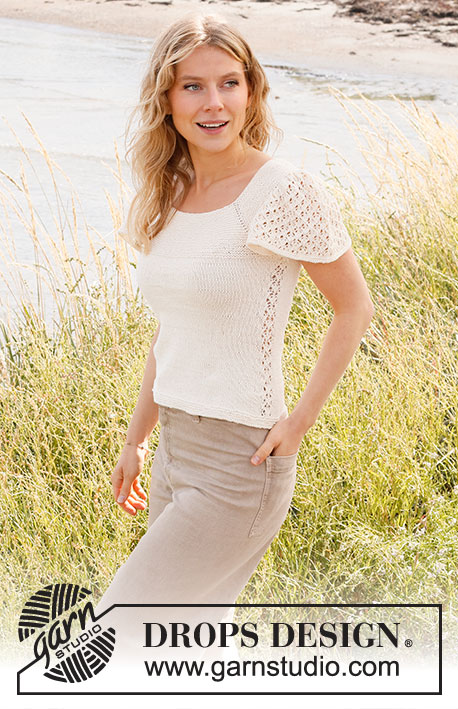
Knitted top in DROPS Safran. The piece is worked top down with garter stitch, lace pattern and short puffed sleeves. Sizes S - XXXL.
DROPS 222-20 |
|||||||||||||||||||
|
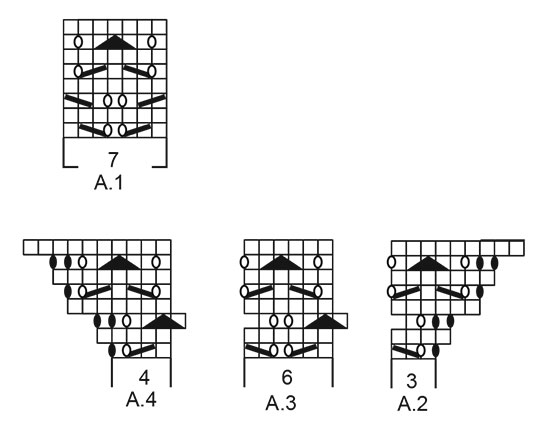
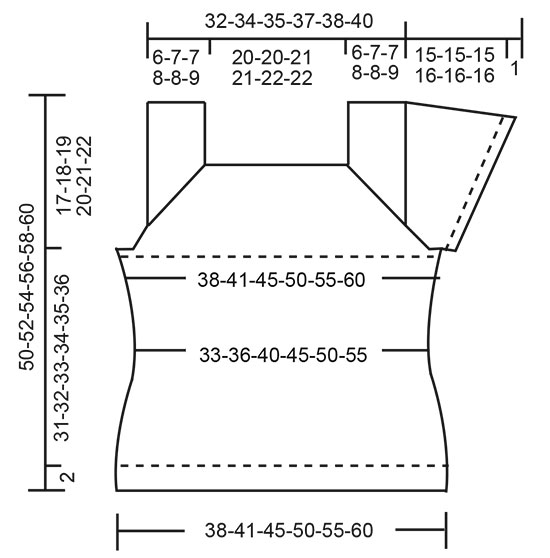
------------------------------------------------------- EXPLANATIONS FOR THE PATTERN: ------------------------------------------------------- RIDGE/GARTER STITCH (worked in the round): 1 ridge in height = 2 rounds; Knit 1 round and purl 1 round. RIDGE/GARTER STITCH (worked back and forth): Knit all rows. 1 ridge in height = Knit 2 rows. PATTERN: See diagrams A.1 to A.4. The diagrams show all rows in the pattern from the right side. INCREASE TIP-1 (evenly spaced): To work out how to increase evenly, count the total number of stitches to be increased over (e.g. 44 stitches) and divide by the number of increases to be made (e.g. 2) = 22. In this example, increase by making 1 yarn over after each 22nd stitch. On the next row work the yarn overs twisted to avoid holes. INCREASE TIP-2 (for sides of body): Work until there is 1 stitch left before A.1, make 1 yarn over, knit 1, work A.1, knit 1, 1 yarn over (= 2 stitches increased). On the next round knit the yarn overs twisted to avoid holes. Then work the new stitches in stockinette stitch. DECREASE TIP (for sides of body): Decrease 1 stitch on each side of A.1 as follows: Work until there are 2 stitches left before A.1, knit 2 together, work A.1, slip 1 stitch as if to knit, knit 1 and pass the slipped stitch over the knitted stitch (= 2 stitches decreased). BINDING-OFF TIP: To avoid the bind-off edge being tight you can bind off with a larger size needle. If the edge is still tight, make 1 yarn over after approx. each 4th stitch at the same time as binding off; the yarn overs are bind off as normal stitches. ------------------------------------------------------- START THE PIECE HERE: ------------------------------------------------------- TOP – SHORT OVERVIEW OF THE PIECE: The piece is worked top down. The front and back pieces are worked separately until the garter stitch sections are finished. Then they are joined and the body is continued in the round. The sleeves are worked back and forth with circular needle, top down. FRONT PIECE: Cast on 94-94-100-100-106-106 stitches with circular needle size 3 MM = US 2.5 and Safran. Change to circular needle size 2.5 MM = US 1.5. Insert 1 marker in the 23rd-23rd-25th-25th-27th-27th stitch in from each side (= 48-48-50-50-52-52 stitches between marker-stitches). Work GARTER STITCH back and forth – read description above, at the same time on the first row, increase 1 stitch on each side of both marker-stitches (= 4 stitches increased on the row) – increase by making 1 yarn over. On the next row, knit the yarn overs twisted to avoid holes. Increase like this every 2nd row a total of 14-17-17-19-19-21 times = 150-162-168-176-182-190 stitches. Knit 1 row back from the wrong side after the last increase. REMEMBER THE KNITTING GAUGE! The piece now measures 6-7-7-8-8-9 cm = 2⅜"-2¾"-2¾"-3⅛"-3⅛"-3½". The next row is worked as follows from the right side: Loosely bind off the first 37-40-42-44-46-48 stitches (= shoulder), knit 76-82-84-88-90-94 (the first of these stitches is already on the right needle) and increase 0-0-0-2-4-8 stitches evenly over these stitches – read INCREASE TIP-1, loosely bind off the last 37-40-42-44-46-48 stitches (= shoulder). Cut the strand. Now work garter stitch back and forth over the 76-82-84-90-94-102 stitches, at the same time as you cast on stitches for the armholes at the end of each row as follows: Cast on 1-1-1-1-2-2 stitches 4 times on each side = 84-90-92-98-110-118 stitches. Cut the strand and lay the piece to one side. BACK PIECE: Cast on 70-70-76-76-82-82 stitches with circular needle size 3 MM = US 2.5 and Safran. Change to circular needle size 2.5 MM = US 1.5. Insert 1 marker in the 11th-11th-13th-13th-15th-15th stitch in from each side (= 48-48-50-50-52-52 stitches between marker-stitches). Work garter stitch back and forth, at the same time on the first row, increase 1 stitch on each side of both marker-stitches (= 4 stitches increased on the row) – increase by making 1 yarn over. On the next row, knit the yarn overs twisted to avoid holes. Increase like this every 2nd row a total of 14-17-17-19-19-21 times = 126-138-144-152-158-166 stitches. Knit 1 row back from the wrong side after the last increase. The piece measures approx. 6-7-7-8-8-9 cm = 2⅜"-2¾"-2¾"-3⅛"-3⅛"-3½". The next row is worked as follows from the right side: Loosely bind off the first 25-28-30-32-34-36 stitches (= shoulder), knit 76-82-84-88-90-94 (the first of these stitches is already on the right needle) and increase 0-0-0-2-4-8 stitches evenly over these stitches, loosely bind off the last 25-28-30-32-34-36 (= shoulder). Cut the strand. Continue with garter stitch back and forth over the 76-82-84-90-94-102 stitches for 5 cm = 2". Cast on stitches for the armholes at the end of each row as follows: Cast on 1-1-1-1-2-2 stitches 4 times = 84-90-92-98-110-118 stitches. Insert 1 marker mid-back (= 42-45-46-49-55-59 stitches on each side). BODY: Now the 2 pieces are joined together, working from the right side. Start mid-back with circular needle size 3 MM = US 2.5 and work as follows: Work the first 42-45-46-49-55-59 stitches, cast on 7-9-17-21-21-25 stitches (= in side under sleeve), work the 84-90-92-98-110-118 stitches from the front piece onto the needle, cast on 7-9-17-21-21-25 stitches (= in side under sleeve), work the last 42-45-46-49-55-59 stitches on the back piece. There are 182-198-218-238-262-286 stitches on the round. Work stockinette stitch in the round and working A.1 over the 7 stitches mid-under both sleeves. When the piece measures 3-3-3-4-4-4 cm = 1⅛"-1⅛"-1⅛"-1½"-1½"-1½" from the armholes, decrease 1 stitch on each side of A.1 in both sides – read DECREASE TIP. Decrease like this every 2½ cm = 1" a total of 6 times = 158-174-194-214-238-262 stitches. When the piece measures 18 cm = 7", increase 1 stitch on both sides of A.1 – read INCREASE TIP-2! Increase like this every 2 cm = ¾" a total of 6 times = 182-198-218-238-262-286 stitches. When the piece measures approx. 31-32-33-34-35-36 cm = 12¼"-12½"-13"-13⅜"-13¾"-14¼" – adjust so you finish after a complete repeat of A.1 in height, change to circular needle size 2.5 MM = US 1.5 and work 2 cm = ¾" with GARTER STITCH in the round – read description above. Then bind off loosely with knit – read BINDING-OFF TIP. The top measures approx. 50-52-54-56-58-60 cm = 19¾"-20½"-21¼"-22"-22¾"-23⅝" from the shoulder down. SLEEVES: Cast on 33-33-37-37-40-40 stitches with circular needle size 3 MM = US 2.5 and Safran. Knit 1 row. Then work the next row from the wrong side as follows: 1 edge stitch in garter stitch, purl until there is 1 stitch left on the row, at the same time as you increase 24-24-26-26-29-29 stitches evenly spaced – remember INCREASE TIP-1, and finish with 1 edge stitch in garter stitch = 57-57-63-63-69-69 stitches. Now work pattern and increase as follows: 1 edge stitch in garter stitch, A.2 over the next 3 stitches, A.3 over the next 48-48-54-54-60-60 stitches (= 8-8-9-9-10-10 repeats of 6 stitches), A.4 over the next 4 stitches and 1 edge stitch in garter stitch. Continue this pattern back and forth – each time the diagrams are completed, you have increased 12 stitches and there is room for 2 more repeats of A.3 between A.2 and A.4. When you have worked the diagrams 6-6-6-6½-6½-6½ times in height there are 129-129-135-141-147-147 stitches on the needle. The sleeve measures approx. 15-15-15-16-16-16 cm = 6"-6"-6"-6¼"-6¼"-6¼" from the cast-on edge. The next row from the right side is worked as follows: Knit all stitches and cast on 7-9-17-21-21-25 stitches at the end of the row = 136-138-152-162-168-172 stitches. Now continue in the round and work 2 ridges. Bind off – remember BINDING-OFF TIP. The sleeve measures 16-16-16-17-17-17 cm = 6¼"-6¼"-6¼"-6¾"-6¾"-6¾". Work the other sleeve in the same way. ASSEMBLY: Sew shoulder seams inside 1 edge stitch in garter stitch. Fit the sleeve evenly into the armhole, with the cast-on edge (33-33-37-37-40-40 stitches) covering 7-7-8-8-9-9 cm = 2¾"-2¾"-3⅛"-3⅛"-3½"-3½" on each side of the shoulder seam. Fit the rest of the sleeve around the armhole – Sew inside the cast-on edge on the sleeve and the bind-off edge on the body. |
|||||||||||||||||||
Diagram explanations |
|||||||||||||||||||
|
|||||||||||||||||||
 |
|||||||||||||||||||
 |
|||||||||||||||||||
Have you finished this pattern?Tag your pictures with #dropspattern #mariposatop or submit them to the #dropsfan gallery. Do you need help with this pattern?You'll find 27 tutorial videos, a Comments/Questions area and more by visiting the pattern on garnstudio.com. © 1982-2026 DROPS Design A/S. We reserve all rights. This document, including all its sub-sections, has copyrights. Read more about what you can do with our patterns at the bottom of each pattern on our site. |
|||||||||||||||||||


With over 40 years in knitting and crochet design, DROPS Design offers one of the most extensive collections of free patterns on the internet - translated to 17 languages. As of today we count 324 catalogs and 12290 patterns - 12280 of which are translated into English (US/in).
We work hard to bring you the best knitting and crochet have to offer, inspiration and advice as well as great quality yarns at incredible prices! Would you like to use our patterns for other than personal use? You can read what you are allowed to do in the Copyright text at the bottom of all our patterns. Happy crafting!
Post a comment to pattern DROPS 222-20
We would love to hear what you have to say about this pattern!
If you want to leave a question, please make sure you select the correct category in the form below, to speed up the answering process. Required fields are marked *.