
Popular categories
Looking for a yarn?


Comments / Questions (53)
![]() Giuseppina wrote:
Giuseppina wrote:
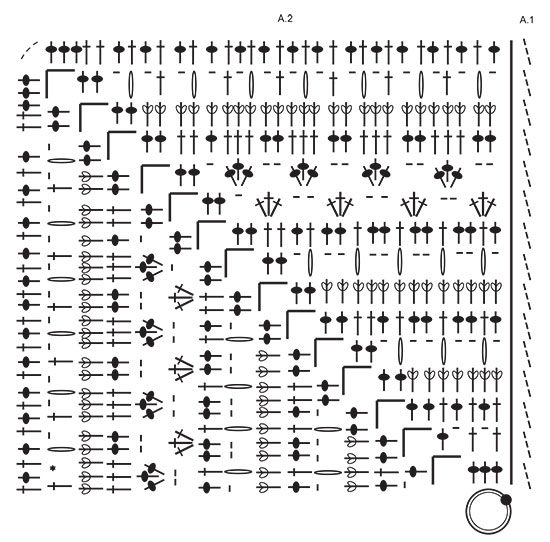
Buongiorno, ho difficoltà con l inizio dei giri il diagramma1 come devo leggerlo e mi direste da dove comincio a contare le maglie.grazie. se ci fosse un diagramma 2 intero e non un solo quarto.
11.09.2025 - 06:12DROPS Design answered:
Buongiorno Giuseppina, il diagramma A.1 mostra l'inizio e la fine dei giri. Poi deve ripetere il diagramma 2. Buon lavoro!
14.09.2025 - 09:30
![]() Xondra wrote:
Xondra wrote:
Do you have a full square in diagram form please and is the pattern available in American terms
11.09.2025 - 04:21DROPS Design answered:
Dear Xondra, here is the pattern with US terms. The square is worked according to chart A.1 (shows the beginning of the square) and chart A.2 (shows the rest of the square), which is repeated 4 times around the chain ring. Happy crochetting!
15.09.2025 - 01:42
![]() Monique wrote:
Monique wrote:
Bonjour, Je suis en train de réaliser cet ouvrage et personnellement la première bride en début de rangs je la remplace par 2 mailles en l'air au lieu de 3. Cela correspond mieux à une hauteur de bride. Bonne journée à tous.
20.06.2025 - 13:09
![]() Agathe B wrote:
Agathe B wrote:
Bonjour, J’ai du mal à comprendre le diagramme A1, est-ce que les 3 mailles en l’air remplacent la première bride de A2? Ou bien c’est en plus? Le résultat est bizarre pour les rangs 5/8/10/12/14 non? Cela créé une barre de 3 mailles au milieu du motif. Comment démarre-t-on ces rangs exactement (le texte n’est pas clair)? Merci beaucoup!
04.05.2025 - 21:55DROPS Design answered:
Bonjour Agathe, les 3 premières mailles en l'air remplacent la 1ère maille de A.1 (cf légende 2ème symbole); aux rangs cités, vous pouvez considérer ces 3 mailles en l'air comme la dernière maille du tour, ainsi, vous n'aurez pas de décalage, ou bien faire ces 3 mailles en l'air en plus (sans qu'elles ne remplacent la 1ère maille) si vous le préférez. Bon crochet!
05.05.2025 - 08:44
![]() Sandra Gonzaga wrote:
Sandra Gonzaga wrote:
Existe algum video a explicar como unir os quadrados? Obrigada
08.03.2025 - 23:27DROPS Design answered:
Bom dia, Existe, sim. No separador geral "Dicas e Ajuda" encontra vários vídeos separados por categorias. No link abaixo, encontra os tutoriais em vídeo relacionados com a montagem de quadrados em croché: https://www.garnstudio.com/videos.php?c=assembly&lang=pt Bons crochés!
11.03.2025 - 10:32
![]() Aline Jacquey wrote:
Aline Jacquey wrote:
Les trois mailles en l'air du début de chaque rang doivent-elles être rajouté sur le diagramme
31.12.2024 - 10:37DROPS Design answered:
Bonjour Mme Jacquey, les 3 mailles en l'air de A.1 remplacent la 1ère maille/bride du tour - cf légende du 2ème symbole. Bon crochet!
02.01.2025 - 15:23
![]() CARYL wrote:
CARYL wrote:
CAN THE COMMENTS BE TRANSLATED INTO ENGLISH?
19.11.2024 - 13:41DROPS Design answered:
Dear Caryl, you can try to use any online translator to see all previous comments & questions, but please feel free to ask your question here so that we can try to help you.
19.11.2024 - 15:59
![]() Sara wrote:
Sara wrote:
Varv nr. 10 vad innebär det? har försökt söka efter den symbolen tre kors tillsammans för att förstå hur den är gjord men hittar ingenting? sen undrar jag också om man ska lägga ihop dem för på diagonalen är det 4x2 st kors tillsammans och lodrät är det bara 3x2 st? ska det inte vara lika många på varje varv? och på varv nr.9 så visas det en utputande kant på bilden som på varv nr.7 men enligt diagrammet så blir det inte någon sån kant?
13.10.2024 - 23:32DROPS Design answered:
Hej Sara. Symbolen 3 kors betyder att du virkar 3 stolpar i maskan under (dvs 5e symbolförklaringen, och så gör man den 3 gånger). Mvh DROPS Design
14.10.2024 - 09:14
![]() Michaela wrote:
Michaela wrote:
Ja, danke! Also doch in der 5. Reihe 3 Stäbchen je Gruppe in der 5. Reihe, und nicht 4 wie es in der Anleitung steht. Nochmals danke!
29.05.2024 - 11:19
![]() Michaela wrote:
Michaela wrote:
Das Problem ist die 4. Reihe, dort habe ich zu wenig Sstäbchen zum Zusammenhäkeln? 4 Stäbchen aus der 4. Reihe werden zu einem zusammengehäkelt, die nächsten 4 Stäbchen der 4. Reihe ebenfalls - damit sind 8 Stäbchen aus der 4. Reihe abgemascht, und es ist nur noch ein Stäbchen aus der 4. Reihe übrig - es sollten aber nochmal 4 Stäbchen zusammengehäkelt werden. Tut mir leid, wenn die Lösung offensichtlich ist, aber als Anfänger sehe ich sie einfach nicht.
27.05.2024 - 13:51DROPS Design answered:
Liebe Michaela, in das 1. Teil von A.2 (vor der Ecke) haben Sie bei der 1. Reihe 3 Stächen, bei der 2. Reihe (1 Stb, 1 Lm) x 3, bei der 3. Reihe (1 Stb in das Stb, 1 Stb um die Lm) x 2 + 1 Stb in das letzte Stb + 2 Stb um die Lm = 7 Stb. bei der 4. Reihe: 1 Stb (relief Stb) in je die 7 Stb + 2 Stb um die Luftmaschenbogen; bei der 5. Reihe wie zuvor beschrieben =3 Stb-Gruppe/Noppe + 2 Stb um die Luftmaschenbogen, usw.. kann das Ihnen helfen?
27.05.2024 - 16:32
|
||||||||||||||||||||||||||||
Day By The Sea#daybytheseablanket |
||||||||||||||||||||||||||||
 |
 |
|||||||||||||||||||||||||||
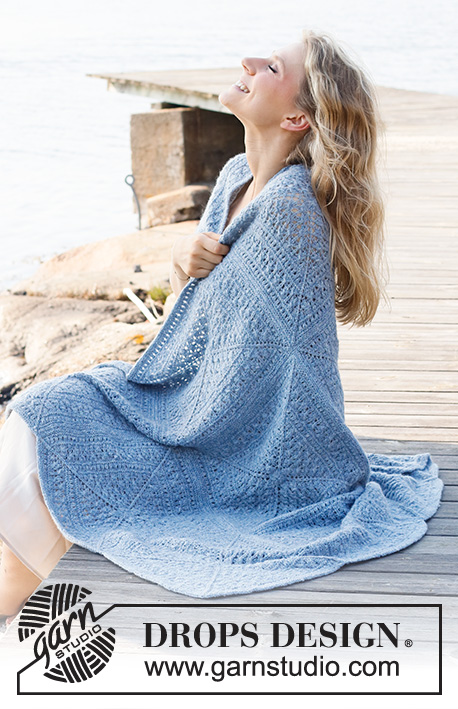
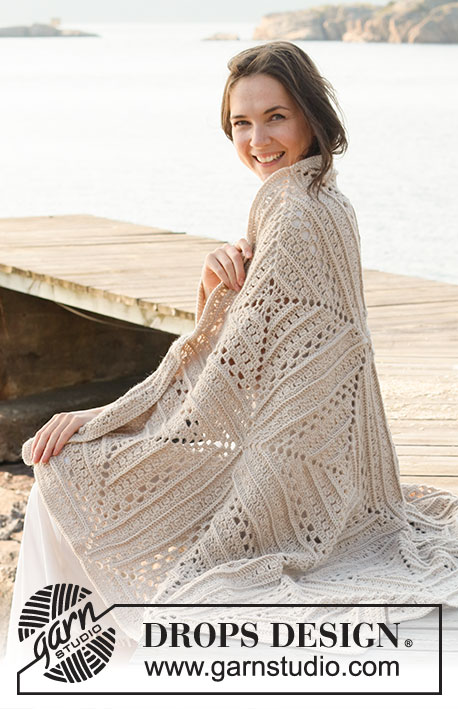
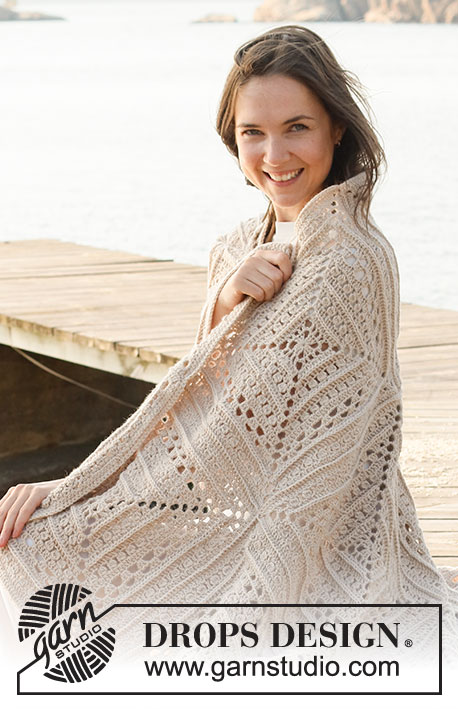
Crocheted blanket in DROPS Lima.
DROPS 221-2 |
||||||||||||||||||||||||||||
|
------------------------------------------------------- EXPLANATIONS FOR THE PATTERN: ------------------------------------------------------- PATTERN: See diagrams A.1 and A.2. Diagram A.1 shows how the rounds start and finish. CHAIN STITCH: If you work outermost on the hook the chain stitch will often be too tight; 1 chain stitch should be as long as 1 double crochet is wide. ------------------------------------------------------- START THE PIECE HERE: ------------------------------------------------------- BLANKET – SHORT OVERVIEW OF THE PIECE: The blanket consists of 12 squares worked according to the diagrams. The squares are crocheted together and an edge is crocheted around the blanket to finish. SQUARE: Use crochet hook size 4 MM = US 6 and Lima. Read CHAIN STITCH in explanations above. Work diagram A.2 a total of 4 times around the chain-stitch ring - A.1 shows how the round begins and ends. REMEMBER THE CROCHET GAUGE! Work a total of 12 squares. ASSEMBLY: Lay the squares out, with 3 in width and 4 in length. Make sure all the squares have the right side up. Use Lima and work the squares together, first in width then in length. Lay 2 squares together, wrong side to wrong side, and work through both layers from the right side as follows: Fasten the strand with 1 single crochet around the chain-spaces in the corner, * work 1 single crochet in each stitch as far as the next corner (= 3 chain stitches), work 1 single crochet around the corner, 2 chain stitches and 1 single crochet around the next corner (= 3 chain stitches). Work from *-* until all the squares have been worked together, but on the last square finish with 1 single crochet in the last corner (= 3 chain stitches). Repeat along the other strips in width. Work the strips together lengthwise in the same way. EDGE: Use Lima and crochet hook size 4 MM = US 6. Start by fastening the strand with 1 slip stitch in the first corner, then work as follows: Work 3 chain stitches and 2 double crochets around the first corner. * Work 1 double crochet in each stitch as far as the corners between squares, work 1 double crochet around each corner *, work from *-* to the last corner on this side of the blanket. Around corner 2 work 3 double crochets, work from *-* to the last corner on this side of the blanket. Around corner 3 work 3 double crochets, work from *-* to the last corner on this side of the blanket. Around corner 4 work 3 double crochets, work from *-* as far as the first corner and finish with 1 slip stitch in the 3rd chain stitch at the beginning of the round. Cut and fasten the strand. |
||||||||||||||||||||||||||||
Diagram explanations |
||||||||||||||||||||||||||||
|
||||||||||||||||||||||||||||
 |
||||||||||||||||||||||||||||
Have you finished this pattern?Tag your pictures with #dropspattern #daybytheseablanket or submit them to the #dropsfan gallery. Do you need help with this pattern?You'll find 9 tutorial videos, a Comments/Questions area and more by visiting the pattern on garnstudio.com. © 1982-2026 DROPS Design A/S. We reserve all rights. This document, including all its sub-sections, has copyrights. Read more about what you can do with our patterns at the bottom of each pattern on our site. |
||||||||||||||||||||||||||||


With over 40 years in knitting and crochet design, DROPS Design offers one of the most extensive collections of free patterns on the internet - translated to 17 languages. As of today we count 324 catalogs and 12291 patterns - 12281 of which are translated into English (US/in).
We work hard to bring you the best knitting and crochet have to offer, inspiration and advice as well as great quality yarns at incredible prices! Would you like to use our patterns for other than personal use? You can read what you are allowed to do in the Copyright text at the bottom of all our patterns. Happy crafting!
Post a comment to pattern DROPS 221-2
We would love to hear what you have to say about this pattern!
If you want to leave a question, please make sure you select the correct category in the form below, to speed up the answering process. Required fields are marked *.