
Looking for a yarn?


Comments / Questions (89)
![]() Julie wrote:
Julie wrote:
Bonjour n'y aurait il pas une erreur, pour moi quand on fait les diminutions sous les manches, il y a 8 diminutions mais il n'y a pas d'augmentations puisqu'elles sont compensées par les diminutions du devant
04.08.2018 - 16:43DROPS Design answered:
Bonjour Julie, quand on diminue au milieu sous la manche, on diminue 2 m (= 1 m avant le marqueur du début du tour, 2 m end (avec le marqueur au milieu) et 1 m après le début du tour). Bon tricot!
06.08.2018 - 09:05
![]() Zubács Gézáné wrote:
Zubács Gézáné wrote:
Szeretném megkérdezni, hogy a minta diagramban a visszája sorok nincsenek rajzolva? Azt értem, hogy a színe oldal felől mutatják a szemeket, de az nem világos, hogy, ha számozva lennének, akkor 1,3,5 sorok, vagy 1,2,3, soroknak kell érteni? További kérdésem még, hogy az első 6 szaporítás minden sorban azt jelenti, hogy ott is kell ráhajtás, ami a visszája sor lenne? Köszönöm szíves válaszukat. üdvözlettel Anikó
09.07.2018 - 09:14DROPS Design answered:
Kedves Anikó, mivel a darabot körben kötjük a körkötőtűn, a fonákoldalról nem kötünk, így a diagram minden sorát úgy kötjük, ahogy a rajzon látjuk, jobbról balra. Ha ez síkban (oda vissza haladva kötött darab lenne, akkor a leírásban benne lenne hogy a SZO-n vagy a FO-n kell-e kezdeni a minta kötését. Sikeres kézimunkázást!
23.07.2018 - 01:21
![]() Paula wrote:
Paula wrote:
Hallo Leider finde ich nirgendwo einen Hinweis, ob das Diagramm ( A.1 bis A.3) wie üblich von unten nach oben zu lesen/stricken ist oder von oben nach unten, wie auch der Pulli gestrickt wird. ....? Außerdem wird von Hin-und Rückreihen gesprochen obwohl in Runden gestrickt wird.
16.05.2018 - 21:33DROPS Design answered:
Liebe Paula, der Pullover wird von oben nach unten in der Runde gestrickt, aber die letzten Reihen ganz unten werden Separat wie beschrieben in Reihen gestrickt. Diagramme lesen Sie wie üblich von unten nach oben, und jede Runde von rechts nach links - siehe auch hier. Viel Spaß beim stricken!
17.05.2018 - 08:30Wendy Hawkins wrote:
I am very sorry but I think I have messed this question up - I cannot understand the instructions towards the end of the BODY when working from mid front to mid back and mid back to mid front . Will this not cause a split at mid front and mid back and make it longer at the sides? Please explain
28.04.2018 - 15:20DROPS Design answered:
Dear Mrs Hawkins, when you continue over half the piece you will cast off sts at the beg of each row to shape the sides and the bottom of piece. Happy knitting!
30.04.2018 - 11:47Wendy Hawkins wrote:
I just posted a question but did not specify which pattern - it is drops 177-6
28.04.2018 - 15:14Rasa wrote:
Hallo! Wie soll man die Erklärung "insgesamt 6-12-10-22-18-30 x zunehmen" verstehen? Und dann noch die 2. Runde. Wenn es 6 steht, heisst es in einer Reihe 6 Maschen verteilt zunehmen? RUMPFTEIL: In jeder Runde insgesamt 6-12-10-22-18-30 x zunehmen, dann in jeder 2. Runde insgesamt 28-28-30-28-34-32 x (= insgesamt 34-40-40-50-52-62 x). Danke
17.03.2018 - 16:23DROPS Design answered:
Liebe Rasa, in der 1. Größe werden Sie die Raglanzunahmen am Rumpfteil 6 Mal in jeder Rd und 28 Mal in jeder 2. Runde wiederholen, und gleichzeitig für die Ärmel 28 M in jeder 2. Runde und 1 x in jeder 4. Runde zunehmen - siehe RAGLANZUNAHMEN. Viel Spaß beim stricken!
19.03.2018 - 09:54
![]() Becque wrote:
Becque wrote:
Bonsoir j ai regardé vos vidéos et j'ai trouvé la réponse (c'est normal pour les trous), la prochaine fois j'irai directement les voir. désolé de ne pas l'avoir fait avant
02.03.2018 - 18:30
![]() Becque wrote:
Becque wrote:
Bonjour lorsque je fais mes augmentations pour le raglan (jetée puis tricoté torse) cela fait des trous. est ce normale ? merci de votre aide
02.03.2018 - 17:48DROPS Design answered:
Bonjour Mme Becque, il peut effectivement y avoir un petit trou qui devrait s'estomper après blocage. Bon tricot!
05.03.2018 - 07:55
![]() Rosemary wrote:
Rosemary wrote:
Hi. In the yoke section it says the following: Continue the pattern as follows (A.1-A.3 repeated to finished length). Does this mean only A1and A3 are repeated in sequence for the entire row leaving out A2? I have included A2 on row 13 of the pattern and it's not working out. Thank you
09.12.2017 - 00:00DROPS Design answered:
Dear Rosemary, no, you should not leave out A.2. Continue with A.1, A.2 and A.3 as before. Happy Knitting!
09.12.2017 - 10:41
![]() Sue wrote:
Sue wrote:
Thank you so much for your quick response to my question. I understand the directions now about the raglan increases. Beautiful pattern
06.09.2017 - 12:41
|
||||||||||||||||||||||
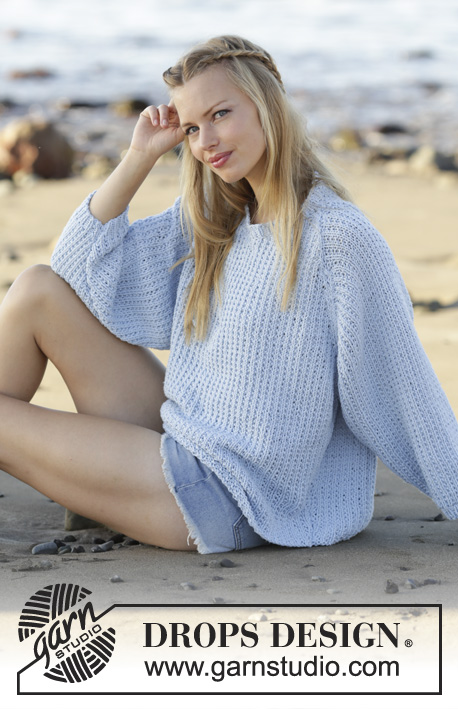
Chevron Delight#chevrondelightsweater |
||||||||||||||||||||||
|
|
||||||||||||||||||||||
Jumper worked top down with raglan and lace pattern in DROPS BabyAlpaca Silk. Sizes S - XXXL.
DROPS 177-6 |
||||||||||||||||||||||
|
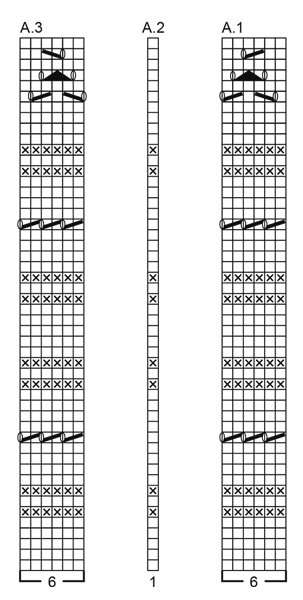
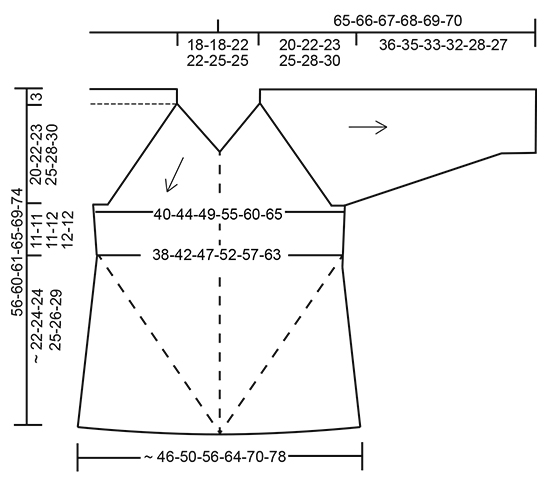
RIDGE/GARTER STITCH (worked in the round): 1 ridge = 2 rounds. Knit 1 round and purl 1 round. PATTERN: See diagrams A.1 to A.3. The diagrams show all the rows in the pattern from the right side. INCREASE TIP: To work out how to increase evenly, count the total number of stitches on the needle (e.g. 124 stitches) and divide by the number of increases to be made (e.g. 12) = 10.3. In this example, increase after approx. every 10th stitch. Increase 1 stitch by making 1 yarn over, on the next round work the yarn overs twisted knit to prevent holes. RAGLAN: Increase to raglan on each side of the stitch with the marker thread mid front/mid back and in each of side of the sleeves (i.e. on each side of the 1st and 4th marker thread, before the 3rd and 6th marker thread and after the 2nd and 5th marker thread). Increase 1 stitch by making 1 yarn over, on the next round the yarn overs are worked twisted knit to prevent holes. The increased stitches are worked into the pattern as you go. NOTE: The increases are different on the body and sleeves as explained in the text. DECREASE TIP-1 (for the sides of the body and mid underarm): Decrease 1 stitch on each side of each marker thread as follows: Work until there are 3 stitches left before the marker, knit 2 together, knit 2 (the marker sits in the middle of these 2 stitches), slip 1 stitch as if to knit, knit 1, pass the slipped stitch over the knitted stitch (= 2 stitches decreased). DECREASE TIP-2 (for the sides of the body): Decrease 2 stitches on each side of each marker as follows: Work until there are 5 stitches left before the marker, * knit 2 together *, repeat from *-* in total 2 times (= 2 stitches decreased), knit 2 (the marker sits in the middle of these 2 stitches), * slip 1 stitch as if to knit, knit 1, pass the slipped stitch over the knitted stitch *, repeat from *-* in total 2 times (= 4 stitches decreased). ---------------------------------------------------------- JUMPER: The piece is worked with circular needle and from the top down. The sleeves are worked with a short circular needle/double pointed needles. YOKE: Cast on 124-124-132-132-148-148 stitches with circular needle size 2.5 mm and BabyAlpaca Silk. Work 3 RIDGES – see description above, AT THE SAME TIME on the 4th round increase 12-12-20-20-24-24 stitches evenly along the round – READ INCREASE TIP = 136-136-152-152-172-172 stitches. Repeat the increase on the 6th round = 148-148-172-172-196-196 stitches on the needle. Change to circular needle size 3 mm and work the next round as follows from the left shoulder back: Work A.1 across the first 30-30-36-36-42-42 stitches (= 5-5-6-6-7-7 repeats of 6 stitches), insert the 1st marker thread in the next stitch and work the stitch A.2 (= mid back), work A.3 across the next 30-30-36-36-42-42 stitches (= 5-5-6-6-7-7 repeats of 6 stitches), insert the 2nd marker thread before the next stitch, work A.1 across the next 12 stitches (= 2 repeats of 6 stitches), work A.2 (= 1 stitch), insert the 3rd marker thread before the next stitch (= 13 stitches on the right sleeve between the 2nd and 3rd marker thread), work A.1 across the next 30-30-36-36-42-42 stitches, insert the 4th marker thread in the next stitch and work this stitch A.2 (= mid front), work A.3 across the next 30-30-36-36-42-42 stitches, insert the 5th marker thread before the next stitch, work A.2 (= 1 stitch), work A.3 across the next 12 stitches, insert the 6th marker thread before the next stitch (= 13 stitches on the left sleeve between the 5th and 6th marker thread). There are now 6 marker threads in the piece. Continue the pattern as follows (A.1-A.3 repeated to finished length). AT THE SAME TIME on the first round after the marker threads have been inserted begin the increases to RAGLAN – see description above. Increase as follows: BODY: Increase every round in total 6-12-10-22-18-30 times, then every 2nd round in total 28-28-30-28-34-32 times (= in total 34-40-40-50-52-62 times). SLEEVE: Increase every round in total 0-3-4-2-0-0 times, every 2nd round in total 29-32-33-37-40-41 times and then every 4th round in total 1-0-0-0-2-3 times (= in total 30-35-37-39-42-44 times). REMEMBER THE KNITTING TENSION! When the increases to raglan are finished the piece measures approx. 20-22-23-25-28-30 cm from the cast-on edge (measured mid front). There are 64-70-76-86-94-104 stitches on each side of the 1st and 4th marker thread (= 129-141-153-173-189-209 stitches on the front and back pieces including the stitches with marker threads) and 73-83-87-91-97-101 stitches on each sleeve = in total 404-448-480-528-572-620 stitches on the needle. The next round is worked as follows: Twisted knit together the first 2 stitches (= 1 stitch decreased), work as before to the 1st marker thread, make 1 yarn over, work the stitch as before (= mid back), make 1 yarn over (= 2 stitches increased), work as before until there are 2 stitches left before the 2nd marker, knit 2 together (= 1 stitch decreased), place the next 73-83-87-91-97-101 stitches (i.e. the stitches between the 2nd and 3rd marker threads) on a thread for the sleeve, cast on 6-6-12-12-12-12 new stitches under the sleeve, insert 1 marker in the middle of the new stitches, twisted knit 2 stitches together (= 1 stitch decreased), work the pattern as before to the 4th marker thread, make 1 yarn over, work the stitch as before (= mid front), make 1 yarn over (= 2 stitches increased), work the pattern as before until there are 2 stitches left before the 5th marker thread, knit 2 together (= 1 stitch decreased), place the next 73-83-87-91-97-101 stitches (i.e. the stitches between the 5th and 6th marker threads) on 1 thread for the sleeve, cast on 6-6-12-12-12-12 new stitches under the sleeve and insert 1 marker in the middle of these new stitches = 270-294-330-370-402-442 stitches on the needle. Cut the strand. THE PIECE IS NOW MEASURED FROM HERE! BODY: Displace the round so that it starts mid-under the sleeve in the right side of the piece when the garment is worn (i.e. move the next stitches across to the right needle without working them first). The markers follow as you work the piece. Continue the pattern as before – NOTE: The new stitches under the sleeve in each side are worked in to the pattern, adjust so that the pattern is symmetrical under the sleeve (i.e. on each side of the marker). AT THE SAME TIME every 2nd round increase 1 stitch on each side of the stitch with the 1st and 4th marker thread in the same way as before and decrease 1 stitch on each side of the marker under the sleeve in each side – READ DECREASE TIP-1 = 4 stitches increased and 4 stitches decreased. When you increase and decrease in this way the number of stitches remains the same. When the piece measures 3 cm from the separation under each sleeve – adjust so that the next round is an increase/decrease round and now decrease 2 stitches on each side of the marker under each sleeve (the increases front and back continue as before) – READ DECREASE TIP-2 = 4 stitches increased and 8 stitches decreased. Decrease and increase like this every 4-4-4-3-3-3 cm in total 3-3-3-4-4-4 times = 258-282-318-354-386-426 stitches. Then work as before with 4 decreases and 4 increases every 2nd round. Continue in this way until the piece measures approx. 46-50-51-55-58-63 cm measured along the middle stitch (i.e. by the 1st and 4th marker thread), but finish so that the next round is an increase/decrease round. The piece now measures approx. 56-60-61-65-69-74 cm measured from the shoulder and down at the longest part. Cut the strand. Place the first 65-71-80-89-97-107 stitches (= half the front piece including the mid-stitch) on 1 thread and the last 64-70-79-88-96-106 stitches (= half the back piece) on the same thread. Now work as follows across the remaining 129-141-159-177-193-213 stitches on the needle (i.e. from after the 4th marker thread up to and including the stitch with the 1st marker thread = left side of the jumper, from mid front to mid back): ROW 1 (= right side): Cast off the first 2 stitches, work the pattern as before until there are 3 stitches left before the marker under the sleeve, decrease 1 stitch on each side of the marker as before (= 2 stitches decreased), work the pattern as before for the rest of the row = 2 stitches decreased at the beginning of the row towards mid front and 2 stitches decreased in the side of the jumper (= in total 4 stitches decreased). ROW 2 (= wrong side): Cast off the first 2 stitches, Work the pattern to the end of the row as before = 2 stitches decreased at the start of the row towards mid back. ROW 3: Cast off the first 2 stitches, work the pattern for the rest of the row as before = 2 stitches decreased at the start of the row towards mid front. ROW 4: Work as for row 2 = 2 stitches decreased at the beginning of the row towards mid back. ROW 5: Work as for row 3 = 2 stitches decreased at the beginning of the row towards mid front. ROW 6: Work as for row 2 = 2 stitches decreased at the beginning of the row towards mid back. ROW 7: Work as for row 1 = 2 stitches decreased at the beginning of the row towards mid front and 2 stitches decreased in the side of the jumper (= in total 4 stitches decreased). ROW 8: Work as for row 2 = 2 stitches decreased at the beginning of the row towards mid back. ROW 9: Work as for row 3 = 2 stitches decreased at the beginning of the row towards mid front. ROW 10: Work as for row 2 = 2 stitches decreased at the beginning of the row towards mid back. Repeat rows 1-10 until there are 5 stitches left on the needle and cast off. Place the stitches from the thread back on the needle and work in the same way (= right side of the jumper, from mid back to mid front). SLEEVE: Place the stitches from the thread in the right side of the piece (when the garment is worn) on a short circular needle size 3 mm, in addition knit up 1 stitch in each of the 6-6-12-12-12-12 stitches cast on under the sleeve = 79-89-99-103-109-113 stitches on the needle. Insert 1 marker in the middle of these new stitches. The marker follows the piece. Continue A.1/A.2 as before, but the stitches which do not fit the pattern under the sleeve are knitted in rounds of knit and purled in rounds of purl. When the piece measures 3 cm decrease 1 stitch on each side of the marker – READ DECREASE TIP-1 (= 2 stitches decreased). Decrease in this way a total of 15-20-25-24-27-26 times in S: Every 6th round, in M: Every 5th round, in L + XL: Every 3rd round and in XXL + XXXL: Alternately every 2nd and 3rd round = 49-49-49-55-55-61 stitches. When the piece measures 34-33-31-30-26-25 cm from the separation (or try the garment on and work to desired length), change to double pointed needles size 2.5 mm. Work 4 RIDGES. Change back to double pointed needles size 3 mm and cast off. The sleeve measures approx. 36-35-33-32-28-27 cm from the separation. Work the other sleeve in the same way, but continue A.2/A.3 as before. RIDGE EDGE AT BOTTOM OF BODY: Knit up stitches for an edge inside 1 stitch along the whole of the bottom edge of the jumper. Knit up approx. 240-260-290-332-364-406 stitches evenly spaced from the right side with circular needle size 2.5 mm. Make sure the edge does not tighten the body! If it does, then knit up more stitches. Work 3 ridges. Change to circular needle size 3 mm and cast off. |
||||||||||||||||||||||
Diagram explanations |
||||||||||||||||||||||
|
||||||||||||||||||||||
 |
||||||||||||||||||||||
 |
||||||||||||||||||||||
Have you finished this pattern?Tag your pictures with #dropspattern #chevrondelightsweater or submit them to the #dropsfan gallery. Do you need help with this pattern?You'll find 26 tutorial videos, a Comments/Questions area and more by visiting the pattern on garnstudio.com. © 1982-2025 DROPS Design A/S. We reserve all rights. This document, including all its sub-sections, has copyrights. Read more about what you can do with our patterns at the bottom of each pattern on our site. |
||||||||||||||||||||||


With over 40 years in knitting and crochet design, DROPS Design offers one of the most extensive collections of free patterns on the internet - translated to 17 languages. As of today we count 320 catalogues and 12094 patterns translated into English (UK/cm). 12094
We work hard to bring you the best knitting and crochet have to offer, inspiration and advice as well as great quality yarns at incredible prices! Would you like to use our patterns for other than personal use? You can read what you are allowed to do in the Copyright text at the bottom of all our patterns. Happy crafting!
Post a comment to pattern DROPS 177-6
We would love to hear what you have to say about this pattern!
If you want to leave a question, please make sure you select the correct category in the form below, to speed up the answering process. Required fields are marked *.