
Looking for a yarn?


Comments / Questions (72)
![]() Sareith wrote:
Sareith wrote:
Bonjour, Je trouve ce modèle très joli. Est il possible de le faire en version gilet ?
29.09.2021 - 18:49DROPS Design answered:
Bonjour Mme Sareith, fort probablement, mais nous ne sommes malheureusement pas en mesure de pouvoir adapter chacun de nos modèles à chaque demande, pour toute assistance individuelle, merci de bien vouloir contacter votre magasin DROPS, même par mail ou téléphone. Merci pour votre compréhension. Bon tricot!
30.09.2021 - 09:42
![]() Astrid wrote:
Astrid wrote:
Wordt het patroon A1 nu met Brushed Alpaca Silk én Merino Extra Fine gebreeën of wordt dit alleen met Brushed Alpaca Silk gedaan?
28.08.2021 - 02:58DROPS Design answered:
Dag Astrid,
Na de boordsteek ga je inderdaad verder met Brushed Alpaca Silk en A.1. In de beschrijving staat telkens aangegeven wanneer je moet wisselen van garen.
03.09.2021 - 09:50
![]() Ellen wrote:
Ellen wrote:
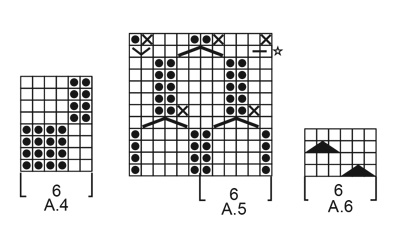
Hej jag har 3 frågor angående mönstret. 1. Stjärnan som beskriver vad som ska ske under hela det varvet som den befinner sig på, kan ni förklara lite mer vad den innebär? Står att man ska sticka 3 maskor 1 gång (gör man inte alltid det?) och sen repetera 6 maskor, vad menar ni med repetera? 2. A6, finns det någon video som förklarar hur man ska göra det? 3. A5, när ska andra halvan stickas och när endast den markerade A5? Tack för svar!
03.08.2021 - 10:15DROPS Design answered:
Hei Ellen. 1). For å lage et struktur mønster. På denne pinnen strikkes de 3 første maskene, så strikkes de 6 neste maskene, disse 6 maskene gjentas hele raden til det gjenstår 4 masker. 2). Nei, ingen video på denne "knuten", men det skal vi få laget, takk for tipset. 3). Den "andre" halvdelen av A.5 er bare for å vise forskyvningen av mønstret og hvordan de siste maskene strikkes ved raden med stjerne. mvh DROPS design
16.08.2021 - 12:59
![]() Lise wrote:
Lise wrote:
Jeg har et problem vedrørene første økning etter vrangborden på bakstykke. Kan ikke skjønne hvordan/hvorfor det skal økes på vrangen og få minst mulig hull på retten?
16.06.2021 - 09:46DROPS Design answered:
Hej Lise, sålänge du stickar omslagen vridna på nästa varv, så blir det bara ett litet hål oavsett om du gör omslagen fra rätsidan eller från avigsidan. Du får gärna flytta om dem på rätsidan ;)
16.06.2021 - 13:11
![]() Lise wrote:
Lise wrote:
Jeg har et problem vedrørene første økning etter vrangborden på bakstykke. Kan ikke skjønne hvordan/hvorfor det skal økes på vrangen og få minst mulig hull på retten?
15.06.2021 - 00:57
![]() Réveillaud wrote:
Réveillaud wrote:
Bonjour je ne comprends pas comment faire A5. Glisser entre la quatrième et cinquième maille pour en faire une nouvelle. Que fait on des mailles avant ? On les glisse sans les tricoter ? Et 1 m end, 2 env, 1end c est sur la maille qu on ajoute ou sur celle d après ? Merci d avance
27.05.2021 - 22:07DROPS Design answered:
Bonjour Mme Réveillaud, vous tricotez ce symbole sur les 4 mailles suivantes ainsi: piquez votre aiguille après la 4ème maille sur l'aiguille gauche (sans tricoter ces mailles pour l'instant), et ramenez 1 boucle sur votre aiguille droite, tricotez maintenant les 4 mailles suivantes ainsi: 1 m end, 1 m env, 1 m end = vous avez maintenant 5 mailles au lieu de 4 sur l'aiguille droite (au rang suivant, vous diminuerez 1 m (= cf 5ème symbole). Bon tricot!
28.05.2021 - 08:15
![]() Anette Lundberg wrote:
Anette Lundberg wrote:
Är väldigt besviken på tröjan. Dels att era bilders nyanser på de två garnen inte stämmer med verkligheten, alpacka silk är betydligt mörkare. Jag har ingen butik i närheten där jag kunde jämföra med innan. Samt att det gick åt 700gr trots att mina mått och masktäthet stämmer. Tröjan blev betydligt dyrare eftersom jag fick skicka efter mer garn.
16.05.2021 - 22:04
![]() Joke Huijben wrote:
Joke Huijben wrote:
Van dit patroon weet ik niet hoe streep A5 gebreid moet worden
15.05.2021 - 10:02DROPS Design answered:
Dag Joke,
Je breit eerst het telpatroon 1 keer in de hoogte, dus het telpatroon waar A.5 bij staat. Als je daarmee klaar bent begin je opnieuw met telpatroon A.5, alleen brei je dan alleen de eerste 8 naalden. Tot slot brei je nog 4 naalden recht, zodat er 2 ribbels komen.
16.05.2021 - 12:03
![]() Anette Lundberg wrote:
Anette Lundberg wrote:
Ca 10 cm kvar på ärm nr 1 och har börjat på 6:e nystanet av merino extra fine. Köpte ett extra nystan, enligt beskrivningen ska det vara 6 men det kommer inte att räcka. Jag följer beskrivningen helt och har rätt mått. Är det snålt tilltaget med 300 gr till denna tröja?
09.05.2021 - 22:16DROPS Design answered:
Hei Anette. Se svaret på ditt forrige spørsmål under. mvh DROPS design
10.05.2021 - 10:48
![]() Lisa wrote:
Lisa wrote:
Skal ermene strikkes rundt eller fram og tilbake? I ØKETIPS står det at man skal øke på begge sider av merketråden, men det står ingenting om hvor merketråden skal være?
09.05.2021 - 08:09DROPS Design answered:
Hei Lisa. Ermene strikkes frem og tilbake med 1 kantmaske i rille i hver side. Her er nok øketipset feil. Takk for at du gjorde oss oppmerksom på dette, vi skal få lagt til riktig asap. mvh DROPS design
10.05.2021 - 10:47
|
|||||||||||||||||||||||||||||||
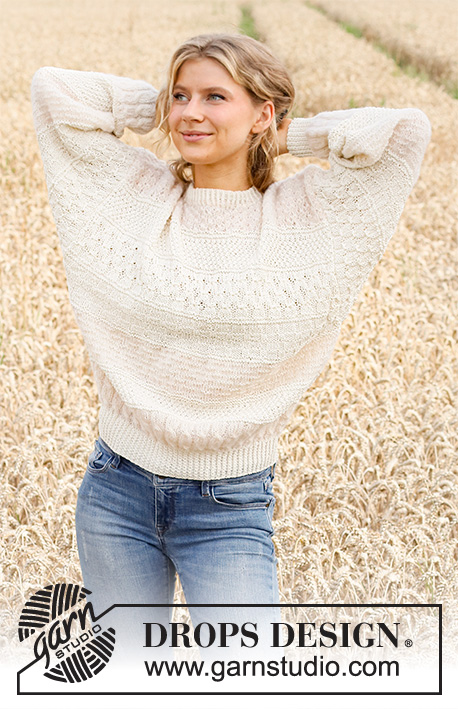
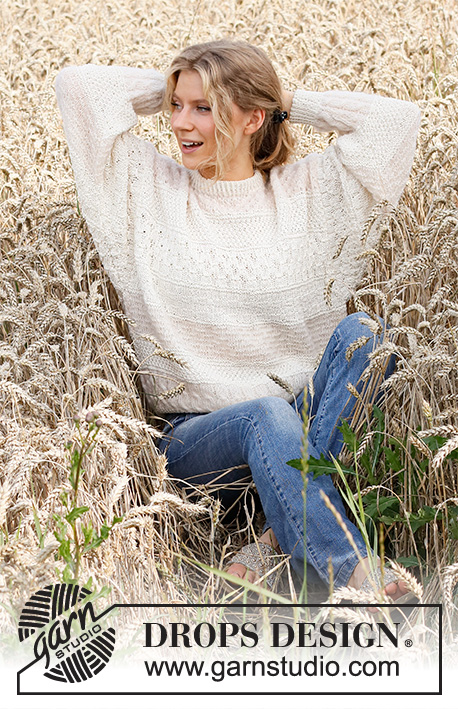
Timeless Textures#timelesstexturessweater |
|||||||||||||||||||||||||||||||
 |
 |
||||||||||||||||||||||||||||||
Knitted jumper in DROPS Merino Extra Fine and DROPS Brushed Alpaca Silk. The piece is worked with cables and textured pattern. Sizes S - XXXL.
DROPS 220-18 |
|||||||||||||||||||||||||||||||
|
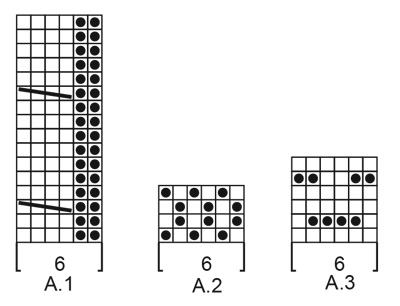
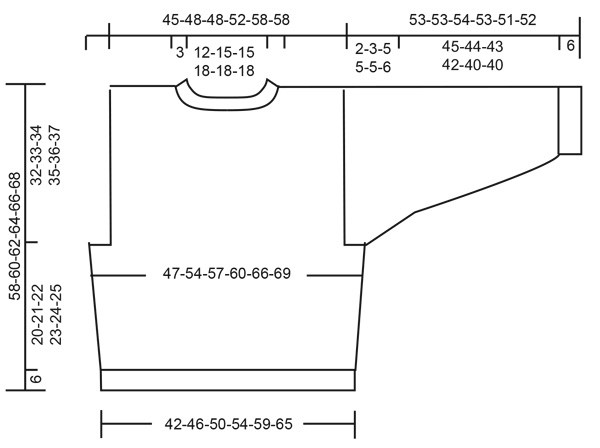
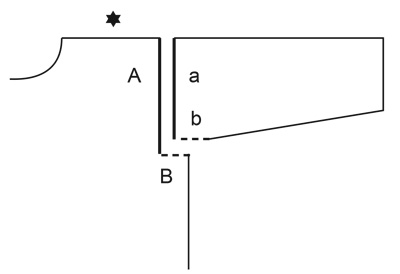
------------------------------------------------------- EXPLANATIONS FOR THE PATTERN: ------------------------------------------------------- RIDGE/GARTER STITCH (worked back and forth): Knit all rows. 1 ridge in height = Knit 2 rows. PATTERN: See diagrams A.1 to A.6. The diagrams show all rows in the pattern from the right side. STRIPES BODY: The stripes are worked with 1 edge stitch in garter stitch on each side. STRIPE 1: Already worked (= A.1) STRIPE 2: (with Merino Extra Fine), work A.2 until the piece measures 18-18-18-19-19-20 cm – adjust so you finish after row 2 or 4 in the diagram. Knit 4 rows (= 2 ridges). STRIPE 3: Change to Brushed Alpaca Silk. Work A.3 until the piece measures 26-27-27-28-28-30 cm – adjust so you finish after a row from the wrong side. STRIPE 4: Change to Merino Extra Fine. Knit 4 rows (= 2 ridges). Work A.4 two times in height, knit 4 rows (= 2 ridges). STRIPE 5: Work A.5 one time in height, then work the first 8 rows in the diagram. Knit 4 rows (= 2 ridges). STRIPE 6: Work A.2 until the piece measures 48-50-50-52-52-55 cm – adjust so you finish after row 2 or 4 in the diagram. Knit 4 rows (= 2 ridges). STRIPE 7: Change to Brushed Alpaca Silk. Work A.6 to finished length. STRIPES SLEEVES: The stripes are worked with 1 edge stitch in garter stitch on each side. STRIPE 1: Work A.1 one time in height, then work the first 8 rows in the diagram. STRIPE 2: Change to Merino Extra Fine. Knit 4 rows (= 2 ridges). Work A.2 until the piece measures 25-25-26-25-24-25 cm – adjust so you finish after row 2 or 4 in the diagram, knit 4 rows (= 2 ridges). STRIPE 3: Change to Brushed Alpaca Silk. Work A.3 until the piece measures 36-36-37-36-34-35 cm – adjust so you finish after a row from the wrong side. STRIPE 4: Change to Merino Extra Fine. Knit 4 rows (= 2 ridges). Work A.4 two times in height. Knit 4 rows (= 2 ridges). STRIPE 5: Work A.5 one time in height, then work the first 8 rows in the diagram. INCREASE/DECREASE TIP (evenly spaced): To work out how to increase/decrease evenly, count the total number of stitches on needle (e.g. 87 stitches), minus the edge stitches (i.e. 2 stitches) and divide the remaining stitches by the number of increases/decreases to be made (e.g. 19) = 4.5. In this example, increase by making 1 yarn over after alternately each 4th and 5th stitch. Do not increase over the edge stitches. On the next row work the yarn overs twisted to avoid holes. When decreasing, knit together alternately each 3rd and 4th stitch and each 4th and 5th stitch. INCREASE TIP (for sleeves): Increase by making 1 yarn over inside the 1 edge stitch on each side. All increase are made from RS! On the next row work the yarn overs twisted to avoid holes. Then work the new stitches in pattern as described in the text. ------------------------------------------------------- START THE PIECE HERE: ------------------------------------------------------- JUMPER – SHORT OVERVIEW OF THE PIECE: The front and back pieces and the sleeves are worked separately back and forth, then sewn together to finish. The neck is worked in the round with short circular needle. BACK PIECE: Cast on 87-95-103-111-121-135 stitches with circular needle size 4 mm and Merino Extra Fine. Purl 1 row (= wrong side). Then work rib as follows: ROW 1 (right side): 1 edge stitch in GARTER STITCH – read description above, * knit 1 twisted, purl 1 *, work from *-* until there are 2 stitches left, knit 1 twisted and work 1 edge stitch in garter stitch. ROW 2 (wrong side): 1 edge stitch in garter stitch * purl 1 twisted, knit 1 *, work from *-* until there are 2 stitches left, purl 1 twisted and 1 edge stitch in garter stitch. Repeat rows 1 and 2 until the rib measures 6 cm – adjust so the last row is worked from the right side. Change to circular needle size 5 mm and Brushed Alpaca Silk. Purl 1 row from the wrong side where you increase 19-23-21-25-21-19 stitches evenly spaced – read INCREASE/DECREASE TIP = 106-118-124-136-142-154 stitches. Now work pattern as follows: 1 edge stitch in garter stitch, A.1 until there are 3 stitches left (= 17-19-20-22-23-25 repeats of 6 stitches), purl 2 and 1 edge stitch in garter stitch. Continue this pattern back and forth until A.1 has been completed in height. REMEMBER THE KNITTING TENSION! Change to Merino Extra Fine. Knit 1 row from the right side where you decrease 14-14-14-20-14-20 stitches evenly spaced = 92-104-110-116-128-134 stitches. Knit 3 more rows (= 2 ridges). Start with stripe 2 in STRIPES BODY – read description above and continue with stripes. AT THE SAME TIME when the piece measures 26-27-28-29-30-31 cm, cast off 3-6-9-9-9-12 stitches at the beginning of the next 2 rows for the armholes = 86-92-92-98-110-110 stitches. When the piece measures 56-58-60-62-64-66 cm cast off the middle 32-38-38-44-44-44 stitches for the neck and each shoulder is finished separately. Then cast off 1 stitch from the neck = 26-26-26-26-32-32 stitches. Continue with pattern and 1 edge stitch in garter stitch on each side until the piece measures 58-60-62-64-66-68 cm from the shoulder down. Cast off. Work the other shoulder in the same way. FRONT PIECE: Cast on 87-95-103-111-121-135 stitches with circular needle size 4 mm and Merino Extra Fine. Purl 1 row (= wrong side). Then work rib as follows: ROW 1 (right side): 1 edge stitch in garter stitch, * knit 1 twisted, purl 1 *, work from *-* until there are 2 stitches left, knit 1 twisted and 1 edge stitch in garter stitch. ROW 2 (wrong side): 1 edge stitch in garter stitch * purl 1 twisted, knit 1 *, work from *-* until there are 2 stitches left, purl 1 twisted and 1 edge stitch in garter stitch. Repeat rows 1 and 2 until the rib measures 6 cm – adjust so the last row is worked from the right side. Change to circular needle size 5 mm and Brushed Alpaca Silk. Purl 1 row from the wrong side where you increase 19-23-21-25-21-19 stitches evenly spaced = 106-118-124-136-142-154 stitches. Work pattern and decrease stitches in the same way as on the back piece = 92-104-110-116-128-134 stitches (when you reach the armholes). When the piece measures 26-27-28-29-30-31 cm, cast off 3-6-9-9-9-12 stitches at the beginning of the next 2 rows for the armholes = 86-92-92-98-110-110 stitches. When the piece measures 51-53-55-56-58-59 cm, place the middle 26-32-32-38-38-38 stitches on a thread for the neck and finish each shoulder separately. Continue by casting off on each row from the neck as follows: Cast off 2 stitches 1 time and 1 stitch 2 times – the stitches which do not fit into the pattern after decreasing, are worked in stocking stitch = 26-26-26-26-32-32 stitches. Continue with this pattern and 1 edge stitch in garter stitch on each side until the piece measures 58-60-62-64-66-68 cm from the shoulder down. Cast off. Work the other shoulder in the same way. SLEEVES: Cast on 44-48-50-52-54-56 stitches (including 1 edge stitch on each side) with circular needle size 4 mm and Merino Extra Fine. Purl 1 row (= wrong side). Then work rib as follows: ROW 1 (right side): 1 edge stitch in garter stitch, * knit 1 twisted, purl 1 *, work from *-* until there is 1 stitch left, knit 1 twisted and 1 edge stitch in garter stitch. ROW 2 (wrong side): 1 edge stitch in garter stitch * purl 1 twisted, knit 1 *, work from *-* until there is 1 stitch left, purl 1 twisted and 1 edge stitch in garter stitch. Repeat rows 1 and 2 until the rib measures 6 cm – adjust so the last row is worked from the right side. Change to circular needle size 5 mm and Brushed Alpaca Silk. Purl 1 row from the wrong side where you increase 18-20-18-22-20-24 stitches evenly spaced = 62-68-68-74-74-80 stitches. Now work STRIPE SLEEVES – read description above, and when the piece measures 13 cm, start to increase on both sides – read INCREASE TIP. Increase like this every 2-2-1½-2-1½- 1½ cm a total of 9-8-10-8-10-9 times = 80-84-88-90-94-98 stitches. Work pattern as far as possible out to each side, the remaining stitches are worked in stocking stitch. When the sleeve measures 33-32-31-30-28-28 cm, continue the increases, but now on each row from the right side, a total of 22 times = 124-128-132-134-138-142 stitches. When the stripes are finished, the sleeve measures 53-53-54-53-51-52 cm. Cast off. Insert a marker in each side 2-3-5-5-5-6 cm from the top. These are used when sewing the sleeves to the body. Work the other sleeve in the same way. ASSEMBLY: Sew the shoulder seams with grafting stitches, inside the cast-off edge. Sew the sleeves to the body – see illustration. Sew the sleeve seams and the side seams in one go, inside the 1 edge stitch. NECK: Start with Brushed Alpaca Silk and short circular needle size 4 mm. Knit up from the right side 92 to 120 stitches inside 1 stitch around the neck (stitch count includes the stitches from the thread in front and should be divisible by 2). Change to Merino Extra Fine and work rib (knit 1 twisted, purl 1) in the round for 7 cm. Cast off with knit over knit and purl over purl. Make sure the cast-off edge is not tight. Fold the neck to the inside and sew down; to avoid the neck being tight and rolling outwards, it is important the seam is elastic. |
|||||||||||||||||||||||||||||||
Diagram explanations |
|||||||||||||||||||||||||||||||
|
|||||||||||||||||||||||||||||||
 |
|||||||||||||||||||||||||||||||
 |
|||||||||||||||||||||||||||||||
 |
|||||||||||||||||||||||||||||||
 |
|||||||||||||||||||||||||||||||
Have you finished this pattern?Tag your pictures with #dropspattern #timelesstexturessweater or submit them to the #dropsfan gallery. Do you need help with this pattern?You'll find 36 tutorial videos, a Comments/Questions area and more by visiting the pattern on garnstudio.com. © 1982-2025 DROPS Design A/S. We reserve all rights. This document, including all its sub-sections, has copyrights. Read more about what you can do with our patterns at the bottom of each pattern on our site. |
|||||||||||||||||||||||||||||||


With over 40 years in knitting and crochet design, DROPS Design offers one of the most extensive collections of free patterns on the internet - translated to 17 languages. As of today we count 320 catalogues and 12093 patterns translated into English (UK/cm). 12093
We work hard to bring you the best knitting and crochet have to offer, inspiration and advice as well as great quality yarns at incredible prices! Would you like to use our patterns for other than personal use? You can read what you are allowed to do in the Copyright text at the bottom of all our patterns. Happy crafting!
Post a comment to pattern DROPS 220-18
We would love to hear what you have to say about this pattern!
If you want to leave a question, please make sure you select the correct category in the form below, to speed up the answering process. Required fields are marked *.