
Looking for a yarn?


Comments / Questions (53)
![]() Rita Rodiek wrote:
Rita Rodiek wrote:
Sorry, ich stricke Größe M. Ich habe in der 7. R von A1, 156 M auf der Nadel, das ist richtig. Wenn ich in der R 8 die linken Maschen mit einstricke,komme ich am Ende des Musters auf 154 M. Zwei M bleiben übrig. D.h. auf der rechten Nadel habe ich zum Ende 2linke M dann 4 rechte M. Auf der linken habe ich die noch nicht gestrickten 2 rechte M(die letzten M. der 8 Runde) dann die erste linke M (Anfang der gestr. 8. R). Was mache ich falsch? Leider kann ich nicht weiterstricken...
20.06.2025 - 17:46DROPS Design answered:
Liebe Frau Rodiek, nach der 7. Reihe sind es 12 Maschen in jedem A.1 (156 M auf der Nadel), diese 12 Maschen stricken Sie so: (1 links, 4 rechts, 2 links, 4 rechts, 1 links) und von (bis) insgesamt 12 Mal wiederholen, so beginnt die Runde mit 1 linke Maschen und endet auch mit 1 linke Maschen, aber beidseitig von den jeweiligen 4 rechten Maschen sind es immer 2 linken Maschen. Kann das helfen?
23.06.2025 - 07:27
![]() Rita Rodiek wrote:
Rita Rodiek wrote:
Hallo! Ich bin verzweifelt!! Die Maschenanzahl bitte ich, zu überprüfen. Bei A1 hat sich in den ersten Reihen ein Fehler eingeschlichen: bis zur R 5 ist alles okay danach schreiben Sie 140M auf der Nadel, tatsächlich sind es 130M. In der nächsten R ist alles okay 156M. In R 8 (linke M) sind am Ende des Musters zwei M übrig, um auf das fortlaufende Muster zu kommen. Nun weiß ich nicht mehr weiter und bitte um Hilfe. Da stimmt etwas nicht! Ich warte gespannt auf Ihre Antwort. MfG Rita
20.06.2025 - 08:42DROPS Design answered:
Liebe Frau Rodiek, ich finde keine 140 M in der Anleitung, so bin ich nicht sicher, was Sie hier meinen; welche Größe stricken Sie? Versuchen Sie mal eine Markierung nach jedem A.1 einzusetzen, so können Sie die Maschenanzahzl prüfen; und so bekommen Sie am Ende die richtige Maschen Anzahl: 18 Maschen x 12-13-14-15-16-17 Mal sind 216-234-252-270-288-306 Maschen. Viel Spaß beim Stricken!
20.06.2025 - 16:00
![]() Nathalie wrote:
Nathalie wrote:
Bonjour. Je voudrais réaliser le modèle pull mais avec un grand col roulé, comme sur la 3eme photo #dropsfan gallery. Je ne trouve pas d'explication pour ceci et je voudrais également savoir combien de laine supplémentaire prévoir ? Merci à vous
04.01.2025 - 12:44DROPS Design answered:
Bonjour Nathalie, comme notre modèle original a un col rond, nous n'avons pas les quantités pour un col roulé, quantité qui peut varier en fonction de la taille et de la hauteur du col choisie - vous pouvez vous inspirer d'un modèle analogue avec la même tension, la même forme et un col de la taille souhaité; votre magasin saura vous conseiller, même par mail ou téléphone. Bon tricot!
06.01.2025 - 08:59
![]() Maryline wrote:
Maryline wrote:
Bonjour, Sous l'empiècement, j'ai terminé le diagramme. il est noté que quand l'ouvrage mesure 16-17-18-18-18-18 cm , on doit augmenter. Cette mesure doit être prise depuis le début de l'empiècement?
17.11.2024 - 08:28DROPS Design answered:
Bonjour Maryline, à la fin du col, vous avez placé un marqueur au milieu dos, mesurez ces 16-18 cm à partir de ce marqueur. Bon tricot!
18.11.2024 - 08:07
![]() Ana Cristina Oliveira wrote:
Ana Cristina Oliveira wrote:
Bom dia, depois de ter feito a gola e de ter feito os aumentos como estou com o tamanho M tinha 91 malhas, mudei para a agulha 5mm e em vez de começar a próxima carreira no meio das costas comecei no fim da carreira anterior. Há alguma diferença? Posso continuar assim ou tenho que desmanchar tudo o que fiz e começar no meio das costas?
22.09.2024 - 13:32DROPS Design answered:
Bom dia, Pode continuar assim porque o fim da carreira da gola dá lugar ao princípio da primeira carreira do encaixe das costas e fica a meio das costas. Bons tricôs!
24.09.2024 - 09:51
![]() Ana Cristina Oliveira wrote:
Ana Cristina Oliveira wrote:
Bom dia, depois de ter feito a gola e de ter feito os aumentos como estou com o tamanho M tinha 91 malhas, mudei para a agulha 5mm e em vez de começar a próxima carreira no meio das costas comecei no fim da carreira anterior. Há alguma diferença? Posso continuar assim ou tenho que desmanchar tudo o que fiz e começar no meio das costas?
22.09.2024 - 12:44DROPS Design answered:
Bom dia, Como está a tricotar em redondo, o fim de uma carreira dá luga ao princípio da outra e, dessa forma, essa nova carreira começa a meio das costas, pelo que pode continuar a tricotar. Bons tricôs!
06.11.2024 - 08:56
![]() Ana Oliveira wrote:
Ana Oliveira wrote:
Bom dia, eu estou a fazer a camisola no tamanho M e já tenho 91 malhas. De seguida tenho que trocar para a agulha 5 e colocar um marcador no meio das costas. Quando começo a fazer o encaixe começo a fazer o diagrama no início da carreira ou começo no marcador no meio das costas? O que significa dividir o encaixe? Obrigada
14.09.2024 - 08:50DROPS Design answered:
Bom dia, Começa a carreira no marcador a meio das costas e tira as medidas a partir daí. Dividir o encaixe significa que depois de tricotar o ponto fantasia se separam as mangas do corpo. Tricota-se o corpo em circular e, depois, as mangas. Bons tricôs!
19.09.2024 - 12:02
![]() Ludmilla wrote:
Ludmilla wrote:
Bonjour, Faut-il vraiment augmenter le bas du corps avant de faire les côtes? Pour quelle raison? Je trouve ça étrange, je n'ai jamais vu ça sur un modèle avant. Merci!
28.01.2024 - 03:23DROPS Design answered:
Bonjour Ludmilla, il faut plus de mailles en côtes avec les aiguilles 4 qu'en jersey avec les aiguilles 5, autrement dit, pour éviter que la bordure du bas ne resserre le bas du pull, on va augmenter avant de tricoter les côtes. Bon tricot!
29.01.2024 - 12:06
![]() Nathalie Moreau wrote:
Nathalie Moreau wrote:
Bonjour, dans un commentaire/question du 02.09.2023 vous dites que l'on peut remplacer les fils A+B par le fil C. Cependant, sur la page Comment remplacer un fil ou une quantité il est écrit que 2 x A =C.... Est-ce qu'il y a une erreur en quelque part? Je comprends qu'il faut faire un échantillon mais c'est contradictoire, non? Merci beaucoup! Ce patron m'intéresse énormément!
14.01.2024 - 19:24DROPS Design answered:
Bonjour Mme Moreau, classiquement, on remplace 2 fils du groupe de fils A par 1 fil du groupe de fils C, mais ce modèle se tricote avec une tension similaire à celle d'un groupe de fils C, autrement dit 17 m x 22 rangs jersey = 10 x 10 cm; la texture sera juste différente, un peu plus dense, tout dépend donc du résultat que l'on veut obtenir. Bon tricot!
15.01.2024 - 09:44
![]() Dauphin wrote:
Dauphin wrote:
Bonjour, je rencontre un problème pour l'empiècement, je fais une taille M donc je pars avec 91 mailles, comment puis je faire 13 fois le motif A1 qui compte 18 mailles ( 13X18=234) alors que je peux en faire que 5 avec mes 91 mailles. merci pour votre réponse.
08.01.2024 - 07:48DROPS Design answered:
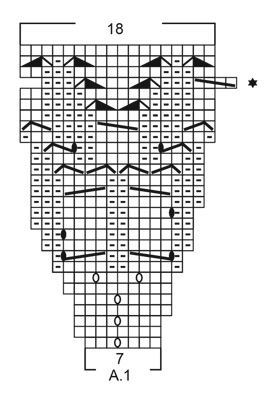
Bonjour Mme Dauphin, le diagramme doit être lu de bas en haut, autrement dit, vous allez répéter les 7 mailles de A.1 13 fois au total soit 13 x 7 = 91 mailles; vous augmentez comme indiqué dans le diagramme, et au dernier rang, vous aurez 18 mailles dans chaque A.1 x 13 motifs en largeur = 234 mailles. Bon tricot!
08.01.2024 - 11:05
|
||||||||||||||||||||||||||||||||||
Endless Possibilities Sweater#endlesspossibilitiessweater |
||||||||||||||||||||||||||||||||||
 |
 |
|||||||||||||||||||||||||||||||||
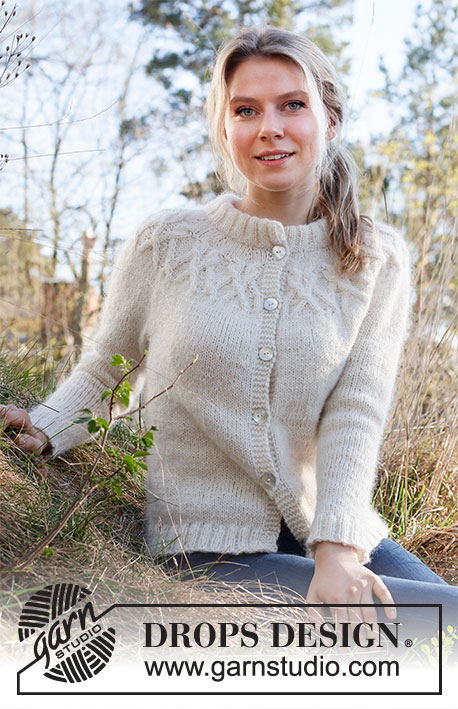
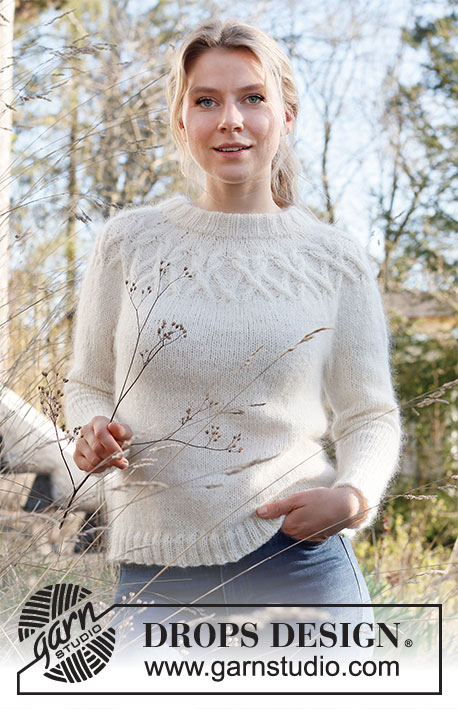
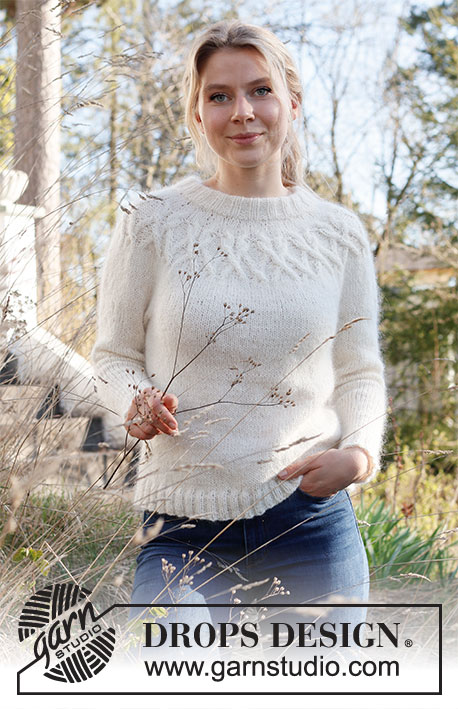
Knitted sweater in DROPS Sky and DROPS Kid-Silk. Piece is knitted top down with round yoke, cables and double neck edge. Size: S - XXXL
DROPS 216-1 |
||||||||||||||||||||||||||||||||||
|
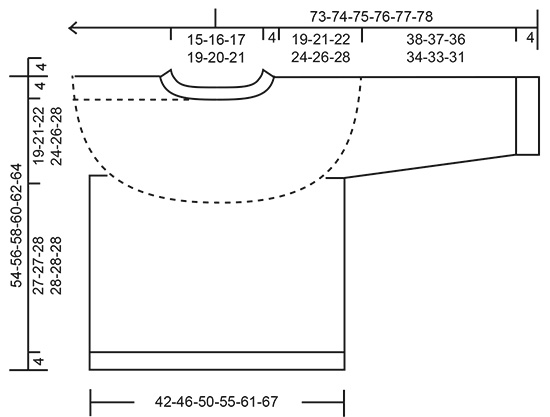
------------------------------------------------------- EXPLANATION FOR THE PATTERN: ------------------------------------------------------- PATTERN: See diagram A.1. INCREASE TIP (evenly): To calculate how to increase evenly, use the total number of stitches on row (e.g. 76 stitches) and divide stitches by number of increases to be done (e.g. 8) = 9.5. In this example increase by making 1 yarn over after alternately approx. every 9th and 10th stitch. On next round work yarn overs twisted to avoid holes. DECREASE TIP (applies to sleeves): Decrease 1 stitch on each side of marker thread as follows: Work until 3 stitches remain before marker thread and knit 2 together, knit 2 (marker thread is between these stitches), slip 1 stitch knitwise, knit 1, pass slipped stitch over stitch worked. BIND-OFF TIP: To avoid a tight bind-off edge you may use a larger needle size. If this also is too tight, work a 1 yarn over after approx. every 4th stitch while binding off (bind off yarn overs as regular stitches). ------------------------------------------------------- START THE PIECE HERE: ------------------------------------------------------- SWEATER - SHORT OVERVIEW OF THE PIECE: Work neck edge and yoke in the round on circular needle from mid back, top down. Now divide yoke for body and sleeves. Body is worked in the round on circular needle, top down. Work sleeves in the round on double pointed needles/short circular needle, top down. DOUBLE NECK EDGE: Cast on 76-80-84-92-96-100 stitches on circular needle size 4 mm = US 6 with 1 strand Sky and 1 strand Kid-Silk (= 2 strands). Knit 1 round. Then work rib (= knit 2/purl 2) in the round for 9 cm = 3½". When rib is done, knit 1 round while increasing 8-11-14-13-16-19 stitches evenly - read INCREASE TIP = 84-91-98-105-112-119 stitches. Knit 1 round. Switch to circular needle size 5 mm. Insert 1 marker mid back, measure yoke from this marker! YOKE: Now work pattern A.1 12-13-14-15-16-17 times in total on round. REMEMBER THE KNITTING GAUGE. When entire A.1 has been worked vertically, there are 216-234-252-270-288-306 stitches on round. Continue in the round with stockinette stitch. When piece measures 16-17-18-18-18-18 cm = 6¼"-6¾"-7"-7"-7"-7", increase 12-12-14-13-14-19 stitches evenly = 228-246-266-283-302-325 stitches. Increase in size S, M and L is now done - continue as explained below. Continue in size XL, XXL and XXXL with stockinette stitch until piece measures 22-24-26 cm = 8¾"-9½"-10¼". Now increase 13-14-19 stitches evenly = 296-316-344 stitches. All sizes: Continue in the round in stockinette stitch until piece measures 19-21-22-24-26-28 cm = 7½"-8¼"-8¾"-9½"-10¼"-11". Now divide piece for body and sleeves. Work next round as follows: Work the first 32-35-37-42-46-51 stitches (= half back piece), slip the next 50-53-58-64-66-70 stitches on a stitch holder for sleeve and cast on 8-8-10-10-12-12 new stitches on needle (= in the side under sleeve), work the next 64-70-75-84-92-102 stitches (= front piece), slip the next 50-53-58-64-66-70 stitches on a stitch holder for sleeve and cast on 8-8-10-10-12-12 new stitches on needle (= in the side under sleeve), work the remaining 32-35-38-42-46-51 stitches (= half back piece). Then finish body and sleeves separately. NOW MEASURE PIECE FROM HERE! BODY: = 144-156-170-188-208-228 stitches. Work in stockinette stitch in the round. When piece measures 27-27-28-28-28-28 cm = 10⅝"-10⅝"-11"-11"-11"-11", increase 28-32-34-40-44-48 stitches evenly = 172-188-204-228-252-276 stitches. Switch to circular needle size 4 mm = US 6. Work rib (knit 2/purl 2) in the round for 4 cm = 1½". Bind off with knit over knit and purl over purl - read BIND-OFF TIP. Sweater measures approx. 54-56-58-60-62-64 cm = 21¼"-22"-22¾"-23⅝"-24⅜"-25¼" from shoulder and down. SLEEVES: Slip the 50-53-58-64-66-70 stitches from stitch holder in one side back on a short circular needle/double pointed needles size 5 mm = US 8 and pick in addition up 1 stitch in each of the new 8-8-10-10-12-12 stitches cast on in the side under sleeve = 58-61-68-74-78-82 stitches. Insert a marker thread in the middle of the new stitches (= 4-4-5-5-6-6 new stitches on each side of marker thread). Work in stockinette stitch in the round. When sleeve measures 4-4-5-5-5-3 cm = 1½"-1½"-2"-2"-2"-1⅛" from division, decrease 2 stitches under sleeve - READ DECREASE TIP. Decrease like this every 3½-3-2-1½-1½-1½ cm = 1¼"-1⅛"-¾"-½"-½"-½" 9-10-13-15-16-17 times in total = 40-41-42-44-46-48 stitches. When sleeve measures 38-37-36-34-33-31 cm = 15"-14½"-14¼"-13⅜"-13"-12¼" (shorter measurements in the larger sizes because of longer yoke), increase 8-7-10-8-10-8 stitches evenly = 48-48-52-52-56-56 stitches. Switch to double pointed needles size 4 mm = US 6. Work rib (knit 2/purl 2) in the round for 4 cm = 1½". Bind off with knit over knit and purl over purl - remember BIND-OFF TIP. Sleeve measures 42-41-40-38-37-35 cm = 16½"-16⅛"-15¾"-15"-14½"-13¾" in total from division. Work the other sleeve the same way. ASSEMBLY: Fold rib at the top of neck down on the inside of garment. Fasten rib to form a double neck edge. To avoid a tight neck edge and avoiding the edge to tip outwards, it is important to make the seam elastic. |
||||||||||||||||||||||||||||||||||
Diagram explanations |
||||||||||||||||||||||||||||||||||
|
||||||||||||||||||||||||||||||||||
|
||||||||||||||||||||||||||||||||||
|
||||||||||||||||||||||||||||||||||
Have you finished this pattern?Tag your pictures with #dropspattern #endlesspossibilitiessweater or submit them to the #dropsfan gallery. Do you need help with this pattern?You'll find 26 tutorial videos, a Comments/Questions area and more by visiting the pattern on garnstudio.com. © 1982-2025 DROPS Design A/S. We reserve all rights. This document, including all its sub-sections, has copyrights. Read more about what you can do with our patterns at the bottom of each pattern on our site. |
||||||||||||||||||||||||||||||||||


With over 40 years in knitting and crochet design, DROPS Design offers one of the most extensive collections of free patterns on the internet - translated to 17 languages. As of today we count 314 catalogs and 11822 patterns - 11812 of which are translated into English (US/in).
We work hard to bring you the best knitting and crochet have to offer, inspiration and advice as well as great quality yarns at incredible prices! Would you like to use our patterns for other than personal use? You can read what you are allowed to do in the Copyright text at the bottom of all our patterns. Happy crafting!
Post a comment to pattern DROPS 216-1
We would love to hear what you have to say about this pattern!
If you want to leave a question, please make sure you select the correct category in the form below, to speed up the answering process. Required fields are marked *.