
Looking for a yarn?


Comments / Questions (7)
![]() Mary Ann wrote:
Mary Ann wrote:
Fant ut av det nå. 😃
14.06.2024 - 09:51DROPS Design answered:
Hei Mary Ann. God fornøyelse videre med strikketøyet :) mvh DROPS Design
24.06.2024 - 10:21
![]() Mary Ann wrote:
Mary Ann wrote:
På A. 1A fra vrangen, skal alle 4 maskene strikkes rett? Skjønner ikke, ser ikke sånn ut på bildet.
14.06.2024 - 09:42DROPS Design answered:
Hei Mary Ann. Så flott at du fant ut av det. mvh DROPS Design
24.06.2024 - 10:20
![]() Ninna Skafsgaard wrote:
Ninna Skafsgaard wrote:
Jeg er startet på soda fountain cardi Jeg forstår ikke diagram A1.A første række vrang på retsiden….hvad skal der strikkes på pinden på vrangsiderne?
04.03.2024 - 19:18DROPS Design answered:
Hej Ninna, stregen i diagrammet betyder ret fra vrangen. Hver 2. pind i diagrammet strikkes fra vrangen :)
07.03.2024 - 15:25
![]() Claudine wrote:
Claudine wrote:
Bonjour ! Je ne comprends pas le diagramme A1B 1er tour que des mailles anglaises ? 2 eme tour que des mailles envers ? Etc pendant 6rangs ? Merci de votre aide
15.08.2021 - 17:51DROPS Design answered:
Bonjour Claudine, effectivement, mais A.1B ne se tricote qu'une seule fois, en fin de rang sur l'endroit et permet au motif A.1 d'être symétrique (= il correspond en fait simplement à la première maille de A.1A). Bon tricot!
16.08.2021 - 07:44
![]() Junell Margit wrote:
Junell Margit wrote:
Var ska de 10 extra maskorna placeras? Det står sammanfattat: "Sticka 62, lägg 80 på tråd, lägg upp 10 o sticka 114m, lägg 80 på tråd, lägg upp 10 o sticka 62. Ska man lägga upp 10 m på bakstyckets ena sida och sedan 10 m på ena framstycket? Det verkar konstigt? Tycker att de 10 m på sidorna ska läggas på antingen resp framstycke eller på båda sidorna om bakstycket!? Tacksam för hjälp!
29.07.2020 - 17:27
![]() Lorraine Bruce wrote:
Lorraine Bruce wrote:
How do I make this with a higher neckline and longer sleeves? This will be my first try at knitting top down.
29.07.2020 - 06:07DROPS Design answered:
Dear Lorraine, Although we cannot give precise and detailed instructions for lengthening this pattern, you can try making a longer collar before starting the yoke. The same for the sleeves. You can keep knitting on the sleeves until desired length. If you want a long sleeve then you will need to do some decreases evenly spaced. Hope this will help. Happy Knitting!
29.07.2020 - 10:50
![]() Hanne Margrethe Spanien wrote:
Hanne Margrethe Spanien wrote:
Pink Day
10.02.2019 - 17:43
|
||||||||||
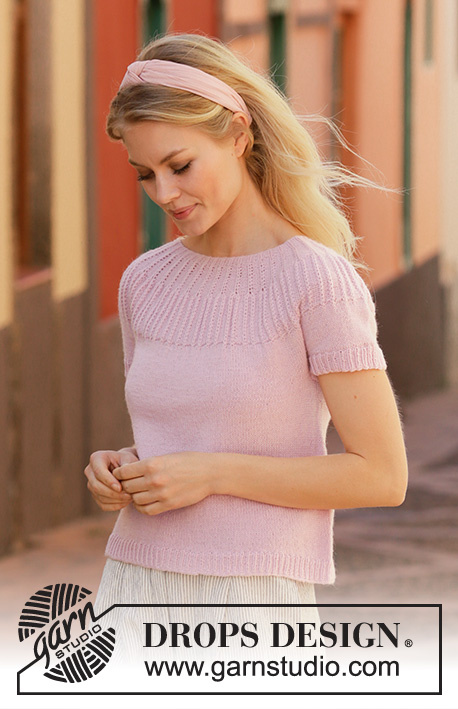
Soda Fountain Cardi#sodafountaincardi |
||||||||||
 |
 |
|||||||||
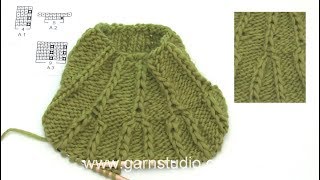
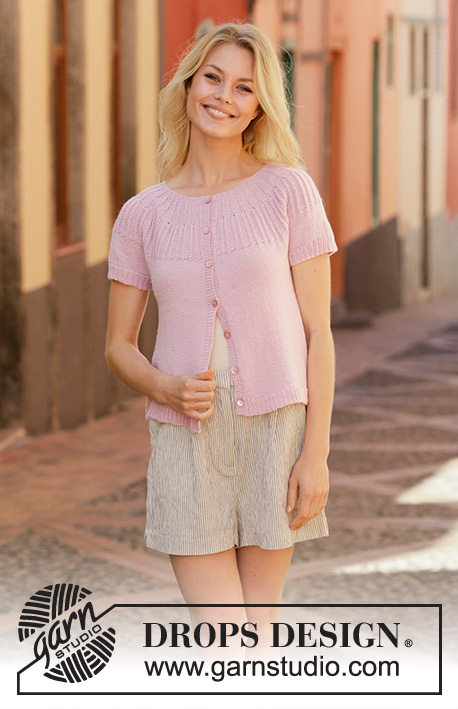
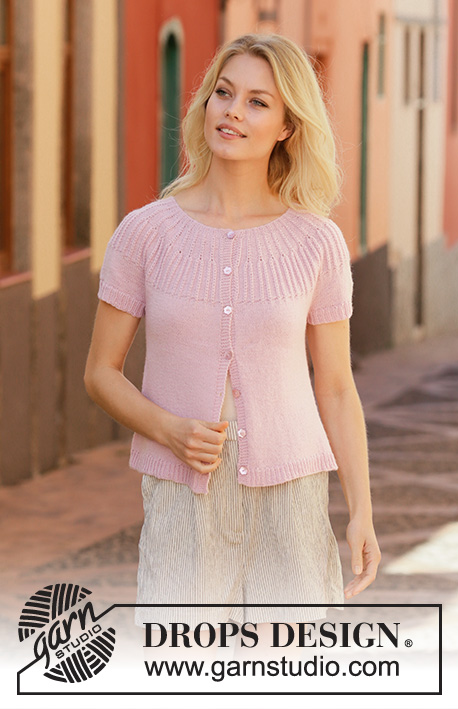
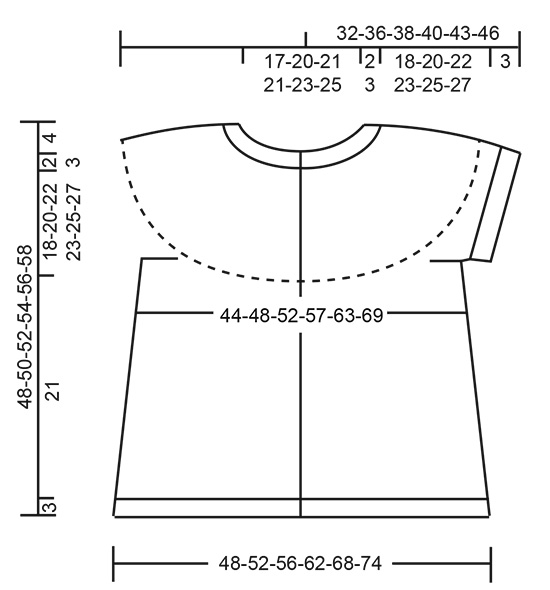
Knitted jacket in DROPS BabyMerino. Piece is knitted top down with round yoke, English rib stitches on yoke and short sleeves. Size: S - XXXL
DROPS 201-39 |
||||||||||
|
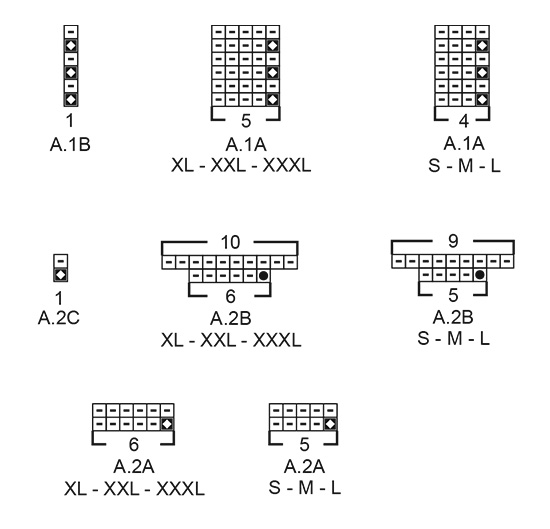
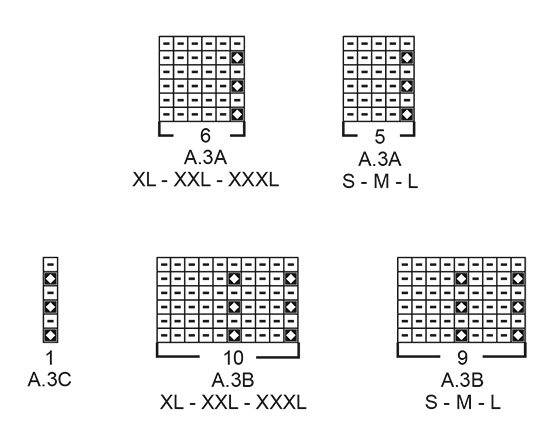
---------------------------------------------------------- EXPLANATION FOR THE PATTERN: ---------------------------------------------------------- GARTER STITCH (back and forth): Knit all rows. 1 ridge vertically = knit 2 rows. PATTERN: See diagrams A.1 to A.3. Choose diagram for your size. Diagrams show all rows in pattern seen from the right side. INCREASE TIP -1 (applies to increases in A.1): All increases are done from the right side. Increase 1 stitch in every purl section by making 1 yarn over after every English rib stitch (do not increase between English rib stitch and band). On next row (wrong side) knit yarn overs twisted to avoid hole. INCREASE TIP-2 (applies to sides of body): All increases are done from the right side. Work until 3 stitches remain before marker, make 1 yarn over, work 6 stitches in stockinette stitch (marker thread is in the middle of these 6 stitches), make 1 yarn over (= 2 stitches increased). Increase the same way at the other marker thread. On next row (wrong side) purl yarn overs twisted to avoid holes. Then work the new stitches in stockinette stitch. INCREASE TIP-3 (evenly): To calculate how to increase evenly, use the total number of stitches on row (e.g. 258 stitches), minus bands (e.g. 10 stitches) and divide the remaining stitches by number of increases to be done (e.g. 71) = 3.5. In this example increase by making 1 yarn over after alternately every 3rd and 4th stitch. Do not increase over bands. On next row (wrong side) work yarn overs twisted to avoid holes. BUTTONHOLES: Decrease for buttonholes on right band (when garment is worn). Decrease from right side when 3 stitches remain on row as follows: Make 1 yarn over, knit the next 2 stitches together, knit last stitch. On next row (wrong side) knit the yarn over to make a hole. Decrease first buttonhole when rib in neck measures approx. 1½-2 cm = ½"-¾". Then decrease the next 6 buttonholes, approx. 6½-7-7½-7½-8-8½ cm = 2½"-2¾"-2⅞"-2⅞"-3⅛"-3¼" between each. ---------------------------------------------------------- START THE PIECE HERE: ---------------------------------------------------------- JACKET - SHORT OVERVIEW OF THE PIECE: Work neck edge and yoke back and forth on circular needle from mid front, work top down. Divide yoke for body and sleeve edges. Work body back and forth on circular needle from mid front, work top down. Work sleeve edges in the round on double pointed needles/short circular needle, top down. NECK EDGE: Cast on 122-134-140-140-149-161 stitches (including 5 band stitches in each side towards mid front) on circular needle size 2.5 mm = US 1,5 with BabyMerino. Purl 1 row (= wrong side). Work next row as follows from right side: 5 band stitches in GARTER STITCH - read explanation above - * knit 1, purl 2 *, repeat from *-* until 6 stitches remain, knit 1 and finish with 5 band stitches on needle in garter stitch. Continue rib like this for 2-2-2-3-3-3 cm = ¾"-¾"-¾"-1⅛"-1⅛"-1⅛". Remember BUTTONHOLES on right band - read explanation above. Work next row as follows from right side: SIZE S, M and L: 5 band stitches in garter stitch, * knit 1, purl 1, 1 yarn over, purl 1 *, repeat from *-* until 6 stitches remain on needle, knit 1 and finish with 5 band stitches in garter stitch = 159-175-183 stitches. SIZE XL, XXL and XXXL: 5 band stitches in garter stitch, * knit 1, purl 1, 1 yarn over, purl 1, 1 yarn over *, repeat from *-* until 6 stitches remain on needle, knit 1 and finish with 5 band stitches in garter stitch = 226-241-261 stitches. ALL SIZES: Work back from wrong side with garter stitch over garter stitch, purl over purl and knit over knit (knit yarn overs twisted to avoid holes). Then work yoke as explained below. YOKE: Switch to circular needle size 3 mm = US 2,5. Work first row as follows from right side: 5 band stitches in garter stitch, work A.1A until 6 stitches remain on row (= 37-41-43-43-46-50 repetitions of 4-4-4-5-5-5 stitches), work A.1B (= 1 stitch) and finish with 5 band stitches in garter stitch. Continue pattern like this. REMEMBER THE KNITTING GAUGE! When piece measures 4-4-4-5-6-6 cm = 1½"-1½"-1½"-2"-2⅜"-2⅜" from cast-on edge, increase 1 stitch in every purl section (seen from right side) – read INCREASE TIP-1 = 196-216-226-269-287-311 stitches. Continue pattern as before with 4-4-4-5-5-5 purl (seen from right side) between every English rib stitch. When piece measures 7-7-8-8-9-9 cm = 2¾"-2¾"-3⅛"-3⅛"-3½"-3½" from cast-on edge mid front, work next row as follows from right side: 5 band stitches in garter stitch, work A.2A (= 5-5-5-6-6-6 stitches), work A.2B until 6 stitches remain on row (= 36-40-42-42-45-49 repetitions of 5-5-5-6-6-6 stitches), work A.2C (= 1 stitch) and finish with 5 band stitches in garter stitch. When A.2 has been worked, there are 340-376-394-437-467-507 stitches on needle. Work next row as follows from right side: 5 band stitches in garter stitch, work A.3A (= 5-5-5-6-6-6 stitches), work A.3B until 6 stitches remain on row (= 36-40-42-42-45-49 repetitions of 9-9-9-10-10-10 stitches), work A.3C (= 1 stitch) and finish with 5 band stitches in garter stitch. Continue pattern like this until piece measures approx. 16-17-19-21-23-25 cm = 6¼"-6¾"-7½"-8¼"-9"-9¾" from cast-on edge mid front. Now work 4 rows in stockinette stitch with 5 band stitches in garter stitch in each side towards mid front, BUT on every row from right side continue English rib stitches as before (i.e. work English rib stitches as before but work stockinette stitch between English rib stitches - NOTE: The English rib stitches will not be very visible on these 4 rounds but they give a softer transition between texture and stockinette stitch). Then work stockinette stitch back and forth over all stitches with 5 band stitches in garter stitches in each side towards mid front – AT THE SAME TIME on first row from right side increase 0-0-4-1-1-1 stitch evenly = 340-376-398-438-468-508 stitches. When piece measures 20-22-24-26-28-30 cm = 8"-8¾"-9½"-10¼"-11"-11¾" from cast-on edge mid front, divide yoke for body and sleeve edges. I.e. work next row from wrong side as follows: Work 55-59-62-68-75-82 stitches in garter stitch and stockinette stitch as before (= front piece), slip the next 65-75-80-88-89-95 stitches on 1 stitch holder for sleeve, cast on 6-8-10-10-12-12 new stitches on row (= in the side under sleeve), work 100-108-114-126-140-154 stitches in stockinette stitch as before (= back piece), slip the next 65-75-80-88-89-95 stitches on 1 stitch holder for sleeve, cast on 6-8-10-10-12-12 new stitches on row (= in the side under sleeve) and work the remaining 55-59-62-68-75-82 stitches in stockinette stitch and garter stitch as before (= front piece). Finish body and sleeve edges separately. NOW MEASURE THE PIECE FROM HERE! BODY: = 222-242-258-282-314-342 stitches. Insert 1 marker thread in each side, in the middle of the 6-8-10-10-12-12 stitches that were cast on under sleeves. Move the marker threads upwards when working; they should be used for increase later in the sides. Work in stockinette stitch back and forth with 5 band stitches in garter stitch in each side towards mid front - remember buttonholes on right band. When piece measures 4-4-4-3-3-3 cm = 1½"-1½"-1½"-1⅛"-1⅛"-1⅛" from division, increase 1 stitch on each side of both marker threads - read INCREASE TIP-2 (= 4 stitches increased). Increase like this every 5-5-3½-3-3-3 cm = 2"-2"-1¼"-1⅛"-1⅛"-1⅛" a total of 4-4-5-6-6-6 times in each side = 238-258-278-306-338-366 stitches. Work until piece measures 21 cm = 8¼" from division (or desired length, approx. 3 cm = 1⅛" remain until finished measurements). Knit 1 row from right side while increasing 67-71-78-83-93-101 stitches evenly - read INCREASE TIP-3 = 305-329-356-389-431-467 stitches. This is done to avoid the rib to be worked, from contracting. Switch to circular needle size 2.5 mm = US 1,5. Work next row as follows from wrong side: 5 band stitches in garter stitch, * purl 1, knit 2 *, repeat from *-* until 6 stitches remain on needle, purl 1 and finish with 5 band stitches in garter stitch. Continue rib like this for 3 cm = 1⅛". Loosely bind off by knitting from right side. Jacket measures approx. 48-50-52-54-56-58 cm = 19"-19¾"-20½"-21¼"-22"-22¾" from shoulder and down. SLEEVE EDGE: Slip the 65-75-80-88-89-95 stitches from stitch holder in one side of piece on double pointed needles or a short circular needle size 3 mm = US 2,5 and pick in addition up 1 stitch in each of the 6-8-10-10-12-12 new stitches cast on under sleeve = 71-83-90-98-101-107 stitches. Knit 1 round while increasing 1-1-0-1-1-1 stitch = 72-84-90-99-102-108 stitches. Switch to double pointed needles size 2.5 mm = US 1,5 and work rib in the round = knit 1/purl 2 for 3 cm = 1⅛". Loosely bind off with knit over knit and purl over purl but to avoid at tight bind-off edge make 1 yarn over after approx. every 6th stitch at the same time bind off (bind off yarn overs as stitches). Work another sleeve edge the same way in the other side of piece. ASSEMBLY: Sew the buttons on to the left band. |
||||||||||
Diagram explanations |
||||||||||
|
||||||||||
|
||||||||||
|
||||||||||
|
||||||||||
Have you finished this pattern?Tag your pictures with #dropspattern #sodafountaincardi or submit them to the #dropsfan gallery. Do you need help with this pattern?You'll find 27 tutorial videos, a Comments/Questions area and more by visiting the pattern on garnstudio.com. © 1982-2025 DROPS Design A/S. We reserve all rights. This document, including all its sub-sections, has copyrights. Read more about what you can do with our patterns at the bottom of each pattern on our site. |
||||||||||


With over 40 years in knitting and crochet design, DROPS Design offers one of the most extensive collections of free patterns on the internet - translated to 17 languages. As of today we count 314 catalogs and 11822 patterns - 11812 of which are translated into English (US/in).
We work hard to bring you the best knitting and crochet have to offer, inspiration and advice as well as great quality yarns at incredible prices! Would you like to use our patterns for other than personal use? You can read what you are allowed to do in the Copyright text at the bottom of all our patterns. Happy crafting!
Post a comment to pattern DROPS 201-39
We would love to hear what you have to say about this pattern!
If you want to leave a question, please make sure you select the correct category in the form below, to speed up the answering process. Required fields are marked *.