DROPS Flora
DROPS Flora
65% Wool, 35% Alpaca
from 3.30 $ /50g
Get the yarn to make this pattern from 13.20$.

The yarn cost is calculated from the pattern’s smallest size and the yarn’s cheapest product type. Looking for an even better price? You might find it on the DROPS Deals!

DROPS SS24

Soda Fountain

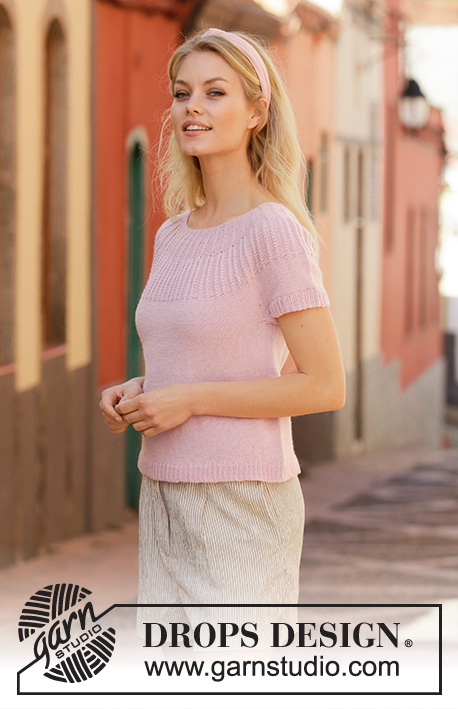
Knitted top in DROPS Flora. Piece is knitted top down with round yoke, English rib stitches on yoke and short sleeves. Size: S - XXXL

DROPS 201-40
DROPS design: Pattern fl-041
Yarn group A
----------------------------------------------------------

SIZE:
S - M - L - XL - XXL – XXXL

Finished measurements:
Chest measurements: 88-96-104-114-126-138 cm = 34⅝"-37¾"-41"-45"-49½"-54¼"
Full length: 48-50-52-54-56-58 cm = 19"-19¾"-20½"-21¼"-22"-22¾"

All measurements in charts are in cm.


MATERIALS:
DROPS FLORA from Garnstudio (belongs to yarn group A)
200-250-250-300-300-350 g color 21, pink

KNITTING GAUGE:
24 stitches in width and 32 rows vertically in stockinette stitch = 10 x 10 cm = 4" x 4".

NEEDLES:
DROPS DOUBLE POINTED NEEDLES SIZE 3 mm = US 2,5
DROPS CIRCULAR NEEDLE SIZE 3 mm = US 2,5: length 40 and 80 cm = 16" and 32" for stockinette stitch and English rib stitches.
DROPS DOUBLE POINTED NEEDLES SIZE 2.5 mm = US 1,5
DROPS CIRCULAR NEEDLE SIZE 2.5 mm = US 1,5: length 40 and 80 cm = 16" and 32" for rib.
Needle size is only a suggestion! If you have too many stitches on 10 cm = 4" switch to larger needles. If you have too few stitches on 10 cm = 4" switch to smaller needles.

-------------------------------------------------------

Alternative Yarn – See how to change yarns here
Yarn Groups A to F – Use the same pattern and change the yarn here
Yarn usage using an alternative yarn – Use our yarn converter here

-------------------------------------------------------

DROPS Flora
DROPS Flora
65% Wool, 35% Alpaca
from 3.30 $ /50g
Get the yarn to make this pattern from 13.20$.

The yarn cost is calculated from the pattern’s smallest size and the yarn’s cheapest product type. Looking for an even better price? You might find it on the DROPS Deals!

Pattern instructions

NOTE: This pattern is written in American English. All measurements in charts are in cm. For conversion from inches to cm - click here. There are different terms for crocheting in American and British English. If this pattern includes crochet, click for "crochet terms" here. For this pattern in British English, please click here.
----------------------------------------------------------

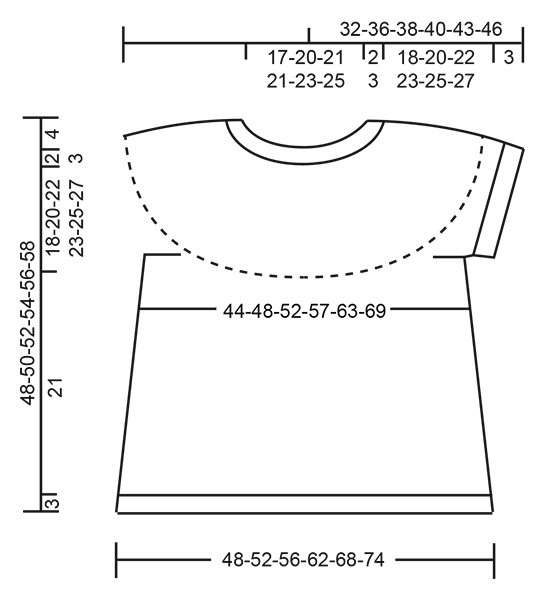
EXPLANATION FOR THE PATTERN:

----------------------------------------------------------

PATTERN:
See diagrams A.1 to A.3. Choose diagram for your size.

INCREASE TIP -1 (applies to increases in A.1):
Increase 1 stitch in every purl section by making 1 yarn over after every English rib stitch.
On next round purl yarn overs twisted to avoid holes.

INCREASE TIP-2 (applies to sides of body):
Work until 3 stitches remain before marker, make 1 yarn over, knit 6 (marker thread is in the middle of these 6 stitches), make 1 yarn over (= 2 stitches increased). Increase the same way at the other marker thread.
On next round knit yarn overs twisted to avoid holes. Then work the new stitches in stockinette stitch.

INCREASE TIP-3 (evenly):
To calculate how to increase evenly, use the total number of stitches on row (e.g. 228 stitches) and divide stitches by number of increases to be done (e.g. 66) = 3.5.
In this example increase by making 1 yarn over after alternately every 3rd and 4th stitch. On next round work yarn overs twisted to avoid holes.

----------------------------------------------------------

START THE PIECE HERE:

----------------------------------------------------------

TOP - SHORT OVERVIEW OF THE PIECE:
Neck edge and yoke are worked in the round on circular needle, top down. Divide yoke for body and sleeve edges. Continue body in the round on circular needle, top down. Work sleeve edges in the round on double pointed needles/short circular needle, top down.

NECK EDGE:
Cast on 111-123-129-129-138-150 stitches on a short circular needle size 2.5 mm = US 1,5 with Flora. Rounds begin mid back. Knit 1 round. Then work rib in the round (= knit 1 / purl 2) for 2-2-2-3-3-3 cm = ¾"-¾"-¾"-1⅛"-1⅛"-1⅛".
Work next round as follows:
SIZE S, M and L: * Knit 1, purl 1, 1 yarn over, purl 1 *, work from *-* the entire round = 148-164-172 stitches.
SIZE XL, XXL and XXXL: * Knit 1, purl 1, 1 yarn over, purl 1, 1 yarn over *, work from *-* the entire round = 215-230-250 stitches.
ALL SIZES: Work 1 round with knit over knit and purl over purl (purl the yarn overs twisted to avoid holes). Then work yoke as explained below.

YOKE:
Switch to circular needle size 3 mm = US 2,5. Work A.1 in the round (= 37-41-43-43-46-50 repetitions of 4-4-4-5-5-5 stitches). REMEMBER THE KNITTING GAUGE!
When piece measures 4-4-4-5-6-6 cm = 1½"-1½"-1½"-2"-2⅜" from cast-on edge, increase 1 stitch in every purl section – read INCREASE TIP-1 = 185-205-215-258-276-300 stitches. Continue pattern as before with 4-4-4-5-5-5 purl between every English rib stitch.
When piece measures 7-7-8-8-9-9 cm = 2¾"-2¾"-3⅛"-3⅛"-3½"-3½" from cast-on edge, work A.2 in the round (= 37-41-43-43-46-50 repetitions of 5-5-5-6-6-6 stitches). When A.2 has been worked, there are 333-369-387-430-460-500 stitches on needle. Then work A.3 in the round (= 37-41-43-43-46-50 repetitions of 9-9-9-10-10-10 stitches). Continue A.3 until piece measures approx. 16-17-19-21-23-25 cm from cast-on edge.
Now work 4 rounds in stockinette stitch, BUT continue the English rib stitches as before, on every other round (i.e. work English rib stitch as before but knit between every English rib stitch - NOTE: The English rib stitches will not be very visible on these 4 rounds but they give a softer transition between texture and stockinette stitch).
Then work in stockinette stitch in the round over all stitches AT THE SAME TIME adjust number of stitches to 332-368-388-428-460-500 on first round (i.e. decrease or increase for correct number of stitch – applies to the 4 smallest sizes).
When piece measures 20-22-24-26-28-30 cm = 8"-8¾"-9½"-10¼"-11"-11¾" from cast-on edge, divide yoke for body and sleeve edges. I.e. work next round as follows: Knit 50-54-57-63-70-77 (= ½ back piece), slip the next 66-76-80-88-90-96 stitches on 1 stitch holder for sleeve, cast on 6-8-10-10-12-12 new stitches on row (= in the side under sleeve), knit 100-108-114-126-140-154 (= front piece), slip the next 66-76-80-88-90-96 stitches on 1 stitch holder for sleeve, cast on 6-8-10-10-12-12 new stitches on row (= in the side under sleeve) and knit the remaining 50-54-57-63-70-77 stitches as before (= ½ back piece). Cut the yarn. Finish body and sleeve edges separately. NOW MEASURE THE PIECE FROM HERE!

BODY:
= 212-232-248-272-304-332 stitches. Insert 1 marker thread in each side, in the middle of the 6-8-10-10-12-12 stitches that were cast on under sleeves. Move the marker threads upwards when working; they should be used for increase later in the sides.
Begin round at one of the marker threads and work stockinette stitch in the round. When piece measures 4-4-4-3-3-3 cm = 1½"-1½"-1½"-1⅛"-1⅛"-1⅛" from division, increase 1 stitch on each side of both marker threads - read INCREASE TIP-2 (= 4 stitches increased). Increase like this every 5-5-3½-3-3-3 cm = 2"-2"-1¼"-1⅛"-1⅛"-1⅛" a total of 4-4-5-6-6-6 times in each side = 228-248-268-296-328-356 stitches.
Work until piece measures 21 cm = 8¼" from division (or desired length, approx. 3 cm = 1⅛" remain until finished measurements). Knit 1 round while increasing 66-70-74-82-92-100 stitches evenly - read INCREASE TIP-3 = 294-318-342-378-420-456 stitches. This is done to avoid the rib to be worked, from contracting.
Switch to circular needle size 2.5 mm = US 1,5. Work rib in the round = knit 1/purl 2 for 3 cm = US 2,5. Then loosely bind off by knitting. Top measures approx. 48-50-52-54-56-58 cm = 19"-19¾"-20½"-21¼"-22"-22¾" from shoulder and down.

SLEEVE EDGE:
Slip the 66-76-80-88-90-96 stitches from stitch holder in one side of piece on double pointed needles or a short circular needle size 3 mm = US 2,5 and pick in addition up 1 stitch in each of the 6-8-10-10-12-12 new stitches cast on under sleeve = 72-84-90-98-102-108 stitches.
Knit 1 round while increasing 0-0-0-1-0-0 stitch = 72-84-90-99-102-108 stitches. Switch to double pointed needles size 2.5 mm = US 1,5 and work rib in the round = knit 1/purl 2 for 3 cm = 1⅛". Loosely bind off with knit over knit and purl over purl but to avoid at tight bind-off edge make 1 yarn over after approx. every 6th stitch at the same time bind off (bind off yarn overs as stitches). Work another sleeve edge the same way in the other side of piece.

Diagram

All measurements in charts are in cm.

symbols = purl
symbols = knit 1 in stitch below next stitch - this stitch is now called an English rib stitch
symbols = work 5 stitches in English rib stitch as follows: Knit 1, but wait to slip the stitch off the needle, * make 1 yarn over on right needle, knit same stitch without slipping the stitch off left needle *, work from *-* 2 times in total, then drop this stitch off left needle = 5 stitches (i.e. 4 stitches increased)
diagram
diagram

Each of our patterns has specific tutorial videos to help you.

Do you have a question? See a list of frequently asked questions (FAQ)

Knitting tension is what determines the final measurements of your work, and is usually measured per 10 x 10 cm. It is provided like so: number of stitches in width x number of rows in height - eg: 19 stitches x 26 rows = 10 x 10 cm.

The knitting tension is very individual; some people knit/crochet loosely while others work tightly. You adjust the knitting tension with the needle size, which is why the suggested needle size only serve as a guide! You need to adjust this (up or down) to ensure that YOUR knitting tension matches the knitting tension provided in the pattern. If you work with a different knitting tension than provided you will have a different yarn consumption, and your work will have different measurements than what the pattern suggests.

The knitting tension also determines which yarns can replace each other. As long as you achieve the same knitting tension you can replace one yarn with another.

See DROPS lesson: How to measure your tension/gauge

See DROPS video: How to make a gauge tension swatch

The required amount of yarn is provided in grams, eg: 450 g. To calculate how many balls you’ll need you first need to know how many grams are in 1 ball (25g, 50g or 100g). This information is available if you click on the individual yarn quality on our pages. Divide the amount required with the amount of each ball. For example, if each ball is 50g (the most common amount), the calculation will be as follows: 450 / 50 = 9 balls.

The important thing when changing from one yarn to another is that the knitting/crochet tension remains the same. This is so that the measurements of the finished piece will be the same as on the sketch provided. It is easier to achieve the same knitting tension using yarns from the same yarn group. It is also possible to work with multiple strands of a thinner yarn to achieve the knitting tension of a thicker one. Please try our yarn converter. We recommend you to always work a test swatch.

Please NOTE: when changing yarn the garment might have a different look and feel to the garment in the photo, due to individual properties and qualities of each yarn.

See DROPS lesson: Can I use a different yarn than the one mentioned in the pattern?

All our yarns are categorised into yarn groups (from A to F) according to thickness and knitting tension – group A contains the thinnest yarns and group F the thickest. This makes it easier for you to find alternative yarns to our patterns, should you wish to switch yarn. All yarns within the same group have a similar knitting tension and can easily replace each other. However, different yarn qualities have different structures and properties which will give the finished work a unique look and feel.

Click here for an overview of the yarns in each yarn group

At the top of all our patterns you’ll find a link to our yarn converter, which is a helpful tool should you wish to use a different yarn than suggested. By filling in the yarn quality you wish to replace, the amount (in your size) and number of strands, the converter will present good alternative yarns with the same knitting tension. Additionally it will tell you how much you’ll require in the new qualities and whether you’ll need to work with multiple strands. Most skeins are 50g (some are 25g or 100g).

If the pattern is worked with multiple colours, every colour will have to be converted separately. Similarly, if the pattern is worked with several strands of different yarns (for example 1 strand Alpaca and 1 strand Kid-Silk) you will have to find alternatives for each, individually.

Click here to see our yarn converter

Since different yarns have different qualities and textures we have chosen to keep the original yarn in our patterns. However, you can easily find options among our available qualities by using our yarn converter, or simply pick a yarn from the same yarn group.

It is possible that some retailers still have discontinued yarns in stock, or that someone has a few skeins at home that they would like to find patterns for.

The yarn converter will provide both alternative yarn as well as required amount in the new quality.

If you think it's hard to decide what size to make, it can be a good idea to measure a garment you own already and like the size of. Then you can pick the size by comparing those measures with the ones available in the pattern's size chart.

You'll find the size chart at the bottom of the pattern.

See DROPS lesson: How to read size chart

The needle size provided in the pattern serves only as a guide, the important thing is to follow the knitting tension. And since knitting tension is very individual, you will have to adjust the needle size to ensure that YOUR tension is the same as in the pattern – maybe you’ll have to adjust 1, or even 2 needle sizes, up or down to achieve the correct tension. For this, we recommend that you work test swatches.

Should you work with a different knitting tension than the one provided, the measurements of the finished garment might deviate from the measurement sketch.

See DROPS lesson: How to measure your tension/gauge

See DROPS video: How to make a gauge tension swatch

Working a garment top-down provides more flexibility and room for personal adjustment. For example it is easier to try the garment on while working, as well as making adjustments to length of yoke and shoulder caps.

The instructions are carefully explaining every step, in the correct order. Diagrams are adjusted to the knitting direction and are worked as usual.

The diagram depicts all rows/rounds, and every stitch seen from the right side. It is read from bottom to top, from right to left. 1 square = 1 stitch.

When working back and forth, every other row is worked from the right side and every other row is worked from the wrong side. When working from the wrong side, the diagram will have to be worked reversed: from left to right, knit stitches are purled, purl stitches are knit etc.

When working in the round every round is worked from the right side and the diagram are worked from right to left on all rounds.

See DROPS lesson: How to read knitting diagrams

The diagram depicts all rows/rounds, and every stitch seen from the right side. It is worked from bottom to top, from right to left.

When working back and forth every other row is worked from the right side: from right to left and every other row is worked from the wrong side: from left to right.

When working in the round, every row in the diagram are worked from the right side, from right to left.

When working a circular diagram you start in the middle and work your way outwards, counter clockwise, row by row.

The rows usually start with a given number of chain stitches (equivalent to the height of the following stitch), this will either be depicted in the diagram or explained in the pattern.

See DROPS lesson: How to read crochet diagrams

Instructions for working several diagrams after each other on the same row/round, will often be written like so: “work A.1, A.2, A.3 a total of 0-0-2-3-4 times". This means you work A.1 once, then A.2 is worked once, and A.3 is repeated (in width) the number of times provided for your size – in this case like so: S = 0 times, M = 0 times, L=2 times, XL= 3 times and XXL = 4 times.

The diagrams are worked as usual: begin with the first row in A.1, then work the first row in A.2 etc.

See DROPS lesson: How to read knitting diagrams

See DROPS lesson: How to read crochet diagrams

The total width of the garment (from wrist-to-wrist) will be larger in the larger sizes, despite the actual sleeves being shorter. The larger sizes have longer sleeve caps and wider shoulders, so there will be a good fit in all sizes.

The measurement sketch/schematic drawing provides information regarding the full length of the garment. If it’s a jumper or a jacket the length is measured from the highest point on the shoulder (usually closest to the neckline), and straight down to the bottom of the garment. It is NOT measured from the tip of shoulder. Similarly, the length of yoke is measured from the highest point on the shoulder and down to where yoke is split into body and sleeves.

See DROPS lesson: How to read a schematic drawing

Diagrams are often repeated on the round or in height. 1 repeat is the diagram the way it appears in the pattern. If it says to work 5 repeats of A.1 in the round, then you work A.1 a total of 5 times after/next to each other in the round. If it says to work 2 repeats of A.1 vertically/in height you work the entire diagram once, then begin again at the start and work the entire diagram one more time.

Chain stitches are slightly narrower than other stitches and to avoid working the cast-on edge too tight, we simply chain more stitches to begin with. The stitch count will be adjusted on the following row to fit the pattern and measurement sketch.

The rib edge is more elastic and will contract slightly compared to, for example, stocking stitch. By increasing before the rib edge, you avoid a visible difference in width between the rib edge and the rest of the body.

It’s very easy to cast off too tightly, and by making yarn overs while casting off (and simultaneously casting these off) you avoid a too tight cast off edge.

See DROPS video: How to bind off with yarn overs (yo)

To achieve an even increase (or decrease) you can increase on, for example: every 3rd and 4th row alternately, like so: work 2 rows and increase on the 3rd row, work 3 rows and increase on the 4th. Repeat this until the increase is complete.

See DROPS lesson: Increase or decrease 1 st on every 3rd and 4th row alternately

Should you prefer to work in the round instead of back and forth, you may of course adjust the pattern. You’ll need to add steeks mid-front (usually 5 stitches), and follow the instructions. When you would normally turn and work from the wrong side, simply work across the steek and continue in the round. At the end you’ll cut the piece open, pick up stitches to work bands, and cover the cut edges.

See DROPS video: How to knit steeks and cut open

Should you prefer to work back and forth instead of in the round, you may of course adjust the pattern so you work the pieces separately and then assemble them at the end. Divide the stitches for the body in 2, add 1 edge stitch in each side (for sewing) and work the front and back pieces separately.

See DROPS lesson: Can I adapt a pattern for circular needles into straight needles?

Pattern repeats can vary slightly in the different sizes, in order to get the correct proportions. If you’re not working the exact same size as the garment in the photo, yours might deviate slightly. This has been carefully developed and adjusted so that the complete impression of the garment is the same in all sizes.

Make sure to follow instructions and diagrams for your size!

If you have found a pattern you like which is available in women’s size it’s not very difficult to convert it to men’s size. The biggest difference will be the length of sleeves and body. Start working on the women size that you think would fit across the chest. The additional length will be worked right before you cast off for the armhole/sleeve cap. If the pattern is worked top-down you can add the length right after the armhole or before the first decrease on sleeve.

Regarding additional yarn amount, this will depend on how much length you add, but it is better with a skein too many than too few.

All yarns will have excess fibres (from production) that might come off as lint or shedding. Brushed yarns (ie hairier yarns) have more of these loose, excess fibres, causing more shedding.

Shedding also depends on what is worn under or over the garment, and whether this pulls at the yarn fibres. It’s therefore not possible to guarantee that there will be no shedding

Below are some tips on how to get the best result when working with hairier yarns:

1. When the garment is finished (before you wash it) shake it vigorously so the looser hairs come off. NOTE: do NOT use a lint roller, brush or any method that pulls at the yarn.

2. Place the garment in a plastic bag and put it in your freezer - the temperature will cause the fibres to become less attached to each other, and excess fibres will come off easier.

3. Leave in the freezer for a few hours before taking it out and shaking it again.

4. Wash the garment according to the instructions on the yarn label.

Pilling is a natural process that happens to even the most exclusive of fibers. It's a natural sign of wear and tear that is hard to avoid, and that is most visible in high friction areas of your garment like a sweater's arms and cuffs.

You can make your garment look as new by removing the pilling, using a fabric comb or a pill/lint remover.

Still can't find the answer you need? Then scroll down and leave your question so one of our experts can try to help you. This will be done normally within 5 to 10 working days.
In the meantime, you can read the questions and answers that others have left to this pattern or join the DROPS Workshop on Facebook to get help from fellow knitters/crocheters!

You might also like...

Soda Fountain

Dri Kool, Italy

Soda Fountain top

Sonja, United States

Soda Fountain

Sarah, United Kingdom

Soda Fountain

Svetlana Cox, United States

Post a comment to pattern DROPS 201-40

We would love to hear what you have to say about this pattern!

If you want to leave a question, please make sure you select the correct category in the form below, to speed up the answering process. Required fields are marked *.

Comments / Questions (14)

country flag Caro Devillez wrote:

Bonjour, je suis habitante de la Belgique mais je parles le français comme plus de la moitié du pays... Pourquoi dois-je prendre le site FRANCE ? Merci

14.06.2022 - 22:30

DROPS Design answered:

Bonjour Mme Devillez, choisissez "FRANCE" pour la langue, pas pour le pays - ceci s'applique également à tous les autres pays francophones. Bon tricot!

15.06.2022 - 09:26

country flag Onbekend wrote:

Voor lijf dus 310 st volgens mijn proeflap 32x 40 ==> 10x10

09.03.2022 - 20:29

country flag Corinna wrote:

Ich stricke viel top down. Wie kann ich hier den vorderen Halsausschnitt vertiefen? Verkürzte Reihen oder gibt es eine weniger rechenintensive Möglichkeit. Mir sind bei Euren Anleitungen für Sommerstrick die Halsausschnitt meist zu hoch. Viele Grüße

20.01.2022 - 13:16

DROPS Design answered:

Liebe Corinna, ja dann am besten verkürzten Reihen für eine Erhöhung würde die beste Möglichkeit, am besten lassen Sie sich von einem ähnlichen Modell inspirieren, das eine Erhöhung hat. Viel Spaß beim stricken!

20.01.2022 - 17:10

country flag Judy Hankey wrote:

On pattern 201-40 in chart A-2 it calls for an English Rib with 5 stitches. When working Row 2, all purls, do you knit each of the 5 stitches as you come to them, or all five stitches worked as 1 stitch.

27.07.2021 - 01:53

DROPS Design answered:

Hi Judy, In row 2 all stitches are purled (the English rib stitches too). Happy knitting!

27.07.2021 - 09:28

country flag Alma wrote:

Dove dice nei giri a rovescio aumentare dopo ogni maglia a costa inglese come verrà lavorata a rovescio come indicato nello schema o diversamente grazie

02.06.2020 - 17:02

DROPS Design answered:

Buongiorno Alma. Al giro successivo, lavora la maglia aumentata a rovescio ritorto. Abbiamo corretto il testo. Buon lavoro!

02.06.2020 - 17:30

country flag Marí Carmen Ríos Aragón wrote:

Cómo saber la talla que tengo , para elegir entre las que te viene en el patrón . Muchas gracias

03.05.2020 - 21:18

DROPS Design answered:

Hola Mari Carmen! Mira la leccion AQUI y siempre tejas una muestra. Buen trabajo!

04.05.2020 - 08:17

country flag Unn-Lisbeth Hansen wrote:

Kan det stemme at denne skal være bare 21 cm fra deling og ned til vrangbord?

08.07.2019 - 22:20

DROPS Design answered:

Hei Unn-Lisbeth, Det er riktig som står i oppskriften, men hvis du vil ha det lengre kan du strikke videre før du strikker vrangbord. God fornøyelse!

09.07.2019 - 07:29

country flag Agnethe Jernek wrote:

Kan jeg strikke fra neden fra og opp

13.06.2019 - 10:41

DROPS Design answered:

Hei Agnetha. Ja, du må gjerne reversere oppskriften og strikke den nedenfra og opp om du ønsker det. Begynn nederst på bolen, fell der det står øk, øk der det står fell, husk å snu diagrammene opp-ned (altså les dem ovenfra og ned, fra venstre mot høyre). God fornøyelse

13.06.2019 - 10:51

country flag Jan wrote:

Is there a way to make the back insert so that the neckline doesn’t sit so high up in the front?

11.06.2019 - 17:58

DROPS Design answered:

Dear Jan, you can try to make an elevation on back of neck. Happy knitting!

12.06.2019 - 07:20

country flag Garciamina wrote:

Es un modelo precioso, elegante y creo será sencillo hacerlo, gracias a todos

16.05.2019 - 01:18