
Looking for a yarn?


Comments / Questions (31)
![]() Sjöfn wrote:
Sjöfn wrote:
Sæl. Ég er að vandræðast með umferð 8 í A.2. Á að taka tvær saman prjóna 5sléttar og tvær saman . Er ég þá ekki að taka úr allan hringinn ef ekker er slegið uppá?
11.07.2025 - 10:11DROPS Design answered:
Blessuð Sjöfn. Það er rétt, lykkjunum fækkar allan hringinn og í næstu umferð þá slærð þú uppá prjóninn samkvæmt mynsturteikningu þannig að lykkjufjöldinn verður aftur sá sami. Gangi þér vel.
11.07.2025 - 11:18
![]() Conni wrote:
Conni wrote:
Model 200-26 Når man skal forskyde de 2 masker til venstre i A2, er det så efter hver rapport ( 10 ) masker eller er det kun i starten af rapporten i A2 På forhånd tak
28.08.2024 - 19:36DROPS Design answered:
Hej Conni, på næste omgang starter omgangen med 1ret, tag 1 maske løst af pinden..... osv ifølge diagrammet (sæt gerne 1 mærke i overgangen, så bliver det tydeligt) :)
29.08.2024 - 11:51
![]() Evelyne wrote:
Evelyne wrote:
Bonjour, merci pour tous ces beaux modèles. Je souhaite remplacer les côtes par une finition identique que le col en point fantaisie A1 aiguilles n°3. Dois-je réaliser les augmentations au dernier rang ? Merci beaucoup ! Bien cordialement
26.07.2024 - 17:22DROPS Design answered:
Bonjour Evelyne, si vous souhaitez terminer par le motif A.1 en aiguilles 3 au lieu des côtes, il va vous falloir recalculer d'après les mesures souhaitées et la circonférence totale le nombre de mailles nécessaire en 3 (il en faudra plus qu'en 4) pour tricoter ce motif et ainsi vous aurez le nombre d'augmentations à faire pour éviter de resserrer le bas du pull, tricotez quelques rangs sur un échantillon pour pouvoir avoir une base de calcul. Bon tricot!
29.07.2024 - 11:25
![]() Ebou wrote:
Ebou wrote:
Bonjour, j'ai lu et traduit les nombreuses réponses concernant les tours 7 et 8 de A2 et je ne comprends toujours pas comment commencer le tour 8. Pardon d'insister. Pouvez-vous décrire précisément ce debut de tour 8? Merci beaucoup. Bien cordialement
07.07.2024 - 10:12DROPS Design answered:
Bonjour Mme Ebou, au début du 8ème tour de A.2, glissez les 2 premières mailles du tour sans les tricoter, tricotez ensuite A.2 en suivant le diagramme: la dernière maille du 1er A.2 se tricote avec les 2 premières mailles du A.2 suivant (le 1er jeté est désormais la dernière maile du 1er A.2, la diminution + le jeté sont maintenant les 2 premières mailles du A.2 suivant), continuez ainsi tout le tour, terminez le tour avec la dernière maille du dernier motif et les 2 premières mailles du tour tricotées ensemble= le 1er jeté est la dernière maille du tour et la diminution + le 2ème jeté sont les 2 premières mailles du tour. Bon tricot!
29.07.2024 - 08:17
![]() Laura wrote:
Laura wrote:
I just want to be sure about A2 rows 7&8. In row 7, I slip the first 2 stitches onto the right needle -so the beginning of the row moves 2 stitches to the left. I then knit row 7 according to the pattern. At the end of row 7, I include the first 2 slipped stitches in the pattern and then end the row with a yarn over. This means that row 8 starts after the yarn over, correct?
19.10.2022 - 17:37DROPS Design answered:
Dear Laura, correct, but the 8th row starts then with the stitch remaining from the decrease (1st st on the round) + the yarn over (2nd st on the round). Happy knitting!
20.10.2022 - 09:44
![]() Conni wrote:
Conni wrote:
Forstår ikke A2 omgang 7 ved pilen. Jeg får flere masker på denne omgang, og på næste omgang 8 kommer jo så heller ikke til at passe. Kan I forklare det så en nybegynder kan forstå det. Har prøvet flere metoder, men kan ikke få det til at passe. Mvh Conni
08.09.2022 - 10:00DROPS Design answered:
Hej Conni, på starten af 7.omgang løfter du 2 masker over på højre pind uden at strikke dem og så strikker du 7ret, 1omslag, tag 1 maske løs af pinden som om den skulle strikkes ret, strik 2 ret sammen, løft den løse maske over maskerne som blev strikket sammen, 1 omslag, 7ret osv, og afslutter omgangen med omslag og indtagning :)
09.09.2022 - 13:11
![]() Rosario Elias Liñero wrote:
Rosario Elias Liñero wrote:
Hola Quería preguntarte cómo se tejen lis dos puntos deslizados al principio de A2 donde está la flecha En cada repetición se deslizan los dos puntos o solo al principio de la vuelta? Y al final de la vuelta como tejí lis dos puntos sin tejer? Es que no entiendo cómo tejerlos Muchas gracias
21.05.2022 - 04:42DROPS Design answered:
Hola Rosario, no es un deslizamiento de los puntos, sino un desplazamiento del diagrama. Esto quiere decir que la repetición comienza y termina dos puntos más hacia la izquierda que en la vuelta anterior.
22.05.2022 - 23:18
![]() Dagmar wrote:
Dagmar wrote:
Wenn ich mit dem Rumpf beginne, soll ich laut Anleitung gleich A3 stricken. Auf den Fotos sieht es aber so aus, als würde A3 erst später beginnen. Muss ich am Anfang des Rumpfes nicht erstmal ein paar Zentimeter glatt rechts stricken?
24.02.2022 - 08:01DROPS Design answered:
Liebe Dagmar, auf dem Foto sieht man nicht wirklich die Teilung der Passe, aber so ist es richtig, nach der Teilung stricken Sie A.3. Viel Spaß beim stricken!
24.02.2022 - 10:43
![]() Maritsantos wrote:
Maritsantos wrote:
Har strikket str. XL og har 2 hele nöster igjen, nesten 3 (130 gr). Dere beregner for mye garn. Det gaar igjen i mange av oppskriftene. Jeg strikker mye og sitter derfor igjen med mye restegarn.
07.09.2021 - 17:57
![]() Chantal wrote:
Chantal wrote:
Bonjour entre le huitième et le neuvième rang du diagramme A2 N’y a-t-il pas un autre tour ?Merci pour votre réponse cordialement
27.02.2021 - 13:19DROPS Design answered:
Bonjour Chantal, les diagrammes sont justes ainsi, autrement dit, aux tours 7 à 13, on va tricoter un motif tous les tours (on diminue aux tours 8, 10 et 12 et on va augmenter aux tours 9, 11 et 13). Bon tricot!
01.03.2021 - 10:40
|
|||||||||||||||||||||||||
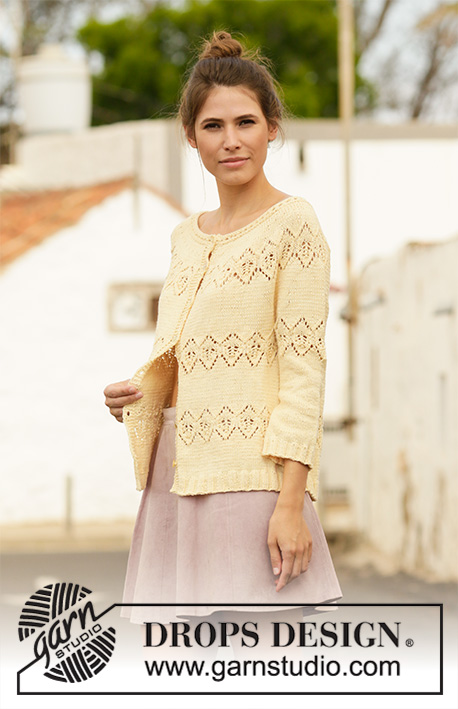
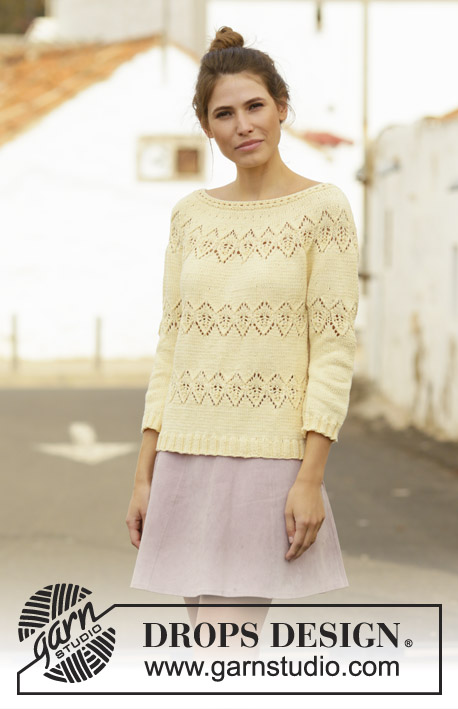
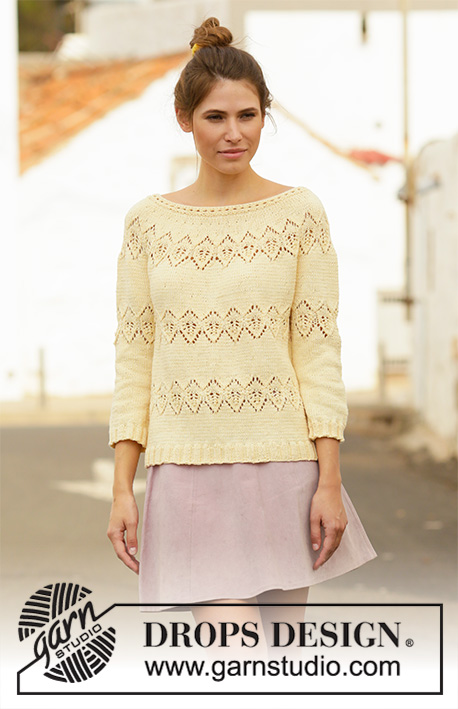
Spring Symmetry#springsymmetrysweater |
|||||||||||||||||||||||||
 |
 |
||||||||||||||||||||||||
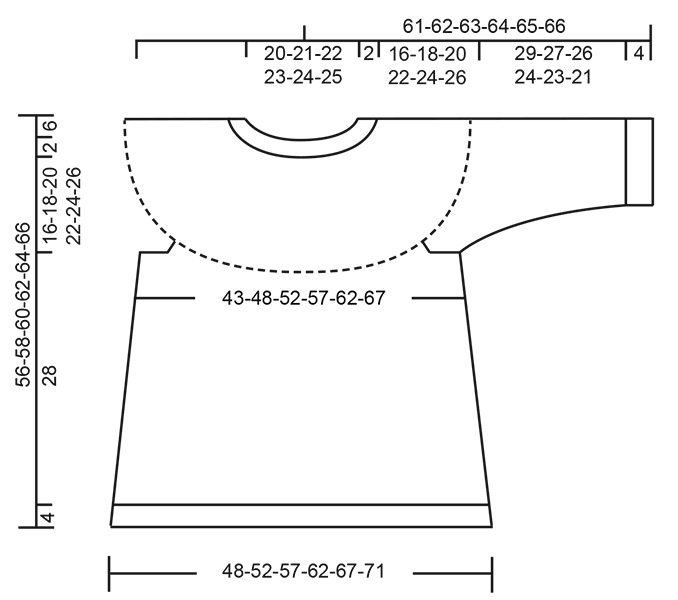
Knitted sweater in DROPS Muskat. The piece is worked top down with round yoke, lace pattern and ¾-length sleeves. Sizes S - XXXL.
DROPS 200-26 |
|||||||||||||||||||||||||
|
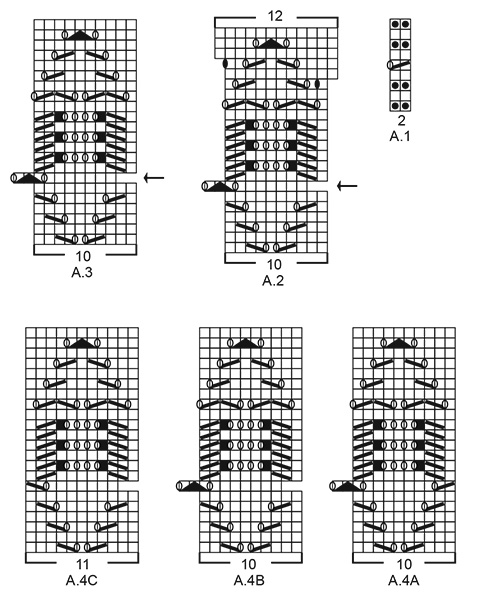
------------------------------------------------------- EXPLANATIONS FOR THE PATTERN: ------------------------------------------------------- PATTERN: See diagrams A.1 to A.4 (note that sometimes the pattern is worked on all rounds). INCREASE TIP-1 (evenly spaced): To work out how to increase evenly, count the total number of stitches on needle (e.g. 108 stitches) and divide by the number of increases to be made.(e.g. 36) = 3. In this example, increase by making 1 yarn over after each 3rd stitch. On the next round knit the yarn overs twisted to avoid holes. DECREASE TIP (for mid under sleeves): Decrease 1 stitch on each side of the marker thread as follows: Work until there are 2 stitches left before the marker thread, knit 2 together, marker thread, slip 1 stitch as if to knit, knit 1 and pass the slipped stitch over the knitted stitch (= 2 stitches decreased). ------------------------------------------------------- START THE PIECE HERE: ------------------------------------------------------- SWEATER - SHORT OVERVIEW OF THE PIECE: The neck and body are worked in the round with circular needle, top down. The yoke is divided for body and sleeves. The body is continued in the round with circular needle, top down. The sleeves are worked in the round with short circular needle/double pointed needles, top down. NECK: Cast on 108-112-116-120-124-128 stitches with short circular needle size 3 mm = US 2,5 and Muskat. Work A.1 in the round. Continue this pattern until A.1 has been worked 1 time in height. Knit 1 round where you increase 36-36-38-40-40-42 stitches evenly spaced – read INCREASE TIP-1 = 144-148-154-160-164-170 stitches. Then work yoke as described below. YOKE: Change to circular needle size 4 mm = US 6 and work stockinette stitch in the round. AT THE SAME TIME increase as described below. REMEMBER THE KNITTING GAUGE! When the piece measures 4-5-5-5-6-6 cm = 1½"-2"-2"-2"-2⅜"-2⅜" from the cast-on edge increase 30-44-50-58-60-62 stitches evenly spaced = 174-192-204-218-224-232 stitches. Continue with stockinette stitch. When the piece measures 6-7-8-9-10-11 cm = 2⅜"-2¾"-3⅛"-3½"-4"-4⅜" from the cast-on edge increase 26-38-46-52-56-58 stitches evenly spaced = 200-230-250-270-280-290 stitches. Work 1 round with stockinette stitch. Then work A.2 in the round (= 20-23-25-27-28-29 repeats of 10 stitches). Continue this pattern, but on the round marked with an arrow in A.2, displace the start of the round 2 stitches to the left; i.e. slip the first 2 stitches onto the right needle without working them, then work A.2 in the round. The 2 stitches which were slipped onto the right needle are worked in the last repeat of A.2. The next round starts as usual. When A.2 has been completed there are 240-276-300-324-336-348 stitches on the needle. Continue in the round with stockinette stitch. AT THE SAME TIME increase as described below. When the piece measures 15-16-17-18-20-21 cm = 6"-6¼"-6¾"-7"-8"-8¼" from the cast-on edge increase 20-20-22-24-28-30 stitches evenly spaced = 260-296-322-348-364-378 stitches. Continue with stockinette stitch. When the piece measures 17-18-19-21-23-25 cm = 6¾"-7"-7½"-8¼"-9"-9¾" from the cast-on edge increase 10-14-20-22-26-28 stitches evenly spaced = 270-310-342-370-390-406 stitches. Continue in the round with stockinette stitch until the piece measures 18-20-22-24-26-28 cm = 7"-8"-8¾"-9½"-10¼"-11" from the cast-on edge mid front. Now divide the yoke for body and sleeves as follows: Work 41-46-50-55-59-63 stitches in stockinette stitch (= ½ back piece), place the next 53-63-71-75-77-77 stitches on 1 thread for sleeve, cast on 8-8-10-10-12-14 new stitches on the needle (= in side under sleeve), work 82-92-100-110-118-126 stitches in stockinette stitch (= front piece), place the next 53-63-71-75-77-77 stitches on 1 thread for sleeve, cast on 8-8-10-10-12-14 new stitches on the needle (= in side under sleeve) and work the remaining 41-46-50-55-59-63 stitches in stockinette stitch (= ½ back piece). Cut the strand. Body and sleeves are finished separately. THE PIECE IS NOW MEASURED FROM HERE! BODY: = 180-200-220-240-260-280 stitches. Start the round on the one side of the piece, in the middle of the 8-8-10-10-12-14 stitches under the sleeve. Work A.3 in the round (= 18-20-22-24-26-28 repeats of 10 stitches). Continue this pattern, but on the round marked with an arrow in A.3, displace the start of the round 2 stitches to the left in the same way as in A.2. When A.3 has been completed, work 1 round of stockinette stitch where you increase 10 stitches evenly spaced in all sizes = 190-210-230-250-270-290 stitches. Continue in the round with stockinette stitch and repeat the increase when the piece measures 14-14-14-14-16-16 cm = 5½"-5½"-5½"-5½"-6¼"-6¼" from the division = 200-220-240-260-280-300 stitches. Now work A.3 in the round again (= 20-22-24-26-28-30 repeats of 10 stitches). When A.3 has been completed work stockinette stitch until the piece measures 28 cm = 11" from the division in all sizes (or to desired length; there is approx. 4 cm = 1½" to finished length). Knit 1 round where you increase 64-74-78-88-92-96 stitches evenly spaced = 264-294-318-348-372-396 stitches. This is done to avoid the rib being tight. Change to circular needle size 3 mm = US 2,5 and work rib in the round (= knit 3 / purl 3) for 4 cm = 1½". Change to circular needle size 4 mm = US 6 and loosely bind off with knit over knit and purl over purl. The sweater measures approx. 56-58-60-62-64-66 cm = 22"-22¾"-23⅝"-24⅜"-25¼"-26" from the shoulder down. SLEEVE: Place the 53-63-71-75-77-77 stitches from the thread on the one side of the piece on short circular needle or double pointed needles size 4 mm = US 6 and knit up 1 stitch in each of the 8-8-10-10-12-14 stitches cast on under sleeve = 61-71-81-85-89-91 stitches. Insert 1 marker thread in the middle of the 8-8-10-10-12-14 stitches under the sleeve. Allow the marker thread to follow your work onwards – it will be used when decreasing mid under sleeve. Start the round by the marker thread and work the first round as follows: Work 0-0-0-2-4-0 stitches in stockinette stitch, work A.4A (= 10 stitches), A.4B over the next 40-50-60-60-60-70 stitches (= 4-5-6-6-6-7 repeats of 10 stitches), A.4C (= 11 stitches) and finish with 0-0-0-2-4-0 stitches in stockinette stitch. Continue this pattern until A.4 has been worked 1 time in height, then work stockinette stitch in the round. AT THE SAME TIME when the piece measures 3-3-2-2-2-2 cm = 1⅛"-1⅛"-¾"-¾"-¾"-¾" from the division, decrease 2 stitches mid under sleeve – read DECREASE TIP. Decrease like this every 6-2½-1½-1½-1½-1 cm = 2⅜"-1"-½"-½"-½"-⅜" a total of 5-9-13-13-14-14 times = 51-53-55-59-61-63 stitches (stitches which do not fit into A.4 when decreasing are worked in stockinette stitch). Work until the sleeve measures 29-27-26-24-23-21 cm = 11⅜"-10⅝"-10¼"-9½"-9"-8¼" from the division (or to desired length; there is approx. 4 cm = 1½" left to finished length. NOTE: Shorter measurements in larger sizes due to wider neck and longer yoke). Knit 1 round where you increase 3-1-5-1-5-3 stitches evenly spaced = 54-54-60-60-66-66 stitches. Change to double pointed needles size 3 mm = US 2,5 and work rib in the round (= knit 3 / purl 3) for 4 cm = 1½". Change back to double pointed needles size 4 mm = US 6. Loosely bind off with knit over knit and purl over purl. The sleeve measures approx. 33-31-30-28-27-25 cm = 13"-12¼"-11¾"-11"-10⅝"-9¾" from the division. Work the other sleeve in the same |
|||||||||||||||||||||||||
Diagram explanations |
|||||||||||||||||||||||||
|
|||||||||||||||||||||||||
|
|||||||||||||||||||||||||
|
|||||||||||||||||||||||||
Have you finished this pattern?Tag your pictures with #dropspattern #springsymmetrysweater or submit them to the #dropsfan gallery. Do you need help with this pattern?You'll find 23 tutorial videos, a Comments/Questions area and more by visiting the pattern on garnstudio.com. © 1982-2025 DROPS Design A/S. We reserve all rights. This document, including all its sub-sections, has copyrights. Read more about what you can do with our patterns at the bottom of each pattern on our site. |
|||||||||||||||||||||||||


With over 40 years in knitting and crochet design, DROPS Design offers one of the most extensive collections of free patterns on the internet - translated to 17 languages. As of today we count 314 catalogs and 11822 patterns - 11812 of which are translated into English (US/in).
We work hard to bring you the best knitting and crochet have to offer, inspiration and advice as well as great quality yarns at incredible prices! Would you like to use our patterns for other than personal use? You can read what you are allowed to do in the Copyright text at the bottom of all our patterns. Happy crafting!
Post a comment to pattern DROPS 200-26
We would love to hear what you have to say about this pattern!
If you want to leave a question, please make sure you select the correct category in the form below, to speed up the answering process. Required fields are marked *.