
Looking for a yarn?


Comments / Questions (24)
![]() Sirpa wrote:
Sirpa wrote:
Hei! Onkohan piirroksen A1 rivillä 9. virhe? Sama huomio kuin Riia Leppämäellä, kuvio ei kohdistu oikein, jos neuloo ohjeen mukaan. Kuvion saa kohdistettua oikein, jos neuloo ensin rivin 2 viimeistä ruutua ja aloittaa sitten ensimmäisestä ruudusta.
19.07.2024 - 13:36
![]() Riia Leppämäki wrote:
Riia Leppämäki wrote:
Hei! En ymmärrä miten piirroksen A.1 rivi 9 pitäisi neuloa. Kuvio ei kohdistu oikein jos jatkan kerroksen vaihtumiskohdasta
16.10.2023 - 09:05DROPS Design answered:
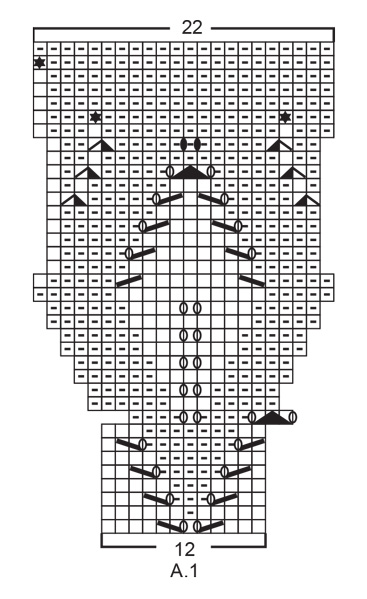
Tällä rivillä aloitetaan neulomalla seuraavasti: 1 langankierto, nosta 1 silmukka oikein neulomatta. neulo 2 silmukkaa oikein yhteen, vedä nostettu silmukka kavennuksen yli, 1 langankierto.
18.10.2023 - 16:48
![]() Margit wrote:
Margit wrote:
A.1 rida 25,27 ja 29. Kas need kolmnurkadega sümbolid ei praks vastupidi olema? Järgmiste ridade parempidised silmused muidu ei klapi ju.
06.02.2022 - 19:12DROPS Design answered:
Tere Margit! Antud juhendis on need pandud niipidi, aga alati võib teha nii nagu omale rohkem meeldib. Head kudumist!
08.03.2022 - 22:33
![]() Guinevere Phaneuf wrote:
Guinevere Phaneuf wrote:
On row 8 of chart A.1 it say to yarn over slip one then knit two together pass slip stitch over. But on next row there are to many stitches.
15.08.2021 - 14:26DROPS Design answered:
Dear Mrs Phaneuf, start row 9 in A.1 2 sts before the end of the round and work: YO, slip 1 as if to K, K2 tog, YO, P4, YO, K1, YO, P4 = 14 sts (2 sts increased in each A.1). On next round, work: P5, K3, P6 = 14 sts. Hope this will help, happy knitting!
16.08.2021 - 08:50
![]() Pichard wrote:
Pichard wrote:
Bonjour je suis en train de faire le modele mais i doit avoir une erreur pour les augmentation je fait la grande taille avant de commence la feuille j ai 240 mile t coment obtenir apres la fin de la feuilles 440 maille sans avoir fait des augnntation
05.10.2020 - 10:14DROPS Design answered:
Bonjour Mme Pichard, dans la grande taille, vous tricotez 20 fois A.1 en largeur (= 20 fois 12 mailles = 240 mailles. Quand le diagramme A.1 est terminé, vous avez 22 mailles x 20 fois = 440 mailles. Vous trouverez ici comment lire un diagramme si besoin. Bon tricot!
05.10.2020 - 11:44
![]() BEAUCLAIR wrote:
BEAUCLAIR wrote:
Bonjour. Est il possible de faire le modèle à deux aiguilles au lieu de l'aiguille circulaire avec laquelle je ne suis pas à l'aise,merci de votre réponse. Cord
07.09.2020 - 10:21DROPS Design answered:
Bonjour Mme Beauclair, vous trouverez comment adapter un modèle sur aiguilles droites ici. Bon tricot!
07.09.2020 - 10:24
![]() Hanne wrote:
Hanne wrote:
Hej. Hvordan tænker I, at man skal strikke A3 over blot 8 masker på ærmet, når A3 går over 16 masker? Venlig hilsen, Hanne
07.04.2020 - 21:28DROPS Design answered:
Hei Hanne. Du har satt en merketråd midt under ermet. Merketråden markerer midt under ermet og omgangen starter ved merketråden. Når du skal strikke etter A.3 avpass slik at du starter midt i A.3, slik at du strikker 4-6-6-7 -8 masker av A.3, deretter glattstrikk og så strikkes det etter A.3 igjen, enten 4-6-6-7 -8 masker. God Fornøyelse!
15.04.2020 - 14:14
![]() Mello wrote:
Mello wrote:
Hi, I am currently knitting this beautiful jumper, however do you have the cables in the pattern the wrong way round?
28.08.2019 - 15:38DROPS Design answered:
Dear Mello, not sure what you are meaning here, the small cables over 2 stitches (= 8th and 9th symbols) are worked as explained under diagram key. Should this help you? Happy knitting!
28.08.2019 - 16:43
![]() Elena wrote:
Elena wrote:
Hei. Har dere oppskrifter på russisk?
21.07.2019 - 23:37DROPS Design answered:
Hei Elena, Dessverre har vi ikke fått oversatt oppskriftene til russisk ennå. Vennlig hilsen, DROPS-teamet.
22.07.2019 - 07:35
![]() Karin wrote:
Karin wrote:
Jag undrar om beskrivningarna för de vridna maskorna på rad 25, 27, 29 har blivit omkastade. Som de är ritade borde det var tvärt om (räta maskan på vänstersidan ska luta åt höger och vice versa), och det borde även se bättre ut (som en sammanhängande gren), men beskrivningen ger ju motsatt effekt.
11.07.2019 - 20:28
|
||||||||||||||||||||||||||||||||||
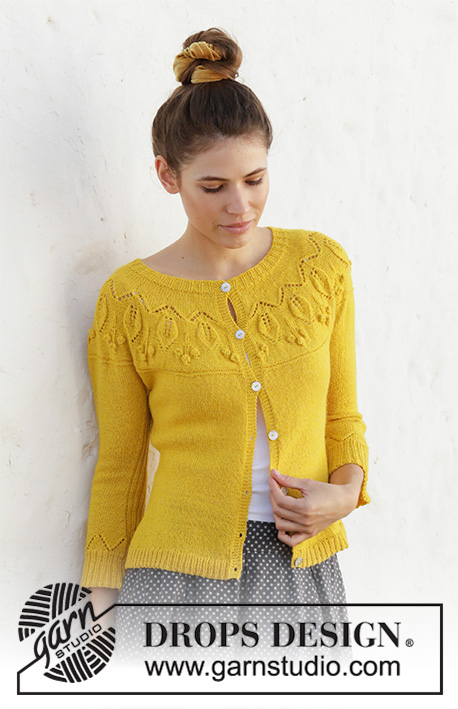
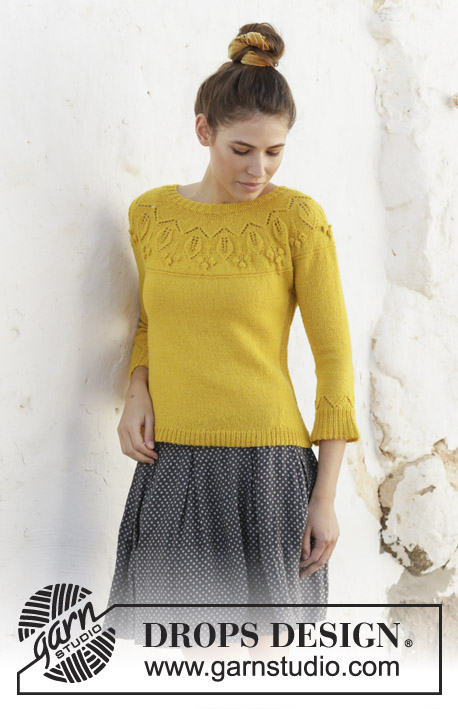
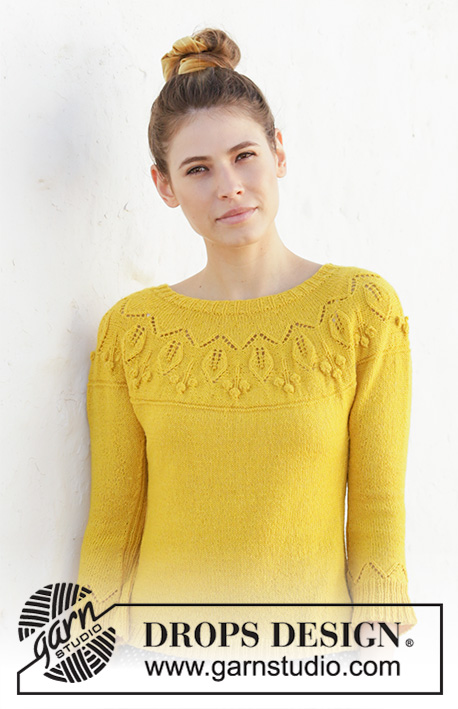
Summer Twinkle Sweater#summertwinklesweater |
||||||||||||||||||||||||||||||||||
 |
 |
|||||||||||||||||||||||||||||||||
Knitted sweater with leaf pattern, bobbles, round yoke and ¾-length sleeves. The piece is worked in DROPS Flora, top down. Sizes S - XXXL.
DROPS 200-12 |
||||||||||||||||||||||||||||||||||
|
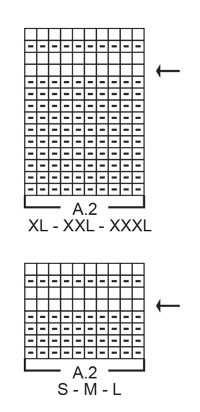
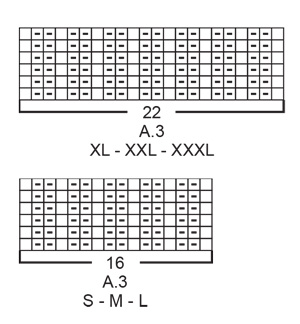
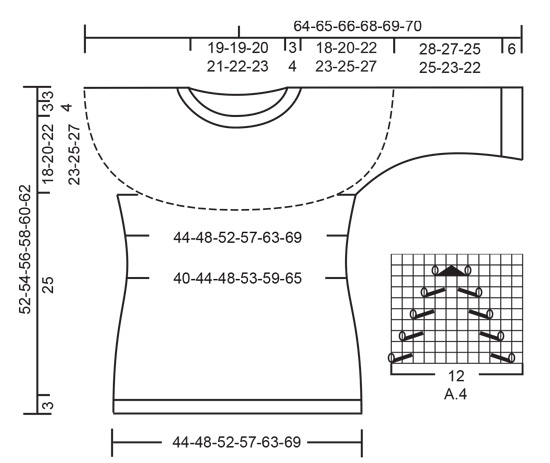
------------------------------------------------------- EXPLANATIONS FOR THE PATTERN: ------------------------------------------------------- PATTERN: See diagrams A.1 to A.4. Choose diagram for your size (applies to A.2 and A.3) INCREASE TIP-1 (evenly spaced): To work out how to increase evenly, count the total number of stitches on the needle (e.g. 117 stitches) and divide by the number of increases to be made (e.g. 39) = 3. In this example, increase by making 1 yarn over after each 3rd stitch. On the next round knit the yarn overs twisted to avoid holes INCREASE TIP-2 (for sides of body and mid under sleeves): Increase on each side of the rib as described below: Work as far as A.3, make 1 yarn over, work A.3 (= 16-16-16-22-22-22 stitches - marker thread sits in middle of these 16-16-16-22-22-22 stitches), make 1 yarn over (= 2 stitches increased). On the next round knit the yarn overs twisted to avoid holes. Then work the new stitches in stockinette stitch. DECREASE TIP (for sides of body and mid under sleeves): Decrease on each side of A.3 as described below: Work until there are 2 stitches left before A.3, knit 2 together, work A.3 (= 16-16-16-22-22-22 stitches - marker thread sits in middle of these 16-16-16-22-22-22 stitches), slip 1 stitch as if to knit, knit 1 and pass the slipped stitch over the knitted stitch (= 2 stitches decreased). ------------------------------------------------------- START THE PIECE HERE: ------------------------------------------------------- SWEATER - SHORT OVERVIEW OF THE PIECE: Neck and yoke are worked in the round with circular needle, top down. The yoke is divided for body and sleeves. The body is continued in the round with circular needle. The sleeves are worked in the round with short circular needle/double pointed needles, top down. NECK: Cast on 117-120-123-129-132-138 stitches with short circular needle size 2.5 mm = US 1,5 and Flora. Knit 1 round then work rib in the round (= knit 1, purl 2) for 3-3-3-4-4-4 cm = 1⅛"-1⅛"-1⅛"-1½"-1½"-1½". When the rib is finished knit 1 round where you increase 39-40-41-43-44-46 stitches evenly spaced – read INCREASE TIP-1 = 156-160-164-172-176-184 stitches. Then work the yoke as described below. YOKE: Change to circular needle size 3 mm = US 2,5 and work stockinette stitch in the round. REMEMBER THE KNITTING GAUGE! When the piece measures 4-5-6-6-7-7 cm = 1½"-2"-2⅜"-2⅜"-2¾"-2¾" from the cast-on edge increase 12-32-40-44-52-56 stitches evenly spaced = 168-192-204-216-228-240 stitches. When the piece measures 5-6-7-8-9-9 cm = 2"-2⅜"-2¾"-3⅛"-3½" from the cast-on edge start the leaf pattern; i.e. work A.1 in the round (= 14-16-17-18-19-20 repeats of 12 stitches). Continue this pattern. When A.1 has been completed there are 308-352-374-396-418-440 stitches on the needle. Work A.2 in the round. AT THE SAME TIME on the round marked with an arrow in A.2 increase 16-8-10-28-34-40 stitches evenly spaced = 324-360-384-424-452-480 stitches on needle. When A.2 has been completed, continue with stockinette stitch until the piece measures 21-23-25-27-29-31 cm = 8¼"-9"-9¾"-10⅝"-11⅜"-12¼" from the cast-on edge. Now divide the yoke for body and sleeves on the next round as follows: Work 48-53-56-62-68-74 stitches in stockinette stitch (= ½ back piece), place the next 65-73-79-87-89-91 stitches on 1 thread for sleeve, cast on 8-8-12-12-14-16 new stitches on needle (= in side under sleeve), work 97-107-113-125-137-149 stitches in stockinette stitch (= front piece), place the next 65-73-79-87-89-91 stitches on 1 thread for sleeve, cast on 8-8-12-12-14-16 new stitches on needle (= in side under sleeve) and work the remaining 49-54-57-63-69-75 stitches in stockinette stitch (= ½ back piece). Cut the strand. Then finish body and sleeves separately. THE PIECE IS NOW MEASURED FROM HERE! BODY: = 210-230-250-274-302-330 stitches. Insert 1 marker thread on each side of the body in the middle of the 8-8-12-12-14-16 stitches cast on under each sleeve. The threads mark sides of body. Start the round by one of the marker threads and work stockinette stitch in the round with A.3 over the middle 16-16-16-22-22-22 stitches on each side of the body (threads sit in the middle of each A.3). Continue this pattern. When the piece measures 2 cm from the division decrease 1 stitch on each side of A.3 on each side – read DECREASE TIP (= 4 stitches decreased). Decrease like this every 1½ cm = ½" a total of 5 times on each side = 190-210-230-254-282-310 stitches. When the piece measures 13 cm = 5⅛" from the division increase 1 stitch on each side of A.3 on each side – read INCREASE TIP-2 (= 4 stitches increased). Increase like this every 2½ cm = 1¼" a total of 5 times on each side = 210-230-250-274-302-330 stitches. Continue working until the piece measures 25 cm = 9¾" from the division in all sizes (or to desired length; there is 3 cm = 1⅛" left to finished length). On the next round increase as follows: Work A.3 as before over the first 8-8-8-11-11-11 stitches on the round, work 89-99-109-115-129-143 stitches in stockinette stitch and increase at the same time 27-26-31-34-35-39 stitches evenly spaced over these 89-99-109-115-129-143 stitches, continue A.3 over the next 16-16-16-22-22-22 stitches as before, work 89-99-109-115-129-143 stitches in stockinette stitch and increase at the same time 27-26-31-34-35-39 stitches evenly spaced over these 89-99-109-115-129-143 stitches, continue A.3 over the remaining 8-8-8-11-11-11 stitches as before = 264-282-312-342-372-408 stitches. This increase is to prevent the rib being tight. Change to circular needle size 2.5 mm = US 1,5 and work rib in the round (= knit 1/ purl 2) for 3 cm = 1⅛" and make sure the rib fits neatly over A.3 on each side. Change to circular needle size 3 mm = US 2,5 and loosely bind off with knit over knit and purl over purl (use a larger needle size to avoid the bind-off edge being tight). The sweater measures approx. 52-54-56-58-60-62 cm = 20½"-21¼"-22"-22¾"-23⅝"-24⅜" from the shoulder down. SLEEVE: Place the 65-73-79-87-89-91 stitches from the thread on the one side of the piece on short circular needle/double pointed needles size 3 mm = US 2,5 and knit up 1 stitch in each of the 8-8-12-12-14-16 stitches cast on under the sleeve = 73-81-91-99-103-107 stitches. Insert 1 marker thread in the middle of the 8-8-12-12-14-16 new stitches. The marker thread marks mid under sleeve and the start of the round. Work A.3 mid under sleeve (marker thread sits in middle of A.3) and the remaining stitches in stockinette stitch. When the piece measures 2-2-1-1-1-1 cm = ¾"-¾"-⅜"-⅜"-⅜"-⅜" from the division decrease 1 stitch on each side of A.3 – read DECREASE TIP (= 2 stitches decreased). Decrease like this every 1½-1-1-1-1-1 cm = ½"-⅜"-⅜"-⅜"-⅜"-⅜" a total of 6-9-13-12-12-13 times = 61-63-65-75-79-81 stitches. When the piece measures 13-13-15-14-14-15 cm from the division increase 1 stitch on each side of A.3 – read INCREASE TIP-2 (= 2 stitches increased). Increase like this every 1½-1½-1-1-1-1 cm a total of 8-7-6-7-5-4 times = 77-77-77-89-89-89 stitches. Continue working until the sleeve measures 25-24-22-22-20-19 cm = 5⅛"-5⅛"-6"-5½"-5½"-6" from the division (shorter measurements in larger sizes due to wider neck and longer yoke). The increases are now finished and the lace pattern at bottom of sleeves starts here. Work the next round as follows: Continue with A.3 as before over the first 8-8-8-11-11-11 stitches, work 0-0-0-3-3-3 stitches in stockinette stitch, A.4 over the next 60 stitches (= 5 repeats of 12 stitches in all sizes), work 1-1-1-4-4-4 stitches in stockinette stitch and finish with A.3 over the remaining 8-8-8-11-11-11 stitches as before. When A.4 has been completed in height, work 1 round with stockinette stitch and A.3 as before where you increase 19-19-19-25-25-25 stitches evenly spaced over the 61-61-61-67-67-67 stitches which are not rib = 96-96-96-114-114-114 stitches. Change to short circular needle/double pointed needles size 2.5 mm = US 1,5 and work rib in the round (= knit 1, purl 2 – the rib fits neatly over A.3 mid under sleeve). When the rib measures 2 cm = ¾" increase every other purl 2 to purl 3 = 112-112-112-133-133-133 stitches. When the rib measures 4 cm = 1½" increase the remaining purl 2 to purl 3 = 128-128-128-152-152-152 stitches. Continue working until the sleeve measures approx. 34-33-31-31-29-28 cm = 13⅜"-13"-12¼"-12¼"-11⅜"-11" from the division (rib measures approx. 6 cm = 2⅜"). Change to short circular needle size 3 mm = US 2,5 and loosely bind off with knit over knit and purl over purl. Work the other sleeve in the same way. |
||||||||||||||||||||||||||||||||||
Diagram explanations |
||||||||||||||||||||||||||||||||||
|
||||||||||||||||||||||||||||||||||
|
||||||||||||||||||||||||||||||||||
|
||||||||||||||||||||||||||||||||||
|
||||||||||||||||||||||||||||||||||
|
||||||||||||||||||||||||||||||||||
Have you finished this pattern?Tag your pictures with #dropspattern #summertwinklesweater or submit them to the #dropsfan gallery. Do you need help with this pattern?You'll find 25 tutorial videos, a Comments/Questions area and more by visiting the pattern on garnstudio.com. © 1982-2025 DROPS Design A/S. We reserve all rights. This document, including all its sub-sections, has copyrights. Read more about what you can do with our patterns at the bottom of each pattern on our site. |
||||||||||||||||||||||||||||||||||


With over 40 years in knitting and crochet design, DROPS Design offers one of the most extensive collections of free patterns on the internet - translated to 17 languages. As of today we count 314 catalogs and 11821 patterns - 11811 of which are translated into English (US/in).
We work hard to bring you the best knitting and crochet have to offer, inspiration and advice as well as great quality yarns at incredible prices! Would you like to use our patterns for other than personal use? You can read what you are allowed to do in the Copyright text at the bottom of all our patterns. Happy crafting!
Post a comment to pattern DROPS 200-12
We would love to hear what you have to say about this pattern!
If you want to leave a question, please make sure you select the correct category in the form below, to speed up the answering process. Required fields are marked *.