
Looking for a yarn?


Comments / Questions (9)
![]() Yvonne wrote:
Yvonne wrote:
Moin. Ein wundervolles Stück. Leider muss ich die Jacke abgeben und neu machen. XXL passt ... ist bei meinen 1,60 m aber viiiieeel zu lang! Die Zipfel hängen mir auf Mitte der Waden und passen unter keine Jacke mehr. Ausgemessen brauche ich statt der 144 M gut 35 M weniger!
22.12.2024 - 10:25
![]() Els Bomhof wrote:
Els Bomhof wrote:
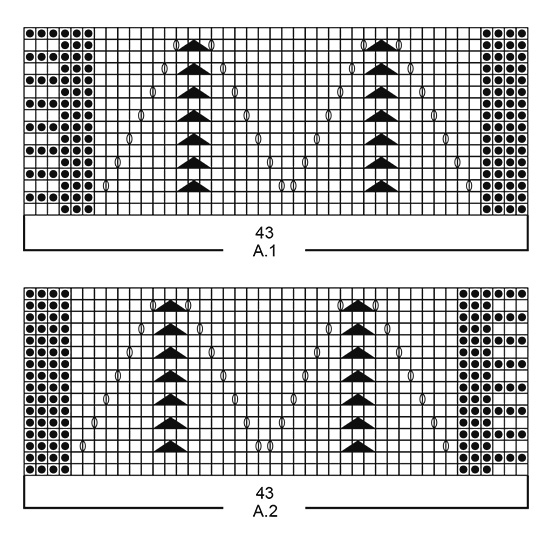
Ik begreep dat je eerst tricotsteek moet breien en dan als laatste het patroongedeelte A1 van 43 steken. Maar op de foto zie ik het gaatjespatroon meerdere keren.
09.09.2020 - 08:39DROPS Design answered:
Dag Els,
Klopt, het patroon herhaalt zich in de hoogte langs de voorpanden. Na het opzetten van het rechter voorpand/acherpand loopt het patroon dus door aan de rechterkant van je werk tot de spie. In de tekening onderaan is dit de bovenste rand tot de stippellijn.
13.09.2020 - 11:07
![]() Simone Hertog wrote:
Simone Hertog wrote:
Ik heb 132 steken opgezet met alpaca boucle en kreeg een gigantisch boord. Met naald 6. Veel meer dan de tekening aangeeft. Ik snap t niet. Klopt het wel?
08.09.2020 - 15:35DROPS Design answered:
Dag Simone,
Bij een stekenverhouding van 15 steken = 10 cm kom je met 132 steken op ongeveer 88 cm. Als de afmeting anders is, klopt je stekenverhouding denk ik niet en moet je de naalddikte aanpassen naar een kleinere naalddikte. Maak altijd eerst even een proeflapje en pas evt. de naalddikte aan totdat je de juiste stekenverhouding hebt.
18.11.2020 - 22:55
![]() Els Bomhof wrote:
Els Bomhof wrote:
Moet ik A1 en A2 1 keer breien of steeds opnieuw dit patroon beginnen?
08.09.2020 - 09:32DROPS Design answered:
Dag Els,
Ja, je herhaalt patroon A.1 en A.2 steeds in de hoogte.
12.09.2020 - 20:27
![]() Yvon wrote:
Yvon wrote:
Der er fejl i diagrammet!!! Hvor er forklaringen på trekanten!!! Den mangler!!” Øv
26.02.2020 - 10:04
![]() Kate wrote:
Kate wrote:
Bonjour ,j'ai un problème au niveau du gousset de l'encolure dos ... est-il bien tricoté en point mousse et rangs racourcis alrs que le dos est en jersey ?.. Merci pour votre aide
22.11.2018 - 13:24DROPS Design answered:
Bonjour Kate, tout à fait les rangs raccourcis se tricotent au point mousse. Bon tricot!
23.11.2018 - 09:33Kirsty wrote:
Hi there. I'm trying to knit this for my daughter, but I'm having some trouble, and I'm very confused. When it comes to working the chart A1, I knit the first row of it as this: K3 garter edge stitches, 86 in stockinette, and then 43 stitches of the chart. When I come to the second row, do I then start with the chart stitches, or begin again with the garter and stockinette? The instructions just say to continue, but doesn't make it clear whether to start with the chart. Thank you.
23.09.2018 - 23:10DROPS Design answered:
Hi Kirsty, Yes, you begin row 2 with the pattern and end with stockinette and garter stitch. Happy knitting!
24.09.2018 - 07:50
![]() NATHALIE wrote:
NATHALIE wrote:
Bonjour, Quand on fait le diagramme du devant gauche/dos ou devant droit/dos, en rang envers, on doit commencer par les mailles du diagramme et ensuite on tricote les mailles à l'envers ou bien doit on commencer par les mailles à l'envers et ensuite le diagramme ? Je vous remercie pour votre réponse. Cordialement
10.07.2018 - 17:16DROPS Design answered:
Bonjour Nathalie, sur l'endroit vous tricotez A.1 en fin de rang, sur l'envers vous tricotez A.1 en fin de rang (devant/dos gauche). Pour le devant/dos droit vous commencez par A.2 sur l'endroit et finissez par A.2 sur l'envers. Sur l'envers, lisez les diagrammes de gauche à droite (et sur l'endroit, de droite à gauche), toujours en commençant en bas. Bon tricot!
11.07.2018 - 07:38
![]() Jenny wrote:
Jenny wrote:
Ich bekomme die Maschenprobe nicht hin. Selbst mit Nadel 5 habe ich bei 15 M noch 11,5 cm Breite. Noch strammer kann man durch die Schlaufen in der Wolle nicht stricken. Ist hier ein Fehler in der Anleitung oder stelle ich mich doof an?
22.01.2018 - 20:10DROPS Design answered:
Liebe Jenny, versuchen Sie die Maschen etwas weniger in der Höhe zu ziehen. Gleichzeitig wird die Reihenanzahl in solchen Modellen nicht zu wichtig, dh weniger als die Breite, so können Sie auch die Höhe in cm folgen. Viel Spaß beim stricken!
23.01.2018 - 08:21
|
|||||||||||||
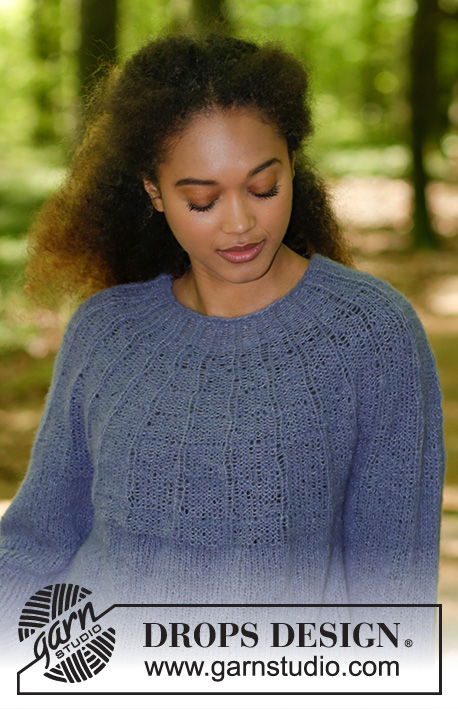
Harvest Moon#harvestmoonjacket |
|||||||||||||
 |
 |
||||||||||||
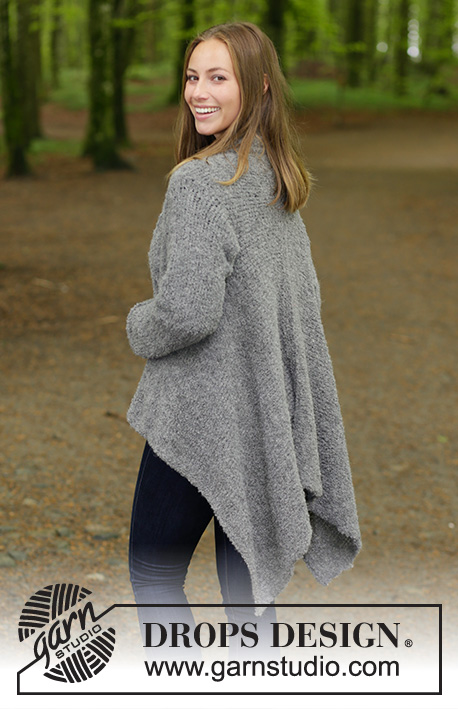
Knitted jacket worked sideways with lace pattern along collar. Size: S - XXXL Piece is knitted in DROPS Alpaca Bouclé.
DROPS 184-3 |
|||||||||||||
|
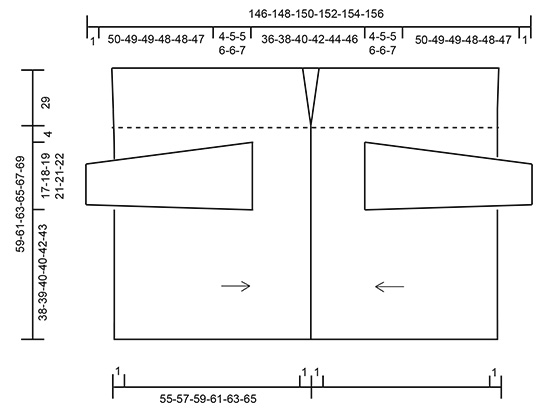
INFORMATION FOR PATTERN: GARTER STITCH (back and forth): 1 ridge = knit 2 rows. PATTERN: See diagrams A.1 and A.2. Diagrams show all rows in pattern seen from the right side. INCREASE TIP (applies to sleeves): Increase 1 stitch by making a yarn over. On next row purl yarn over twisted to avoid hole. ---------------------------------------------------------- JACKET: Work front and back pieces back and forth on circular needle in 2 parts and sew together mid back. Work sleeves back and forth on circular needle and sew to body when finished. LEFT FRONT/BACK PIECE: Cast on 132-135-138-141-144-147 stitches on circular needle size 6 mm / US 10 with Alpaca Bouclé. Switch to circular needle size 5 mm / US 8 and work 1 ridges in GARTER ST - see explanation above. Switch back to circular needle size 6 mm / US 10 and work pattern as follows (1st row = right side): 3 edge stitches in garter stitch, 86-89-92-95-98-101 stitches in stockinette stitch, work PATTERN A.1 (= 43 stitches) – see explanation above. Continue like this back and forth. REMEMBER THE GAUGE! When piece measures 37-38-39-40-41-42 cm / 14½"-15"-15¼"-15¾"-16⅛"-16½" from cast-on edge, work next row from right side as follows: Work the first 57-59-60-60-63-65 stitches, bind off the next 26-27-29-32-32-33 stitches (= armhole) work the remaining stitches on needle. On next row work as before but over stitches bind-off for armholes cast on 26-27-29-32-32-33 new stitches = 132-135-138-141-144-147 stitches. Continue as before until piece measures 54-56-58-60-62-64 cm / 21¼"-22"-22¾"-23⅝"-24⅜"-25¼" (adjust so that next row is from right side). Switch to circular needle size 5 mm / US 8 and work a gusset in the neck as follows: ROW 1 (= right side): Knit all stitches, turn. ROW 2 (= wrong side): Knit the first 43 stitches, turn. ROW 3: Knit all stitches, turn. ROW 4: Knit the first 22 stitches, turn. ROW 5: Knit all stitches, turn. ROW 6: Knit all 132-135-138-141-144-147 stitches on row. Switch to circular needle size 6 mm / US 10. Bind off but after approx. every 5th stitch make a yarn over and cast if off as a stitch. This is done to avoid a tight bind-off edge. RIGHT FRONT/BACK PIECE: Cast on 132-135-138-141-144-147 stitches on circular needle size 6 mm / US 10 with Alpaca Bouclé. Switch to circular needle size 5 mm / US 8 and work 1 ridge. Switch back to circular needle size 6 mm / US 10 and work pattern as follows (1st row = right side): A.2 (= 43 stitches), 86-89-92-95-98-101 stitches in stockinette stitch, 3 edge stitches in garter stitch. Continue like this back and forth. When piece measures 37-38-39-40-41-42 cm / 14½"-15"-15¼"-15¾"-16⅛"-16½" from cast-on edge, work next row from right side as follows: Work the first 49 stitches (= A.2 and 6 stitches in stockinette stitch), bind off the next 26-27-29-32-32-33 stitches (= armhole) work the remaining stitches on row. On next row work as before but cast on 26-27-29-32-32-33 new stitches for armhole over stitches bind off on previous row = 132-135-138-141-144-147 stitches. Continue as before until piece measures 54-56-58-60-62-64 cm / 21¼"-22"-22¾"-23⅝"-24⅜"-25¼" (adjust so that next row is from wrong side). Switch to circular needle size 5 mm / US 8 and work a gusset in the neck as follows: ROW 1 (= wrong side): Knit all stitches, turn. ROW 2 (= right side): Knit the first 43 stitches, turn. ROW 3: Knit all stitches, turn. ROW 4: Knit the first 22 stitches, turn. ROW 5: Knit all stitches, turn. ROW 6: Knit all 132-135-138-141-144-147 stitches on row. Switch to circular needle size 6 mm / US 10. Bind off but after approx. every 5th stitch make a yarn over and cast if off as a stitch. SLEEVE: Cast on 31-32-34-35-37-38 stitches on circular needle size 6 mm / US 10 with Alpaca Bouclé. Switch to circular needle size 5 mm / US 8. Work 1 ridge. Switch back to circular needle size 6 mm / US 10. Work in stockinette stitch with 1 stitch in garter stitch in each side. When piece measures 12-11-6-5-9-8 cm / 4¾"-4½"-2"½-2"-3½"-3", increase 1 stitch inside 1 edge stitch in garter stitch in each side - READ INCREASE TIP. Increase like this every 5-5-5-4-4-4 cm / 2"-2"-2"-1½"-1½"-1½" 8-8-9-11-10-10 times in total = 47-48-52-57-57-58 stitches. When piece measures 51-50-50-49-49-48 cm / 20"-19¾"-19¾"-19¼"-19¼"-19" (shorter measurements in the larger sizes because of wider shoulders), work a small sleeve cap as follows: Work in stockinette stitch and bind off at beginning of every row in each side as follows: 4-3-3-3-3-3 stitches 8-10-10-12-12-14 times (= 4-5-5-6-6-7 times in each side) = 15-18-22-21-21-16 stitches remain. Sleeve measures approx. 55 cm / 21½" in all sizes. Bind off the remaining stitches but after approx. every 5th stitch make a yarn over and cast if off as a stitch. Work another sleeve the same way. ASSEMBLY: Sew the 2 front and back piece together mid back, sew inside bind-off edge and make sure to avoid a tight seam. Sew sleeves to body inside bind-off/cast-on edges and then sew seam under sleeves inside 1 edge stitch in garter stitch in each side. Cut the yarn and fasten. |
|||||||||||||
Diagram explanations |
|||||||||||||
|
|||||||||||||
|
|||||||||||||
|
|||||||||||||
Have you finished this pattern?Tag your pictures with #dropspattern #harvestmoonjacket or submit them to the #dropsfan gallery. Do you need help with this pattern?You'll find 22 tutorial videos, a Comments/Questions area and more by visiting the pattern on garnstudio.com. © 1982-2025 DROPS Design A/S. We reserve all rights. This document, including all its sub-sections, has copyrights. Read more about what you can do with our patterns at the bottom of each pattern on our site. |
|||||||||||||


With over 40 years in knitting and crochet design, DROPS Design offers one of the most extensive collections of free patterns on the internet - translated to 17 languages. As of today we count 314 catalogs and 11821 patterns - 11811 of which are translated into English (US/in).
We work hard to bring you the best knitting and crochet have to offer, inspiration and advice as well as great quality yarns at incredible prices! Would you like to use our patterns for other than personal use? You can read what you are allowed to do in the Copyright text at the bottom of all our patterns. Happy crafting!
Post a comment to pattern DROPS 184-3
We would love to hear what you have to say about this pattern!
If you want to leave a question, please make sure you select the correct category in the form below, to speed up the answering process. Required fields are marked *.